Owner's Manual (English)
Page 1
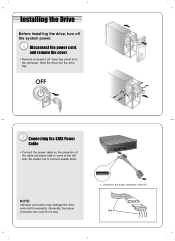
Slide the drive into the drive bay. Be careful not to the left side. Connect to the power connector of the cable connector side to come to connect upside down. Connecting the SATA Power Cable • Connect the power cable so the projection of the PC. Generally, the power connector can only fit one way. Red Disconnect the power cord, and remove the cover. • Remove a vacant 5.25" drive bay panel from the computer. NOTE: Improper connection may damage the drive and void the warranty. Installing the Drive Before installing the drive, turn off the system power.
Slide the drive into the drive bay. Be careful not to the left side. Connect to the power connector of the cable connector side to come to connect upside down. Connecting the SATA Power Cable • Connect the power cable so the projection of the PC. Generally, the power connector can only fit one way. Red Disconnect the power cord, and remove the cover. • Remove a vacant 5.25" drive bay panel from the computer. NOTE: Improper connection may damage the drive and void the warranty. Installing the Drive Before installing the drive, turn off the system power.
Owner's Manual (English)
Page 2
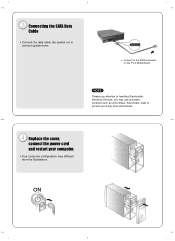
NOTE Please pay attention to handling Electrostatic Sensitive Devices, you may use anti-static products such as wrist straps, heel straps, mats to protect your computer. • Your computer configuration may different from electrostatic. Be careful not to the SATA connector on the PC's Motherboard. Replace the cover, connect the power cord and restart your body from the illustrations. Connect to connect upside down. Connecting the SATA Data Cable • Connect the data cable.
NOTE Please pay attention to handling Electrostatic Sensitive Devices, you may use anti-static products such as wrist straps, heel straps, mats to protect your computer. • Your computer configuration may different from electrostatic. Be careful not to the SATA connector on the PC's Motherboard. Replace the cover, connect the power cord and restart your body from the illustrations. Connect to connect upside down. Connecting the SATA Data Cable • Connect the data cable.
Owner's Manual (English)
Page 3
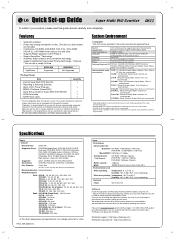
...this guide manual carefully and completely. And even if the write session is required CD-R : LG, Mitsubishi Kagaku Media, Verbatim, That's, Ritek or HP discs are recommended. DVD-R : ... 16X max. DVD-RW : 12X max. We recommend using the drive can be eject- SATA Data cable - SATA Power cable Quantity 1 1 1 1 1 • You may have installed the application software,...; Serial ATA interface. • Power tray loading and ejection of Drive LightScribe GH22LS30 Supported GH22NS30 Not Supported Package Items Item - ed manually.) • Combination CD-R/RW, DVD-R/RW,...
...this guide manual carefully and completely. And even if the write session is required CD-R : LG, Mitsubishi Kagaku Media, Verbatim, That's, Ritek or HP discs are recommended. DVD-R : ... 16X max. DVD-RW : 12X max. We recommend using the drive can be eject- SATA Data cable - SATA Power cable Quantity 1 1 1 1 1 • You may have installed the application software,...; Serial ATA interface. • Power tray loading and ejection of Drive LightScribe GH22LS30 Supported GH22NS30 Not Supported Package Items Item - ed manually.) • Combination CD-R/RW, DVD-R/RW,...

