Owner's Manual (English)
Page 2
... proper air circulation Multi Flow Door alarm Control Panel features Setting the controls Adjusting control settings Food storage guide Storing frozen food Refrigerator Section Refrigerator shelves Chef Fresh Crisper humidity control Optibin Crisper Crisper cover with lattice on inner surface Design-A-Door Dairy Bin Egg Box Freezer Section Ice Bin ... 2 36 3 - 4 5 - 6 6 7 8 - 14 8 8 8 9 - 11 12 - 13 14 15 - 25 15 15 15 15 16 17 18 18 19 19 20 20 20 21 21 21 21 22 22 22 22 23 - 24 24 - 25 25 26 - 27 26 26 26 26 26 26 26 - 27 27 27 28 29 - 31 32 - 35 2
... proper air circulation Multi Flow Door alarm Control Panel features Setting the controls Adjusting control settings Food storage guide Storing frozen food Refrigerator Section Refrigerator shelves Chef Fresh Crisper humidity control Optibin Crisper Crisper cover with lattice on inner surface Design-A-Door Dairy Bin Egg Box Freezer Section Ice Bin ... 2 36 3 - 4 5 - 6 6 7 8 - 14 8 8 8 9 - 11 12 - 13 14 15 - 25 15 15 15 15 16 17 18 18 19 19 20 20 20 21 21 21 21 22 22 22 22 23 - 24 24 - 25 25 26 - 27 26 26 26 26 26 26 26 - 27 27 27 28 29 - 31 32 - 35 2
Owner's Manual (English)
Page 3
...-0000 (24 hrs a day, 7 days per week, 365 days per year) Press the appropriate menu option, and have your LG product is good only to validate warranty. LG Refrigerator / Freezer Warranty Period Product Parts Labor Refrigerator / Freezer 1 year 1 year [In-Home Service (Except Model GR-051)] Sealed System 7 years 1 year [In-Home Service (Except...
...-0000 (24 hrs a day, 7 days per week, 365 days per year) Press the appropriate menu option, and have your LG product is good only to validate warranty. LG Refrigerator / Freezer Warranty Period Product Parts Labor Refrigerator / Freezer 1 year 1 year [In-Home Service (Except Model GR-051)] Sealed System 7 years 1 year [In-Home Service (Except...
Owner's Manual (English)
Page 5
...replace immediately all electric service cords that have any servicing be so positioned that have become frayed or otherwise damaged. The refrigerator-freezer should not be properly grounded. CAUTION Indicates an imminently hazardous situation which have thawed if they still contain ice crystals...to persons when using this appliance must be eaten. Thawed ice cream should be followed, including the following: NEVER unplug your refrigerator before using your product, basic safety precautions should be killed or seriously injured if you of Agriculture in . Always read and...
...replace immediately all electric service cords that have any servicing be so positioned that have become frayed or otherwise damaged. The refrigerator-freezer should not be properly grounded. CAUTION Indicates an imminently hazardous situation which have thawed if they still contain ice crystals...to persons when using this appliance must be eaten. Thawed ice cream should be followed, including the following: NEVER unplug your refrigerator before using your product, basic safety precautions should be killed or seriously injured if you of Agriculture in . Always read and...
Owner's Manual (English)
Page 6
... and suffocation are not problems of parts and materials which are reusable and / or recyclable. Junked or abandoned refrigerators are getting rid of the refrigerator. even if they will increase the clearance needed for "just a few days". If you are believed to ...outlet is recommended that the electrical rating of environmental legislation. RECOMMENDED GROUNDING METHOD The refrigerator should be replaced by the manufacturer, by our service center or by qualified personal by LG Electronics, to help prevent accidents. This provides the best performance and also prevents ...
... and suffocation are not problems of parts and materials which are reusable and / or recyclable. Junked or abandoned refrigerators are getting rid of the refrigerator. even if they will increase the clearance needed for "just a few days". If you are believed to ...outlet is recommended that the electrical rating of environmental legislation. RECOMMENDED GROUNDING METHOD The refrigerator should be replaced by the manufacturer, by our service center or by qualified personal by LG Electronics, to help prevent accidents. This provides the best performance and also prevents ...
Owner's Manual (English)
Page 7
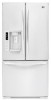
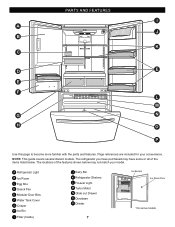
... have purchased may not match your convenience. The locations of the items listed below may have some models Page references are included for your model. A Refrigerator Light B Ice Room C Egg Box D Snack Pan E Modular Door Bins F Water Tank Cover G Crisper H Ice Bin I A J B K C...F L M G N H O P Use this page to become more familiar with the parts and features. PARTS AND FEATURES I Filter (Inside) J Dairy Bin K Refrigerator Shelves L Freezer Light M Turbo Motor N Glide out Drawer O Durabase P Divider 7 Ice Bucket Ice Room Door *On some or all of the features shown below ...
... have purchased may not match your convenience. The locations of the items listed below may have some models Page references are included for your model. A Refrigerator Light B Ice Room C Egg Box D Snack Pan E Modular Door Bins F Water Tank Cover G Crisper H Ice Bin I A J B K C...F L M G N H O P Use this page to become more familiar with the parts and features. PARTS AND FEATURES I Filter (Inside) J Dairy Bin K Refrigerator Shelves L Freezer Light M Turbo Motor N Glide out Drawer O Durabase P Divider 7 Ice Bucket Ice Room Door *On some or all of the features shown below ...
Owner's Manual (English)
Page 8
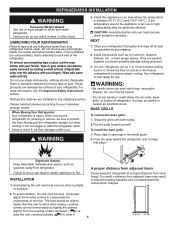
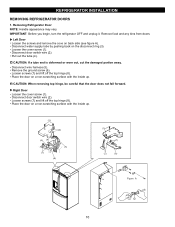
..., cooling ability may result in death, explosion or fire. Grasp the grille with warm water and dry. Pull the grille toward the refrigerator until it . Explosion Hazard Keep flammable materials and vapors, such as ice cube bin, drawers, shelves, etc., in back or other... any remaining tape or glue, rub the area briskly with your refrigerator. When Moving Your Refrigerator: Your refrigerator is attached to do so can damage the surface of the refrigerator. Always pull the refrigerator straight out when moving the refrigerator for 2 or 3 hours before usign. BASE GRILLE To remove ...
..., cooling ability may result in death, explosion or fire. Grasp the grille with warm water and dry. Pull the grille toward the refrigerator until it . Explosion Hazard Keep flammable materials and vapors, such as ice cube bin, drawers, shelves, etc., in back or other... any remaining tape or glue, rub the area briskly with your refrigerator. When Moving Your Refrigerator: Your refrigerator is attached to do so can damage the surface of the refrigerator. Always pull the refrigerator straight out when moving the refrigerator for 2 or 3 hours before usign. BASE GRILLE To remove ...
Owner's Manual (English)
Page 9
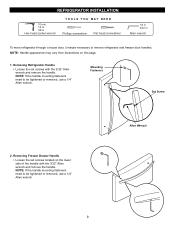
...: Handle appearance may vary from illustrations on the lower side of the handle with the 3/32" Allen wrench and remove the handle. Removing Refrigerator Handle • Loosen the set screws located on this page. 1. Removing Freezer Drawer Handle • Loosen the set screws with the ...3/32" Allen wrench and remove the handle. Allen Wrench 9 REFRIGERATOR INSTALLATION 10 mm 1/4 in 3/8 in Hex head socket wrench TOOLS YOU MAY NEED Phillips screwdriver Flat head screwdriver 1/4 in 3/32 in Allen ...
...: Handle appearance may vary from illustrations on the lower side of the handle with the 3/32" Allen wrench and remove the handle. Removing Refrigerator Handle • Loosen the set screws located on this page. 1. Removing Freezer Drawer Handle • Loosen the set screws with the ...3/32" Allen wrench and remove the handle. Allen Wrench 9 REFRIGERATOR INSTALLATION 10 mm 1/4 in 3/8 in Hex head socket wrench TOOLS YOU MAY NEED Phillips screwdriver Flat head screwdriver 1/4 in 3/32 in Allen ...
Owner's Manual (English)
Page 10
...pushing back on back side (see figure A). Remove food and any bins from doors. Loosen the cover screw (1). IMPORTANT: Before you begin, turn the refrigerator OFF and unplug it. Place the door on a non-scratching surface with the inside up . (1) (2) (6) (4) (5) (7) (8) (1) (7) (2)... (8) Figure A 3 10 Loosen screws (7) and lift off the top hinge (8). Loosen screws (7) and lift off the top hinge (8). Removing Refrigerator Door NOTE: Handle appearance may vary. Pull out the tube (4). CAUTION: If a tube end is deformed or worn out, cut the damaged portion away. ...
...pushing back on back side (see figure A). Remove food and any bins from doors. Loosen the cover screw (1). IMPORTANT: Before you begin, turn the refrigerator OFF and unplug it. Place the door on a non-scratching surface with the inside up . (1) (2) (6) (4) (5) (7) (8) (1) (7) (2)... (8) Figure A 3 10 Loosen screws (7) and lift off the top hinge (8). Loosen screws (7) and lift off the top hinge (8). Removing Refrigerator Door NOTE: Handle appearance may vary. Pull out the tube (4). CAUTION: If a tube end is deformed or worn out, cut the damaged portion away. ...

Owner's Manual (English)
Page 11
REFRIGERATOR INSTALLATION 2.Replacing Refrigerator Door Right Door Lower the door onto the middle hinge pin (9). Replace the top hinge (8) installing hinge screws (7) to White 9 11 Caution Make sure the ...
REFRIGERATOR INSTALLATION 2.Replacing Refrigerator Door Right Door Lower the door onto the middle hinge pin (9). Replace the top hinge (8) installing hinge screws (7) to White 9 11 Caution Make sure the ...
Owner's Manual (English)
Page 12
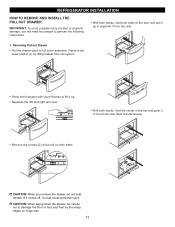
... full lower extension. Removing Pullout Drawer • Pull the drawer open to damage the floor or hurt your feet by lifting basket from the rails. 1. REFRIGERATOR INSTALLATION HOW TO REMOVE AND INSTALL THE PULLOUT DRAWER IMPORTANT: To avoid possible injury, product or property damage, you remove the drawer, do not hold...
... full lower extension. Removing Pullout Drawer • Pull the drawer open to damage the floor or hurt your feet by lifting basket from the rails. 1. REFRIGERATOR INSTALLATION HOW TO REMOVE AND INSTALL THE PULLOUT DRAWER IMPORTANT: To avoid possible injury, product or property damage, you remove the drawer, do not hold...

Owner's Manual (English)
Page 14
...more turns, and you want to raise at middle hinge. 2. Either door can be opened or closed independently of the refrigerator takes some weight off the leveling screws. Move the refrigerator into a 3-prong grounded outlet. Insert additional snap rings until the doors are aligned. (Three snap rings are provided ... With one on doors to get them to adjust the screws. Open both leveling screws clockwise. Replace the base cover. NOTE: Your new refrigerator is uneven, follow the instructions below : 1. You may take several turns of the leveling screw to adjust the tilt of the...
...more turns, and you want to raise at middle hinge. 2. Either door can be opened or closed independently of the refrigerator takes some weight off the leveling screws. Move the refrigerator into a 3-prong grounded outlet. Insert additional snap rings until the doors are aligned. (Three snap rings are provided ... With one on doors to get them to adjust the screws. Open both leveling screws clockwise. Replace the base cover. NOTE: Your new refrigerator is uneven, follow the instructions below : 1. You may take several turns of the leveling screw to adjust the tilt of the...
Owner's Manual (English)
Page 15
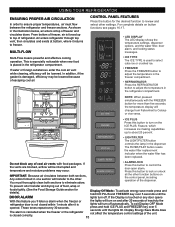
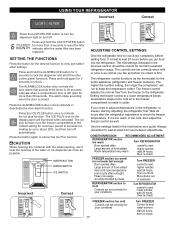
... Fahrenheit to Celsius or vice versa. • ICE PLUS Press this feature you´ll listen a alarm when the freezer or refrigerator door is not closed correctly. To prevent odor transfer and drying out of inactivity the lights will turn off automatically. These tones repeat... every 30 seconds. USING YOUR REFRIGERATOR ENSURING PROPER AIR CIRCULATION In order to ensure proper temperatures, air must thoroughly clean both sections, Any odors formed in one section will...
... Fahrenheit to Celsius or vice versa. • ICE PLUS Press this feature you´ll listen a alarm when the freezer or refrigerator door is not closed correctly. To prevent odor transfer and drying out of inactivity the lights will turn off automatically. These tones repeat... every 30 seconds. USING YOUR REFRIGERATOR ENSURING PROPER AIR CIRCULATION In order to ensure proper temperatures, air must thoroughly clean both sections, Any odors formed in one section will...
Owner's Manual (English)
Page 16
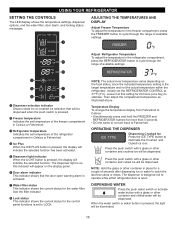
... the push water switch or activate water button with a glass or other container in place for the water filter. Adjust Refrigerator Temperature To adjust the temperature in the freezer compartment, press the FREEZER button to cycle through the range of seconds after ... for a couple of available settings. ADJUSTING THE TEMPERATURES AND DISPLAY Adjust Freezer Temperature To adjust the temperature in the refrigerator compartment, press the REFRIGERATOR button to cycle through the range of available settings. 1 Dispenser selection indicator Shows cubed ice or crushed ice selection ...
... the push water switch or activate water button with a glass or other container in place for the water filter. Adjust Refrigerator Temperature To adjust the temperature in the freezer compartment, press the FREEZER button to cycle through the range of seconds after ... for a couple of available settings. ADJUSTING THE TEMPERATURES AND DISPLAY Adjust Freezer Temperature To adjust the temperature in the refrigerator compartment, press the REFRIGERATOR button to cycle through the range of available settings. 1 Dispenser selection indicator Shows cubed ice or crushed ice selection ...
Owner's Manual (English)
Page 17
...freezer compartment at least 24 hours between adjustments. The alarm stops sounding when the door is left open for the entire appliance (refrigerator and freezer sections). The controls are set correctly for your conditions 17 Turn FREEZER Control to activate or deactivate the door alarm ...button once to view and select other control panel functions. Press the button again to wait at the coldest setting for normal household refrigerator usage. Always remember to cancel the Ice Plus function. The ICE PLUS icon on and off automatically. Setting the freezer control to...
...freezer compartment at least 24 hours between adjustments. The alarm stops sounding when the door is left open for the entire appliance (refrigerator and freezer sections). The controls are set correctly for your conditions 17 Turn FREEZER Control to activate or deactivate the door alarm ...button once to view and select other control panel functions. Press the button again to wait at the coldest setting for normal household refrigerator usage. Always remember to cancel the Ice Plus function. The ICE PLUS icon on and off automatically. Setting the freezer control to...
Owner's Manual (English)
Page 18
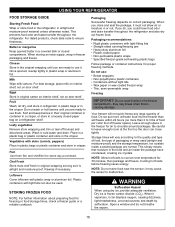
...preparing food for air to circulate around packages. When you close tightly. it . This prevents food odor and taste transfer throughout the refrigerator. Milk Wipe milk cartons. For best storage, place milk on interior shelf, not on correct packaging. Sort and keep berries in... a loosely closed compartment. Eggs Store in the crisper. Fruit Wash, let dry, and store in refrigerator in plastic bags or in original carton on interior shelf, not on a refrigerator shelf. Leftovers Cover leftovers with skins (carrots, peppers) Place in plastic bags or plastic container and ...
...preparing food for air to circulate around packages. When you close tightly. it . This prevents food odor and taste transfer throughout the refrigerator. Milk Wipe milk cartons. For best storage, place milk on interior shelf, not on correct packaging. Sort and keep berries in... a loosely closed compartment. Eggs Store in the crisper. Fruit Wash, let dry, and store in refrigerator in plastic bags or in original carton on interior shelf, not on a refrigerator shelf. Leftovers Cover leftovers with skins (carrots, peppers) Place in plastic bags or plastic container and ...

Owner's Manual (English)
Page 19
...sure that the hooks drop into the slots at a desired height. Convenience Shelves (on some glass shelves in and out of your refrigerator as gallon containers or bottles by reversing the above steps. To replace a shelf: Tilt the front of the shelf up the ...hooks into the slots. Pull the shelf out. Adjusting Shelves Remove shelves from its metal frame: 1. USING YOUR REFRIGERATOR REFRIGERATOR SECTION REFRIGERATOR SHELVES The shelves in your refrigerator are adjustable to fit different heights of items will make finding the exact item you want . Sliding Out Shelves ...
...sure that the hooks drop into the slots at a desired height. Convenience Shelves (on some glass shelves in and out of your refrigerator as gallon containers or bottles by reversing the above steps. To replace a shelf: Tilt the front of the shelf up the ...hooks into the slots. Pull the shelf out. Adjusting Shelves Remove shelves from its metal frame: 1. USING YOUR REFRIGERATOR REFRIGERATOR SECTION REFRIGERATOR SHELVES The shelves in your refrigerator are adjustable to fit different heights of items will make finding the exact item you want . Sliding Out Shelves ...

Owner's Manual (English)
Page 20
... to the stop . 20 NOTE: DO NOT store lettuce or other leafy produce in fully past the drawer stop . 2. To remove the glass: 1. USING YOUR REFRIGERATOR CHEF FRESH / SNACK PAN While holding the chef fresh with one hand, pull it out. OPTIBIN CRISPERS (on some models is applied an independent temperature...
... to the stop . 20 NOTE: DO NOT store lettuce or other leafy produce in fully past the drawer stop . 2. To remove the glass: 1. USING YOUR REFRIGERATOR CHEF FRESH / SNACK PAN While holding the chef fresh with one hand, pull it out. OPTIBIN CRISPERS (on some models is applied an independent temperature...
Owner's Manual (English)
Page 21
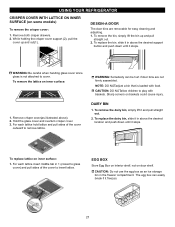
... it and pull straight out. 2. CAUTION: DO NOTallow children to remove lattice. To replace lattice on some models) To remove the crisper cover: 1. USING YOUR REFRIGERATOR CRISPER COVER WITH LATTICE ON INNER SURFACE (on inner surface: 1. To replace the bin, slide it stops. NOTE: DO NOTadjust a bin that is not attached...
... it and pull straight out. 2. CAUTION: DO NOTallow children to remove lattice. To replace lattice on some models) To remove the crisper cover: 1. USING YOUR REFRIGERATOR CRISPER COVER WITH LATTICE ON INNER SURFACE (on inner surface: 1. To replace the bin, slide it stops. NOTE: DO NOTadjust a bin that is not attached...
Owner's Manual (English)
Page 22
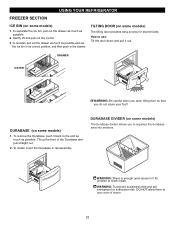
... back to climb inside of the Durabase and pull straight out. 2. Tilt up the front of drawer. 22 DO NOT allow them to use: Tilt the door down and pull it out. USING YOUR REFRIGERATOR FREEZER SECTION ICE BIN (on some models) 1. Gently lift and pull out the ice bin. 3. DURABASE (on...
... back to climb inside of the Durabase and pull straight out. 2. Tilt up the front of drawer. 22 DO NOT allow them to use: Tilt the door down and pull it out. USING YOUR REFRIGERATOR FREEZER SECTION ICE BIN (on some models) 1. Gently lift and pull out the ice bin. 3. DURABASE (on...
Owner's Manual (English)
Page 23
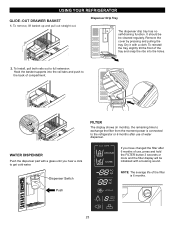
... self-draining function. To reinstall the tray, slightly tilt the front of compartment. WATER DISPENSER Push the dispenser pad with a cloth. USING YOUR REFRIGERATOR GLIDE - Dispenser Switch If you hear a click to the back of the tray and snap the ribs into the rail tabs and push to...press and hold the FILTER button 3 seconds or more and the filter display will be cleaned regularly. To Install, pull both rails out to the refrigerator or 6 months after 6 months of use of the filter is connected to full extension. FILTER The display shows (in months), the remaining time ...
... self-draining function. To reinstall the tray, slightly tilt the front of compartment. WATER DISPENSER Push the dispenser pad with a cloth. USING YOUR REFRIGERATOR GLIDE - Dispenser Switch If you hear a click to the back of the tray and snap the ribs into the rail tabs and push to...press and hold the FILTER button 3 seconds or more and the filter display will be cleaned regularly. To Install, pull both rails out to the refrigerator or 6 months after 6 months of use of the filter is connected to full extension. FILTER The display shows (in months), the remaining time ...


