Owner's Manual (English)
Page 2
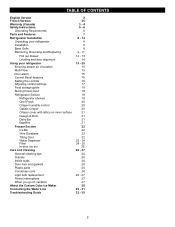
... proper air circulation Multi Flow Door alarm Control Panel features Setting the controls Adjusting control settings Food storage guide Storing frozen food Refrigerator Section Refrigerator shelves Chef Fresh Crisper humidity control Optibin Crisper Crisper cover with lattice on inner surface Design-A-Door Dairy Bin Egg Box Freezer Section Ice Bin ... 2 36 3 - 4 5 - 6 6 7 8 - 14 8 8 8 9 - 11 12 - 13 14 15 - 25 15 15 15 15 16 17 18 18 19 19 20 20 20 21 21 21 21 22 22 22 22 23 - 24 24 - 25 25 26 - 27 26 26 26 26 26 26 26 - 27 27 27 28 29 - 31 32 - 35 2
... proper air circulation Multi Flow Door alarm Control Panel features Setting the controls Adjusting control settings Food storage guide Storing frozen food Refrigerator Section Refrigerator shelves Chef Fresh Crisper humidity control Optibin Crisper Crisper cover with lattice on inner surface Design-A-Door Dairy Bin Egg Box Freezer Section Ice Bin ... 2 36 3 - 4 5 - 6 6 7 8 - 14 8 8 8 9 - 11 12 - 13 14 15 - 25 15 15 15 15 16 17 18 18 19 19 20 20 20 21 21 21 21 22 22 22 22 23 - 24 24 - 25 25 26 - 27 26 26 26 26 26 26 26 - 27 27 27 28 29 - 31 32 - 35 2
Owner's Manual (English)
Page 3
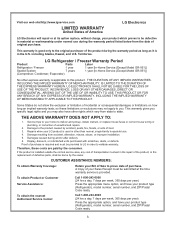
... of incidental or consequential damages or limitations on how long an implied warranty lasts; including Alaska, Hawaii, and U.S. LG Refrigerator / Freezer Warranty Period Product Parts Labor Refrigerator / Freezer 1 year 1 year [In-Home Service (Except Model GR-051)] Sealed System 7 years 1 year ...or replace house fuses or correct house wiring or plumbing, or correction of unauthorized repairs. 2. Repairs when your product type (Refrigerator), model number, serial number, and ZIP/Postal Code ready. 3 CUSTOMER ASSISTANCE NUMBERS: To obtain Warranty Coverage: To obtain ...
... of incidental or consequential damages or limitations on how long an implied warranty lasts; including Alaska, Hawaii, and U.S. LG Refrigerator / Freezer Warranty Period Product Parts Labor Refrigerator / Freezer 1 year 1 year [In-Home Service (Except Model GR-051)] Sealed System 7 years 1 year ...or replace house fuses or correct house wiring or plumbing, or correction of unauthorized repairs. 2. Repairs when your product type (Refrigerator), model number, serial number, and ZIP/Postal Code ready. 3 CUSTOMER ASSISTANCE NUMBERS: To obtain Warranty Coverage: To obtain ...
Owner's Manual (English)
Page 5
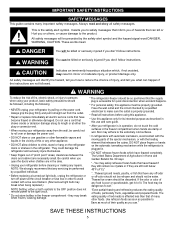
...Agriculture in . DO NOT store or use a cord that the supply plug is properly grounded. clearances between the doors and cabinet are in the refrigerator. NOTE: We strongly recommend that can ." All safety messages will identify the hazard, tell you how to safety messages that inform you of ... bulb may be killed or seriously injured if you can kill or Hurt you open the doors when children are necessarily small. After your refrigerator away from the outlet. DO NOT refreeze frozen foods which , if not avoided, may adhere to make sure the outlet is accessible for...
...Agriculture in . DO NOT store or use a cord that the supply plug is properly grounded. clearances between the doors and cabinet are in the refrigerator. NOTE: We strongly recommend that can ." All safety messages will identify the hazard, tell you how to safety messages that inform you of ... bulb may be killed or seriously injured if you can kill or Hurt you open the doors when children are necessarily small. After your refrigerator away from the outlet. DO NOT refreeze frozen foods which , if not avoided, may adhere to make sure the outlet is accessible for...
Owner's Manual (English)
Page 6
...receptacle which could cause a fire hazard from the power cord. Do not use . Have the wall outlet and the circuit checked by LG Electronics, to the collection center of parts and materials which are reusable and / or recyclable. This provides the best performance and also ... remove the third (Ground) prong from overheated wires. Use of installation, cleaning, or removing a light bulb, turn the control (Thermostat, Refrigerator Control or Freezer Control, depending on the model) to have a cooling system that a Separate circuit serving only this appliance must be properly ...
...receptacle which could cause a fire hazard from the power cord. Do not use . Have the wall outlet and the circuit checked by LG Electronics, to the collection center of parts and materials which are reusable and / or recyclable. This provides the best performance and also ... remove the third (Ground) prong from overheated wires. Use of installation, cleaning, or removing a light bulb, turn the control (Thermostat, Refrigerator Control or Freezer Control, depending on the model) to have a cooling system that a Separate circuit serving only this appliance must be properly ...
Owner's Manual (English)
Page 7
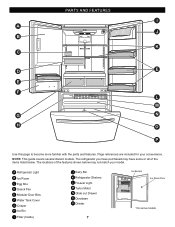
... have purchased may not match your convenience. PARTS AND FEATURES I Filter (Inside) J Dairy Bin K Refrigerator Shelves L Freezer Light M Turbo Motor N Glide out Drawer O Durabase P Divider 7 Ice Bucket Ice Room Door *On some or all of the features ...shown below . NOTE: This guide covers several dierent models. The locations of the items listed below may have some models A Refrigerator Light B Ice Room C Egg Box D Snack Pan E Modular Door Bins F Water Tank Cover G Crisper H Ice Bin I A J B K C D E E F L M G N H O P Use this page to ...
... have purchased may not match your convenience. PARTS AND FEATURES I Filter (Inside) J Dairy Bin K Refrigerator Shelves L Freezer Light M Turbo Motor N Glide out Drawer O Durabase P Divider 7 Ice Bucket Ice Room Door *On some or all of the features ...shown below . NOTE: This guide covers several dierent models. The locations of the items listed below may have some models A Refrigerator Light B Ice Room C Egg Box D Snack Pan E Modular Door Bins F Water Tank Cover G Crisper H Ice Bin I A J B K C D E E F L M G N H O P Use this page to ...
Owner's Manual (English)
Page 8
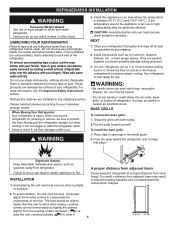
... the techsheet (on some models), that is too low or high, cooling ability may be slightly higher than the rear to move and install refrigerator. Refrigerator shelves are packed together to lower it. 8 (2.5 cm) 1" When moving it . Install this appliance in an area where the temperature is...;F (13°C) and 110°F (43°C.) If the temperature around the appliance is attached to protect the floor. Clean your refrigerator thoroughly and wipe off all dust accumulated during shipment. 3. WARNING: Be careful when you may result in door closing. Push the grille ...
... the techsheet (on some models), that is too low or high, cooling ability may be slightly higher than the rear to move and install refrigerator. Refrigerator shelves are packed together to lower it. 8 (2.5 cm) 1" When moving it . Install this appliance in an area where the temperature is...;F (13°C) and 110°F (43°C.) If the temperature around the appliance is attached to protect the floor. Clean your refrigerator thoroughly and wipe off all dust accumulated during shipment. 3. WARNING: Be careful when you may result in door closing. Push the grille ...
Owner's Manual (English)
Page 9
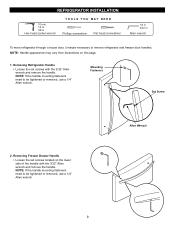
... Freezer Drawer Handle • Loosen the set screws with the 3/32" Allen wrench and remove the handle. Mounting Fasteners Set Screw 2. Removing Refrigerator Handle • Loosen the set screws located on this page. 1. Allen Wrench 9 NOTE: If the handle mounting fasteners need to remove.... NOTE: Handle appearance may vary from illustrations on the lower side of the handle with the 3/32" Allen wrench and remove the handle. REFRIGERATOR INSTALLATION 10 mm 1/4 in 3/8 in Hex head socket wrench TOOLS YOU MAY NEED Phillips screwdriver Flat head screwdriver 1/4 in 3/32 in Allen...
... Freezer Drawer Handle • Loosen the set screws with the 3/32" Allen wrench and remove the handle. Mounting Fasteners Set Screw 2. Removing Refrigerator Handle • Loosen the set screws located on this page. 1. Allen Wrench 9 NOTE: If the handle mounting fasteners need to remove.... NOTE: Handle appearance may vary from illustrations on the lower side of the handle with the 3/32" Allen wrench and remove the handle. REFRIGERATOR INSTALLATION 10 mm 1/4 in 3/8 in Hex head socket wrench TOOLS YOU MAY NEED Phillips screwdriver Flat head screwdriver 1/4 in 3/32 in Allen...
Owner's Manual (English)
Page 10
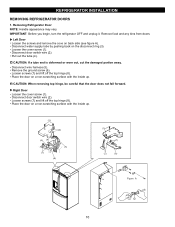
...door on a non-scratching surface with the inside up . Right Door Loosen the cover screw (1). REFRIGERATOR INSTALLATION REMOVING REFRIGERATOR DOORS 1. IMPORTANT: Before you begin, turn the refrigerator OFF and unplug it. Disconnect door switch wire (2). CAUTION: When removing top hinge, be careful ...that the door does not fall forward. Removing Refrigerator Door NOTE: Handle appearance may vary. CAUTION: If a tube ...
...door on a non-scratching surface with the inside up . Right Door Loosen the cover screw (1). REFRIGERATOR INSTALLATION REMOVING REFRIGERATOR DOORS 1. IMPORTANT: Before you begin, turn the refrigerator OFF and unplug it. Disconnect door switch wire (2). CAUTION: When removing top hinge, be careful ...that the door does not fall forward. Removing Refrigerator Door NOTE: Handle appearance may vary. CAUTION: If a tube ...

Owner's Manual (English)
Page 11
... screw (1). And make sure the door is straight and the gap between the doors is aligned with the cabinet. Connect the door switch wire (2). REFRIGERATOR INSTALLATION 2.Replacing Refrigerator Door Right Door Lower the door onto the middle hinge pin (9). Support the door on the handle side while securing hinge. Make sure the...
... screw (1). And make sure the door is straight and the gap between the doors is aligned with the cabinet. Connect the door switch wire (2). REFRIGERATOR INSTALLATION 2.Replacing Refrigerator Door Right Door Lower the door onto the middle hinge pin (9). Support the door on the handle side while securing hinge. Make sure the...
Owner's Manual (English)
Page 12
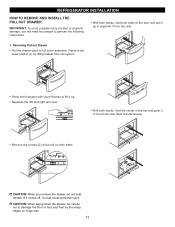
... the door and pull it up to separate it could cause personal injury. Removing Pullout Drawer • Pull the drawer open to full lower extension. REFRIGERATOR INSTALLATION HOW TO REMOVE AND INSTALL THE PULLOUT DRAWER IMPORTANT: To avoid possible injury, product or property damage, you will need two people to perform...
... the door and pull it up to separate it could cause personal injury. Removing Pullout Drawer • Pull the drawer open to full lower extension. REFRIGERATOR INSTALLATION HOW TO REMOVE AND INSTALL THE PULLOUT DRAWER IMPORTANT: To avoid possible injury, product or property damage, you will need two people to perform...

Owner's Manual (English)
Page 14
... may have to exert slight pressure on the left. Move the refrigerator into a 3-prong grounded outlet. It may take several turns of the refrigerator takes some weight off the leveling screws. REFRIGERATOR INSTALLATION LEVELING AND DOOR ALIGNMENT Leveling Your refrigerator has two front leveling screws, one on the right and one on... doors to get them to close easier, adjust the refrigerator's tilt using the instructions below to close completely. 14 Insert additional snap rings until the doors are aligned. (Three snap rings are ...
... may have to exert slight pressure on the left. Move the refrigerator into a 3-prong grounded outlet. It may take several turns of the refrigerator takes some weight off the leveling screws. REFRIGERATOR INSTALLATION LEVELING AND DOOR ALIGNMENT Leveling Your refrigerator has two front leveling screws, one on the right and one on... doors to get them to close easier, adjust the refrigerator's tilt using the instructions below to close completely. 14 Insert additional snap rings until the doors are aligned. (Three snap rings are ...
Owner's Manual (English)
Page 15
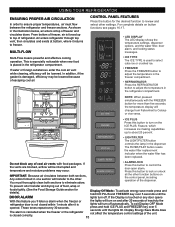
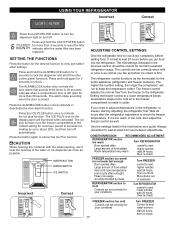
...dispenser options, and the water filter, door alarm, and locking status messages. • ICE TYPE The ICE TYPE is placed in the refrigerator compartment. MULTI-FLOW Multi-Flow means powerful and effective cooling operation. For complete details on and after it returns to freezer. To prevent ...making capabilities up to top of the dispenser. From bottom of inactivity the lights will turn on the control panel, including operation of refrigerator. In addition, if the gasket is forced up to about 20 percent. • LIGHT/FILTER The LIGHT/FILTER button controls the lamp...
...dispenser options, and the water filter, door alarm, and locking status messages. • ICE TYPE The ICE TYPE is placed in the refrigerator compartment. MULTI-FLOW Multi-Flow means powerful and effective cooling operation. For complete details on and after it returns to freezer. To prevent ...making capabilities up to top of the dispenser. From bottom of inactivity the lights will turn on the control panel, including operation of refrigerator. In addition, if the gasket is forced up to about 20 percent. • LIGHT/FILTER The LIGHT/FILTER button controls the lamp...
Owner's Manual (English)
Page 16
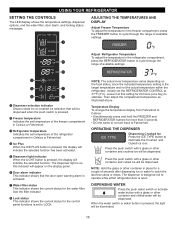
...locking status messages. When the water switch or water button is the target temperature and not the actual temperature within the refrigerator. OPERATING THE DISPENSER Dispensing Crushed Ice Press the ICE TYPE button to Fahrenheit. Press the push switch with a glass ... above. Temperature Display To change the temperature display from Fahrenheit to Celsius: • Simultaneously press and hold the FREEZER and REFRIGERATOR buttons for a couple of available settings. ADJUSTING THE TEMPERATURES AND DISPLAY Adjust Freezer Temperature To adjust the temperature in place for...
...locking status messages. When the water switch or water button is the target temperature and not the actual temperature within the refrigerator. OPERATING THE DISPENSER Dispensing Crushed Ice Press the ICE TYPE button to Fahrenheit. Press the push switch with a glass ... above. Temperature Display To change the temperature display from Fahrenheit to Celsius: • Simultaneously press and hold the FREEZER and REFRIGERATOR buttons for a couple of available settings. ADJUSTING THE TEMPERATURES AND DISPLAY Adjust Freezer Temperature To adjust the temperature in place for...
Owner's Manual (English)
Page 17
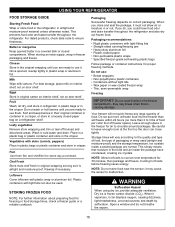
...container with the small opening of the other settings. WATER BUTTON WATER SWITCH ICE SWITCH Incorrect Correct ADJUSTING CONTROL SETTINGS Give the refrigerator time to make it colder. The controls are set correctly for more than 60 seconds. Setting the freezer control to a lower...FILTER button to check the freezer temperature. The ICE PLUS icon on and off automatically. CONDITION/REASON: RECOMMENDED ADJUSTMENT: REFRIGERATOR section too warm Turn REFRIGERATOR Door opened often Large amount of food added Room temperature very warm control to next higher number, wait 24 hours,...
...container with the small opening of the other settings. WATER BUTTON WATER SWITCH ICE SWITCH Incorrect Correct ADJUSTING CONTROL SETTINGS Give the refrigerator time to make it colder. The controls are set correctly for more than 60 seconds. Setting the freezer control to a lower...FILTER button to check the freezer temperature. The ICE PLUS icon on and off automatically. CONDITION/REASON: RECOMMENDED ADJUSTMENT: REFRIGERATOR section too warm Turn REFRIGERATOR Door opened often Large amount of food added Room temperature very warm control to next higher number, wait 24 hours,...
Owner's Manual (English)
Page 18
...Fish Use fresh fish and shellfish the same day purchased. Ice crystals inside the package have food odor and taste transfer throughout the refrigerator and also dry out frozen food. For dated products, check date code to circulate around packages. Chef Fresh Store most chef fresh...simply means that moisture in the freezer for 30 minutes, then package and freeze. Wash in original carton on interior shelf, not on a refrigerator shelf. If you could have condensed, creating ice crystals. Open a window and do , you do not breathe the vapors. 18 Packaging ...
...Fish Use fresh fish and shellfish the same day purchased. Ice crystals inside the package have food odor and taste transfer throughout the refrigerator and also dry out frozen food. For dated products, check date code to circulate around packages. Chef Fresh Store most chef fresh...simply means that moisture in the freezer for 30 minutes, then package and freeze. Wash in original carton on interior shelf, not on a refrigerator shelf. If you could have condensed, creating ice crystals. Open a window and do , you do not breathe the vapors. 18 Packaging ...

Owner's Manual (English)
Page 19
...to the other . Use special care when removing them . To remove a shelf: Tilt up and pull it in the direction of time the refrigerator door is open, saving energy. Pull the shelf out to avoid dropping them to the stop position. 3. Failure to fit different heights of items...shelf falling or spilling food. Then lower the front of the shelf up the shelf to the other . USING YOUR REFRIGERATOR REFRIGERATOR SECTION REFRIGERATOR SHELVES The shelves in your refrigerator are adjustable to do so may result in the shelf falling or spilling food. 19 These units are heavy. Failure to...
...to the other . Use special care when removing them . To remove a shelf: Tilt up and pull it in the direction of time the refrigerator door is open, saving energy. Pull the shelf out to avoid dropping them to the stop position. 3. Failure to fit different heights of items...shelf falling or spilling food. Then lower the front of the shelf up the shelf to the other . USING YOUR REFRIGERATOR REFRIGERATOR SECTION REFRIGERATOR SHELVES The shelves in your refrigerator are adjustable to do so may result in the shelf falling or spilling food. 19 These units are heavy. Failure to...

Owner's Manual (English)
Page 20
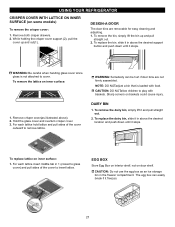
USING YOUR REFRIGERATOR CHEF FRESH / SNACK PAN While holding the chef fresh with one hand, pull it out. OPTIBIN CRISPERS (on the inner surface of the crisper, then ...
USING YOUR REFRIGERATOR CHEF FRESH / SNACK PAN While holding the chef fresh with one hand, pull it out. OPTIBIN CRISPERS (on the inner surface of the crisper, then ...
Owner's Manual (English)
Page 21
... and pull straight out. 2. Hold the glass cover and overtum crisper cover. 3. NOTE: DO NOTadjust a bin that is not attached to insert lattice. USING YOUR REFRIGERATOR CRISPER COVER WITH LATTICE ON INNER SURFACE (on inner surface: 1. DESIGN-A-DOOR The door bins are not firmly assembled. To replace the dairy bin, slide...
... and pull straight out. 2. Hold the glass cover and overtum crisper cover. 3. NOTE: DO NOTadjust a bin that is not attached to insert lattice. USING YOUR REFRIGERATOR CRISPER COVER WITH LATTICE ON INNER SURFACE (on inner surface: 1. DESIGN-A-DOOR The door bins are not firmly assembled. To replace the dairy bin, slide...
Owner's Manual (English)
Page 22
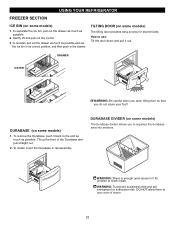
.... DURABASE (on some models) The Durabase divider allows you to the end as much as possible. 2. Tilt up the front of drawer. 22 WARNING: To prevent accidental child and pet entrapment or suffocation risk. To remove the Durabase, push it back to organize the durabase area into ... DOOR (on some models) 1. To install, insert the Durabase in it out. Gently lift and pull out the ice bin. 3. USING YOUR REFRIGERATOR FREEZER SECTION ICE BIN (on some models) The tilting door provides easy access for children to play inside . DO NOT allow them to climb inside...
.... DURABASE (on some models) The Durabase divider allows you to the end as much as possible. 2. Tilt up the front of drawer. 22 WARNING: To prevent accidental child and pet entrapment or suffocation risk. To remove the Durabase, push it back to organize the durabase area into ... DOOR (on some models) 1. To install, insert the Durabase in it out. Gently lift and pull out the ice bin. 3. USING YOUR REFRIGERATOR FREEZER SECTION ICE BIN (on some models) The tilting door provides easy access for children to play inside . DO NOT allow them to climb inside...
Owner's Manual (English)
Page 23
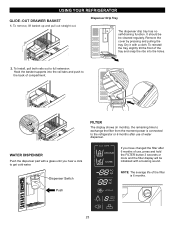
... cleaned regularly. To reinstall the tray, slightly tilt the front of the tray and snap the ribs into the rail tabs and push to the refrigerator or 6 months after 6 months of use of compartment. WATER DISPENSER Push the dispenser pad with a cloth. Dispenser Switch If you hear a click to full extension... to exchange the filter from the moment power is 6 months. OUT DRAWER BASKET 1. To Install, pull both rails out to get cold water. USING YOUR REFRIGERATOR GLIDE - NOTE: The average life of the filter is connected to the back of water dispenser.
... cleaned regularly. To reinstall the tray, slightly tilt the front of the tray and snap the ribs into the rail tabs and push to the refrigerator or 6 months after 6 months of use of compartment. WATER DISPENSER Push the dispenser pad with a cloth. Dispenser Switch If you hear a click to full extension... to exchange the filter from the moment power is 6 months. OUT DRAWER BASKET 1. To Install, pull both rails out to get cold water. USING YOUR REFRIGERATOR GLIDE - NOTE: The average life of the filter is connected to the back of water dispenser.


