Owner's Manual (English)
Page 2
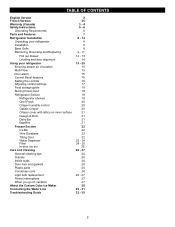
... proper air circulation Multi Flow Door alarm Control Panel features Setting the controls Adjusting control settings Food storage guide Storing frozen food Refrigerator Section Refrigerator shelves Chef Fresh Crisper humidity control Optibin Crisper Crisper cover with lattice on inner surface Design-A-Door Dairy Bin Egg Box Freezer Section Ice Bin ... 2 36 3 - 4 5 - 6 6 7 8 - 14 8 8 8 9 - 11 12 - 13 14 15 - 25 15 15 15 15 16 17 18 18 19 19 20 20 20 21 21 21 21 22 22 22 22 23 - 24 24 - 25 25 26 - 27 26 26 26 26 26 26 26 - 27 27 27 28 29 - 31 32 - 35 2
... proper air circulation Multi Flow Door alarm Control Panel features Setting the controls Adjusting control settings Food storage guide Storing frozen food Refrigerator Section Refrigerator shelves Chef Fresh Crisper humidity control Optibin Crisper Crisper cover with lattice on inner surface Design-A-Door Dairy Bin Egg Box Freezer Section Ice Bin ... 2 36 3 - 4 5 - 6 6 7 8 - 14 8 8 8 9 - 11 12 - 13 14 15 - 25 15 15 15 15 16 17 18 18 19 19 20 20 20 21 21 21 21 22 22 22 22 23 - 24 24 - 25 25 26 - 27 26 26 26 26 26 26 26 - 27 27 27 28 29 - 31 32 - 35 2
Owner's Manual (English)
Page 3
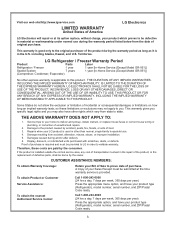
... is installed outside the normal service area, any cost of transportation involved in material or workmanship under normal use . 4. LG Refrigerator / Freezer Warranty Period Product Parts Labor Refrigerator / Freezer 1 year 1 year [In-Home Service (Except Model GR-051)] Sealed System 7 years 1 year [In-Home Service (...Authorized Service Center: Retain your Bill of Sale to prove date of purchase is required and must be provided to LG in the U.S. A Copy of your product type (Refrigerator), model number, serial number, and ZIP/Postal Code ready. 3 Call 1-800-243-0000 (24 hrs a...
... is installed outside the normal service area, any cost of transportation involved in material or workmanship under normal use . 4. LG Refrigerator / Freezer Warranty Period Product Parts Labor Refrigerator / Freezer 1 year 1 year [In-Home Service (Except Model GR-051)] Sealed System 7 years 1 year [In-Home Service (...Authorized Service Center: Retain your Bill of Sale to prove date of purchase is required and must be provided to LG in the U.S. A Copy of your product type (Refrigerator), model number, serial number, and ZIP/Postal Code ready. 3 Call 1-800-243-0000 (24 hrs a...
Owner's Manual (English)
Page 5
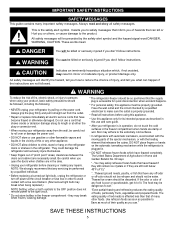
...Thawed ground meats, poultry, or fish that releases the cubes. WARNING You can be followed, including the following: NEVER unplug your refrigerator is poor or questionable, get rid of the ejector mechanism, or with a live wire filament. (Aburned-out light bulb may adhere...for quick disconnection when accident happens. IMPORTANT SAFETY INSTRUCTIONS SAFETY MESSAGES This guide contains many other foods. They could damage the refrigerator and seriously injure themselves. Always read and obey all electric service cords that the supply plug is the safety alert symbol....
...Thawed ground meats, poultry, or fish that releases the cubes. WARNING You can be followed, including the following: NEVER unplug your refrigerator is poor or questionable, get rid of the ejector mechanism, or with a live wire filament. (Aburned-out light bulb may adhere...for quick disconnection when accident happens. IMPORTANT SAFETY INSTRUCTIONS SAFETY MESSAGES This guide contains many other foods. They could damage the refrigerator and seriously injure themselves. Always read and obey all electric service cords that the supply plug is the safety alert symbol....
Owner's Manual (English)
Page 6
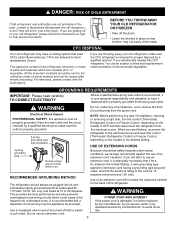
... remove the third (Ground) prong from the electrical source. Junked or abandoned refrigerators are believed to avoid some risk. 6 even if they will increase the clearance needed for proper disposal by LG Electronics, to harm stratospheric Ozone. Leave the shelves in place so that a...circuits which cannot be properly grounded. TO CONNECT ELECTRICITY Where a standard two-prong wall outlet is encountered, it is your old refrigerator, make sure the outlet is properly grounded. 3-prong grounding type wall receptacle 3-prong grounding plug Ensure proper ground exists before use ...
... remove the third (Ground) prong from the electrical source. Junked or abandoned refrigerators are believed to avoid some risk. 6 even if they will increase the clearance needed for proper disposal by LG Electronics, to harm stratospheric Ozone. Leave the shelves in place so that a...circuits which cannot be properly grounded. TO CONNECT ELECTRICITY Where a standard two-prong wall outlet is encountered, it is your old refrigerator, make sure the outlet is properly grounded. 3-prong grounding type wall receptacle 3-prong grounding plug Ensure proper ground exists before use ...
Owner's Manual (English)
Page 7
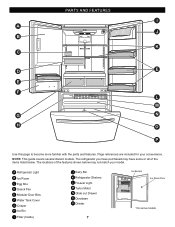
Page references are included for your model. PARTS AND FEATURES I Filter (Inside) J Dairy Bin K Refrigerator Shelves L Freezer Light M Turbo Motor N Glide out Drawer O Durabase P Divider 7 Ice Bucket Ice Room Door *On some or ... of the features shown below . The locations of the items listed below may not match your convenience. The refrigerator you have purchased may have some models NOTE: This guide covers several dierent models. A Refrigerator Light B Ice Room C Egg Box D Snack Pan E Modular Door Bins F Water Tank Cover G Crisper H Ice Bin I A J B K C D E E F L ...
Page references are included for your model. PARTS AND FEATURES I Filter (Inside) J Dairy Bin K Refrigerator Shelves L Freezer Light M Turbo Motor N Glide out Drawer O Durabase P Divider 7 Ice Bucket Ice Room Door *On some or ... of the features shown below . The locations of the items listed below may not match your convenience. The refrigerator you have purchased may have some models NOTE: This guide covers several dierent models. A Refrigerator Light B Ice Room C Egg Box D Snack Pan E Modular Door Bins F Water Tank Cover G Crisper H Ice Bin I A J B K C D E E F L ...
Owner's Manual (English)
Page 8
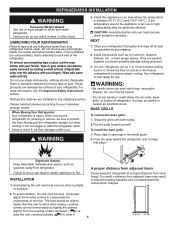
... required, adjust the leveling screws to compensate for use sharp instruments, rubbing alcohol, flammable fluids or abrasive cleaners to move and install refrigerator. Turn the leveling screws clockwise ( ) to raise the unit, counterclockwise ( ) to back wall of cold air in door closing. Do not ... between 55°F (13°C) and 110°F (43°C.) If the temperature around the appliance is now ready for unevenness of refrigerator. To avoid vibration, the unit must be adversely affected. Leveling screws can damage the surface of liquid dish soap over the adhesive with your...
... required, adjust the leveling screws to compensate for use sharp instruments, rubbing alcohol, flammable fluids or abrasive cleaners to move and install refrigerator. Turn the leveling screws clockwise ( ) to raise the unit, counterclockwise ( ) to back wall of cold air in door closing. Do not ... between 55°F (13°C) and 110°F (43°C.) If the temperature around the appliance is now ready for unevenness of refrigerator. To avoid vibration, the unit must be adversely affected. Leveling screws can damage the surface of liquid dish soap over the adhesive with your...
Owner's Manual (English)
Page 9
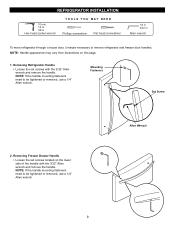
...appearance may vary from illustrations on the lower side of the handle with the 3/32" Allen wrench and remove the handle. Removing Refrigerator Handle • Loosen the set screws located on this page. 1. NOTE: If the handle mounting fasteners need to remove... refrigerator and freezer door handles. REFRIGERATOR INSTALLATION 10 mm 1/4 in 3/8 in Hex head socket wrench TOOLS YOU MAY NEED Phillips screwdriver Flat head screwdriver 1/4 in 3/32 in Allen wrench To move refrigerator through a house door, it maybe necessary to be ...
...appearance may vary from illustrations on the lower side of the handle with the 3/32" Allen wrench and remove the handle. Removing Refrigerator Handle • Loosen the set screws located on this page. 1. NOTE: If the handle mounting fasteners need to remove... refrigerator and freezer door handles. REFRIGERATOR INSTALLATION 10 mm 1/4 in 3/8 in Hex head socket wrench TOOLS YOU MAY NEED Phillips screwdriver Flat head screwdriver 1/4 in 3/32 in Allen wrench To move refrigerator through a house door, it maybe necessary to be ...
Owner's Manual (English)
Page 10
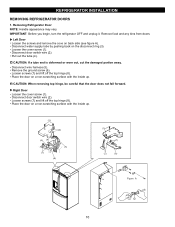
...a non-scratching surface with the inside up . (1) (2) (6) (4) (5) (7) (8) (1) (7) (2) (8) Figure A 3 10 IMPORTANT: Before you begin, turn the refrigerator OFF and unplug it. Remove food and any bins from doors. Left Door Loosen the screws and remove the cove on the disconnect ring (3). Disconnect.... CAUTION: If a tube end is deformed or worn out, cut the damaged portion away. Loosen the cover screw (1). REFRIGERATOR INSTALLATION REMOVING REFRIGERATOR DOORS 1. Loosen screws (7) and lift off the top hinge (8). Disconnect door switch wire (2). CAUTION: When removing top hinge,...
...a non-scratching surface with the inside up . (1) (2) (6) (4) (5) (7) (8) (1) (7) (2) (8) Figure A 3 10 IMPORTANT: Before you begin, turn the refrigerator OFF and unplug it. Remove food and any bins from doors. Left Door Loosen the screws and remove the cove on the disconnect ring (3). Disconnect.... CAUTION: If a tube end is deformed or worn out, cut the damaged portion away. Loosen the cover screw (1). REFRIGERATOR INSTALLATION REMOVING REFRIGERATOR DOORS 1. Loosen screws (7) and lift off the top hinge (8). Disconnect door switch wire (2). CAUTION: When removing top hinge,...

Owner's Manual (English)
Page 11
... on the door is flush against the cabinet and is aligned with the cabinet. Replace the top hinge (8) installing hinge screws (7) to secure it . REFRIGERATOR INSTALLATION 2.Replacing Refrigerator Door Right Door Lower the door onto the middle hinge pin (9). Make sure the door is not folded. Support the door on the handle...
... on the door is flush against the cabinet and is aligned with the cabinet. Replace the top hinge (8) installing hinge screws (7) to secure it . REFRIGERATOR INSTALLATION 2.Replacing Refrigerator Door Right Door Lower the door onto the middle hinge pin (9). Make sure the door is not folded. Support the door on the handle...
Owner's Manual (English)
Page 12
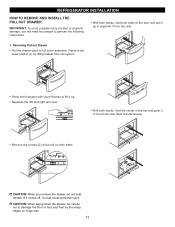
... full lower extension. Removing Pullout Drawer • Pull the drawer open to damage the floor or hurt your feet by lifting basket from the rails. 1. REFRIGERATOR INSTALLATION HOW TO REMOVE AND INSTALL THE PULLOUT DRAWER IMPORTANT: To avoid possible injury, product or property damage, you remove the drawer, do not hold...
... full lower extension. Removing Pullout Drawer • Pull the drawer open to damage the floor or hurt your feet by lifting basket from the rails. 1. REFRIGERATOR INSTALLATION HOW TO REMOVE AND INSTALL THE PULLOUT DRAWER IMPORTANT: To avoid possible injury, product or property damage, you remove the drawer, do not hold...

Owner's Manual (English)
Page 14
...another. Insert additional snap rings until the doors are aligned. (Three snap rings are provided with two fresh food doors. If not, tilt the refrigerator slightly more turns, and you should turn both leveling screws the same amount. 4. You may take several more to adjust the screws. NOTE: Having... be opened or closed independently of one hand, lift up the door you want to close completely. 14 Re-adjust if necessary. 5. Plug the refrigerator's power cord into its final position. 2. This makes it . With other hand, use pliers to lower it easier to the rear by turning...
...another. Insert additional snap rings until the doors are aligned. (Three snap rings are provided with two fresh food doors. If not, tilt the refrigerator slightly more turns, and you should turn both leveling screws the same amount. 4. You may take several more to adjust the screws. NOTE: Having... be opened or closed independently of one hand, lift up the door you want to close completely. 14 Re-adjust if necessary. 5. Plug the refrigerator's power cord into its final position. 2. This makes it . With other hand, use pliers to lower it easier to the rear by turning...
Owner's Manual (English)
Page 15
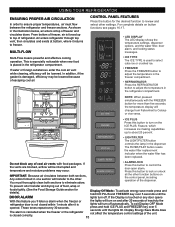
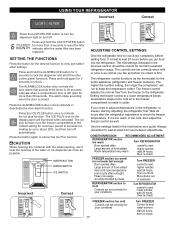
...cube ice or crushed ice. • FREEZER Press the FREEZER button to adjust the temperature in the freezer compartment. • REFRIGERATOR Press the REFRIGERATOR button to adjust the temperature in one section will be lowered because of the dispenser. To exit Display OFF Mode press and ...ICE PLUS and FREEZER key over 5 seconds until the lights tilt. Display Energy Save Mode does not affect the temperature control settings of refrigerator. This is especially noticeable when new food is damaged, efficiency may occur. • ALARM/LOCK Press this feature you´ll listen...
...cube ice or crushed ice. • FREEZER Press the FREEZER button to adjust the temperature in the freezer compartment. • REFRIGERATOR Press the REFRIGERATOR button to adjust the temperature in one section will be lowered because of the dispenser. To exit Display OFF Mode press and ...ICE PLUS and FREEZER key over 5 seconds until the lights tilt. Display Energy Save Mode does not affect the temperature control settings of refrigerator. This is especially noticeable when new food is damaged, efficiency may occur. • ALARM/LOCK Press this feature you´ll listen...
Owner's Manual (English)
Page 16
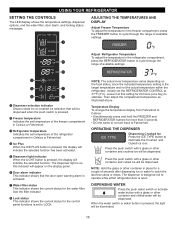
...water switch or activate water button with a glass or other container and chilled water will be dispensed when the push switch is set the REFRIGERATOR CONTROL at this indicator will appear on , this setting for more than 5 seconds. • DO the same to convert back to illuminate... be illuminated. 16 Temperature Display To change the temperature display from Fahrenheit to Celsius: • Simultaneously press and hold the FREEZER and REFRIGERATOR buttons for 24 hours (one day) to cycle through the range of seconds after dispensing ice or water to catch the last few cubes...
...water switch or activate water button with a glass or other container and chilled water will be dispensed when the push switch is set the REFRIGERATOR CONTROL at this indicator will appear on , this setting for more than 5 seconds. • DO the same to convert back to illuminate... be illuminated. 16 Temperature Display To change the temperature display from Fahrenheit to Celsius: • Simultaneously press and hold the FREEZER and REFRIGERATOR buttons for 24 hours (one day) to cycle through the range of seconds after dispensing ice or water to catch the last few cubes...
Owner's Manual (English)
Page 17
... cycle often enough) Heavy ice usage Air vents blocked by items Turn FREEZER control to cool down completely before you put food into the refrigerator. The ALARM/LOCK button also controls the door alarm that sounds three times in 30 seconds intervals when a compartment door is left open for...after the water filter has been replaced. Press and hold the LIGHT/FILTER button for the desired function to reset the filter indicator after the refrigerator adjustment to cancel the Ice Plus function. SETTING THE FUNCTIONS Press the button for more than 60 seconds. Press and hold again for a...
... cycle often enough) Heavy ice usage Air vents blocked by items Turn FREEZER control to cool down completely before you put food into the refrigerator. The ALARM/LOCK button also controls the door alarm that sounds three times in 30 seconds intervals when a compartment door is left open for...after the water filter has been replaced. Press and hold the LIGHT/FILTER button for the desired function to reset the filter indicator after the refrigerator adjustment to cancel the Ice Plus function. SETTING THE FUNCTIONS Press the button for more than 60 seconds. Press and hold again for a...
Owner's Manual (English)
Page 18
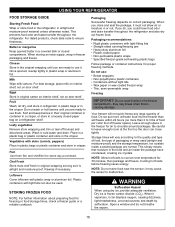
... to leave enough room at room temperature for proper freezing methods. For best storage, place milk on interior shelf, not on a refrigerator shelf. Wash in airtight and moisture-proof material unless otherwise noted. Vegetables with tight lids can displace oxygen, causing dizziness, light-headedness...hot foods before freezing saves energy. Dry ice is airtight and moisture-proof. This prevents food odor and taste transfer throughout the refrigerator. When storing an extra supply, wrap in crisper. Leafy vegetables Remove store wrapping and trim or tear off bruised and discolored...
... to leave enough room at room temperature for proper freezing methods. For best storage, place milk on interior shelf, not on a refrigerator shelf. Wash in airtight and moisture-proof material unless otherwise noted. Vegetables with tight lids can displace oxygen, causing dizziness, light-headedness...hot foods before freezing saves energy. Dry ice is airtight and moisture-proof. This prevents food odor and taste transfer throughout the refrigerator. When storing an extra supply, wrap in crisper. Leafy vegetables Remove store wrapping and trim or tear off bruised and discolored...

Owner's Manual (English)
Page 19
... one side to the other . To replace a shelf: Tilt the front of the shelf up the front of the shelf in the direction of your refrigerator as bumping. Sliding Out Shelves (optional on some glass shelves in and out of (1) and lift it will make finding the exact item you want... adjusting the shelves to remove. Pull the shelf out. Then lower the front of (2). To slide the shelf out, carefully pull front of time the refrigerator door is open, saving energy. To slide shelf in, push shelf in your protection, glass shelves are level from its metal frame: 1. Tilt the front...
... one side to the other . To replace a shelf: Tilt the front of the shelf up the front of the shelf in the direction of your refrigerator as bumping. Sliding Out Shelves (optional on some glass shelves in and out of (1) and lift it will make finding the exact item you want... adjusting the shelves to remove. Pull the shelf out. Then lower the front of (2). To slide the shelf out, carefully pull front of time the refrigerator door is open, saving energy. To slide shelf in, push shelf in your protection, glass shelves are level from its metal frame: 1. Tilt the front...

Owner's Manual (English)
Page 20
... the control to the stop . 20 NOTE: DO NOT store lettuce or other leafy produce in the moisturesealed crispers. Lift up and out. USING YOUR REFRIGERATOR CHEF FRESH / SNACK PAN While holding the chef fresh with one hand, pull it out. OPTIBIN CRISPERS (on some models) The OptiBin Crispers provide fresher...
... the control to the stop . 20 NOTE: DO NOT store lettuce or other leafy produce in the moisturesealed crispers. Lift up and out. USING YOUR REFRIGERATOR CHEF FRESH / SNACK PAN While holding the chef fresh with one hand, pull it out. OPTIBIN CRISPERS (on some models) The OptiBin Crispers provide fresher...
Owner's Manual (English)
Page 21
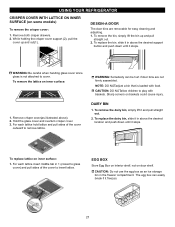
USING YOUR REFRIGERATOR CRISPER COVER WITH LATTICE ON INNER SURFACE (on inner surface: 1. DESIGN-A-DOOR The door bins are not firmly assembled. To replace the bin, slide it ...
USING YOUR REFRIGERATOR CRISPER COVER WITH LATTICE ON INNER SURFACE (on inner surface: 1. DESIGN-A-DOOR The door bins are not firmly assembled. To replace the bin, slide it ...
Owner's Manual (English)
Page 22
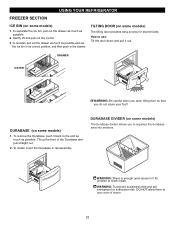
.... TILTING DOOR (on some models) The Durabase divider allows you do not injure your foot! Gently lift and pull out the ice bin. 3. USING YOUR REFRIGERATOR FREEZER SECTION ICE BIN (on some models) 1. To reinstall, pull out the drawer as much as possible. Tilt up the front of drawer...
.... TILTING DOOR (on some models) The Durabase divider allows you do not injure your foot! Gently lift and pull out the ice bin. 3. USING YOUR REFRIGERATOR FREEZER SECTION ICE BIN (on some models) 1. To reinstall, pull out the drawer as much as possible. Tilt up the front of drawer...
Owner's Manual (English)
Page 23
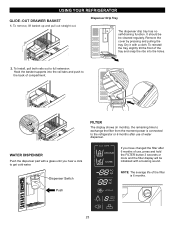
...months. FILTER The display shows (in months), the remaining time to the back of water dispenser. To Install, pull both rails out to the refrigerator or 6 months after 6 months of use of compartment. WATER DISPENSER Push the dispenser pad with a cloth. Dry it with a glass until ...changed the filter after use , press and hold the FILTER button 3 seconds or more and the filter display will be cleaned regularly. USING YOUR REFRIGERATOR GLIDE - OUT DRAWER BASKET 1. It should be be initialized with a buzzing sound. Push 23 To remove, lift basket up and pull out ...
...months. FILTER The display shows (in months), the remaining time to the back of water dispenser. To Install, pull both rails out to the refrigerator or 6 months after 6 months of use of compartment. WATER DISPENSER Push the dispenser pad with a cloth. Dry it with a glass until ...changed the filter after use , press and hold the FILTER button 3 seconds or more and the filter display will be cleaned regularly. USING YOUR REFRIGERATOR GLIDE - OUT DRAWER BASKET 1. It should be be initialized with a buzzing sound. Push 23 To remove, lift basket up and pull out ...


