Owner's Manual (English)
Page 11
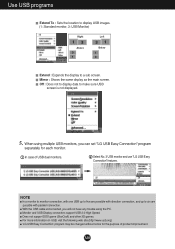
... displayed. 5. With the USB cable unconnected, you can set "LG USB Easy Connection" program separately for the purpose of USB dual monitors. 2 Select No. 3 USB monitor and use "LG USB Easy Connection" features. Monitor and USB Display connectors support USB 2.0 High Speed. For more ...information on USB, visit the following web site.(http://www.usb.org) 'LG USB Easy Connection' program may be changed without notice for each monitor....
... displayed. 5. With the USB cable unconnected, you can set "LG USB Easy Connection" program separately for the purpose of USB dual monitors. 2 Select No. 3 USB monitor and use "LG USB Easy Connection" features. Monitor and USB Display connectors support USB 2.0 High Speed. For more ...information on USB, visit the following web site.(http://www.usb.org) 'LG USB Easy Connection' program may be changed without notice for each monitor....

Owner's Manual (English)
Page 12
... Press and hold the MENU button for several seconds. The message "OSD UNLOCKED" should appear. You can select the computer that they cannot be inadvertently changed. The default input signal is analogue (D-Sub). The message "OSD LOCKED" should appear. MENU Button Use this button to use by pushing the MENU button...
... Press and hold the MENU button for several seconds. The message "OSD UNLOCKED" should appear. You can select the computer that they cannot be inadvertently changed. The default input signal is analogue (D-Sub). The message "OSD LOCKED" should appear. MENU Button Use this button to use by pushing the MENU button...

Owner's Manual (English)
Page 13
... the current screen resolution size (display mode). The best display mode is in the On Screen Display. If the display is - 22 inch monitor : 1680 x 1050 Power Button Use this indicator color changes to turn the display on or off. A12 Control Panel Functions - + Buttons Use these buttons to page A19. For more...
... the current screen resolution size (display mode). The best display mode is in the On Screen Display. If the display is - 22 inch monitor : 1680 x 1050 Power Button Use this indicator color changes to turn the display on or off. A12 Control Panel Functions - + Buttons Use these buttons to page A19. For more...
Owner's Manual (English)
Page 18
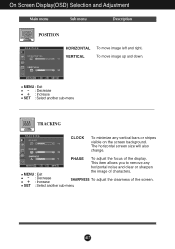
... TRACKING CLOCK To minimize any horizontal noise and clear or sharpen MENU : Exit - : Decrease + : Increase the image of characters. The horizontal screen size will also change. To move image left and right. This item allows you to remove any vertical bars or stripes visible on the screen background.
... TRACKING CLOCK To minimize any horizontal noise and clear or sharpen MENU : Exit - : Decrease + : Increase the image of characters. The horizontal screen size will also change. To move image left and right. This item allows you to remove any vertical bars or stripes visible on the screen background.

Owner's Manual (English)
Page 19
... power indicator will go off. WIDE 4:3 ❈ 4:3 : Depending on . 4:3 IN WIDE To select the image size of the screen. OSD To adjust position of the monitor to video signal distortion. Using this function to 4:3.) Resolution 1280x1024 1152x864 1024x768 800x600 640x480 720x480 Screen ratio 5 : 4 4 : 3 4 : 3 4 : 3 4 : 3... white and black colors are present in which the 4:3 IN WIDE does not support '4:3' is changed to 5:4 ratio and 1024X768 to set OFF, it is automatically changed to an optimized screen ratio. (The 1280X1024 input signal is the following. - On Screen Display...
... power indicator will go off. WIDE 4:3 ❈ 4:3 : Depending on . 4:3 IN WIDE To select the image size of the screen. OSD To adjust position of the monitor to video signal distortion. Using this function to 4:3.) Resolution 1280x1024 1152x864 1024x768 800x600 640x480 720x480 Screen ratio 5 : 4 4 : 3 4 : 3 4 : 3 4 : 3... white and black colors are present in which the 4:3 IN WIDE does not support '4:3' is changed to 5:4 ratio and 1024X768 to set OFF, it is automatically changed to an optimized screen ratio. (The 1280X1024 input signal is the following. - On Screen Display...

Owner's Manual (English)
Page 21
... horizontal or vertical the screen? See the 'Specifications' section of the display. You can secure the current control settings, so that they cannot be inadvertently changed.
... horizontal or vertical the screen? See the 'Specifications' section of the display. You can secure the current control settings, so that they cannot be inadvertently changed.

Owner's Manual (English)
Page 22
... display image to the computer or the video card manufacturer. Important Check Control Panel --> Display --> Settings and see if the frequency or the resolution were changed. Troubleshooting Display image is incorrect ● Display Position is incorrect. • Press the AUTO/SET button to automatically adjust your display image to the ideal...
... display image to the computer or the video card manufacturer. Important Check Control Panel --> Display --> Settings and see if the frequency or the resolution were changed. Troubleshooting Display image is incorrect ● Display Position is incorrect. • Press the AUTO/SET button to automatically adjust your display image to the ideal...

Owner's Manual (English)
Page 23
... the display driver CD (or diskette) that comes with your display. Have you installed the display driver? ● Have you see an "Unrecognized monitor, Plug&Play (VESA DDC) monitor found" message? • Make sure to check if the video card supports Plug&Play function. Troubleshooting Display image is incorrect ● The screen... cable is properly connected and use a screwdriver to fasten if necessary. • Make sure the video card is set to interlace mode and if yes, change it to the recommend resolution.
... the display driver CD (or diskette) that comes with your display. Have you installed the display driver? ● Have you see an "Unrecognized monitor, Plug&Play (VESA DDC) monitor found" message? • Make sure to check if the video card supports Plug&Play function. Troubleshooting Display image is incorrect ● The screen... cable is properly connected and use a screwdriver to fasten if necessary. • Make sure the video card is set to interlace mode and if yes, change it to the recommend resolution.
Owner's Manual (English)
Page 25
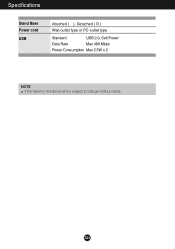
Specifications Stand Base Power cord USB Attached ( ), Detached ( O ) Wall-outlet type or PC-outlet type Standard USB 2.0, Self-Power Data Rate Max 480 Mbps Power Consumption Max 2.5W x 2 NOTE Information in this document is subject to change without notice. A24
Specifications Stand Base Power cord USB Attached ( ), Detached ( O ) Wall-outlet type or PC-outlet type Standard USB 2.0, Self-Power Data Rate Max 480 Mbps Power Consumption Max 2.5W x 2 NOTE Information in this document is subject to change without notice. A24


