Owner's Manual (English)
Page 3
.... However, this product with your finger for your local authority. On Cleaning Unplug the display before cleaning the face of the fixed-resolution LCD panel. On Repacking Do not throw away the carton and packing materials. If these openings are provided with cloth or other material. ... bathtub, washbowl, kitchen sink, laundry tub, in its original material. On Disposal The fluorescent lamp used under any mode except the recommended resolution, some afterimages. A2 Displays are blocked, built-up heat can cause failures which may appear as near or over the power cord, and ...
.... However, this product with your finger for your local authority. On Cleaning Unplug the display before cleaning the face of the fixed-resolution LCD panel. On Repacking Do not throw away the carton and packing materials. If these openings are provided with cloth or other material. ... bathtub, washbowl, kitchen sink, laundry tub, in its original material. On Disposal The fluorescent lamp used under any mode except the recommended resolution, some afterimages. A2 Displays are blocked, built-up heat can cause failures which may appear as near or over the power cord, and ...
Owner's Manual (English)
Page 7
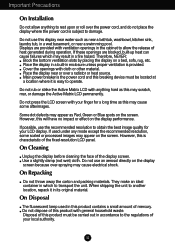
.... 'AUTO/SET' Function? When monitor power is executed automatically. (Only Analog Mode) NOTE ' Self Image Setting Function'? Connect the cable as blurry screen, blurred letters, screen flicker or tilted screen while using the device or after changing screen resolution, press the AUTO/SET function button... to 2 . When you encounter problems such as below sketch map form 1 to improve resolution. This function provides the user with optimal display settings.When the user connects the monitor for the first time, this function automatically adjusts the display to turn the power on ,...
.... 'AUTO/SET' Function? When monitor power is executed automatically. (Only Analog Mode) NOTE ' Self Image Setting Function'? Connect the cable as blurry screen, blurred letters, screen flicker or tilted screen while using the device or after changing screen resolution, press the AUTO/SET function button... to 2 . When you encounter problems such as below sketch map form 1 to improve resolution. This function provides the user with optimal display settings.When the user connects the monitor for the first time, this function automatically adjusts the display to turn the power on ,...
Owner's Manual (English)
Page 8
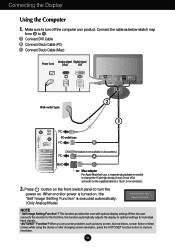
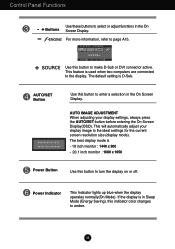
... be inadvertently changed. A7 Control Panel Functions Front Panel Controls 6 ZOOMING At the current display, Use 'ez Zooming' Key, then the display resolution is possible to magnify the size of ez-zoom, you can differ by pushing the MENU button for several seconds. In this button to the...as follows: For the 19 inch monitor, 1440 x 900, 1280 x 1024, 1024 x 768, 800 x 600 For the 20.1 inch monitor, 1680 x 1050, 1440 x 900, 1280 x 1024, 1024 x 768, 800 x 600. Use 'ez Zooming' Key one more, the display is back to the one step low resolution. MENU Button Use this case, ...
... be inadvertently changed. A7 Control Panel Functions Front Panel Controls 6 ZOOMING At the current display, Use 'ez Zooming' Key, then the display resolution is possible to magnify the size of ez-zoom, you can differ by pushing the MENU button for several seconds. In this button to the...as follows: For the 19 inch monitor, 1440 x 900, 1280 x 1024, 1024 x 768, 800 x 600 For the 20.1 inch monitor, 1680 x 1050, 1440 x 900, 1280 x 1024, 1024 x 768, 800 x 600. Use 'ez Zooming' Key one more, the display is back to the one step low resolution. MENU Button Use this case, ...
Owner's Manual (English)
Page 9
... up blue when the display operates normally(On Mode). A8 This feature is - 19 inch monitor : 1440 x 900 - 20.1 inch monitor : 1680 x 1050 Power Button Use this indicator color changes to the ideal settings for the current screen resolution size (display mode). AUTO IMAGE ADJUSTMENT When adjusting your display image to amber. The best...
... up blue when the display operates normally(On Mode). A8 This feature is - 19 inch monitor : 1440 x 900 - 20.1 inch monitor : 1680 x 1050 Power Button Use this indicator color changes to the ideal settings for the current screen resolution size (display mode). AUTO IMAGE ADJUSTMENT When adjusting your display image to amber. The best...
Owner's Manual (English)
Page 15
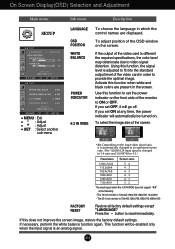
The 20.1 inch monitor is adjusted to fit into the standard output level of the video card in order to set the power indicator on the screen. Using this ... level is 720x400,1280x768,1360x768,1680x1050 FACTORY RESET Restore all factory default settings except - To select the image size of the monitor to video signal distortion. Press the button to 4:3.) Resolution Screen ratio 1280x1024 5 : 4 1152x864 4 : 3 1024x768 4 : 3 800x600 4 : 3 640x480 4 : 3 720x480 3 : 2 The input signal which the control names are present in the screen. The...
The 20.1 inch monitor is adjusted to fit into the standard output level of the video card in order to set the power indicator on the screen. Using this ... level is 720x400,1280x768,1360x768,1680x1050 FACTORY RESET Restore all factory default settings except - To select the image size of the monitor to video signal distortion. Press the button to 4:3.) Resolution Screen ratio 1280x1024 5 : 4 1152x864 4 : 3 1024x768 4 : 3 800x600 4 : 3 640x480 4 : 3 720x480 3 : 2 The input signal which the control names are present in the screen. The...
Owner's Manual (English)
Page 18
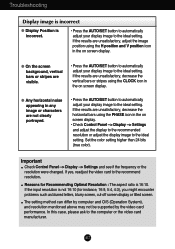
... bars using the CLOCK icon in the on screen display. The setting method can differ by computer and O/S (Operation System), and resolution mentioned above may not be supported by the video card performance. G On the screen background, vertical bars or stripes are unsatisfactory, ... automatically adjust your display image to the ideal setting. Important Check Control Panel --> Display --> Settings and see if the frequency or the resolution were changed. Reasons for instance, 16:9, 5:4, 4:3), you might encounter problems such as blurred letters, blurry screen, cut-off screen display ...
... bars using the CLOCK icon in the on screen display. The setting method can differ by computer and O/S (Operation System), and resolution mentioned above may not be supported by the video card performance. G On the screen background, vertical bars or stripes are unsatisfactory, ... automatically adjust your display image to the ideal setting. Important Check Control Panel --> Display --> Settings and see if the frequency or the resolution were changed. Reasons for instance, 16:9, 5:4, 4:3), you might encounter problems such as blurred letters, blurry screen, cut-off screen display ...
Owner's Manual (English)
Page 19
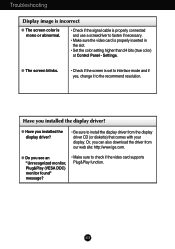
... driver? • Be sure to install the display driver from our web site: http://www.lge.com. A18 Have you see an "Unrecognized monitor, Plug&Play (VESA DDC) monitor found" message? • Make sure to check if the video card supports Plug&Play function. G Do you installed the display driver? G Have you... use a screwdriver to fasten if necessary. • Make sure the video card is set to interlace mode and if yes, change it to the recommend resolution. Settings.
... driver? • Be sure to install the display driver from our web site: http://www.lge.com. A18 Have you see an "Unrecognized monitor, Plug&Play (VESA DDC) monitor found" message? • Make sure to check if the video card supports Plug&Play function. G Do you installed the display driver? G Have you... use a screwdriver to fasten if necessary. • Make sure the video card is set to interlace mode and if yes, change it to the recommend resolution. Settings.
Owner's Manual (English)
Page 20
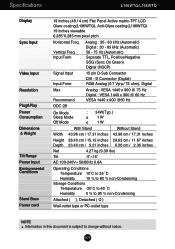
...; AC 100-240V~ 50/60Hz 0.8A Operating Conditions Temperature 10˚C to 35 ˚C Humidity 10 % to 80 % non-Condensing Storage Conditions Temperature -20˚C to 60 ˚C Humidity 5 % to 90 % non-Condensing Attached ( ), Detached ( O ) Wall-outlet type or PC-outlet type NOTE ...Information in this document is subject to change without notice. A19 Specifications L196WTG/L196WTQ Display Sync Input Video Input Resolution Plug&Play Power Consumption Dimensions & Weight Tilt Range Power Input Environmental Conditions Stand Base Power cord 19 inches (48.14 cm)...
...; AC 100-240V~ 50/60Hz 0.8A Operating Conditions Temperature 10˚C to 35 ˚C Humidity 10 % to 80 % non-Condensing Storage Conditions Temperature -20˚C to 60 ˚C Humidity 5 % to 90 % non-Condensing Attached ( ), Detached ( O ) Wall-outlet type or PC-outlet type NOTE ...Information in this document is subject to change without notice. A19 Specifications L196WTG/L196WTQ Display Sync Input Video Input Resolution Plug&Play Power Consumption Dimensions & Weight Tilt Range Power Input Environmental Conditions Stand Base Power cord 19 inches (48.14 cm)...
Owner's Manual (English)
Page 21
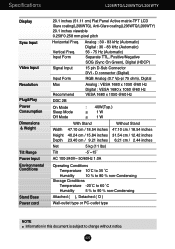
... to change without notice. Specifications L206WTG/L206WTQ/L206WTY Display Sync Input Video Input Resolution Plug&Play Power Consumption Dimensions & Weight Tilt Range Power Input Environmental Conditions Stand Base Power cord 20.1 inches (51.11 cm) Flat Panel Active matrix-TFT LCD Glare coating(L206WTG), Anti-Glare coating(L206WTQ/L206WTY) 20.1 inches viewable 0.258*0.258 mm pixel...
... to change without notice. Specifications L206WTG/L206WTQ/L206WTY Display Sync Input Video Input Resolution Plug&Play Power Consumption Dimensions & Weight Tilt Range Power Input Environmental Conditions Stand Base Power cord 20.1 inches (51.11 cm) Flat Panel Active matrix-TFT LCD Glare coating(L206WTG), Anti-Glare coating(L206WTQ/L206WTY) 20.1 inches viewable 0.258*0.258 mm pixel...
Owner's Manual (English)
Page 22
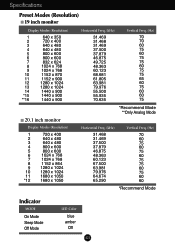
... x 768 9 1024 x 768 10 1152 x 870 11 1152 x 900 12 1280 x 1024 13 1280 x 1024 14 1440 x 900 *15 1440 x 900 **16 1440 x 900 20.1 inch monitor Display Modes (Resolution) 1 720 x 400 2 640 x 480 3 640 x 480 4 800 x 600 5 800 x 600 6 1024 x 768 7 1024 x 768 8 1152 x 864 9 1280 x 1024 10 1280 x 1024 11 1680...
... x 768 9 1024 x 768 10 1152 x 870 11 1152 x 900 12 1280 x 1024 13 1280 x 1024 14 1440 x 900 *15 1440 x 900 **16 1440 x 900 20.1 inch monitor Display Modes (Resolution) 1 720 x 400 2 640 x 480 3 640 x 480 4 800 x 600 5 800 x 600 6 1024 x 768 7 1024 x 768 8 1152 x 864 9 1280 x 1024 10 1280 x 1024 11 1680...


