
User Guide
Page 2
...the wall outlet. During a lightning storm or when the display is to be left unattended for its installation, use, and servicing. If the power cable is OFF. They may result in potential eletrical shock or fire hazards. There are Dangerous High Voltages inside . There are no user ...any way, please contact the manufacturer or the nearest authorized repair service provider for this display. Overloaded AC outlets and extension cords are frayed power cords and broken plugs. To Prevent Fire or Hazards: Always turn the display OFF if you have not been designed for a replacement. ...
...the wall outlet. During a lightning storm or when the display is to be left unattended for its installation, use, and servicing. If the power cable is OFF. They may result in potential eletrical shock or fire hazards. There are Dangerous High Voltages inside . There are no user ...any way, please contact the manufacturer or the nearest authorized repair service provider for this display. Overloaded AC outlets and extension cords are frayed power cords and broken plugs. To Prevent Fire or Hazards: Always turn the display OFF if you have not been designed for a replacement. ...

User Guide
Page 3
...near a bathtub, washbowl, kitchen sink, laundry tub, in a wet basement, or near or over a radiator or heat source. Disposal of your LCD display. Important Precautions On Installation Do not allow the release of mercury. Displays are blocked, built-up heat can cause failures which to obtain the...may result in a fire hazard. If these openings are provided with anything to rest upon or roll over the power cord, and do not place the display where the power cord is provided. However, this product contains a small amount of heat generated during operation. If possible, use the...
...near a bathtub, washbowl, kitchen sink, laundry tub, in a wet basement, or near or over a radiator or heat source. Disposal of your LCD display. Important Precautions On Installation Do not allow the release of mercury. Displays are blocked, built-up heat can cause failures which to obtain the...may result in a fire hazard. If these openings are provided with anything to rest upon or roll over the power cord, and do not place the display where the power cord is provided. However, this product contains a small amount of heat generated during operation. If possible, use the...

User Guide
Page 4
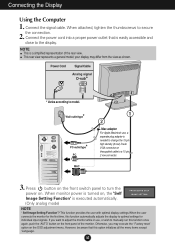
...hands, holding the monitor head. Expand the stand base to expand the stand base over 90 degrees as desired. Adjust the stand base angle with two hands. 2. Connecting the Display Before setting up the monitor, ensure that the power to 90 degrees. Place the monitor with its front ...facing upward on a cushion or soft cloth. Place the monitor with its front facing downward and then further expand the stand base fully ...
...hands, holding the monitor head. Expand the stand base to expand the stand base over 90 degrees as desired. Adjust the stand base angle with two hands. 2. Connecting the Display Before setting up the monitor, ensure that the power to 90 degrees. Place the monitor with its front ...facing upward on a cushion or soft cloth. Place the monitor with its front facing downward and then further expand the stand base fully ...
User Guide
Page 6
... for the first time, this function automatically adjusts the display to turn the power on. This function provides the user with optimal display settings.When the user connects the monitor for individual input signals. However, be aware that is easily accessible and close...Self Image Setting Function' is turned on the OSD adjustment menu. When monitor power is executed automatically. (Only analog mode) NOTE ' Self Image Setting Function'? Connect the signal cable. Connect the power cord into a proper power outlet that this function once again, push the 'AUTO' button on ...
... for the first time, this function automatically adjusts the display to turn the power on. This function provides the user with optimal display settings.When the user connects the monitor for individual input signals. However, be aware that is easily accessible and close...Self Image Setting Function' is turned on the OSD adjustment menu. When monitor power is executed automatically. (Only analog mode) NOTE ' Self Image Setting Function'? Connect the signal cable. Connect the power cord into a proper power outlet that this function once again, push the 'AUTO' button on ...
User Guide
Page 7
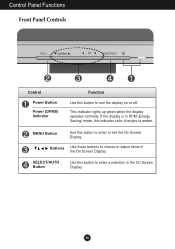
A6 MENU Button Use this button to amber. If the display is in DPM (Energy Saving) mode, this indicator color changes to enter or exit the On Screen Display. SELECT/AUTO Button Use this button to turn the display on or off. Control Panel Functions Front Panel Controls Control Power Button Power (DPMS) Indicator Function Use this button to enter a selection in the On Screen Display. This Indicator lights up green when the display operates normally. Buttons Use these buttons to choose or adjust items in the On Screen Display.
A6 MENU Button Use this button to amber. If the display is in DPM (Energy Saving) mode, this indicator color changes to enter or exit the On Screen Display. SELECT/AUTO Button Use this button to turn the display on or off. Control Panel Functions Front Panel Controls Control Power Button Power (DPMS) Indicator Function Use this button to enter a selection in the On Screen Display. This Indicator lights up green when the display operates normally. Buttons Use these buttons to choose or adjust items in the On Screen Display.

User Guide
Page 10
... PICTURE COLOR BRIGHTNESS CONTRAST GAMMA PRESET 6500K 9300K RED GREEN BLUE POSITION HORIZONTAL VERTICAL TRACKING CLOCK PHASE SETUP LANGUAGE OSD HORIZONTAL POSITION VERTICAL WHITE BALANCE POWER INDICATOR FACTORY RESET Reference To adjust the brightness, contrast and gamma of the screen To customize the color of the screen To adjust the position...
... PICTURE COLOR BRIGHTNESS CONTRAST GAMMA PRESET 6500K 9300K RED GREEN BLUE POSITION HORIZONTAL VERTICAL TRACKING CLOCK PHASE SETUP LANGUAGE OSD HORIZONTAL POSITION VERTICAL WHITE BALANCE POWER INDICATOR FACTORY RESET Reference To adjust the brightness, contrast and gamma of the screen To customize the color of the screen To adjust the position...

User Guide
Page 12
Press the button to remove any time, the power indicator will automatically be enabled only when the input signal is an analog signal. ...are present in order to provide the optimal image. SETUP MENU MENU OSDPOSITION To adjust position of the monitor to fit into the standard output level of the screen OSD Adjust TRACKING CLOCK Description To minimize any vertical ...the signal level is different the required specifications, the color level may deteriorate due to set the power INDICATOR indicator on the front side of the OSD window on the screen. If this function when...
Press the button to remove any time, the power indicator will automatically be enabled only when the input signal is an analog signal. ...are present in order to provide the optimal image. SETUP MENU MENU OSDPOSITION To adjust position of the monitor to fit into the standard output level of the screen OSD Adjust TRACKING CLOCK Description To minimize any vertical ...the signal level is different the required specifications, the color level may deteriorate due to set the power INDICATOR indicator on the front side of the OSD window on the screen. If this function when...

User Guide
Page 13
... any key on . Check the signal cable and try moving the mouse or pressing any time by pushing the MENU button for service. Is the power indicator amber? If the display is connected properly to bring up the screen. Do you see a "OSD LOCKED" message on the screen? See the '... and see an " OUT OF RANGE" message on the screen? Do you push MENU button? No image appears Is the power cord of the display connected? Is the power on the screen? power indicator green? Do you see "OSD LOCKED" when you see a "CHECK SIGNAL CABLE" message on and the Adjust the ...
... any key on . Check the signal cable and try moving the mouse or pressing any time by pushing the MENU button for service. Is the power indicator amber? If the display is connected properly to bring up the screen. Do you see a "OSD LOCKED" message on the screen? See the '... and see an " OUT OF RANGE" message on the screen? Do you push MENU button? No image appears Is the power cord of the display connected? Is the power on the screen? power indicator green? Do you see "OSD LOCKED" when you see a "CHECK SIGNAL CABLE" message on and the Adjust the ...

User Guide
Page 14
... SELECT/AUTO button to automatically adjust your display image to be higher than AC100-240V 50/60Hz. The screen color is incorrect. Make sure the power voltage is set to interlace mode and if yes, change it to the ideal setting. A13 Press the SELECT/AUTO button to automatically adjust your...
... SELECT/AUTO button to automatically adjust your display image to be higher than AC100-240V 50/60Hz. The screen color is incorrect. Make sure the power voltage is set to interlace mode and if yes, change it to the ideal setting. A13 Press the SELECT/AUTO button to automatically adjust your...

User Guide
Page 16
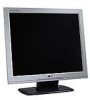
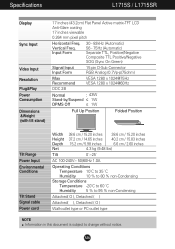
A15 Specifications L1515S / L1515SR Display Sync Input Video Input Resolution Plug&Play Power Consumption Dimensions &Weight (with tilt stand) 15 inches (38.1cm) Flat Panel Active matrix-TFT LCD Anti-Glare coating 15 inches viewable 0.297 mm pixel pitch Horizontal Freq. 30 - 63kHz (Automatic) Vertical Freq. 56 - 75Hz (... 768@60Hz DDC 2B Normal : 25W Stand-by/Suspend ≤ 1W DPMS Off ≤ 1W Full Up Position Folded Position Tilt Range Power Input Environmental Conditions Tilt Stand Signal cablePower cord Width Height Depth Net Tilt 35.00 cm / 13.78 inches 31.80 cm / 12.52...
A15 Specifications L1515S / L1515SR Display Sync Input Video Input Resolution Plug&Play Power Consumption Dimensions &Weight (with tilt stand) 15 inches (38.1cm) Flat Panel Active matrix-TFT LCD Anti-Glare coating 15 inches viewable 0.297 mm pixel pitch Horizontal Freq. 30 - 63kHz (Automatic) Vertical Freq. 56 - 75Hz (... 768@60Hz DDC 2B Normal : 25W Stand-by/Suspend ≤ 1W DPMS Off ≤ 1W Full Up Position Folded Position Tilt Range Power Input Environmental Conditions Tilt Stand Signal cablePower cord Width Height Depth Net Tilt 35.00 cm / 13.78 inches 31.80 cm / 12.52...
User Guide
Page 17
...60Hz Normal : 43W Stand-by/Suspend ≤ 1W DPMS Off ≤ 1W Full Up Position Folded Position Tilt Range Power Input Environmental Conditions Tilt Stand Signal cable Power cord Width Height Depth Net 38.6 cm / 15.20 inches 38.6 cm / 15.20 inches 37.2 cm / ... to change without notice. Vertical Freq. A16 Specifications L1715S / L1715SR Display Sync Input Video Input Resolution Plug&Play Power Consumption Dimensions &Weight (with tilt stand) 17 inches (43.2cm) Flat Panel Active matrix-TFT LCD Anti-Glare coating 17 inches viewable 0.264 mm pixel pitch Horizontal Freq.
...60Hz Normal : 43W Stand-by/Suspend ≤ 1W DPMS Off ≤ 1W Full Up Position Folded Position Tilt Range Power Input Environmental Conditions Tilt Stand Signal cable Power cord Width Height Depth Net 38.6 cm / 15.20 inches 38.6 cm / 15.20 inches 37.2 cm / ... to change without notice. Vertical Freq. A16 Specifications L1715S / L1715SR Display Sync Input Video Input Resolution Plug&Play Power Consumption Dimensions &Weight (with tilt stand) 17 inches (43.2cm) Flat Panel Active matrix-TFT LCD Anti-Glare coating 17 inches viewable 0.264 mm pixel pitch Horizontal Freq.


