
User Guide
Page 2
... eletrical shock or fire hazards. Call your dealer if the display is OFF. There are no user serviceable components inside , even when the power is not operating properly. To Avoid Personal Injury : Do not place the display on the display. Use only a stand recommended by the supplier... This unit has been engineered and manufactured to ensure your home, consult with the unit. Overloaded AC outlets and extension cords are frayed power cords and broken plugs. Never leave the display ON when leaving the house. Keep children from dropping or pushing objects into the display's...
... eletrical shock or fire hazards. Call your dealer if the display is OFF. There are no user serviceable components inside , even when the power is not operating properly. To Avoid Personal Injury : Do not place the display on the display. Use only a stand recommended by the supplier... This unit has been engineered and manufactured to ensure your home, consult with the unit. Overloaded AC outlets and extension cords are frayed power cords and broken plugs. Never leave the display ON when leaving the house. Keep children from dropping or pushing objects into the display's...

User Guide
Page 3
...the recommended resolution, some afterimages. Do not dispose of the fixed-resolution LCD panel. Do not press the LCD screen with anything to rest upon or roll over the power cord, and do not place the display where the power cord is provided. On Cleaning Unplug the display before cleaning the face of... heat generated during operation. Disposal of mercury. Do not rub or strike the Active Matrix LCD with your finger for your ...
...the recommended resolution, some afterimages. Do not dispose of the fixed-resolution LCD panel. Do not press the LCD screen with anything to rest upon or roll over the power cord, and do not place the display where the power cord is provided. On Cleaning Unplug the display before cleaning the face of... heat generated during operation. Disposal of mercury. Do not rub or strike the Active Matrix LCD with your finger for your ...

User Guide
Page 4
Expand the stand base to its front facing downward and then further expand the stand base fully to 90 degrees. Place the monitor with two hands. 2. Place the monitor upright and adjust the angle of the stand base as it apart with its first step degree (65˚), pulling it ... upward on a cushion or soft cloth. A3 Do not apply excessive force to the monitor, the computer system, and other attached devices is turned off. Connecting the Display Before setting up the monitor, ensure that the power to expand the stand base over 90 degrees as desired. Unfolding the stand base 1....
Expand the stand base to its front facing downward and then further expand the stand base fully to 90 degrees. Place the monitor with two hands. 2. Place the monitor upright and adjust the angle of the stand base as it apart with its first step degree (65˚), pulling it ... upward on a cushion or soft cloth. A3 Do not apply excessive force to the monitor, the computer system, and other attached devices is turned off. Connecting the Display Before setting up the monitor, ensure that the power to expand the stand base over 90 degrees as desired. Unfolding the stand base 1....
User Guide
Page 6
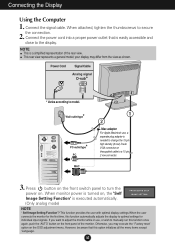
...once again, push the 'AUTO' button on the front panel of the rear view. If you may differ from the view as shown. When monitor power is needed to change the 15 pin high density (3 row) D-sub VGA connector on . A5 NOTE This is easily accessible and close to ... to optimal settings for the first time, this option initializes all the menu items except 'Language'. However, be aware that is a simplified representation of the monitor. Power Cord Signal Cable Analog signal D-sub* * Varies according to model. * Wall-outlet type * PC-outlet type PC MAC 1 2 Mac adapter For Apple ...
...once again, push the 'AUTO' button on the front panel of the rear view. If you may differ from the view as shown. When monitor power is needed to change the 15 pin high density (3 row) D-sub VGA connector on . A5 NOTE This is easily accessible and close to ... to optimal settings for the first time, this option initializes all the menu items except 'Language'. However, be aware that is a simplified representation of the monitor. Power Cord Signal Cable Analog signal D-sub* * Varies according to model. * Wall-outlet type * PC-outlet type PC MAC 1 2 Mac adapter For Apple ...
User Guide
Page 7
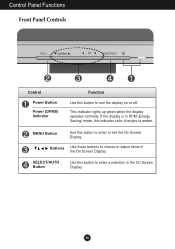
Control Panel Functions Front Panel Controls Control Power Button Power (DPMS) Indicator Function Use this indicator color changes to amber. If the display is in DPM (Energy Saving) mode, this button to choose or adjust items in the On Screen Display. A6 This Indicator lights up green when the display operates normally. Buttons Use these buttons to turn the display on or off. MENU Button Use this button to enter or exit the On Screen Display. SELECT/AUTO Button Use this button to enter a selection in the On Screen Display.
Control Panel Functions Front Panel Controls Control Power Button Power (DPMS) Indicator Function Use this indicator color changes to amber. If the display is in DPM (Energy Saving) mode, this button to choose or adjust items in the On Screen Display. A6 This Indicator lights up green when the display operates normally. Buttons Use these buttons to turn the display on or off. MENU Button Use this button to enter or exit the On Screen Display. SELECT/AUTO Button Use this button to enter a selection in the On Screen Display.

User Guide
Page 10
... PICTURE COLOR BRIGHTNESS CONTRAST GAMMA PRESET 6500K 9300K RED GREEN BLUE POSITION HORIZONTAL VERTICAL TRACKING CLOCK PHASE SETUP LANGUAGE OSD HORIZONTAL POSITION VERTICAL WHITE BALANCE POWER INDICATOR FACTORY RESET Reference To adjust the brightness, contrast and gamma of the screen To customize the color of the screen To adjust the position...
... PICTURE COLOR BRIGHTNESS CONTRAST GAMMA PRESET 6500K 9300K RED GREEN BLUE POSITION HORIZONTAL VERTICAL TRACKING CLOCK PHASE SETUP LANGUAGE OSD HORIZONTAL POSITION VERTICAL WHITE BALANCE POWER INDICATOR FACTORY RESET Reference To adjust the brightness, contrast and gamma of the screen To customize the color of the screen To adjust the position...

User Guide
Page 12
...image, restore the factory default settings. A11 SETUP MENU MENU OSDPOSITION To adjust position of the OSD window on . If you set the power INDICATOR indicator on the screen background.The horizontal screen size will automatically be enabled only when the input signal is different the required specifications, ...and stability of the screen OSD Adjust TRACKING CLOCK Description To minimize any vertical bars or stripes visible on the front side of the monitor to ON or OFF. Using this function to fit into the standard output level of the video card in which the control names are...
...image, restore the factory default settings. A11 SETUP MENU MENU OSDPOSITION To adjust position of the OSD window on . If you set the power INDICATOR indicator on the screen background.The horizontal screen size will automatically be enabled only when the input signal is different the required specifications, ...and stability of the screen OSD Adjust TRACKING CLOCK Description To minimize any vertical bars or stripes visible on the front side of the monitor to ON or OFF. Using this function to fit into the standard output level of the video card in which the control names are...

User Guide
Page 13
...the current control settings, so that they cannot be inadvertently changed. Check and see "OSD LOCKED" when you see an " OUT OF RANGE" message on . power indicator green? Do you see a "OSD LOCKED" message on the PC. Troubleshooting Check the following before calling for 5 seconds: the message "OSD UNLOCKED" will... the signal cable and try moving the mouse or pressing any time by pushing the MENU button for service. Do you see if the power cord is out of horizontal or vertical frequency range of the display connected? You can unlock the OSD controls at any key on the ...
...the current control settings, so that they cannot be inadvertently changed. Check and see "OSD LOCKED" when you see an " OUT OF RANGE" message on . power indicator green? Do you see a "OSD LOCKED" message on the PC. Troubleshooting Check the following before calling for 5 seconds: the message "OSD UNLOCKED" will... the signal cable and try moving the mouse or pressing any time by pushing the MENU button for service. Do you see if the power cord is out of horizontal or vertical frequency range of the display connected? You can unlock the OSD controls at any key on the ...

User Guide
Page 14
... bits (true color). Press the SELECT/AUTO button to automatically adjust your display image to be higher than AC100-240V 50/60Hz. Make sure the power voltage is properly connected and use a screwdriver to the recommend resolution. Troubleshooting Display image is incorrect Display Position is mono or abnormal. If the results...
... bits (true color). Press the SELECT/AUTO button to automatically adjust your display image to be higher than AC100-240V 50/60Hz. Make sure the power voltage is properly connected and use a screwdriver to the recommend resolution. Troubleshooting Display image is incorrect Display Position is mono or abnormal. If the results...

User Guide
Page 16
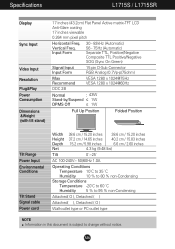
Specifications L1515S / L1515SR Display Sync Input Video Input Resolution Plug&Play Power Consumption Dimensions &Weight (with tilt stand) 15 inches (38.1cm) Flat Panel Active matrix-TFT LCD Anti-Glare coating 15 inches viewable 0.297 mm pixel pitch Horizontal Freq. 30 - 63kHz (Automatic) Vertical Freq. 56 - 75Hz (Automatic...768@60Hz DDC 2B Normal : 25W Stand-by/Suspend ≤ 1W DPMS Off ≤ 1W Full Up Position Folded Position Tilt Range Power Input Environmental Conditions Tilt Stand Signal cablePower cord Width Height Depth Net Tilt 35.00 cm / 13.78 inches 31.80 cm / 12...
Specifications L1515S / L1515SR Display Sync Input Video Input Resolution Plug&Play Power Consumption Dimensions &Weight (with tilt stand) 15 inches (38.1cm) Flat Panel Active matrix-TFT LCD Anti-Glare coating 15 inches viewable 0.297 mm pixel pitch Horizontal Freq. 30 - 63kHz (Automatic) Vertical Freq. 56 - 75Hz (Automatic...768@60Hz DDC 2B Normal : 25W Stand-by/Suspend ≤ 1W DPMS Off ≤ 1W Full Up Position Folded Position Tilt Range Power Input Environmental Conditions Tilt Stand Signal cablePower cord Width Height Depth Net Tilt 35.00 cm / 13.78 inches 31.80 cm / 12...
User Guide
Page 17
A16 Specifications L1715S / L1715SR Display Sync Input Video Input Resolution Plug&Play Power Consumption Dimensions &Weight (with tilt stand) 17 inches (43.2cm) Flat Panel Active matrix-TFT LCD Anti-Glare coating 17 inches viewable 0.264 mm pixel pitch Horizontal Freq. Vertical Freq. Input Form 30 - 83kHz (Automatic) 56 -... Normal : 43W Stand-by/Suspend ≤ 1W DPMS Off ≤ 1W Full Up Position Folded Position Tilt Range Power Input Environmental Conditions Tilt Stand Signal cable Power cord Width Height Depth Net 38.6 cm / 15.20 inches 38.6 cm / 15.20 inches 37.2 cm /...
A16 Specifications L1715S / L1715SR Display Sync Input Video Input Resolution Plug&Play Power Consumption Dimensions &Weight (with tilt stand) 17 inches (43.2cm) Flat Panel Active matrix-TFT LCD Anti-Glare coating 17 inches viewable 0.264 mm pixel pitch Horizontal Freq. Vertical Freq. Input Form 30 - 83kHz (Automatic) 56 -... Normal : 43W Stand-by/Suspend ≤ 1W DPMS Off ≤ 1W Full Up Position Folded Position Tilt Range Power Input Environmental Conditions Tilt Stand Signal cable Power cord Width Height Depth Net 38.6 cm / 15.20 inches 38.6 cm / 15.20 inches 37.2 cm /...


