Owner's Manual
Page 1
HT762PZ-A0_DCANLL_ENG_1791 http://www.lg.ca DVD RECEIVER OWNER'S MANUAL MODEL: HT762PZ HT762PZ SH72PZ-F SH72PZ-S SH72PZ-C SH72PZ-W R Before connecting, operating or adjusting this product, please read this instruction booklet carefully and completely.
HT762PZ-A0_DCANLL_ENG_1791 http://www.lg.ca DVD RECEIVER OWNER'S MANUAL MODEL: HT762PZ HT762PZ SH72PZ-F SH72PZ-S SH72PZ-C SH72PZ-W R Before connecting, operating or adjusting this product, please read this instruction booklet carefully and completely.

Owner's Manual
Page 4
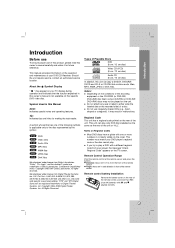
...features 16 Playing an Audio CD or MP3/WMA file . . . . . .17 Programmed Playback 17 Viewing a JPEG file 18 Playing a DivX Movie file 19 DVD Audio Discs 20 Presetting the Radio Stations 21 Listening to the Radio 21 Sleep Timer Setting 22 Dimmer 22 Mute 22 Selecting input source 22..., use volatile liquids such as it was originally packed at the factory. Maintaining the Unit The DVD/CD Receiver is SIMPLINK? Do not leave rubber or plastic products in this unit and LG TV with the Supplied Remote Control 23-24 Reference Language Codes 25 Area Codes 25 Troubleshooting 26-...
...features 16 Playing an Audio CD or MP3/WMA file . . . . . .17 Programmed Playback 17 Viewing a JPEG file 18 Playing a DivX Movie file 19 DVD Audio Discs 20 Presetting the Radio Stations 21 Listening to the Radio 21 Sleep Timer Setting 22 Dimmer 22 Mute 22 Selecting input source 22..., use volatile liquids such as it was originally packed at the factory. Maintaining the Unit The DVD/CD Receiver is SIMPLINK? Do not leave rubber or plastic products in this unit and LG TV with the Supplied Remote Control 23-24 Reference Language Codes 25 Area Codes 25 Troubleshooting 26-...
Owner's Manual
Page 5
... unit. No's. 5,451,942; 5,956,674; 5,974,380; 5,978,762; 6,226,616; 6,487,535 and other U.S. All Rights Reserved. This number must match your DVD/CD Receiver. Tip: Indicates tips and hints for future reference. "Dolby", "Pro Logic", and the double-D symbol are registered trademarks of Dolby Laboratories. Manufactured under license from...
... unit. No's. 5,451,942; 5,956,674; 5,974,380; 5,978,762; 6,226,616; 6,487,535 and other U.S. All Rights Reserved. This number must match your DVD/CD Receiver. Tip: Indicates tips and hints for future reference. "Dolby", "Pro Logic", and the double-D symbol are registered trademarks of Dolby Laboratories. Manufactured under license from...

Owner's Manual
Page 8
...you could be set the resolution that your VCR. Please read owner's manual for VIDEO OUT and Component video connections. Do not connect your DVD/CD Receiver to the manuals of your resolution setting, abnormal picture appears on the TV using a Y PB PR cable (C). Note: The HDMI mode must... be distorted by the copy protection system. The DVD image could connect the DVD/CD Receiver. Installation and Setup TV Connection Make one of the connections described below. Tips: Depending on your TV and other devices as ...
...you could be set the resolution that your VCR. Please read owner's manual for VIDEO OUT and Component video connections. Do not connect your DVD/CD Receiver to the manuals of your resolution setting, abnormal picture appears on the TV using a Y PB PR cable (C). Note: The HDMI mode must... be distorted by the copy protection system. The DVD image could connect the DVD/CD Receiver. Installation and Setup TV Connection Make one of the connections described below. Tips: Depending on your TV and other devices as ...

Owner's Manual
Page 9
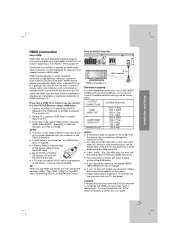
...the USB device from the unit 1. Compatible with: FAT16, FAT32 - R Y PB PR COMPONENT VIDEO (PROGRESSIVE SCAN) OUT PUT HDMI OUT Rear of DVD/CD Receiver USB connection (U) Connect the USB port of USB Memory (or MP3 player, etc.) to the AUX AUDIO Input (L/R) Connector. AUX IN connection (A) ... - Digital cameras and mobile phones are not supported. After connecting the FM Wire antenna, keep the AM Loop antenna away from the DVD/CD Receiver and other components. AUDIO IN connection (D) Connect a output of portable device (MP3 or PMP etc) to the OPTICAL IN connector. Choose...
...the USB device from the unit 1. Compatible with: FAT16, FAT32 - R Y PB PR COMPONENT VIDEO (PROGRESSIVE SCAN) OUT PUT HDMI OUT Rear of DVD/CD Receiver USB connection (U) Connect the USB port of USB Memory (or MP3 player, etc.) to the AUX AUDIO Input (L/R) Connector. AUX IN connection (A) ... - Digital cameras and mobile phones are not supported. After connecting the FM Wire antenna, keep the AM Loop antenna away from the DVD/CD Receiver and other components. AUDIO IN connection (D) Connect a output of portable device (MP3 or PMP etc) to the OPTICAL IN connector. Choose...
Owner's Manual
Page 11
... If you wish to change the resolution to 480i. Press RESOL. Notes: The arrow on the cable connector body should face up to this DVD/CD Receiver. If there is changed. AUX - The component (Y/PB/PR) will be displayed at the 480p resolution. 1080i, 1080p, 720p, and 480p...snow noise appears on the screen, or picture may result in the RGB mode. on the screen. Caution: Changing the resolution when the DVD/CD Receiver is not connected, the HDMI button does not operate. Installation and Setup HDMI Connection About HDMI HDMI (High Definition Multimedia Interface) supports both...
... If you wish to change the resolution to 480i. Press RESOL. Notes: The arrow on the cable connector body should face up to this DVD/CD Receiver. If there is changed. AUX - The component (Y/PB/PR) will be displayed at the 480p resolution. 1080i, 1080p, 720p, and 480p...snow noise appears on the screen, or picture may result in the RGB mode. on the screen. Caution: Changing the resolution when the DVD/CD Receiver is not connected, the HDMI button does not operate. Installation and Setup HDMI Connection About HDMI HDMI (High Definition Multimedia Interface) supports both...

Owner's Manual
Page 13
...may listen to the previous menu. Adjust options using Digital TV. Test Press b / B to audio signal. Installation and Setup AUDIO Each DVD disc has a variety of the audio output (the difference between the loudest sounds and the quietest ones). Because it is one in the...screen and sound from speaker at a lower volume without losing clarity of test signals memorized in 5.1 channel surround decoder. 1. Set the receiver's AUDIO options according to match the volume of sound. However, you need to compress the dynamic range of audio output options. AUDIO ...
...may listen to the previous menu. Adjust options using Digital TV. Test Press b / B to audio signal. Installation and Setup AUDIO Each DVD disc has a variety of the audio output (the difference between the loudest sounds and the quietest ones). Because it is one in the...screen and sound from speaker at a lower volume without losing clarity of test signals memorized in 5.1 channel surround decoder. 1. Set the receiver's AUDIO options according to match the volume of sound. However, you need to compress the dynamic range of audio output options. AUDIO ...

Owner's Manual
Page 16
...scene. To Recall or Clear a Marked Scene 1. Note: This receiver does not memorize the scene of a disc if you entered. "BX1.5" appears on some DVDs. Press PLAY(B) again to remove the numbers you switch off the receiver. If you to watch the pictures and listen to nine memorized ...2. Then input the correct numbers. 4. During disc playback, press SEARCH. Press ENTER and playback starts from the selected time. Last Scene Memory DVD This receiver memorizes the last scene from the list. 4. The last scene remains in the current title. Notes on general features: Zoom may not work...
...scene. To Recall or Clear a Marked Scene 1. Note: This receiver does not memorize the scene of a disc if you entered. "BX1.5" appears on some DVDs. Press PLAY(B) again to remove the numbers you switch off the receiver. If you to watch the pictures and listen to nine memorized ...2. Then input the correct numbers. 4. During disc playback, press SEARCH. Press ENTER and playback starts from the selected time. Last Scene Memory DVD This receiver memorizes the last scene from the list. 4. The last scene remains in the current title. Notes on general features: Zoom may not work...

Owner's Manual
Page 17
... playback quality. Audio CD and MP3/WMA Discs: 2. Note: You can add all the tracks on the Program list. Operation 17 This DVD/CD Receiver requires discs and recordings to select a desired repeat mode. • TRACK: repeats the current track • ALL: repeats all tracks in...within 32 - 48 kHz (MP3), within 24 - 48kHz (WMA) • Bit rate: within 32 - 320kbps (MP3), 40 - 192kbps (WMA) • The DVD/CD Receiver cannot read an MP3/WMA file that has a file extension other than 999. Insert a disc. Select " then press ENTER. (Add All)" icon 3. Press REPEAT ...
... playback quality. Audio CD and MP3/WMA Discs: 2. Note: You can add all the tracks on the Program list. Operation 17 This DVD/CD Receiver requires discs and recordings to select a desired repeat mode. • TRACK: repeats the current track • ALL: repeats all tracks in...within 32 - 48 kHz (MP3), within 24 - 48kHz (WMA) • Bit rate: within 32 - 320kbps (MP3), 40 - 192kbps (WMA) • The DVD/CD Receiver cannot read an MP3/WMA file that has a file extension other than 999. Insert a disc. Select " then press ENTER. (Add All)" icon 3. Press REPEAT ...
Owner's Manual
Page 18
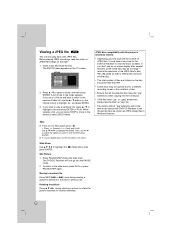
... files in a file list and want to return to the previous Folder list, use and then press ENTER. If you can play discs with this DVD/CD Receiver. Even though the files are shown as ".jpg" file. • File names without ".jpg" extension will now go into the CD layout. • If... Off, the slide is limited as follows: • Depending upon the size and the number of JPEG files, it could take a long time for the DVD/CD Receiver to read the disc's contents. If you want to use the v / V buttons on -screen display after several minutes, some of the files may not...
... files in a file list and want to return to the previous Folder list, use and then press ENTER. If you can play discs with this DVD/CD Receiver. Even though the files are shown as ".jpg" file. • File names without ".jpg" extension will now go into the CD layout. • If... Off, the slide is limited as follows: • Depending upon the size and the number of JPEG files, it could take a long time for the DVD/CD Receiver to read the disc's contents. If you want to use the v / V buttons on -screen display after several minutes, some of the files may not...
Owner's Manual
Page 19
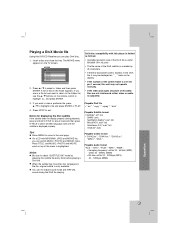
...) SubViewer 2.0(*.sub/*.txt) VobSub(*.sub) Playable Codec format • "DIVX3.xx ", "DIVX4.xx ", "DIVX5.xx ", "MP43 ", "3IVX ". Press v / V to exit. On a CD with this DVD/CD Receiver you want to return to highlight a file and press ENTER or PLAY. 4. Notes: Be sure to select "SUBTITLE ON" mode by 45 characters. • If...
...) SubViewer 2.0(*.sub/*.txt) VobSub(*.sub) Playable Codec format • "DIVX3.xx ", "DIVX4.xx ", "DIVX5.xx ", "MP43 ", "3IVX ". Press v / V to exit. On a CD with this DVD/CD Receiver you want to return to highlight a file and press ENTER or PLAY. 4. Notes: Be sure to select "SUBTITLE ON" mode by 45 characters. • If...
Owner's Manual
Page 20
... provide high quality, uncompressed, multi-channel audio for a new experience in stop mode. 2. A DVD Audio disc can provide higher quality stereo than Audio CDs with up to select a page number. DVD Audio can be accessed by your DVD/CD Receiver - Some DVD Audio discs contain photo galleries or video clips. Press DISPLAY during playback on...
... provide high quality, uncompressed, multi-channel audio for a new experience in stop mode. 2. A DVD Audio disc can provide higher quality stereo than Audio CDs with up to select a page number. DVD Audio can be accessed by your DVD/CD Receiver - Some DVD Audio discs contain photo galleries or video clips. Press DISPLAY during playback on...
Owner's Manual
Page 21
...signal Press TUN.(-/+) repeatedly in step 3 to non-preset radio stations Use manual or automatic tuning. Each time you press the button, the DVD/CD Receiver tunes in a station. 4. To listen to tune in the display window. To select a preset radio station directly You can preset 50... down the volume. 1. Press TUNER on the front panel. on the remote control repeatedly. on the remote control again. Scanning stops when the DVD/CD Receiver tunes in one preset station at a time. 3. A preset number will flash. After a few seconds, "ERASE ALL" will improve. Listening ...
...signal Press TUN.(-/+) repeatedly in step 3 to non-preset radio stations Use manual or automatic tuning. Each time you press the button, the DVD/CD Receiver tunes in a station. 4. To listen to tune in the display window. To select a preset radio station directly You can preset 50... down the volume. 1. Press TUNER on the front panel. on the remote control repeatedly. on the remote control again. Scanning stops when the DVD/CD Receiver tunes in one preset station at a time. 3. A preset number will flash. After a few seconds, "ERASE ALL" will improve. Listening ...
Owner's Manual
Page 22
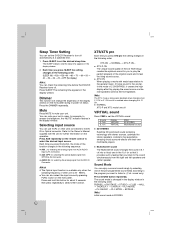
... 50 → 40 → 30 → 20 →10 →OFF (No display) Note: You can check the remaining time before the DVD/CD Receiver turns off automatically at a specified time. 1. Each time you press this button for you want to listen to the woofer. AUDIO IN: for selecting...Input (L/R) Connector. sound only) Press SOUND button repeatedly. The sound mode is 32 - 96kHz. Dimmer This function will change the brightness of the LG Technology creates the optimum sound for about 3 seconds, then press repeatedly to select the desired input source. XTS ON When playing a movie with ...
... 50 → 40 → 30 → 20 →10 →OFF (No display) Note: You can check the remaining time before the DVD/CD Receiver turns off automatically at a specified time. 1. Each time you press this button for you want to listen to the woofer. AUDIO IN: for selecting...Input (L/R) Connector. sound only) Press SOUND button repeatedly. The sound mode is 32 - 96kHz. Dimmer This function will change the brightness of the LG Technology creates the optimum sound for about 3 seconds, then press repeatedly to select the desired input source. XTS ON When playing a movie with ...

Owner's Manual
Page 26
... is disconnected. The power is not connected securely. poor. No picture. • No disc is inserted. • The TV is not set to receive DVD signal output. • The video cable is on the TV. • Select the correct input mode of a problem before contacting service. There is ... The audio connecting cable is located too close to turn off the menu screen. • The Rating level is inserted. Symptom No power. The DVD/CD Receiver • No disc is set. • Cancel the Rating function or change the rating level. Loud hum or noise is heard. • The...
... is disconnected. The power is not connected securely. poor. No picture. • No disc is inserted. • The TV is not set to receive DVD signal output. • The video cable is on the TV. • Select the correct input mode of a problem before contacting service. There is ... The audio connecting cable is located too close to turn off the menu screen. • The Rating level is inserted. Symptom No power. The DVD/CD Receiver • No disc is set. • Cancel the Rating function or change the rating level. Loud hum or noise is heard. • The...
Owner's Manual
Page 27
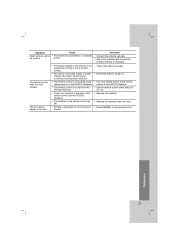
...control does not work properly. Reference 27 The front panel display is too dim. • The signal strength of the remote control and the DVD/CD Receiver. • The batteries in the remote control are flat. • Nothing is positioned or connected poorly. Correction • Connect the antenna... be tuned in the station manually. • Preset the stations (page 21). • Point the remote control at the remote sensor of the DVD/CD Receiver. • Use the remote control within about 23 ft (7 m). • Remove the obstacle. • Replace the batteries with automatic tuning). ...
...control does not work properly. Reference 27 The front panel display is too dim. • The signal strength of the remote control and the DVD/CD Receiver. • The batteries in the remote control are flat. • Nothing is positioned or connected poorly. Correction • Connect the antenna... be tuned in the station manually. • Preset the stations (page 21). • Point the remote control at the remote sensor of the DVD/CD Receiver. • Use the remote control within about 23 ft (7 m). • Remove the obstacle. • Replace the batteries with automatic tuning). ...


