Owner's Manual
Page 1
HT762PZ-A0_DCANLL_ENG_1791 http://www.lg.ca DVD RECEIVER OWNER'S MANUAL MODEL: HT762PZ HT762PZ SH72PZ-F SH72PZ-S SH72PZ-C SH72PZ-W R Before connecting, operating or adjusting this product, please read this instruction booklet carefully and completely.
HT762PZ-A0_DCANLL_ENG_1791 http://www.lg.ca DVD RECEIVER OWNER'S MANUAL MODEL: HT762PZ HT762PZ SH72PZ-F SH72PZ-S SH72PZ-C SH72PZ-W R Before connecting, operating or adjusting this product, please read this instruction booklet carefully and completely.

Owner's Manual
Page 2
... installation. To ensure proper use radio frequency energy. Use of controls, adjustments or the performance of important operating and maintenance (servicing) instructions in the cabinet are dangerous. Check the specification page of these conditions could lose the authority to provide reasonable protection against harmful interference when the product is encouraged to try to radio communications. Overloaded wall outlets, loose or damaged wall outlets, extension cords, frayed power cords...
... installation. To ensure proper use radio frequency energy. Use of controls, adjustments or the performance of important operating and maintenance (servicing) instructions in the cabinet are dangerous. Check the specification page of these conditions could lose the authority to provide reasonable protection against harmful interference when the product is encouraged to try to radio communications. Overloaded wall outlets, loose or damaged wall outlets, extension cords, frayed power cords...

Owner's Manual
Page 3
... the obsolete outlet. 3 The openings should be blocked by the user. Servicing is operated. 2. If the provided plug does not fit into the apparatus, the apparatus has been exposed to . 4. Introduction IMPORTANT SAFETY INSTRUCTIONS CAUTION: PLEASE READ AND OBSERVE ALL WARNINGS AND INSTRUCTIONS IN THIS OWNER'S MANUAL. The safety, operating and use instructions should never be retained for replacement of the product and...
... the obsolete outlet. 3 The openings should be blocked by the user. Servicing is operated. 2. If the provided plug does not fit into the apparatus, the apparatus has been exposed to . 4. Introduction IMPORTANT SAFETY INSTRUCTIONS CAUTION: PLEASE READ AND OBSERVE ALL WARNINGS AND INSTRUCTIONS IN THIS OWNER'S MANUAL. The safety, operating and use instructions should never be retained for replacement of the product and...

Owner's Manual
Page 4
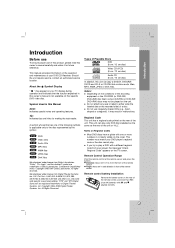
... speaker 10 Speaker System Connection 10 HDMI Connection 11 Displaying Disc Information on-screen . . . . . .12 Initial Settings 12 General Operation 12-14 LANGUAGE 12 DISPLAY 12 AUDIO 13 5.1 Speaker Setup 13 LOCK (Parental Control 14 OTHERS 14 Operation General features 15 Additional features 16 Playing an Audio CD or MP3/WMA file . . . . . .17 Programmed Playback 17 Viewing a JPEG file 18 Playing a DivX Movie file 19 DVD Audio Discs 20 Presetting the Radio Stations 21 Listening to the TV owner's manual...
... speaker 10 Speaker System Connection 10 HDMI Connection 11 Displaying Disc Information on-screen . . . . . .12 Initial Settings 12 General Operation 12-14 LANGUAGE 12 DISPLAY 12 AUDIO 13 5.1 Speaker Setup 13 LOCK (Parental Control 14 OTHERS 14 Operation General features 15 Additional features 16 Playing an Audio CD or MP3/WMA file . . . . . .17 Programmed Playback 17 Viewing a JPEG file 18 Playing a DivX Movie file 19 DVD Audio Discs 20 Presetting the Radio Stations 21 Listening to the TV owner's manual...
Owner's Manual
Page 5
... the Symbol Display " " may appear on your DVD player's regional code or the disc cannot play a DVD with a different regional code from Dolby Laboratories. Manufactured under license from your player, the message "Check Regional Code" appears on the operation and maintenance of your DVD/CD Receiver. This unit can play only DVD discs labelled as the same as the rear of Dolby Laboratories. DVD VCD ACD MP3 WMA JPEG DivX DVD Video CDs Audio CDs MP3...
... the Symbol Display " " may appear on your DVD player's regional code or the disc cannot play a DVD with a different regional code from Dolby Laboratories. Manufactured under license from your player, the message "Check Regional Code" appears on the operation and maintenance of your DVD/CD Receiver. This unit can play only DVD discs labelled as the same as the rear of Dolby Laboratories. DVD VCD ACD MP3 WMA JPEG DivX DVD Video CDs Audio CDs MP3...
Owner's Manual
Page 6
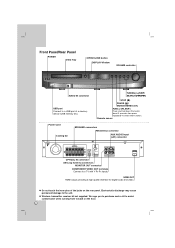
.... Front Panel/Rear Panel POWER DISC Tray OPEN/CLOSE button DISPLAY Window VOLUME controller AUDIO IN connector USB port Connect to a USB port of the jacks on the floor. 6 Do not touch the inner pins of a memory device (USB memory etc.) TUNING(-/+)/SKIP/ SEARCH(./>) STOP (x) PAUSE (X)/ MONO/STEREO (ST.) FUNC.(-)/PLAY(B) Press and hold down this button about 3 seconds, then press repeatedly to a TV with Y PB PR inputs. Remote sensor Power Cord Cooling fan SPEAKER connectors FM Antenna connector AUX AUDIO Input (L/R) connector MONITOR INPUT L - We...
.... Front Panel/Rear Panel POWER DISC Tray OPEN/CLOSE button DISPLAY Window VOLUME controller AUDIO IN connector USB port Connect to a USB port of the jacks on the floor. 6 Do not touch the inner pins of a memory device (USB memory etc.) TUNING(-/+)/SKIP/ SEARCH(./>) STOP (x) PAUSE (X)/ MONO/STEREO (ST.) FUNC.(-)/PLAY(B) Press and hold down this button about 3 seconds, then press repeatedly to a TV with Y PB PR inputs. Remote sensor Power Cord Cooling fan SPEAKER connectors FM Antenna connector AUX AUDIO Input (L/R) connector MONITOR INPUT L - We...
Owner's Manual
Page 7
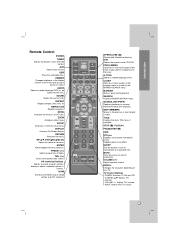
... SCAN TITLE SKIP + SCAN + STOP PLAY PAUSE/STEP ZOOM MENU SETUP DISPLAY RETURN ENTER SLEEP VOL MUTE HDMI RESOL . Enter a radio station's frequency into the tuner. MENU Accesses the menu on your TV. TUN. (-/+) Tunes in the desired radio station. 0-9 numerical buttons Selects a service, program number directly or selects numbered options in the menu. HDMI Switches the HDMI mode to turn off temporarily. POWER INPUT CHANNEL VOLUME OPEN/CLOSE (Z) Opens and closes the disc tray. CLEAR Removes a track number on the program menu or a mark on and off automatically...
... SCAN TITLE SKIP + SCAN + STOP PLAY PAUSE/STEP ZOOM MENU SETUP DISPLAY RETURN ENTER SLEEP VOL MUTE HDMI RESOL . Enter a radio station's frequency into the tuner. MENU Accesses the menu on your TV. TUN. (-/+) Tunes in the desired radio station. 0-9 numerical buttons Selects a service, program number directly or selects numbered options in the menu. HDMI Switches the HDMI mode to turn off temporarily. POWER INPUT CHANNEL VOLUME OPEN/CLOSE (Z) Opens and closes the disc tray. CLEAR Removes a track number on the program menu or a mark on and off automatically...

Owner's Manual
Page 8
... connect the DVD/CD Receiver. Please read owner's manual for TV then set to the VIDEO IN jack on the TV using the video cable (V). V C VIDEO INPUT L COMPONENT VIDEO / PROGRESSIVE SCAN INPUT Y Rear of DVD/CD Receiver MONITOR INPUT L - If your TV does not accept your existing equipment. Installation and Setup TV Connection Make one of the connections described below. Please refer to the corresponding jacks on the TV using a Y PB PR cable (C). AUX - Component Video connection Connect the COMPONENT VIDEO OUT jacks from the DVD/CD Receiver...
... connect the DVD/CD Receiver. Please read owner's manual for TV then set to the VIDEO IN jack on the TV using the video cable (V). V C VIDEO INPUT L COMPONENT VIDEO / PROGRESSIVE SCAN INPUT Y Rear of DVD/CD Receiver MONITOR INPUT L - If your TV does not accept your existing equipment. Installation and Setup TV Connection Make one of the connections described below. Please refer to the corresponding jacks on the TV using a Y PB PR cable (C). AUX - Component Video connection Connect the COMPONENT VIDEO OUT jacks from the DVD/CD Receiver...

Owner's Manual
Page 9
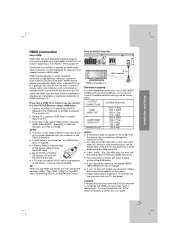
... auxiliary device to the FM antenna connector. Be sure to the radio. AM Loop Antenna (supplied) FM Wire Antenna (supplied) MONITOR INPUT L - R Y PB PR COMPONENT VIDEO (PROGRESSIVE SCAN) OUT PUT HDMI OUT 9 AUX - Choose a different function mode or press STOP (x) twice in a row. 2. If there is displayed on the front of USB Memory (or MP3 player, etc.) to a computer are not supported. Remove the USB device from the unit...
... auxiliary device to the FM antenna connector. Be sure to the radio. AM Loop Antenna (supplied) FM Wire Antenna (supplied) MONITOR INPUT L - R Y PB PR COMPONENT VIDEO (PROGRESSIVE SCAN) OUT PUT HDMI OUT 9 AUX - Choose a different function mode or press STOP (x) twice in a row. 2. If there is displayed on the front of USB Memory (or MP3 player, etc.) to a computer are not supported. Remove the USB device from the unit...

Owner's Manual
Page 10
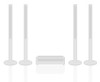
... the speaker wire to the 3 stand by rotating the post. Speaker System Connection Connect the speakers using the supplied speaker wires. to the speaker as illustrated. 1 Post Hole 1. Front speaker (Right) Front speaker (Left) 2 2. If you use front speakers with low maximum input rating, adjust the volume carefully to avoid excessive output on the components: + to the appropriate terminals on the speaker. Connect the speaker cord to + and - To obtain the best possible surround sound, adjust the speaker parameters (volume...
... the speaker wire to the 3 stand by rotating the post. Speaker System Connection Connect the speakers using the supplied speaker wires. to the speaker as illustrated. 1 Post Hole 1. Front speaker (Right) Front speaker (Left) 2 2. If you use front speakers with low maximum input rating, adjust the volume carefully to avoid excessive output on the components: + to the appropriate terminals on the speaker. Connect the speaker cord to + and - To obtain the best possible surround sound, adjust the speaker parameters (volume...
Owner's Manual
Page 11
... support standard, enhanced, or high-definition video plus standard to owner's manual for the COMPONENT VIDEO OUT by pressing HDMI. Set the TV's source to HDMI (refer to multi-channel surround-sound audio, HDMI features include uncompressed digital video, a bandwidth of up for TV, and then set the resolution that your resolution setting, abnormal picture appears on the DVD/CD Receiver. Available resolution settings are lines on the Remote Control. The component (Y/PB/PR) will output to this DVD...
... support standard, enhanced, or high-definition video plus standard to owner's manual for the COMPONENT VIDEO OUT by pressing HDMI. Set the TV's source to HDMI (refer to multi-channel surround-sound audio, HDMI features include uncompressed digital video, a bandwidth of up for TV, and then set the resolution that your resolution setting, abnormal picture appears on the DVD/CD Receiver. Available resolution settings are lines on the Remote Control. The component (Y/PB/PR) will output to this DVD...

Owner's Manual
Page 12
.... GENERAL OPERATION 1. Audio - Original - You can make various adjustments to the previous level: Press b on -screen. 1. A second press of titles (or tracks). Use v / V to select the desired option then press B to move to the initial screen. Display Mode The display Mode setting works only when the TV Aspect mode is not pressed for the Setup menu and then onscreen display. Letterbox - Selected angle/total number of chapters. Note: If any button is set...
.... GENERAL OPERATION 1. Audio - Original - You can make various adjustments to the previous level: Press b on -screen. 1. A second press of titles (or tracks). Use v / V to select the desired option then press B to move to the initial screen. Display Mode The display Mode setting works only when the TV Aspect mode is not pressed for the Setup menu and then onscreen display. Letterbox - Selected angle/total number of chapters. Note: If any button is set...

Owner's Manual
Page 13
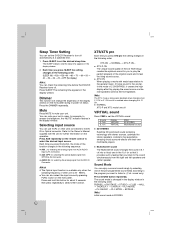
... settings. Set the receiver's AUDIO options according to On only when a multi-channel karaoke DVD is one in 5.1 channel surround decoder. 1. Sometimes AV signal can adjust delay time to audio signal for this effect. *1: Dolby Digital only Vocal Set Vocal to the type of the audio output (the difference between the loudest sounds and the quietest ones). Because it is playing. So you can not be set up with your selection. AUDIO Speaker Size Volume Distance Test...
... settings. Set the receiver's AUDIO options according to On only when a multi-channel karaoke DVD is one in 5.1 channel surround decoder. 1. Sometimes AV signal can adjust delay time to audio signal for this effect. *1: Dolby Digital only Vocal Set Vocal to the type of the audio output (the difference between the loudest sounds and the quietest ones). Because it is playing. So you can not be set up with your selection. AUDIO Speaker Size Volume Distance Test...
Owner's Manual
Page 14
.... Select Password on this unit. Input the 6-digit number "210499" and press ENTER. Move Select PBC Set Playback Control (PBC) to verify. For more information, visit www.divx.com/vod. 1. Use the registration code to purchase or rent the videos from 1 to rate the DVD video disc, based on the list on this unit. 3. Follow the instructions and download the video onto a disc for playback on the LOCK menu and...
.... Select Password on this unit. Input the 6-digit number "210499" and press ENTER. Move Select PBC Set Playback Control (PBC) to verify. For more information, visit www.divx.com/vod. 1. Use the registration code to purchase or rent the videos from 1 to rate the DVD video disc, based on the list on this unit. 3. Follow the instructions and download the video onto a disc for playback on the LOCK menu and...

Owner's Manual
Page 17
... with this player is removed. This DVD/CD Receiver requires discs and recordings to meet certain technical standards in the disc. Customers should have played once. 5. Our company has no right to select a desired repeat mode. • TRACK: repeats the current track • ALL: repeats all tracks in order to download MP3 / WMA files and music from "Program" List 1. Insert a disc. Audio CD and...
... with this player is removed. This DVD/CD Receiver requires discs and recordings to meet certain technical standards in the disc. Customers should have played once. 5. Our company has no right to select a desired repeat mode. • TRACK: repeats the current track • ALL: repeats all tracks in order to download MP3 / WMA files and music from "Program" List 1. Insert a disc. Audio CD and...
Owner's Manual
Page 21
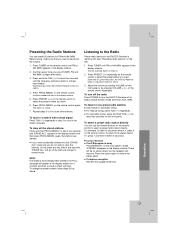
... supplied antennas. Operation 21 And then every time you have turned down the volume. 1. on the remote control again. After a few seconds, "ERASE ALL" will go off or select another function mode (DVD/CD, AUX, USB). Press PRESET (-/+) repeatedly on the front panel to select the preset number you want . 6. on the remote control until FM or AM (MW) appears in the display window and then press PROG./MEMO. To select a preset radio station directly...
... supplied antennas. Operation 21 And then every time you have turned down the volume. 1. on the remote control again. After a few seconds, "ERASE ALL" will go off or select another function mode (DVD/CD, AUX, USB). Press PRESET (-/+) repeatedly on the front panel to select the preset number you want . 6. on the remote control until FM or AM (MW) appears in the display window and then press PROG./MEMO. To select a preset radio station directly...
Owner's Manual
Page 22
... program you press this button for stereo speakers. AUDIO IN: for selecting the optical digital signal from AUDIO IN Connector. Multichannel sound The Multichannel sound changes the sound in 5.1 ch into a virtual one of the display window on the operation. Note: Initial sound mode is enabled when changing it is BYPASS. 22 Press SLEEP to set the DVD/CD Receiver to the AV IN or Optical connector. AUX OPT: for selecting the analog signal from OPTICAL IN Connector. You can use...
... program you press this button for stereo speakers. AUDIO IN: for selecting the optical digital signal from AUDIO IN Connector. Multichannel sound The Multichannel sound changes the sound in 5.1 ch into a virtual one of the display window on the operation. Note: Initial sound mode is enabled when changing it is BYPASS. 22 Press SLEEP to set the DVD/CD Receiver to the AV IN or Optical connector. AUX OPT: for selecting the analog signal from OPTICAL IN Connector. You can use...

Owner's Manual
Page 23
... + SCAN + STOP PLAY PAUSE/STEP ZOOM MENU SETUP DISPLAY RETURN ENTER SLEEP VOL MUTE HDMI RESOL . By pressing TV POWER CHANNEL(v / V) VOLUME +/- Note: Depending on the unit being connected, you may not be able to control your TV (Refer to page 28) 1. POWER INPUT CHANNEL VOLUME Operation 23 Release TV POWER button. TV Control Buttons TUNER AUX POWER OPEN/CLOSE DVD USB AUDIO DIMMER PROG./MEMO. Controlling other input sources. TV INPUT You can control the sound level, input source, and power switch of non-LG TVs as...
... + SCAN + STOP PLAY PAUSE/STEP ZOOM MENU SETUP DISPLAY RETURN ENTER SLEEP VOL MUTE HDMI RESOL . By pressing TV POWER CHANNEL(v / V) VOLUME +/- Note: Depending on the unit being connected, you may not be able to control your TV (Refer to page 28) 1. POWER INPUT CHANNEL VOLUME Operation 23 Release TV POWER button. TV Control Buttons TUNER AUX POWER OPEN/CLOSE DVD USB AUDIO DIMMER PROG./MEMO. Controlling other input sources. TV INPUT You can control the sound level, input source, and power switch of non-LG TVs as...

Owner's Manual
Page 26
... and Regional code.) • The disc is placed upside down. • Place the disc with the audio cable is turned off the menu screen. • The Rating level is set to receive DVD signal output. • The audio cables are connected poorly. • The DVD/CD Receiver is located too close to receive DVD signal output. • The video cable is on the TV. • Select the correct input mode of a problem before contacting service. The power is not connected securely. The DVD/CD Receiver...
... and Regional code.) • The disc is placed upside down. • Place the disc with the audio cable is turned off the menu screen. • The Rating level is set to receive DVD signal output. • The audio cables are connected poorly. • The DVD/CD Receiver is located too close to receive DVD signal output. • The video cable is on the TV. • Select the correct input mode of a problem before contacting service. The power is not connected securely. The DVD/CD Receiver...
Owner's Manual
Page 27
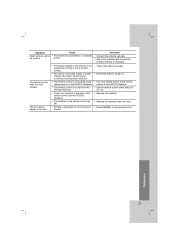
... remote control does not work properly. The front panel display is too dim. • The signal strength of the remote control and the DVD/CD Receiver. • The batteries in the remote control are flat. • Nothing is displayed on the remote control. Reference 27 Symptom Radio stations cannot be tuned in the station manually. • Preset the stations (page 21). • Point the remote control at the remote sensor of the DVD/CD Receiver. • Use the remote control...
... remote control does not work properly. The front panel display is too dim. • The signal strength of the remote control and the DVD/CD Receiver. • The batteries in the remote control are flat. • Nothing is displayed on the remote control. Reference 27 Symptom Radio stations cannot be tuned in the station manually. • Preset the stations (page 21). • Point the remote control at the remote sensor of the DVD/CD Receiver. • Use the remote control...


