
Owner's Manual
Page 5
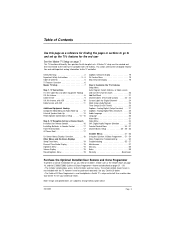
... Menu 19 Volume Display 19 Closed Captions Menu 19 Captions Unknown display 19 Ch Preview Menu 19 Ghost Channel Display 19 Step 3. The remote control shown herein is used to and set up the TV's features for finding the pages or sections to go to duplicate a Zenith.../Monaural Audio Hook Up . . . 12 External Speaker Hook Up 13 Pillow Speaker Connection & Setup . . . . . 14 - 15 Step 2. See your Zenith/LG Dealer. Table of Contents 5 TV Features Overview 6 Master TV Setup 7 Step 1. A Master TV setup must be purchased separately. Customize the TV's Features Setup Menu Auto...
... Menu 19 Volume Display 19 Closed Captions Menu 19 Captions Unknown display 19 Ch Preview Menu 19 Ghost Channel Display 19 Step 3. The remote control shown herein is used to and set up the TV's features for finding the pages or sections to go to duplicate a Zenith.../Monaural Audio Hook Up . . . 12 External Speaker Hook Up 13 Pillow Speaker Connection & Setup . . . . . 14 - 15 Step 2. See your Zenith/LG Dealer. Table of Contents 5 TV Features Overview 6 Master TV Setup 7 Step 1. A Master TV setup must be purchased separately. Customize the TV's Features Setup Menu Auto...

Owner's Manual
Page 6
... on the installer menu pages. If there is equipped with Monaural Audio • External Speaker Output • Pillow Speaker Control • Front Panel Controls / Optional Remote Control Available Features Analog Menus • Alarm Menu • Captions/Text • Language • Parental Control • Sleep Timer • On/Off Timers • Video...
... on the installer menu pages. If there is equipped with Monaural Audio • External Speaker Output • Pillow Speaker Control • Front Panel Controls / Optional Remote Control Available Features Analog Menus • Alarm Menu • Captions/Text • Language • Parental Control • Sleep Timer • On/Off Timers • Video...
Owner's Manual
Page 7
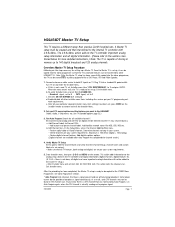
...TV. This action adds information to 140 digital broadcast and 125 analog channels. Exit Installer menu. If you want in the H20J54DT (Video, Audio, V-Chip menus etc. Turn TV on the remote. When the menu returns to 0, the TV is not a new TV, set up to the analog setup stored in the...CBS, NBC etc. Plug TV into the TV's four channel banks.) a. when the DTV channel is ready to be entered into a standard AC power outlet. H20J54DT Master TV Setup This TV requires a different setup than previous Zenith hospital sets. If this point, edit the Channel Banks and verify that have been...
...TV. This action adds information to 140 digital broadcast and 125 analog channels. Exit Installer menu. If you want in the H20J54DT (Video, Audio, V-Chip menus etc. Turn TV on the remote. When the menu returns to 0, the TV is not a new TV, set up to the analog setup stored in the...CBS, NBC etc. Plug TV into the TV's four channel banks.) a. when the DTV channel is ready to be entered into a standard AC power outlet. H20J54DT Master TV Setup This TV requires a different setup than previous Zenith hospital sets. If this point, edit the Channel Banks and verify that have been...
Owner's Manual
Page 14
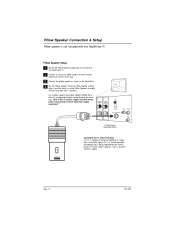
... HealthView TV Pillow Speaker Setup 1 Locate the Pillow Speaker output jack on the back of the HealthView TV. 2 Connect an accessory pillow speaker or wired remote control unit to this 6-pin jack. 3 Connect the pillow speaker as Curbell's "GEN-II" models. M.P.I .
... HealthView TV Pillow Speaker Setup 1 Locate the Pillow Speaker output jack on the back of the HealthView TV. 2 Connect an accessory pillow speaker or wired remote control unit to this 6-pin jack. 3 Connect the pillow speaker as Curbell's "GEN-II" models. M.P.I .

Owner's Manual
Page 15
... DOWN Pin No. Impedance to the TV Pillow Speaker Control Pillow Speaker Interface This connector furnishes three control lines and an audio output. A patient-pendant remote control, or entertainment audio and nurse call system may be connected here. There are isolated from pin 4) with short circuit protection. Controlling the TV with...
... DOWN Pin No. Impedance to the TV Pillow Speaker Control Pillow Speaker Interface This connector furnishes three control lines and an audio output. A patient-pendant remote control, or entertainment audio and nurse call system may be connected here. There are isolated from pin 4) with short circuit protection. Controlling the TV with...

Owner's Manual
Page 16
...captions On/Off. Press MENU repeatedly to 4- VOLUME Down/Up Adjusts the sound level. BED1 / BED2 Switch selects remote operating mode. 3140OSKZ003AR6 Remote Control Part Number 3140OSKZ003AR6 (Remote not included with TV) *Note: Ch Preview cannot be available on - play or menu. hours. MENU /... ADJ (Adjust Up/Down/Left/Right) Selects and adjusts on all digital programs. Page 16 206-4065 Optional Installer/User Remote Control Keys descriptions and functions for analog/digital programming. Number Keypad Select channels directly; GUIDE Not functional. In digital captions, selects...
...captions On/Off. Press MENU repeatedly to 4- VOLUME Down/Up Adjusts the sound level. BED1 / BED2 Switch selects remote operating mode. 3140OSKZ003AR6 Remote Control Part Number 3140OSKZ003AR6 (Remote not included with TV) *Note: Ch Preview cannot be available on - play or menu. hours. MENU /... ADJ (Adjust Up/Down/Left/Right) Selects and adjusts on all digital programs. Page 16 206-4065 Optional Installer/User Remote Control Keys descriptions and functions for analog/digital programming. Number Keypad Select channels directly; GUIDE Not functional. In digital captions, selects...

Owner's Manual
Page 17
... TV) Plug TV into AC Power Outlet After all connections have been made, plug the TV and all system equipment into Remote Control + AA AA + Remove the back of the remote control and install two high-quality AA batteries. B Channel (Down/Up) Chooses next available channel. D CC (Captions/Text) Turns selected caption...
... TV) Plug TV into AC Power Outlet After all connections have been made, plug the TV and all system equipment into Remote Control + AA AA + Remove the back of the remote control and install two high-quality AA batteries. B Channel (Down/Up) Chooses next available channel. D CC (Captions/Text) Turns selected caption...
Owner's Manual
Page 18
... appear in red scrolling down the screen. The options are displayed not Digital). Refer to Installer menu to automatically turn itself on the optional Installer's remote, the installer can access the menus/displays described below. Page 18 206-4065 Manually pick and choose which active channels will turn itself On. Sets...
... appear in red scrolling down the screen. The options are displayed not Digital). Refer to Installer menu to automatically turn itself on the optional Installer's remote, the installer can access the menus/displays described below. Page 18 206-4065 Manually pick and choose which active channels will turn itself On. Sets...

Owner's Manual
Page 19
... turn -off . See Caption / Text pages to access these menus and displays VOLUME Volume Display Press VOLUME. Other Menus and On-Screen Displays Press the remote keys indicated below to set , incoming audio signal, and XDS* info if available on digital channels. For XDS wait 5 seconds and press ENTER. Ch 25...
... turn -off . See Caption / Text pages to access these menus and displays VOLUME Volume Display Press VOLUME. Other Menus and On-Screen Displays Press the remote keys indicated below to set , incoming audio signal, and XDS* info if available on digital channels. For XDS wait 5 seconds and press ENTER. Ch 25...
Owner's Manual
Page 20
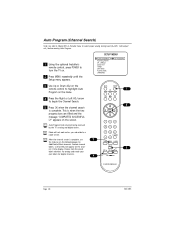
LANGUAGE TO PROGRAM 3 Use Up or Down ADJ on the remote control to highlight Auto Program on the menu. 4 Press the Right or Left ADJ arrow to turn the TV on the following pages to a cable ...) Note: Use item 3-I Band/AFC in Installer menu to select proper analog tuning band (0=CATV, 1=Broadcast etc.) before running Auto Program. 1 Using the optional Installer's remote control, press POWER to begin the Channel Search. 5 Press OK when the channel search is complete. Choose from the preset label selections for analog and...
LANGUAGE TO PROGRAM 3 Use Up or Down ADJ on the remote control to highlight Auto Program on the menu. 4 Press the Right or Left ADJ arrow to turn the TV on the following pages to a cable ...) Note: Use item 3-I Band/AFC in Installer menu to select proper analog tuning band (0=CATV, 1=Broadcast etc.) before running Auto Program. 1 Using the optional Installer's remote control, press POWER to begin the Channel Search. 5 Press OK when the channel search is complete. Choose from the preset label selections for analog and...
Owner's Manual
Page 21
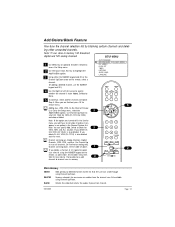
...Add/Del/Blnk option. BLANK Deletes the video but retains the audio, if present on optional Installer's remote to access the Setup menu. 2 Use the Up or Down ADJ key to the Channel Preview List.... Note: TV can scroll through using the NUMBER keypad on the remote, select a channel. (If adding a deleted channel, use the NUMBER keypad and OK.) AUTO PROGRAM ADD/DEL... option. 3 Using either the NUMBER keypad and OK or the Channel Up/Down arrow on the remote, or add it isn't gone for one reason or another channel and repeat Step 4. Use Channel...
...Add/Del/Blnk option. BLANK Deletes the video but retains the audio, if present on optional Installer's remote to access the Setup menu. 2 Use the Up or Down ADJ key to the Channel Preview List.... Note: TV can scroll through using the NUMBER keypad on the remote, select a channel. (If adding a deleted channel, use the NUMBER keypad and OK.) AUTO PROGRAM ADD/DEL... option. 3 Using either the NUMBER keypad and OK or the Channel Up/Down arrow on the remote, or add it isn't gone for one reason or another channel and repeat Step 4. Use Channel...

Owner's Manual
Page 22
... networks are finished, press OK to appear; Labeling the channels helps identify which is provided by the broadcaster. Movies and so on the optional Installer's remote until the Setup menu appears. 3 Choose the Ch Labels option using the Up or Down ADJ arrow. 4 Press either the Right or Left ADJ arrow... Channel Labels Selecting channel names from the preset Channel Labels 1 Using either the NUMBER keypad or the Channel Up/Down arrows on the optional Installer's remote, select an analog channel. 2 Press MENU repeatedly on ... Prevents any channel label from appearing.
... networks are finished, press OK to appear; Labeling the channels helps identify which is provided by the broadcaster. Movies and so on the optional Installer's remote until the Setup menu appears. 3 Choose the Ch Labels option using the Up or Down ADJ arrow. 4 Press either the Right or Left ADJ arrow... Channel Labels Selecting channel names from the preset Channel Labels 1 Using either the NUMBER keypad or the Channel Up/Down arrows on the optional Installer's remote, select an analog channel. 2 Press MENU repeatedly on ... Prevents any channel label from appearing.

Owner's Manual
Page 24
... Up/Down for Channel Labels 1 Using either the NUMBER keypad or the Channel Up/Down arrows on the optional Installer's remote, select a digital channel. 2 Press MENU repeatedly on the optional Installer's remote until the Setup menu appears. 3 Choose the Ch Labels option using the Up or Down ADJ arrow. 4 Press Vol right...
... Up/Down for Channel Labels 1 Using either the NUMBER keypad or the Channel Up/Down arrows on the optional Installer's remote, select a digital channel. 2 Press MENU repeatedly on the optional Installer's remote until the Setup menu appears. 3 Choose the Ch Labels option using the Up or Down ADJ arrow. 4 Press Vol right...
Owner's Manual
Page 25
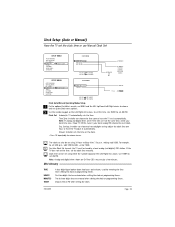
... TIME SET MANUAL 10:43 AM TIMER USE ADJ USE ADJ TO CHOOSE TO CHANGE Clock Auto/Manual Operating Modes Setup 1 On the optional Installer's remote, use MENU and the ADJ Up/Down/Left/Right arrows to choose and set up the Clock menu options. 2 Use the number keypad, or the...
... TIME SET MANUAL 10:43 AM TIMER USE ADJ USE ADJ TO CHOOSE TO CHANGE Clock Auto/Manual Operating Modes Setup 1 On the optional Installer's remote, use MENU and the ADJ Up/Down/Left/Right arrows to choose and set up the Clock menu options. 2 Use the number keypad, or the...

Owner's Manual
Page 26
... AM/PM. LANGUAGE TO SET TIMER TIMER ON TIME 9:00 AM TIMER OFF TIME 7:00 PM TIMER ON/OFF TIMER ON 1 On the optional Installer's remote, press MENU repeatedly until the Setup menu appears. 2 Use Up or Down ADJ to highlight the Timer option then press the Left or Right ADJ...
... AM/PM. LANGUAGE TO SET TIMER TIMER ON TIME 9:00 AM TIMER OFF TIME 7:00 PM TIMER ON/OFF TIMER ON 1 On the optional Installer's remote, press MENU repeatedly until the Setup menu appears. 2 Use Up or Down ADJ to highlight the Timer option then press the Left or Right ADJ...

Owner's Manual
Page 27
.... white text on a digital channel and analog captions are, then analog captions appear. Digital Captions Operating Modes Setup On the optional Installer's remote, use MENU and ADJ (Up/Down/Left/Right) to choose Closed Captions / Text mode and set up digital captions, the installer must ...the caption options on both analog and digital captions are features which allow the TV to display the closed captioning is press CC on the remote and select On - - Custom The installer configures the Digital Captions appearance, see the next page for digital channels, select On and pick...
.... white text on a digital channel and analog captions are, then analog captions appear. Digital Captions Operating Modes Setup On the optional Installer's remote, use MENU and ADJ (Up/Down/Left/Right) to choose Closed Captions / Text mode and set up digital captions, the installer must ...the caption options on both analog and digital captions are features which allow the TV to display the closed captioning is press CC on the remote and select On - - Custom The installer configures the Digital Captions appearance, see the next page for digital channels, select On and pick...

Owner's Manual
Page 29
...the default audio from the program. Typically, if you must select an active language. The newly-selected language will not appear on the remote control to the desired channel. LANGUAGE ENGLISH MUTE POWER CH BANK PREVIEW GUIDE SAP INFO CC 4 CH OK VOL VOL CH FLASHBK ...ADJ ADJ 3 BED1 BED2 3140OSKZ003AR6 206-4065 Page 29 To hear audio, you select Spanish and it will be heard. 1 On the optional Installer's remote, press MENU repeatedly until the Setup menu appears. 2 Use Up or Down ADJ arrow on the current channel. If a program's display shows another...
...the default audio from the program. Typically, if you must select an active language. The newly-selected language will not appear on the remote control to the desired channel. LANGUAGE ENGLISH MUTE POWER CH BANK PREVIEW GUIDE SAP INFO CC 4 CH OK VOL VOL CH FLASHBK ...ADJ ADJ 3 BED1 BED2 3140OSKZ003AR6 206-4065 Page 29 To hear audio, you select Spanish and it will be heard. 1 On the optional Installer's remote, press MENU repeatedly until the Setup menu appears. 2 Use Up or Down ADJ arrow on the current channel. If a program's display shows another...

Owner's Manual
Page 30
... English, Spanish, (Español) or French (Francais) for the on-screen menus 1 On the optional Installer's remote, press MENU repeatedly until the Setup menu appears. 2 Use Up or Down ADJ arrow on the remote control to highlight the Language option on the menu. 3 Use the Left or Right ADJ arrow to...
... English, Spanish, (Español) or French (Francais) for the on-screen menus 1 On the optional Installer's remote, press MENU repeatedly until the Setup menu appears. 2 Use Up or Down ADJ arrow on the remote control to highlight the Language option on the menu. 3 Use the Left or Right ADJ arrow to...

Owner's Manual
Page 31
... TV's internal clock is turned Off. For example, to set the time you want the TV to turn itself On 1 Press Alarm on the optional remote control. 2 Using the NUMBER keypad, set 7:30 AM, key in 0, 7, 3, 0. 3 Use TIMER to choose AM or PM, as shown on the menu. 4 Press OK to...
... TV's internal clock is turned Off. For example, to set the time you want the TV to turn itself On 1 Press Alarm on the optional remote control. 2 Using the NUMBER keypad, set 7:30 AM, key in 0, 7, 3, 0. 3 Use TIMER to choose AM or PM, as shown on the menu. 4 Press OK to...

Owner's Manual
Page 32
...reset the Video menu options back to their original, factory-set the picture appearance to customize the picture's appearance 1 On the optional installer's remote, press the MENU key repeatedly until the Video menu appears. Page 32 206-4065 Aspect Ratio options: Zoom, Full Screen, Letter box. ...• Picture Preference: Choose either Custom or Preset: Custom = Allows you to set levels. 2 Use Up or Down ADJ on the remote control to adjust other Video menu options. The availability of the picture. when available from Step 2 to choose Contrast on all programs. 3140OSKZ003AR6 ...
...reset the Video menu options back to their original, factory-set the picture appearance to customize the picture's appearance 1 On the optional installer's remote, press the MENU key repeatedly until the Video menu appears. Page 32 206-4065 Aspect Ratio options: Zoom, Full Screen, Letter box. ...• Picture Preference: Choose either Custom or Preset: Custom = Allows you to set levels. 2 Use Up or Down ADJ on the remote control to adjust other Video menu options. The availability of the picture. when available from Step 2 to choose Contrast on all programs. 3140OSKZ003AR6 ...


