

Owners Manual
Page 2
... your service technician for replacement. In the presence of thunder and lightning, never touch the power cord and signal cable because it can be left unattended for a replacement. If the power cable is faulty in a shock or fire hazard. If you use may result in any toys or objects on the display. Keep children from a power source indicated in this manual or listed on the product screen...
... your service technician for replacement. In the presence of thunder and lightning, never touch the power cord and signal cable because it can be left unattended for a replacement. If the power cable is faulty in a shock or fire hazard. If you use may result in any toys or objects on the display. Keep children from a power source indicated in this manual or listed on the product screen...
Owners Manual
Page 3
... or heat source. Contact an authorized the service center for a long time may result in . Make sure to use the recommended resolution to move. Cover the openings with both hands to obtain the best image quality for your finger for a long time as Red, Green or Blue spots on the screen. Do not press the LCD screen with anything to the screen and cause image burn-in...
... or heat source. Contact an authorized the service center for a long time may result in . Make sure to use the recommended resolution to move. Cover the openings with both hands to obtain the best image quality for your finger for a long time as Red, Green or Blue spots on the screen. Do not press the LCD screen with anything to the screen and cause image burn-in...
Owners Manual
Page 7
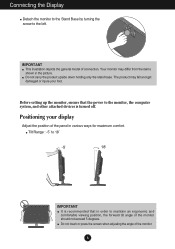
... get damaged or injure your display Adjust the position of connection. Positioning your foot. Do not carry the product upside down holding only the stand base. IMPORTANT This illustration depicts the general model of the panel in various ways for maximum comfort. Before setting up the monitor, ensure that in the picture. Do not touch or press the screen when adjusting the angle of the...
... get damaged or injure your display Adjust the position of connection. Positioning your foot. Do not carry the product upside down holding only the stand base. IMPORTANT This illustration depicts the general model of the panel in various ways for maximum comfort. Before setting up the monitor, ensure that in the picture. Do not touch or press the screen when adjusting the angle of the...
Owners Manual
Page 8
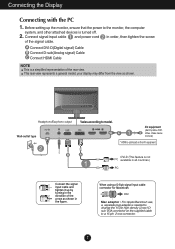
... (Set-Top Box, DVD, Video, Video Game Console) * HDMI is needed to the monitor, the computer system, and other attached devices is turned off. 2. This rear view represents a general model; When using a D-Sub signal input cable connector for Macintosh Mac adapter : For Apple Macintosh use, a separate plug adapter is optimized on the supplied cable to model. A Connect DVI-D(Digital signal) Cable B Connect D-sub(Analog signal) Cable C Connect HDMI Cable NOTE This is not available in order, then tighten the screw of the signal cable. Headphone/Earphone output Wall-outlet...
... (Set-Top Box, DVD, Video, Video Game Console) * HDMI is needed to the monitor, the computer system, and other attached devices is turned off. 2. This rear view represents a general model; When using a D-Sub signal input cable connector for Macintosh Mac adapter : For Apple Macintosh use, a separate plug adapter is optimized on the supplied cable to model. A Connect DVI-D(Digital signal) Cable B Connect D-sub(Analog signal) Cable C Connect HDMI Cable NOTE This is not available in order, then tighten the screw of the signal cable. Headphone/Earphone output Wall-outlet...
Owners Manual
Page 9
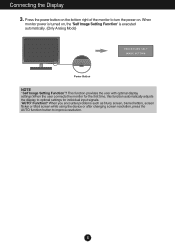
... changing screen resolution, press the AUTO function button to turn the power on. When monitor power is executed automatically. (Only Analog Mode) Power Button NOTE ' Self Image Setting Function'? Press the power button on , the 'Self Image Setting Function' is turned on the bottom right of the monitor to improve resolution. 8 This function provides the user with optimal display settings.When the user connects the monitor for the first time, this function automatically adjusts the display to optimal settings for individual input signals. 'AUTO' Function? Connecting the Display...
... changing screen resolution, press the AUTO function button to turn the power on. When monitor power is executed automatically. (Only Analog Mode) Power Button NOTE ' Self Image Setting Function'? Press the power button on , the 'Self Image Setting Function' is turned on the bottom right of the monitor to improve resolution. 8 This function provides the user with optimal display settings.When the user connects the monitor for the first time, this function automatically adjusts the display to optimal settings for individual input signals. 'AUTO' Function? Connecting the Display...
Owners Manual
Page 10
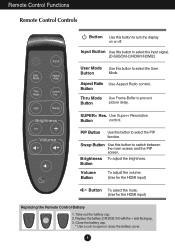
... control. Use Super+ Resolution Button control. PIP Button Use this button to turn the display on or off. Remote Control Functions Remote Control Controls Button Use this button to select the PIP function. Brightness To adjust the brightness. Take out the battery cap. 2. Swap Button Use this button to switch between the main screen and the PIP screen. Button Thru Mode Use Frame-Buffer to open or close the battery cover. 9 Input Button Use this button to select the input signal. (D-SUB/DVI-D/HDMI1/HDMI2) User Mode Use this button to select the User Button Mode...
... control. Use Super+ Resolution Button control. PIP Button Use this button to turn the display on or off. Remote Control Functions Remote Control Controls Button Use this button to select the PIP function. Brightness To adjust the brightness. Take out the battery cap. 2. Swap Button Use this button to switch between the main screen and the PIP screen. Button Thru Mode Use Frame-Buffer to open or close the battery cover. 9 Input Button Use this button to select the input signal. (D-SUB/DVI-D/HDMI1/HDMI2) User Mode Use this button to select the User Button Mode...
Owners Manual
Page 12
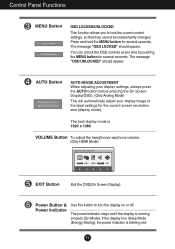
... screen resolution size (display mode). The best display mode is blinking red. 11 If the display is in Sleep Mode (Energy Saving), the power indicator is 1920 x 1080 VOLUME Button To adjust the headphone/ earphone volume. (Only HDMI Mode) EXIT Button Exit the OSD(On Screen Display). The message "OSD UNLOCKED" should appear. The power indicator stays red if the display is running properly (On Mode). The message "OSD LOCKED" should appear. Press and hold the MENU button for several seconds. AUTO Button AUTO IMAGE ADJUSTMENT When adjusting your display settings...
... screen resolution size (display mode). The best display mode is blinking red. 11 If the display is in Sleep Mode (Energy Saving), the power indicator is 1920 x 1080 VOLUME Button To adjust the headphone/ earphone volume. (Only HDMI Mode) EXIT Button Exit the OSD(On Screen Display). The message "OSD UNLOCKED" should appear. The power indicator stays red if the display is running properly (On Mode). The message "OSD LOCKED" should appear. Press and hold the MENU button for several seconds. AUTO Button AUTO IMAGE ADJUSTMENT When adjusting your display settings...
Owners Manual
Page 14
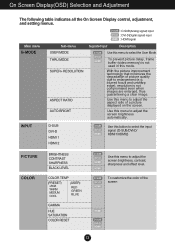
...HDMI1/HDMI2) PICTURE COLOR BRIGHTNESS CONTRAST SHARPNESS BLACK LEVEL COLOR TEMP (PRESET) sRGB WARM MEDIUM COOL (USER) RED GREEN BLUE GAMMA HUE SATURATION COLOR RESET D-SUB DVI-D HDMI HDMI Use this menu to adjust the screen brightness automatically. Use this menu to enlargement (e.g. Use this menu to select the User Mode. Main menu G-MODE Sub-menu USER MODE THRU MODE SUPER+ RESOLUTION ASPECT RATIO AUTO BRIGHT D-SUB : D-SUB(Analog signal) input DVI-D : DVI-D(Digital signal) input HDMI : HDMI signal Supported input Description D-SUB DVI-D HDMI Use this menu to adjust the...
...HDMI1/HDMI2) PICTURE COLOR BRIGHTNESS CONTRAST SHARPNESS BLACK LEVEL COLOR TEMP (PRESET) sRGB WARM MEDIUM COOL (USER) RED GREEN BLUE GAMMA HUE SATURATION COLOR RESET D-SUB DVI-D HDMI HDMI Use this menu to adjust the screen brightness automatically. Use this menu to enlargement (e.g. Use this menu to select the User Mode. Main menu G-MODE Sub-menu USER MODE THRU MODE SUPER+ RESOLUTION ASPECT RATIO AUTO BRIGHT D-SUB : D-SUB(Analog signal) input DVI-D : DVI-D(Digital signal) input HDMI : HDMI signal Supported input Description D-SUB DVI-D HDMI Use this menu to adjust the...
Owners Manual
Page 15
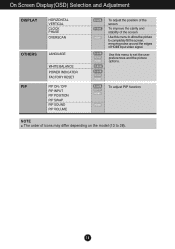
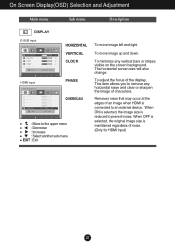
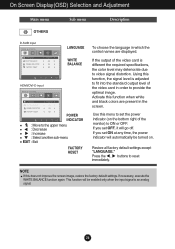
... the screen, removing noise around the edges of HDMI input video signal. On Screen Display(OSD) Selection and Adjustment DISPLAY HORIZONTAL VERTICAL CLOCK PHASE OVERSCAN OTHERS PIP LANGUAGE WHITE BALANCE POWER INDICATOR FACTORY RESET PIP ON / OFF PIP INPUT PIP POSITION PIP SWAP PIP SOUND PIP VOLUME D-SUB D-SUB HDMI D-SUB DVI-D HDMI D-SUB D-SUB DVI-D HDMI D-SUB DVI-D HDMI To adjust the position of the screen To improve the clarity and stability of the screen Use this menu to set the user preferences and the picture options...
... the screen, removing noise around the edges of HDMI input video signal. On Screen Display(OSD) Selection and Adjustment DISPLAY HORIZONTAL VERTICAL CLOCK PHASE OVERSCAN OTHERS PIP LANGUAGE WHITE BALANCE POWER INDICATOR FACTORY RESET PIP ON / OFF PIP INPUT PIP POSITION PIP SWAP PIP SOUND PIP VOLUME D-SUB D-SUB HDMI D-SUB DVI-D HDMI D-SUB D-SUB DVI-D HDMI D-SUB DVI-D HDMI To adjust the position of the screen To improve the clarity and stability of the screen Use this menu to set the user preferences and the picture options...
Owners Manual
Page 17
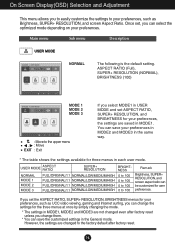
... MMOODDEE 33 the settings are changed even after factory reset. 16 On Screen Display(OSD) Selection and Adjustment This menu allows you to easily customize the settings to thGe-MOfDaEctoAUrTyO BdRIGeHfTault after factory reset unless you can change them. * You can select the optimized mode depending on your preferences. USER MODE ARSAPTIEOCT MMOODDEE11 MMOODDEE 22 MMOODDEE 33 SUPER+AUTO BRIGHTBRIGHT- Once set ASPECT RATIO, MODE 3 SUPER+ RESOLUTION, and BRIGHTNESS for the three...
... MMOODDEE 33 the settings are changed even after factory reset. 16 On Screen Display(OSD) Selection and Adjustment This menu allows you to easily customize the settings to thGe-MOfDaEctoAUrTyO BdRIGeHfTault after factory reset unless you can change them. * You can select the optimized mode depending on your preferences. USER MODE ARSAPTIEOCT MMOODDEE11 MMOODDEE 22 MMOODDEE 33 SUPER+AUTO BRIGHTBRIGHT- Once set ASPECT RATIO, MODE 3 SUPER+ RESOLUTION, and BRIGHTNESS for the three...
Owners Manual
Page 19
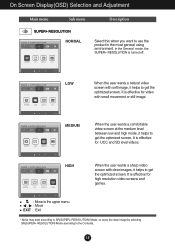
...helps to use the G-MODE ASPECT RATIO productGi-MnODtEheASmPEoCTsRtATgIOeneral using environment. It is turned off. FULL ORIGINAL 1:1 FULL ORIGINAL 1:1 G-MODE SUPER+ RESOLUTION G-MODE SUPER+ RESOLUTION G-MODE SUPER+ RESOLUTION G-MODE SUPER+ RESOLUTION MEDIUM When the user wants a comfortable G-MODE ASPECT RATIO video scG-MreODeE nAaSPtEtChT ReATmIO edium level between low and high mode, it helps to get the optimized screen. On Screen Display(OSD) Selection and Adjustment Main menu Sub menu SSUUPPEERR++ RREESSOOLLUUTTIIOONN G-MODE SUPER+ RESOLUTION G-MODE SUPER+ RESOLUTION...
...helps to use the G-MODE ASPECT RATIO productGi-MnODtEheASmPEoCTsRtATgIOeneral using environment. It is turned off. FULL ORIGINAL 1:1 FULL ORIGINAL 1:1 G-MODE SUPER+ RESOLUTION G-MODE SUPER+ RESOLUTION G-MODE SUPER+ RESOLUTION G-MODE SUPER+ RESOLUTION MEDIUM When the user wants a comfortable G-MODE ASPECT RATIO video scG-MreODeE nAaSPtEtChT ReATmIO edium level between low and high mode, it helps to get the optimized screen. On Screen Display(OSD) Selection and Adjustment Main menu Sub menu SSUUPPEERR++ RREESSOOLLUUTTIIOONN G-MODE SUPER+ RESOLUTION G-MODE SUPER+ RESOLUTION...
Owners Manual
Page 21
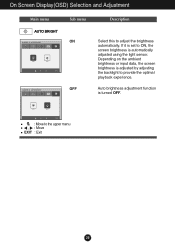
... adjusted by adjusting the backlight to provide the optimal playback experience. G-MODE SUPER+ RESOLUTION Depending on the ambient brightness or input data, the screen brightness is automatically G-MODE SUPER+ RESOLUTION G-MODE aSUdPEjRu+ RsEtSOeLUdTIOuN sing the light sensor. Auto brightness adjustment function is turned OFF. : Move to adjust the brightness automatically. G-MODE SUPER+ RESOLUTION G Main menu Sub menu Description AAUUTTOO BBRRIIGGHHTT AUTO BRIGHT G-MODE G-MODE G-MODE AUTO BRIGHT AUTO BRIGHT AUTO BRIGHT ON G-MODE G-MODE G-MODE AUTO BRIGHT AUTO BRIGHT AUTO BRIGHT...
... adjusted by adjusting the backlight to provide the optimal playback experience. G-MODE SUPER+ RESOLUTION Depending on the ambient brightness or input data, the screen brightness is automatically G-MODE SUPER+ RESOLUTION G-MODE aSUdPEjRu+ RsEtSOeLUdTIOuN sing the light sensor. Auto brightness adjustment function is turned OFF. : Move to adjust the brightness automatically. G-MODE SUPER+ RESOLUTION G Main menu Sub menu Description AAUUTTOO BBRRIIGGHHTT AUTO BRIGHT G-MODE G-MODE G-MODE AUTO BRIGHT AUTO BRIGHT AUTO BRIGHT ON G-MODE G-MODE G-MODE AUTO BRIGHT AUTO BRIGHT AUTO BRIGHT...

Owners Manual
Page 25
... picture color using Red, Green and Blue colors. The higher the color temperature gets, the bluer the screen becomes; PIP INPUT PIP POSITION PIP POSITION PIP SWAP PPIIPP SSWOAUPND Select the screen color. BLUE GAMMA Set your own saturation levels. (only for HDMI input) * This option is enabled only for HDMI input) SATURATION Set your own gamma value. : 1 / 2 / 3 On the monitor, high gamma values display whitish images and low gamma values display blackish images. PIP SOUND PIP VOLUME...
... picture color using Red, Green and Blue colors. The higher the color temperature gets, the bluer the screen becomes; PIP INPUT PIP POSITION PIP POSITION PIP SWAP PPIIPP SSWOAUPND Select the screen color. BLUE GAMMA Set your own saturation levels. (only for HDMI input) * This option is enabled only for HDMI input) SATURATION Set your own gamma value. : 1 / 2 / 3 On the monitor, high gamma values display whitish images and low gamma values display blackish images. PIP SOUND PIP VOLUME...
Owners Manual
Page 26
... Screen Display(OSD) Selection and Adjustment Main menu Sub menu Description D-SUB input HDMI input HORIZONTAL VERTICAL CLOCK PHASE OVERSCAN : Move to the upper menu : Decrease : Increase : Select another sub-menu EXIT : Exit To move image up and down. To adjust the focus of noise. (Only for HDMI input) PIP ON / OFF PIP ON / OFF PIP INPUT PIP INPUT PIP POSITION PIP POSITION PIP SWAP PPIPIP SSOWUANPD PIP SOUND PIP VOLUME 30 PIP VOLUME...
... Screen Display(OSD) Selection and Adjustment Main menu Sub menu Description D-SUB input HDMI input HORIZONTAL VERTICAL CLOCK PHASE OVERSCAN : Move to the upper menu : Decrease : Increase : Select another sub-menu EXIT : Exit To move image up and down. To adjust the focus of noise. (Only for HDMI input) PIP ON / OFF PIP ON / OFF PIP INPUT PIP INPUT PIP POSITION PIP POSITION PIP SWAP PPIPIP SSOWUANPD PIP SOUND PIP VOLUME 30 PIP VOLUME...
Owners Manual
Page 27
... the monitor) to provide the optimal image. HDMI/DVI-D input WHITE BALANCE If the output of the video card is different the required specifications, the color level may deteriorate due to reset immediately. This function will go off. POWER INDICATOR : Move to the upper menu : Decrease : Increase : Select another sub-menu EXIT : Exit Use this function when white and black colors are present in which the control names are displayed. On Screen Display(OSD...
... the monitor) to provide the optimal image. HDMI/DVI-D input WHITE BALANCE If the output of the video card is different the required specifications, the color level may deteriorate due to reset immediately. This function will go off. POWER INDICATOR : Move to the upper menu : Decrease : Increase : Select another sub-menu EXIT : Exit Use this function when white and black colors are present in which the control names are displayed. On Screen Display(OSD...
Owners Manual
Page 30
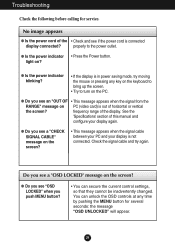
... power indicator • Press the Power button. G Do you push MENU button? • You can unlock the OSD controls at any key on ? See the 'Specifications' section of the display. Do you see if the power cord is not connected. frequency range of this manual and configure your display is connected display connected? Check the signal cable and try moving the mouse or pressing any time by pushing the MENU button for service. G Is the power indicator blinking...
... power indicator • Press the Power button. G Do you push MENU button? • You can unlock the OSD controls at any key on ? See the 'Specifications' section of the display. Do you see if the power cord is not connected. frequency range of this manual and configure your display is connected display connected? Check the signal cable and try moving the mouse or pressing any time by pushing the MENU button for service. G Is the power indicator blinking...
Owners Manual
Page 31
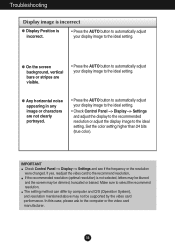
... video card to the recommend resolution. IMPORTANT Check Control Panel --> Display --> Settings and see if the frequency or the resolution were changed. Troubleshooting Display image is incorrect G Display Position is not selected, letters may be blurred and the screen may not be dimmed, truncated or biased. If the recommended resolution (optimal resolution) is incorrect. • Press the AUTO button to automatically adjust your display image to the ideal setting. • Check Control Panel --> Display --> Settings and adjust the display to the recommended resolution or adjust...
... video card to the recommend resolution. IMPORTANT Check Control Panel --> Display --> Settings and see if the frequency or the resolution were changed. Troubleshooting Display image is incorrect G Display Position is not selected, letters may be blurred and the screen may not be dimmed, truncated or biased. If the recommended resolution (optimal resolution) is incorrect. • Press the AUTO button to automatically adjust your display image to the ideal setting. • Check Control Panel --> Display --> Settings and adjust the display to the recommended resolution or adjust...
Owners Manual
Page 32
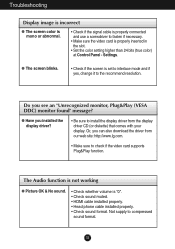
Troubleshooting Display image is incorrect G The screen color is mono or abnormal. • Check if the signal cable is properly connected and use a screwdriver to fasten if necessary. • Make sure the video card is "0". • Check sound muted. • HDMI cable installed properly. • Head phone cable installed properly. • Check sound format. Settings. Or, you see an "Unrecognized monitor, Plug&Play (VESA DDC) monitor found" message? Do you can also download the driver from the display driver CD (or diskette...
Troubleshooting Display image is incorrect G The screen color is mono or abnormal. • Check if the signal cable is properly connected and use a screwdriver to fasten if necessary. • Make sure the video card is "0". • Check sound muted. • HDMI cable installed properly. • Head phone cable installed properly. • Check sound format. Settings. Or, you see an "Unrecognized monitor, Plug&Play (VESA DDC) monitor found" message? Do you can also download the driver from the display driver CD (or diskette...
Owners Manual
Page 33
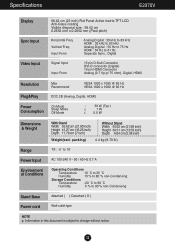
Specifications E2370V Display Sync Input Video Input 58.42 cm (23 inch) Flat Panel Active matrix-TFT LCD Anti-Glare coating Visible diagonal size : 58.42 cm 0.2652 mm x 0.2652 mm (Pixel pitch) Horizontal Freq. Input Form Analog,Digital: 30 kHz to 83 kHz HDMI : 30 kHz to 83 kHz Analog,Digital : 56 Hz to 75 Hz HDMI : 56 Hz to change without notice. 32 packing) 4.4 kg (9.70 lb) Range Power Input Environment al Conditions Tilt : -5˚...
Specifications E2370V Display Sync Input Video Input 58.42 cm (23 inch) Flat Panel Active matrix-TFT LCD Anti-Glare coating Visible diagonal size : 58.42 cm 0.2652 mm x 0.2652 mm (Pixel pitch) Horizontal Freq. Input Form Analog,Digital: 30 kHz to 83 kHz HDMI : 30 kHz to 83 kHz Analog,Digital : 56 Hz to 75 Hz HDMI : 56 Hz to change without notice. 32 packing) 4.4 kg (9.70 lb) Range Power Input Environment al Conditions Tilt : -5˚...
Owners Manual
Page 34
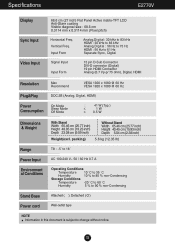
... (19.23 inch) Depth 23.08 cm (9.09 inch) Weight(excl. Vertical Freq. Input Form Analog,Digital: 30 kHz to 83 kHz HDMI : 30 kHz to 83 kHz Analog,Digital : 56 Hz to 75 Hz HDMI : 56 Hz to change without notice. 33 Specifications E2770V Display Sync Input Video Input 68.6 cm (27 inch) Flat Panel Active matrix-TFT LCD Anti-Glare coating Visible diagonal size : 68.6 cm 0.3114 mm x 0.3114 mm (Pixel pitch) Horizontal Freq.
... (19.23 inch) Depth 23.08 cm (9.09 inch) Weight(excl. Vertical Freq. Input Form Analog,Digital: 30 kHz to 83 kHz HDMI : 30 kHz to 83 kHz Analog,Digital : 56 Hz to 75 Hz HDMI : 56 Hz to change without notice. 33 Specifications E2770V Display Sync Input Video Input 68.6 cm (27 inch) Flat Panel Active matrix-TFT LCD Anti-Glare coating Visible diagonal size : 68.6 cm 0.3114 mm x 0.3114 mm (Pixel pitch) Horizontal Freq.


