
Brochure
Page 1
... productivity in standard. 1920 x 1080 MAXIMUM DISPLAY RESOLUTION DVI, D-SUB AND HDMI CONNECTIVITY 5,000,000:1 CONTRAST RATIO (DFC) 5MS RESPONSE TIME SUPER ENERGY SAVING MODE VESA™ COMPLIANT WALL MOUNT RoHS COMPLIANT EPEAT GOLD RATED 3 YEAR LIMITED WARRANTY (parts/labor/backlight) www.LGsolutions.com Designed with a remarkable 5M:1 Digital Fine Contrast, 5ms response and 16.7 million colors, images are rendered with E2241VB WIDESCREEN LCD monitor. Trendy yet differentiated Design comes in...
... productivity in standard. 1920 x 1080 MAXIMUM DISPLAY RESOLUTION DVI, D-SUB AND HDMI CONNECTIVITY 5,000,000:1 CONTRAST RATIO (DFC) 5MS RESPONSE TIME SUPER ENERGY SAVING MODE VESA™ COMPLIANT WALL MOUNT RoHS COMPLIANT EPEAT GOLD RATED 3 YEAR LIMITED WARRANTY (parts/labor/backlight) www.LGsolutions.com Designed with a remarkable 5M:1 Digital Fine Contrast, 5ms response and 16.7 million colors, images are rendered with E2241VB WIDESCREEN LCD monitor. Trendy yet differentiated Design comes in...
Brochure
Page 2
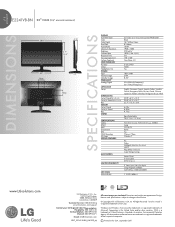
...-BN_081109_PR All screen images are approximate. lcd dimensions monitor specifications E2241VB-BN 22" class (21.5" measured diagonally) 20.0" 2.3" 12.7" 15.3" 8.9" 75mm 6.5" 75mm DISPLAY LCD Panel Type Color Color Depth Pixel Pitch Aspect Ratio Maximum Resolution Brightness Contrast Ratio Response Time Viewing Angle (HxV) Surface Treatment USER INTERFACE PC Input Others Headphone Out POWER Input Normal Usage Stand-by Usage FREQUENCY Analog/Digital LANGUAGE Set-up DIMENSIONS Set w/Stand (W x D x H) Set w/o Stand (W x D x H) Box WEIGHT Set w/Stand Set w/o Stand Box STAND CERTIFICATIONS...
...-BN_081109_PR All screen images are approximate. lcd dimensions monitor specifications E2241VB-BN 22" class (21.5" measured diagonally) 20.0" 2.3" 12.7" 15.3" 8.9" 75mm 6.5" 75mm DISPLAY LCD Panel Type Color Color Depth Pixel Pitch Aspect Ratio Maximum Resolution Brightness Contrast Ratio Response Time Viewing Angle (HxV) Surface Treatment USER INTERFACE PC Input Others Headphone Out POWER Input Normal Usage Stand-by Usage FREQUENCY Analog/Digital LANGUAGE Set-up DIMENSIONS Set w/Stand (W x D x H) Set w/o Stand (W x D x H) Box WEIGHT Set w/Stand Set w/o Stand Box STAND CERTIFICATIONS...
User Manual
Page 2
...: Always turn the display OFF if you use may result in any toys or objects on or apply impact to ensure your dealer if the display is turned off. Keep children from the wall outlet. It can cause injury to human, problem to allow the proper operation of thunder and lightning, never touch the power cord and signal cable because it is connected to...
...: Always turn the display OFF if you use may result in any toys or objects on or apply impact to ensure your dealer if the display is turned off. Keep children from the wall outlet. It can cause injury to human, problem to allow the proper operation of thunder and lightning, never touch the power cord and signal cable because it is connected to...
User Manual
Page 3
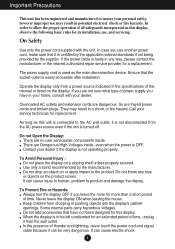
... place the display where the power cord is subject to obtain the best image quality for your finger for repair. Make sure to move. Make sure the panel faces forward and hold it may cause disturbing reflections from surrounding light and bright surfaces. 2 Do not use the recommended resolution to damage. Displays are not covered by placing the display on the screen. If used under any mode except the...
... place the display where the power cord is subject to obtain the best image quality for your finger for repair. Make sure to move. Make sure the panel faces forward and hold it may cause disturbing reflections from surrounding light and bright surfaces. 2 Do not use the recommended resolution to damage. Displays are not covered by placing the display on the screen. If used under any mode except the...
User Manual
Page 6
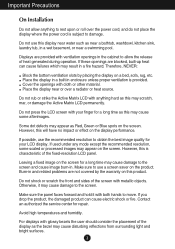
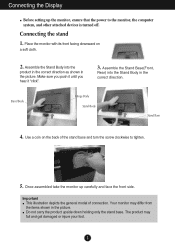
... turned off. Connecting the stand 1. Stand Body Hinge Body Stand Body Stand Base 4. Do not carry the product upside down holding only the stand base. The product may differ from the items shown in the picture. Make sure you push it until you hear it "click". 3. Use a coin on a soft cloth. 2. Once assembled take the monitor up the monitor, ensure that the power to tighten. 5. Your monitor...
... turned off. Connecting the stand 1. Stand Body Hinge Body Stand Body Stand Base 4. Do not carry the product upside down holding only the stand base. The product may differ from the items shown in the picture. Make sure you push it until you hear it "click". 3. Use a coin on a soft cloth. 2. Once assembled take the monitor up the monitor, ensure that the power to tighten. 5. Your monitor...
User Manual
Page 7
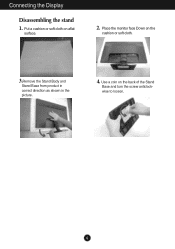
Use a coin on aflat surface. 2. Put a cushion or soft cloth on the back of the Stand Base and turn the screw anticlockwise to loosen. 6 Place the monitor face Down on the cushion or soft cloth. 3.Remove the Stand Body and Stand Base from product in correct direction as shown in the picture. 4. Connecting the Display Disassembling the stand 1.
Use a coin on aflat surface. 2. Put a cushion or soft cloth on the back of the Stand Base and turn the screw anticlockwise to loosen. 6 Place the monitor face Down on the cushion or soft cloth. 3.Remove the Stand Body and Stand Base from product in correct direction as shown in the picture. 4. Connecting the Display Disassembling the stand 1.
User Manual
Page 8
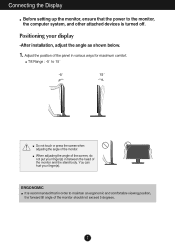
.... Adjust the position of the panel in between the head of the monitor and the stand body. Tilt Range : -5˚ to maintain an ergonomic and comfortable viewing position, the forward tilt angle of the monitor should not exceed 5 degrees. 7 Positioning your finger(s). You can hurt your display -After installation, adjust the angle as shown below. 1. Connecting the Display Before setting up the monitor, ensure that the power to the monitor, the...
.... Adjust the position of the panel in between the head of the monitor and the stand body. Tilt Range : -5˚ to maintain an ergonomic and comfortable viewing position, the forward tilt angle of the monitor should not exceed 5 degrees. 7 Positioning your finger(s). You can hurt your display -After installation, adjust the angle as shown below. 1. Connecting the Display Before setting up the monitor, ensure that the power to the monitor, the...
User Manual
Page 9
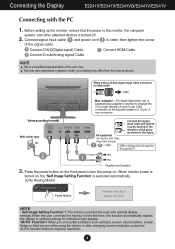
... . A Connect DVI-D(Digital signal) Cable C Connect HDMI Cable B Connect D-sub(Analog signal) Cable NOTE This is needed to change the 15 pin high density (3 row) D-sub VGA connector on the supplied cable to turn the power on the AV equipment. * Not supported PC Headphone/Speaker 3. This function provides the user with the PC 1. Connect signal input cable 1 and power cord 2 in the direction of the arrow as shown. Wall-outlet type Mac adapter : For Apple Macintosh use, a separate plug adapter is a simplified representation of the signal cable...
... . A Connect DVI-D(Digital signal) Cable C Connect HDMI Cable B Connect D-sub(Analog signal) Cable NOTE This is needed to change the 15 pin high density (3 row) D-sub VGA connector on the supplied cable to turn the power on the AV equipment. * Not supported PC Headphone/Speaker 3. This function provides the user with the PC 1. Connect signal input cable 1 and power cord 2 in the direction of the arrow as shown. Wall-outlet type Mac adapter : For Apple Macintosh use, a separate plug adapter is a simplified representation of the signal cable...
User Manual
Page 11
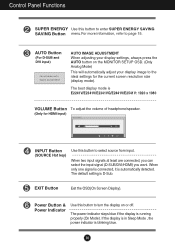
... OSD(On Screen Display). AUTO Button (For D-SUB and DVI input) AUTO IMAGE ADJUSTMENT When adjusting your display settings, always press the AUTO button on or off. If the display is in Sleep Mode , the power indicator is automatically detected. The power indicator stays blue if the display is D-Sub. The default setting is running properly (On Mode). Control Panel Functions SUPER ENERGY Use this button to turn the display on the MONITOR SETUP OSD. (Only Analog Mode) This will automatically adjust your display image to the ideal settings for HDMI input) INPUT Button (SOURCE...
... OSD(On Screen Display). AUTO Button (For D-SUB and DVI input) AUTO IMAGE ADJUSTMENT When adjusting your display settings, always press the AUTO button on or off. If the display is in Sleep Mode , the power indicator is automatically detected. The power indicator stays blue if the display is D-Sub. The default setting is running properly (On Mode). Control Panel Functions SUPER ENERGY Use this button to turn the display on the MONITOR SETUP OSD. (Only Analog Mode) This will automatically adjust your display image to the ideal settings for HDMI input) INPUT Button (SOURCE...
User Manual
Page 13
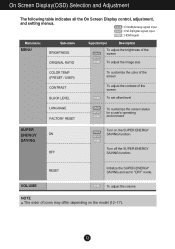
... On Screen Display control, adjustment, and setting menus. DSUB : D-SUB(Analog signal) input DVI-D : DVI-D(Digital signal) input HDMI : HDMI signal Main menu MENU Sub-menu BRIGHTNESS ORIGINAL RATIO Supported input Description DSUB DVI-D HDMI To adjust the brightness of the screen To adjust the image size COLOR TEMP (PRESET / USER) CONTRAST BLACK LEVEL To customize the color of the screen To adjust the contrast of icons may differ depending on the SUPER ENERGY SAVING function. RESET Initialize the SUPER ENERGY SAVING and set offset level LANGUAGE FACTORY RESET DSUB DVI-D HDMI...
... On Screen Display control, adjustment, and setting menus. DSUB : D-SUB(Analog signal) input DVI-D : DVI-D(Digital signal) input HDMI : HDMI signal Main menu MENU Sub-menu BRIGHTNESS ORIGINAL RATIO Supported input Description DSUB DVI-D HDMI To adjust the brightness of the screen To adjust the image size COLOR TEMP (PRESET / USER) CONTRAST BLACK LEVEL To customize the color of the screen To adjust the contrast of icons may differ depending on the SUPER ENERGY SAVING function. RESET Initialize the SUPER ENERGY SAVING and set offset level LANGUAGE FACTORY RESET DSUB DVI-D HDMI...
User Manual
Page 14
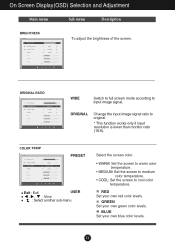
On Screen Display(OSD) Selection and Adjustment Main menu Sub menu Description To adjust the brightness of the screen. RED Set your own blue color levels. 13 BLUE Set your own red color levels. GREEN Set your own green color levels. WIDE Switch to full screen mode according to original. * This function works only if input resolution is lower than monitor ratio (16:9). ORIGINAL Change the input image signal ratio to input image signal. PRESET Exit : Exit USER , , : Move : Select another sub-menu Select the screen color. • WARM: Set the screen to...
On Screen Display(OSD) Selection and Adjustment Main menu Sub menu Description To adjust the brightness of the screen. RED Set your own blue color levels. 13 BLUE Set your own red color levels. GREEN Set your own green color levels. WIDE Switch to full screen mode according to original. * This function works only if input resolution is lower than monitor ratio (16:9). ORIGINAL Change the input image signal ratio to input image signal. PRESET Exit : Exit USER , , : Move : Select another sub-menu Select the screen color. • WARM: Set the screen to...
User Manual
Page 15
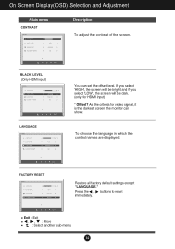
...-menu 14 Restore all factory default settings except "LANGUAGE." As the criteria for HDMI input) * Offset? Press the , buttons to reset immediately. On Screen Display(OSD) Selection and Adjustment Main menu Description To adjust the contrast of the screen. (Only HDMI input) You can show. If you select 'HIGH', the screen will be bright and if you select 'LOW', the screen will be dark. (only for video signal, it is the darkest screen the monitor can set...
...-menu 14 Restore all factory default settings except "LANGUAGE." As the criteria for HDMI input) * Offset? Press the , buttons to reset immediately. On Screen Display(OSD) Selection and Adjustment Main menu Description To adjust the contrast of the screen. (Only HDMI input) You can show. If you select 'HIGH', the screen will be bright and if you select 'LOW', the screen will be dark. (only for video signal, it is the darkest screen the monitor can set...
User Manual
Page 19
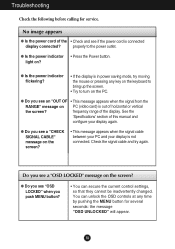
... the screen? Troubleshooting Check the following before calling for several seconds: the message "OSD UNLOCKED" will appear. 18 Check the signal cable and try moving the mouse or pressing any time by pushing the MENU button for service. You can secure the current control settings, so that they cannot be inadvertently changed. No image appears G Is the power cord of horizontal or vertical the screen? light on the PC. properly to turn...
... the screen? Troubleshooting Check the following before calling for several seconds: the message "OSD UNLOCKED" will appear. 18 Check the signal cable and try moving the mouse or pressing any time by pushing the MENU button for service. You can secure the current control settings, so that they cannot be inadvertently changed. No image appears G Is the power cord of horizontal or vertical the screen? light on the PC. properly to turn...
User Manual
Page 20
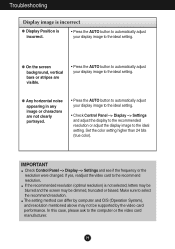
G Any horizontal noise appearing in any image or characters are visible. • Press the AUTO button to automatically adjust your display image to the ideal setting. If yes, readjust the video card to the ideal setting. IMPORTANT Check Control Panel --> Display --> Settings and see if the frequency or the resolution were changed. If the recommended resolution (optimal resolution) is incorrect. • Press the AUTO button to automatically adjust your display image to the ideal setting. • Check Control Panel --> Display --> Settings and adjust the display to...
G Any horizontal noise appearing in any image or characters are visible. • Press the AUTO button to automatically adjust your display image to the ideal setting. If yes, readjust the video card to the ideal setting. IMPORTANT Check Control Panel --> Display --> Settings and see if the frequency or the resolution were changed. If the recommended resolution (optimal resolution) is incorrect. • Press the AUTO button to automatically adjust your display image to the ideal setting. • Check Control Panel --> Display --> Settings and adjust the display to...
User Manual
Page 21
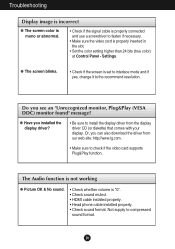
...; Make sure to compressed sound format. 20 G The screen blinks. • Check if the screen is properly inserted in the slot. • Set the color setting higher than 24 bits (true color) at Control Panel - G Have you see an "Unrecognized monitor, Plug&Play (VESA DDC) monitor found" message? The Audio function is not working G Picture OK & No sound. • Check whether volume is "0". • Check sound muted. • HDMI cable installed properly. • Head phone cable installed properly. • Check sound...
...; Make sure to compressed sound format. 20 G The screen blinks. • Check if the screen is properly inserted in the slot. • Set the color setting higher than 24 bits (true color) at Control Panel - G Have you see an "Unrecognized monitor, Plug&Play (VESA DDC) monitor found" message? The Audio function is not working G Picture OK & No sound. • Check whether volume is "0". • Check sound muted. • HDMI cable installed properly. • Head phone cable installed properly. • Check sound...

User Manual
Page 22
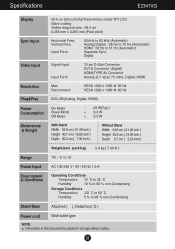
...Freq. Specifications E2241V Display 54.6 cm (21.5 inch) Flat Panel Active matrix-TFT LCD Anti-Glare coating Visible diagonal size : 54.6 cm 0.248 mm x 0.248 mm (Pixel pitch) Sync Input Horizontal Freq. Digital Video Input Signal Input Input Form 15 pin D-Sub Connector DVI-D Connector (Digital) HDMI(TYPE-A) Connector Analog (0.7 Vp-p/ 75 ohm), Digital, HDMI Resolution Plug&Play Max Recommend VESA 1920 x 1080 @ 60 Hz VESA 1920 x 1080 @ 60 Hz DDC 2B(Analog, Digital, HDMI) Power Consumption On Mode Sleep Mode Off Mode : 24 W(Typ.) < 0.3 W < 0.3 W Dimensions & Weight With Stand...
...Freq. Specifications E2241V Display 54.6 cm (21.5 inch) Flat Panel Active matrix-TFT LCD Anti-Glare coating Visible diagonal size : 54.6 cm 0.248 mm x 0.248 mm (Pixel pitch) Sync Input Horizontal Freq. Digital Video Input Signal Input Input Form 15 pin D-Sub Connector DVI-D Connector (Digital) HDMI(TYPE-A) Connector Analog (0.7 Vp-p/ 75 ohm), Digital, HDMI Resolution Plug&Play Max Recommend VESA 1920 x 1080 @ 60 Hz VESA 1920 x 1080 @ 60 Hz DDC 2B(Analog, Digital, HDMI) Power Consumption On Mode Sleep Mode Off Mode : 24 W(Typ.) < 0.3 W < 0.3 W Dimensions & Weight With Stand...

User Manual
Page 23
...Sync. Specifications E2341V Display 58.4 cm (23 inch) Flat Panel Active matrix-TFT LCD Anti-Glare coating Visible diagonal size : 58.4 cm 0.265 mm x 0.265 mm (Pixel pitch) Sync Input Horizontal Freq. Digital Video Input Signal Input Input Form 15 pin D-Sub Connector DVI-D Connector (Digital) HDMI(TYPE-A) Connector Analog (0.7 Vp-p/ 75 ohm), Digital, HDMI Resolution Plug&Play Max Recommend VESA 1920 x 1080 @ 60 Hz VESA 1920 x 1080 @ 60 Hz DDC 2B(Analog, Digital, HDMI) Power Consumption On Mode Sleep Mode Off Mode : 28 W(Typ.) < 0.3 W < 0.3 W Dimensions & Weight With Stand...
...Sync. Specifications E2341V Display 58.4 cm (23 inch) Flat Panel Active matrix-TFT LCD Anti-Glare coating Visible diagonal size : 58.4 cm 0.265 mm x 0.265 mm (Pixel pitch) Sync Input Horizontal Freq. Digital Video Input Signal Input Input Form 15 pin D-Sub Connector DVI-D Connector (Digital) HDMI(TYPE-A) Connector Analog (0.7 Vp-p/ 75 ohm), Digital, HDMI Resolution Plug&Play Max Recommend VESA 1920 x 1080 @ 60 Hz VESA 1920 x 1080 @ 60 Hz DDC 2B(Analog, Digital, HDMI) Power Consumption On Mode Sleep Mode Off Mode : 28 W(Typ.) < 0.3 W < 0.3 W Dimensions & Weight With Stand...
User Manual
Page 24
... (Automatic) HDMI : 56 Hz to change without notice. 23 Specifications E2341VG Display 58.4 cm (23 inch) Flat Panel Active matrix-TFT LCD Glare coating Visible diagonal size : 58.4 cm 0.265 mm x 0.265 mm (Pixel pitch) Sync Input Horizontal Freq. Digital Video Input Signal Input Input Form 15 pin D-Sub Connector DVI-D Connector (Digital) HDMI(TYPE-A) Connector Analog (0.7 Vp-p/ 75 ohm), Digital, HDMI Resolution Plug&Play Max Recommend VESA 1920 x 1080 @ 60 Hz VESA 1920 x 1080 @ 60 Hz DDC 2B(Analog, Digital, HDMI) Power Consumption On Mode Sleep Mode Off Mode : 28...
... (Automatic) HDMI : 56 Hz to change without notice. 23 Specifications E2341VG Display 58.4 cm (23 inch) Flat Panel Active matrix-TFT LCD Glare coating Visible diagonal size : 58.4 cm 0.265 mm x 0.265 mm (Pixel pitch) Sync Input Horizontal Freq. Digital Video Input Signal Input Input Form 15 pin D-Sub Connector DVI-D Connector (Digital) HDMI(TYPE-A) Connector Analog (0.7 Vp-p/ 75 ohm), Digital, HDMI Resolution Plug&Play Max Recommend VESA 1920 x 1080 @ 60 Hz VESA 1920 x 1080 @ 60 Hz DDC 2B(Analog, Digital, HDMI) Power Consumption On Mode Sleep Mode Off Mode : 28...

User Manual
Page 25
... kHz (Automatic) Analog,Digital : 56 Hz to 75 Hz (Automatic) HDMI : 56 Hz to change without notice. 24 Digital Video Input Signal Input Input Form 15 pin D-Sub Connector DVI-D Connector (Digital) HDMI(TYPE-A) Connector Analog (0.7 Vp-p/ 75 ohm), Digital, HDMI Resolution Plug&Play Max Recommend VESA 1920 x 1080 @ 60 Hz VESA 1920 x 1080 @ 60 Hz DDC 2B(Analog, Digital, HDMI) Power Consumption On Mode Sleep Mode Off Mode : 25 W(Typ.) < 0.3 W < 0.3 W Dimensions & Weight With Stand Width 56.9 cm ( 22.40 inch ) Height 41.9 cm...
... kHz (Automatic) Analog,Digital : 56 Hz to 75 Hz (Automatic) HDMI : 56 Hz to change without notice. 24 Digital Video Input Signal Input Input Form 15 pin D-Sub Connector DVI-D Connector (Digital) HDMI(TYPE-A) Connector Analog (0.7 Vp-p/ 75 ohm), Digital, HDMI Resolution Plug&Play Max Recommend VESA 1920 x 1080 @ 60 Hz VESA 1920 x 1080 @ 60 Hz DDC 2B(Analog, Digital, HDMI) Power Consumption On Mode Sleep Mode Off Mode : 25 W(Typ.) < 0.3 W < 0.3 W Dimensions & Weight With Stand Width 56.9 cm ( 22.40 inch ) Height 41.9 cm...
User Manual
Page 26
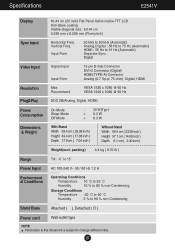
....38 inch ) Height 37.1 cm ( 14.60 inch ) Depth 6.1 cm ( 2.40 inch ) Weight(excl. Input Form 30 kHz to 83 kHz (Automatic) Analog,Digital : 56 Hz to 75 Hz (Automatic) HDMI : 56 Hz to change without notice. 25 Specifications E2541V Display 63.44 cm (25 inch) Flat Panel Active matrix-TFT LCD Anti-Glare coating Visible diagonal size : 63.44 cm 0.288 mm x 0.288 mm (Pixel pitch) Sync Input Horizontal Freq. Vertical...
....38 inch ) Height 37.1 cm ( 14.60 inch ) Depth 6.1 cm ( 2.40 inch ) Weight(excl. Input Form 30 kHz to 83 kHz (Automatic) Analog,Digital : 56 Hz to 75 Hz (Automatic) HDMI : 56 Hz to change without notice. 25 Specifications E2541V Display 63.44 cm (25 inch) Flat Panel Active matrix-TFT LCD Anti-Glare coating Visible diagonal size : 63.44 cm 0.288 mm x 0.288 mm (Pixel pitch) Sync Input Horizontal Freq. Vertical...


