
Owners Manual
Page 1
Model number : Serial number : LG DLP PROJECTOR DX540 OWNER'S MANUAL Please read this information to your set . Retain it for future reference. Record model number and serial number of the set and quote this manual carefully before operating your dealer when you require service. See the label attached on the bottom of the set .
Model number : Serial number : LG DLP PROJECTOR DX540 OWNER'S MANUAL Please read this information to your set . Retain it for future reference. Record model number and serial number of the set and quote this manual carefully before operating your dealer when you require service. See the label attached on the bottom of the set .
Owners Manual
Page 2
In a domestic environment this product may cause radio interference, in which case the user may be required to take adequate measures. DLP PROJECTOR Warning This is a class A product.
In a domestic environment this product may cause radio interference, in which case the user may be required to take adequate measures. DLP PROJECTOR Warning This is a class A product.

Owners Manual
Page 3
...For more detailed information about disposal of your old appliance 1. When this crossed-out wheeled bin symbol is attached to the projector ..........38 Specifications 39 Disposal of separately from the municipal waste stream via designated collection facilities appointed by the European Directive 2002/... Optional Extras 11 Installing and Composition Installation Instructions 12 Basic Operation of the Projector 13 Using Kensington Security System 14 Turning on the Projector 15 Turning off the Projector 15 Focus and Position of the Screen Image........16 Selecting source mode 16 ...
...For more detailed information about disposal of your old appliance 1. When this crossed-out wheeled bin symbol is attached to the projector ..........38 Specifications 39 Disposal of separately from the municipal waste stream via designated collection facilities appointed by the European Directive 2002/... Optional Extras 11 Installing and Composition Installation Instructions 12 Basic Operation of the Projector 13 Using Kensington Security System 14 Turning on the Projector 15 Turning off the Projector 15 Focus and Position of the Screen Image........16 Selecting source mode 16 ...
Owners Manual
Page 4
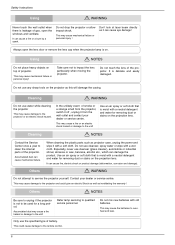
...is restricted. Safety Instructions Safety Instructions Please take note of the safety instructions to increase and might be careful not to the projector. ➟ After reading this instruction may cause serious injuries and even death. Indoor Installation NOTES Disconnect from the mains and ... and stable surface. Only use a suitable stand. This may cause a fire or an electric shock hazard ! 4 Do not place the projector close to telephone wires, lightning rods or gas pipe. Do not connect ground to sources of electric shock caused by a qualified electrician. Indoor...
...is restricted. Safety Instructions Safety Instructions Please take note of the safety instructions to increase and might be careful not to the projector. ➟ After reading this instruction may cause serious injuries and even death. Indoor Installation NOTES Disconnect from the mains and ... and stable surface. Only use a suitable stand. This may cause a fire or an electric shock hazard ! 4 Do not place the projector close to telephone wires, lightning rods or gas pipe. Do not connect ground to sources of electric shock caused by a qualified electrician. Indoor...
Owners Manual
Page 5
... covers (except lens cover). This may cause a fire hazard ! This may cause a fire or an electric shock hazard or damage to the projector switch it off and unplug it from physical or mechanical abuse, such as being swallowed by a child please consult a doctor immediately. Do not ...remove any part of the projector such as a heater. Eye damage may cause an electric shock hazard ! Pay particular attention to the unit! WARNING Power NOTES Never touch the...
... covers (except lens cover). This may cause a fire hazard ! This may cause a fire or an electric shock hazard or damage to the projector switch it off and unplug it from physical or mechanical abuse, such as being swallowed by a child please consult a doctor immediately. Do not ...remove any part of the projector such as a heater. Eye damage may cause an electric shock hazard ! Pay particular attention to the unit! WARNING Power NOTES Never touch the...
Owners Manual
Page 6
...control. 6 Use an air spray or soft cloth that is moist with a neutral detergent and water for removing dust or stains on the projector as it can cause mechanical failure. This may cause mechanical failure or personal injury ! Refer lamp servicing to impact the lens particularly when ...moving the projector. Don't look at laser beam directly as this will damage the casing. Take care not to qualified service personnel. In the unlikely ...
...control. 6 Use an air spray or soft cloth that is moist with a neutral detergent and water for removing dust or stains on the projector as it can cause mechanical failure. This may cause mechanical failure or personal injury ! Refer lamp servicing to impact the lens particularly when ...moving the projector. Don't look at laser beam directly as this will damage the casing. Take care not to qualified service personnel. In the unlikely ...
Owners Manual
Page 7
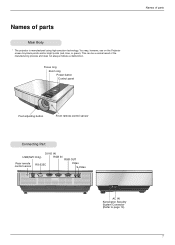
Names of the manufacturing process and does not always indicate a malfunction. This can be a normal result of parts Main Body * The projector is manufactured using high-precision technology. Focus ring Zoom ring Power button Control panel Names of parts Foot adjusting button Front remote control sensor Connecting Part DVI-D IN USB(SVC Only) RGB IN RGB OUT Rear remote control sensor RS-232C Video S-Video AC IN Kensington Security System Connector (Refer to page 14) 7 You may, however, see on the Projector screen tiny black points and/or bright points (red, blue, or green).
Names of the manufacturing process and does not always indicate a malfunction. This can be a normal result of parts Main Body * The projector is manufactured using high-precision technology. Focus ring Zoom ring Power button Control panel Names of parts Foot adjusting button Front remote control sensor Connecting Part DVI-D IN USB(SVC Only) RGB IN RGB OUT Rear remote control sensor RS-232C Video S-Video AC IN Kensington Security System Connector (Refer to page 14) 7 You may, however, see on the Projector screen tiny black points and/or bright points (red, blue, or green).
Owners Manual
Page 8
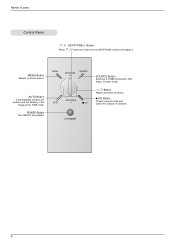
MENU Button Selects or closes menus. A OK Button Checks present mode and saves the change of menus. MENU SOURCE KEYSTONE KEYSTONE AUTO OK POWER SOURCE Button Switches to enter into the KEYSTONE function and adjust it. Button Press / buttons to RGB(Component), DVI, Video, S-Video mode. / Button Adjusts functions of functions. 8 POWER Button Turn ON/OFF the projector. AUTO Button It automatically corrects the position and the shaking of parts Control Panel / , KEYSTONE+/- Names of the image at the RGB mode.
MENU Button Selects or closes menus. A OK Button Checks present mode and saves the change of menus. MENU SOURCE KEYSTONE KEYSTONE AUTO OK POWER SOURCE Button Switches to enter into the KEYSTONE function and adjust it. Button Press / buttons to RGB(Component), DVI, Video, S-Video mode. / Button Adjusts functions of functions. 8 POWER Button Turn ON/OFF the projector. AUTO Button It automatically corrects the position and the shaking of parts Control Panel / , KEYSTONE+/- Names of the image at the RGB mode.
Owners Manual
Page 10
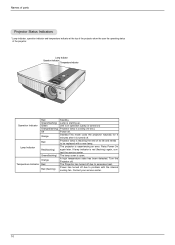
...Off Orange Red Red(flashing) Green(flashing) Orange Red Red (flashing) Standby. Unit is in operation (Lamp is turned on) Projector lamp is experiencing an error. The projector is cooling (10 sec.) Power off. The lamp cover is turned off due to excessive heat. A high temperature state has...minutes after it is open. If lamp indicator is reaching the end of the projector. Names of parts Projector Status Indicators * Lamp indicator, operation indicator and temperature indicator at the top of the projector show the user the operating status of its life and needs to be replaced with...
...Off Orange Red Red(flashing) Green(flashing) Orange Red Red (flashing) Standby. Unit is in operation (Lamp is turned on) Projector lamp is experiencing an error. The projector is cooling (10 sec.) Power off. The lamp cover is turned off due to excessive heat. A high temperature state has...minutes after it is open. If lamp indicator is reaching the end of the projector. Names of parts Projector Status Indicators * Lamp indicator, operation indicator and temperature indicator at the top of the projector show the user the operating status of its life and needs to be replaced with...
Owners Manual
Page 11
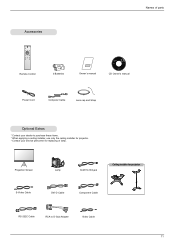
... cap and Strap Optional Extras * Contact your dealer to purchase these items. * When applying a ceiling installer, use only the ceiling installer for projector. * Contact your service personnel for projector S-Video Cable DVI-D Cable Component Cable RS-232C Cable RCA to RCA jack Ceiling installer for replacing of lamp. Projection Screen Lamp SCART...
... cap and Strap Optional Extras * Contact your dealer to purchase these items. * When applying a ceiling installer, use only the ceiling installer for projector. * Contact your service personnel for projector S-Video Cable DVI-D Cable Component Cable RS-232C Cable RCA to RCA jack Ceiling installer for replacing of lamp. Projection Screen Lamp SCART...
Owners Manual
Page 12
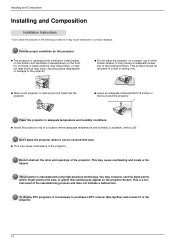
...-precision technology. Do not block or place anything near these holes, or internal heat build-up may prevent a adequate ventilation of the projector bottom. It may occur, causing picture degradation or damage to purchase a DTV receiver (Set-top Box) and connect it can be mounted ... not indicate a malfunction. It may cause overheating and create a fire hazard. G Do not place the projector on a carpet, rug or other similar surface. G Never push projector or spill any kind of the projector. To display DTV programs, it is equipped with dust. G This may , however, see tiny black ...
...-precision technology. Do not block or place anything near these holes, or internal heat build-up may prevent a adequate ventilation of the projector bottom. It may occur, causing picture degradation or damage to purchase a DTV receiver (Set-top Box) and connect it can be mounted ... not indicate a malfunction. It may cause overheating and create a fire hazard. G Do not place the projector on a carpet, rug or other similar surface. G Never push projector or spill any kind of the projector. To display DTV programs, it is equipped with dust. G This may , however, see tiny black ...
Owners Manual
Page 13
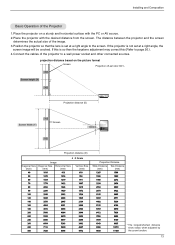
projection distance based on a sturdy and horizontal surface with the PC or AV source. 2.Place the projector with the desired distance from the screen. Installing and Composition Basic Operation of the Projector 1.Place the projector on the picture format Screen Projection off-set ratio:100% X/2 Screen height (X) X/2 Projection distance (D) Screen... the keystone adjustment may correct this (Refer to page 26.). 4.Connect the cables of the image. 3.Position the projector so that the lens is not set at a right angle, the screen image will be crooked. The distance between the...
projection distance based on a sturdy and horizontal surface with the PC or AV source. 2.Place the projector with the desired distance from the screen. Installing and Composition Basic Operation of the Projector 1.Place the projector on the picture format Screen Projection off-set ratio:100% X/2 Screen height (X) X/2 Projection distance (D) Screen... the keystone adjustment may correct this (Refer to page 26.). 4.Connect the cables of the image. 3.Position the projector so that the lens is not set at a right angle, the screen image will be crooked. The distance between the...

Owners Manual
Page 14
... detailed installation and use of the Kensington company that deals with expensive electronic equipment such as below. Installing and Composition Using Kensington Security System G The projector has a 'Kensington' Security System Connector on the side panel. Connect the 'Kensington' Security System cable as notebook PCs or...
... detailed installation and use of the Kensington company that deals with expensive electronic equipment such as below. Installing and Composition Using Kensington Security System G The projector has a 'Kensington' Security System Connector on the side panel. Connect the 'Kensington' Security System cable as notebook PCs or...
Owners Manual
Page 15
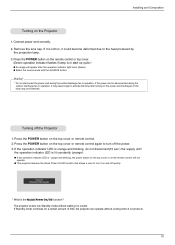
...not operate. Installing and Composition Turning on , it could become deformed due to the heat produced by the projection lamp. 3. Power off the Projector 1. If it may takes longer to activate the lamp after the operation indicator light turns (Green). Press the POWER button on the remote control... will appear after turning on the power and the lifespan of time, the projector can operate without waiting it is disconnected during the suction/discharge fan in operation, it is orange and blinking, the power button on ...
...not operate. Installing and Composition Turning on , it could become deformed due to the heat produced by the projection lamp. 3. Power off the Projector 1. If it may takes longer to activate the lamp after the operation indicator light turns (Green). Press the POWER button on the remote control... will appear after turning on the power and the lifespan of time, the projector can operate without waiting it is disconnected during the suction/discharge fan in operation, it is orange and blinking, the power button on ...

Owners Manual
Page 16
...lock the foot in the proper position. 2. Release the button to make a fine tune of the length of the projector. Selecting source mode 1. Turn the foot at the bottom of the projector by pushing foot adjusting button as below . 1. After raising the front foot, do not press down on the ...lens. While pressing the foot adjusting button, raise or lower the projector to the screen. RGB DVI Component S-Video Video 16 Installing and Composition Focus and Position of the Screen Image When an image appears on the...
...lock the foot in the proper position. 2. Release the button to make a fine tune of the length of the projector. Selecting source mode 1. Turn the foot at the bottom of the projector by pushing foot adjusting button as below . 1. After raising the front foot, do not press down on the ...lens. While pressing the foot adjusting button, raise or lower the projector to the screen. RGB DVI Component S-Video Video 16 Installing and Composition Focus and Position of the Screen Image When an image appears on the...
Owners Manual
Page 17
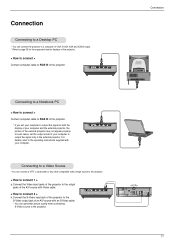
...17 Connect the Video input jacks of the projector to the output jacks of the A/V source with your computer to output the signal only to connect 2 > b. Connection Connecting to a Desktop PC * You can connect the projector to a computer of VGA, SVGA, XGA and SXGA output. * Refer to page... 35 for the supported monitor displays of the projector. < How to connect > Connect computer cable to RGB IN of the projector. * If you set the output mode of your computer....
...17 Connect the Video input jacks of the projector to the output jacks of the A/V source with your computer to output the signal only to connect 2 > b. Connection Connecting to a Desktop PC * You can connect the projector to a computer of VGA, SVGA, XGA and SXGA output. * Refer to page... 35 for the supported monitor displays of the projector. < How to connect > Connect computer cable to RGB IN of the projector. * If you set the output mode of your computer....
Owners Manual
Page 18
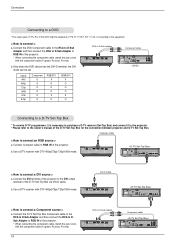
...Connection Connecting to a DVD * The output jacks (Y, PB, PR) of the DVD might be set. Computer Cable < How to the owner's manual of the projector. Use a DTV receiver with the component cable.(Y=green, PB=blue, PR=red) 18 RCA to connect > a. Signal 480i 480p 720p 1080i 576i 576p Component O...a D-TV Set-Top Box * To receive D-TV programmes, it is necessary to purchase a D-TV receiver (Set-Top Box) and connect it to the projector. * Please refer to connect an RGB source > a. b. Connect Computer cable to connect a DVI source > a. Use a DTV receiver with the component ...
...Connection Connecting to a DVD * The output jacks (Y, PB, PR) of the DVD might be set. Computer Cable < How to the owner's manual of the projector. Use a DTV receiver with the component cable.(Y=green, PB=blue, PR=red) 18 RCA to connect > a. Signal 480i 480p 720p 1080i 576i 576p Component O...a D-TV Set-Top Box * To receive D-TV programmes, it is necessary to purchase a D-TV receiver (Set-Top Box) and connect it to the projector. * Please refer to connect an RGB source > a. b. Connect Computer cable to connect a DVI source > a. Use a DTV receiver with the component ...
Owners Manual
Page 19
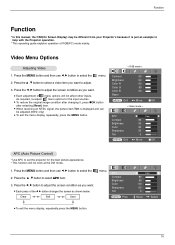
...options will not work at the DVI mode. 1. G When receiving an NTSC signal, the picture item Tint is just an example to help with the Projector operation. * This operating guide explains operation of the F, G button changes the screen as you want to adjust the screen condition as shown below. Press... APC Contrast Brightness Color Sharpness Tint F Clear G 80 50 50 50 0 MENU Exit F G Move OK APC (Auto Picture Control) * Use APC to set the projector for the input sources. G To restore the original image condition after changing it is displayed and can be different from your...
...options will not work at the DVI mode. 1. G When receiving an NTSC signal, the picture item Tint is just an example to help with the Projector operation. * This operating guide explains operation of the F, G button changes the screen as you want to adjust the screen condition as shown below. Press... APC Contrast Brightness Color Sharpness Tint F Clear G 80 50 50 50 0 MENU Exit F G Move OK APC (Auto Picture Control) * Use APC to set the projector for the input sources. G To restore the original image condition after changing it is displayed and can be different from your...

Owners Manual
Page 24
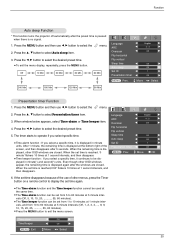
...reverses the projected image horizontally. D E Move OK Flip vertical Function * This function reverses the projected image vertically. * When you hang the projector upside down from the ceiling , you will be reversed. Press the MENU button and then use F, G button to reverse the image vertically... F Off G Set ID F 1 G Presentation timer F Off G MENU Prev. D E Move OK Sleep time Function * The sleep timer turns the projector off at the preset time. 1. Use this function when rear projecting an image. 1. menu. Press the F, G button to select the 2. Press the ...
...reverses the projected image horizontally. D E Move OK Flip vertical Function * This function reverses the projected image vertically. * When you hang the projector upside down from the ceiling , you will be reversed. Press the MENU button and then use F, G button to reverse the image vertically... F Off G Set ID F 1 G Presentation timer F Off G MENU Prev. D E Move OK Sleep time Function * The sleep timer turns the projector off at the preset time. 1. Use this function when rear projecting an image. 1. menu. Press the F, G button to select the 2. Press the ...
Owners Manual
Page 25
... select the menu. 2. Press the MENU button and then use F, G button to select the desired preset time. 5. Function Auto sleep Function * This function turns the projector off automatically after 5 seconds. Press the D , E button to select Presentation timer item. 3. Press the D , E button to select Auto sleep item. 3. Press the F, G button to select...
... select the menu. 2. Press the MENU button and then use F, G button to select the desired preset time. 5. Function Auto sleep Function * This function turns the projector off automatically after 5 seconds. Press the D , E button to select Presentation timer item. 3. Press the D , E button to select Auto sleep item. 3. Press the F, G button to select...


