
Owners Manual
Page 3
... via designated collection facilities appointed by the European Directive 2002/96/EC. 2. When this crossed-out wheeled bin symbol is attached to the projector ..........38 Specifications 39 Disposal of your old appliance 1. Contents Contents Safety Instructions 4 Names of parts Main Body 7 Connecting Part 7 Control... 25 Presentation timer Function 25 Using Keystone Function 26 Using Blank Function 26 Selecting Blank image color 26 Lamp mode Function 27 Checking lamp time 27 Using Still Function 27 Screen Menu Options Auto configure Function 28 Using Phase Function 28 Using ...
... via designated collection facilities appointed by the European Directive 2002/96/EC. 2. When this crossed-out wheeled bin symbol is attached to the projector ..........38 Specifications 39 Disposal of your old appliance 1. Contents Contents Safety Instructions 4 Names of parts Main Body 7 Connecting Part 7 Control... 25 Presentation timer Function 25 Using Keystone Function 26 Using Blank Function 26 Selecting Blank image color 26 Lamp mode Function 27 Checking lamp time 27 Using Still Function 27 Screen Menu Options Auto configure Function 28 Using Phase Function 28 Using ...
Owners Manual
Page 5
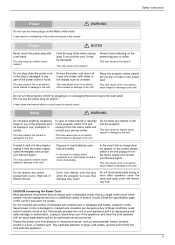
...cause a fire hazard ! that is loose. Protect the power cord from the mains supply outlet immediately and consult your service center. Do not turn the projector On/Off by a child please consult a doctor immediately. If water is damaged or any covers (except lens cover). Overloaded wall outlets,loose or damaged...may cause an electric shock hazard or damage to the unit! Do not touch metal parts during or soon after operation since the vents and lamp cover will not trip or tread on top of impact shock or damage to be damaged. Safety Instructions Power Do not use . Do ...
...cause a fire hazard ! that is loose. Protect the power cord from the mains supply outlet immediately and consult your service center. Do not turn the projector On/Off by a child please consult a doctor immediately. If water is damaged or any covers (except lens cover). Overloaded wall outlets,loose or damaged...may cause an electric shock hazard or damage to the unit! Do not touch metal parts during or soon after operation since the vents and lamp cover will not trip or tread on top of impact shock or damage to be damaged. Safety Instructions Power Do not use . Do ...
Owners Manual
Page 6
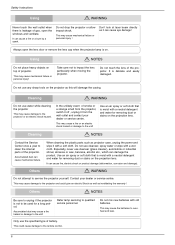
... may cause a fire hazard or damage to clean the internal parts of gas, open the lens door or remove the lens cap when the projector lamp is moist with a wet cloth. It can cause fire, electric shock or product damage (deformation, corrosion and damage). Using NOTES Do not place...the wall outlet and contact your dealer or service centre. This may cause mechanical failure or personal injury ! Do not touch the lens of projector. Do not use any sharp tools on . Accumulated dust can damage the product. Others NOTES Be sure to impact the lens particularly when ...
... may cause a fire hazard or damage to clean the internal parts of gas, open the lens door or remove the lens cap when the projector lamp is moist with a wet cloth. It can cause fire, electric shock or product damage (deformation, corrosion and damage). Using NOTES Do not place...the wall outlet and contact your dealer or service centre. This may cause mechanical failure or personal injury ! Do not touch the lens of projector. Do not use any sharp tools on . Accumulated dust can damage the product. Others NOTES Be sure to impact the lens particularly when ...
Owners Manual
Page 10
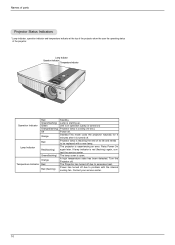
... state has been detected. Contact your service center. 10 The lamp cover is experiencing an error. Unit is in operation (Lamp is turned on) Projector lamp is reaching the end of the projector. The projector is open. Turn the Projector off. Names of parts Projector Status Indicators * Lamp indicator, operation indicator and temperature indicator at the top of the...
... state has been detected. Contact your service center. 10 The lamp cover is experiencing an error. Unit is in operation (Lamp is turned on) Projector lamp is reaching the end of the projector. The projector is open. Turn the Projector off. Names of parts Projector Status Indicators * Lamp indicator, operation indicator and temperature indicator at the top of the...
Owners Manual
Page 11
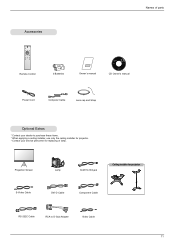
Projection Screen Lamp SCART to D-Sub Adapter Video Cable 11 Names of parts Accessories POWER MENU KEYSTONE SOURCE AUTO KEYSTONE OK BLANK LASER ARC TIMER STILL Remote Control 1.... Computer Cable Lens cap and Strap Optional Extras * Contact your dealer to purchase these items. * When applying a ceiling installer, use only the ceiling installer for projector. * Contact your service personnel for projector S-Video Cable DVI-D Cable Component Cable RS-232C Cable RCA to RCA jack Ceiling installer for replacing of...
Projection Screen Lamp SCART to D-Sub Adapter Video Cable 11 Names of parts Accessories POWER MENU KEYSTONE SOURCE AUTO KEYSTONE OK BLANK LASER ARC TIMER STILL Remote Control 1.... Computer Cable Lens cap and Strap Optional Extras * Contact your dealer to purchase these items. * When applying a ceiling installer, use only the ceiling installer for projector. * Contact your service personnel for projector S-Video Cable DVI-D Cable Component Cable RS-232C Cable RCA to RCA jack Ceiling installer for replacing of...
Owners Manual
Page 15
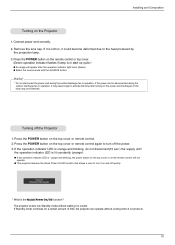
... the POWER button on the remote control or top cover. (Green operation indicator flashes if lamp is disconnected during the suction/discharge fan in operation. The projector enters into Standby mode without cooling when it may be shortened. Press the POWER button on the top cover or ... cord correctly. 2. G If the operation indicator LED is left on and off the power. 3. G This projector features the Quick Power On/Off function that allows a user to activate the lamp after the operation indicator light turns (Green). If it is orange and blinking, the power button on the top...
... the POWER button on the remote control or top cover. (Green operation indicator flashes if lamp is disconnected during the suction/discharge fan in operation. The projector enters into Standby mode without cooling when it may be shortened. Press the POWER button on the top cover or ... cord correctly. 2. G If the operation indicator LED is left on and off the power. 3. G This projector features the Quick Power On/Off function that allows a user to activate the lamp after the operation indicator light turns (Green). If it is orange and blinking, the power button on the top...

Owners Manual
Page 26
... Lamp time MENU Prev. 0 F Logo G F High Bright G 11 Hr D E Move F G Select 26 G Keystone can choose the background color. (Refer to 'Selecting blank image color') 2. Press any objects when the projector is a trapezoid shape. * Only use . Selecting Blank image color 1. Press the F, G button to select the ... Function Special Menu Options Using Keystone Function * Use this function when the screen is not at a right angle to the projector and the image is under operation as you want to use the Keystone function when you can also access this could cause the...
... Lamp time MENU Prev. 0 F Logo G F High Bright G 11 Hr D E Move F G Select 26 G Keystone can choose the background color. (Refer to 'Selecting blank image color') 2. Press any objects when the projector is a trapezoid shape. * Only use . Selecting Blank image color 1. Press the F, G button to select the ... Function Special Menu Options Using Keystone Function * Use this function when the screen is not at a right angle to the projector and the image is under operation as you want to use the Keystone function when you can also access this could cause the...
Owners Manual
Page 27
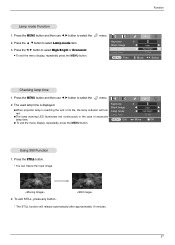
...F Logo G GWhen projector lamp is displayed. MENU Exit F G Move OK G To exit the menu display, repeatedly, press the MENU button. Using Still Function 1. To exit STILL, press any button . * The STILL function will turn Lamp mode red. Press the F, G button to select Lamp mode item. 3. Press...To exit the menu display, repeatedly press the MENU button. Function Lamp mode Function 1. The used lamp time is reaching the end of excessive F High Bright G 11 Hr lamp time. menu. Lamp time GThe lamp warning LED illuminates red continuously in the case of its life, ...
...F Logo G GWhen projector lamp is displayed. MENU Exit F G Move OK G To exit the menu display, repeatedly, press the MENU button. Using Still Function 1. To exit STILL, press any button . * The STILL function will turn Lamp mode red. Press the F, G button to select Lamp mode item. 3. Press...To exit the menu display, repeatedly press the MENU button. Function Lamp mode Function 1. The used lamp time is reaching the end of excessive F High Bright G 11 Hr lamp time. menu. Lamp time GThe lamp warning LED illuminates red continuously in the case of its life, ...
Owners Manual
Page 36
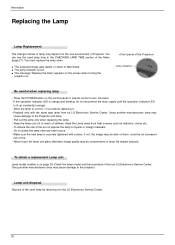
... image may cause damage to the Projector and lamp. - Make sure the new lamp is securely tightened with the same type lamp from an LG Electronics Service Center. Check the lamp model and then purchase it . - Using another manufacturers lamp may be dark or there could be compromised or lamp life maybe reduced. Lamp indicators Be careful when replacing...
... image may cause damage to the Projector and lamp. - Make sure the new lamp is securely tightened with the same type lamp from an LG Electronics Service Center. Check the lamp model and then purchase it . - Using another manufacturers lamp may be dark or there could be compromised or lamp life maybe reduced. Lamp indicators Be careful when replacing...
Owners Manual
Page 37
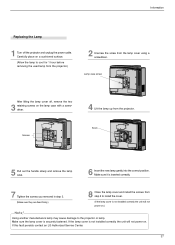
...screws you removed in step 3. (Make sure they are fixed firmly.) 8 Close the lamp cover and install the screws from the lamp cover using a screwdriver. If this fault persists contact an LG Authorized Service Center. 37 Make sure it is not installed correctly the unit will not... cushioned surface. (Allow the lamp to cool for 1 hour before removing the used lamp from the projector.) 2 Unscrew the screw from step 2 to the projector or lamp. Lamp case screw After lifting the lamp cover off the projector and unplug the power cable. Make sure the lamp cover is not installed correctly ...
...screws you removed in step 3. (Make sure they are fixed firmly.) 8 Close the lamp cover and install the screws from the lamp cover using a screwdriver. If this fault persists contact an LG Authorized Service Center. 37 Make sure it is not installed correctly the unit will not... cushioned surface. (Allow the lamp to cool for 1 hour before removing the used lamp from the projector.) 2 Unscrew the screw from step 2 to the projector or lamp. Lamp case screw After lifting the lamp cover off the projector and unplug the power cable. Make sure the lamp cover is not installed correctly ...
Owners Manual
Page 38
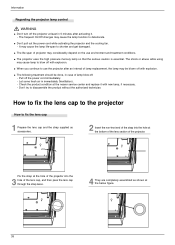
...nearer service center and replace it . - Let some fresh air in case of projector may cause lamp to disassemble the product without the authorized technician. The frequent On/Off changes may cause the lamp life-span to shorten and get damaged. Check the product condition at the hole of... assembled as accessories. 2 Insert the non-knot end of the strap into the 3 hole of the projector. It may cause the lamp function to use environment and treatment conditions. G The life-span of lamp blow-off. - Pull off the power cord immediately. - G Don't pull out the power cord ...
...nearer service center and replace it . - Let some fresh air in case of projector may cause lamp to disassemble the product without the authorized technician. The frequent On/Off changes may cause the lamp life-span to shorten and get damaged. Check the product condition at the hole of... assembled as accessories. 2 Insert the non-knot end of the strap into the 3 hole of the projector. It may cause the lamp function to use environment and treatment conditions. G The life-span of lamp blow-off. - Pull off the power cord immediately. - G Don't pull out the power cord ...
Owners Manual
Page 39
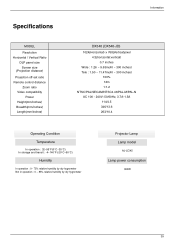
Specifications MODEL Resolution Horizontal / Vertical Ratio DLP panel size Screen size (Projection distance) Projection off-set ratio Remote control distance Zoom ratio Video compatibility Power Height(mm/inches) Breadth(mm/inches) Length(mm/inches) Information DX540 (DX540-JD) 1024(Horizontal) x 768(Vertical)pixel 4:3(horizontal:vertical) 0.7 inches Wide : 1.26 ~ 9.63m(40 ~ 300...20°C~60°C) Humidity In operation : 0~ 75% relative humidity by dry hygrometer Not in operation : 0 ~ 85% relative humidity by dry hygrometer Projector Lamp Lamp model AJ-LDX5 Lamp power consumption 300W 39
Specifications MODEL Resolution Horizontal / Vertical Ratio DLP panel size Screen size (Projection distance) Projection off-set ratio Remote control distance Zoom ratio Video compatibility Power Height(mm/inches) Breadth(mm/inches) Length(mm/inches) Information DX540 (DX540-JD) 1024(Horizontal) x 768(Vertical)pixel 4:3(horizontal:vertical) 0.7 inches Wide : 1.26 ~ 9.63m(40 ~ 300...20°C~60°C) Humidity In operation : 0~ 75% relative humidity by dry hygrometer Not in operation : 0 ~ 85% relative humidity by dry hygrometer Projector Lamp Lamp model AJ-LDX5 Lamp power consumption 300W 39

