
Owner's Manual (English)
Page 6
...14 Desktop Pedestal Installation 17 Vesa Wall Mounting 17 Not using the desk-type stand 18 Swivel Stand 18 Antenna or Cable Connection 19 EXTERNAL EQUIPMENT SETUP HD Receiver Setup 20 DVD Setup 23 VCR Setup 25 Other A/V Source Setup 27 PC Setup 28 USB In Setup 34 Audio Out Setup 35 WATCHING TV / CHANNEL CONTROL Remote Control Functions 36 Turning on TV 38 Channel Selection 39 Volume Adjustment 40 On-Screen Menus Selection 41 Channel Setup - Preset 58 Manual Picture Adjustment - Color Tone - Digital Broadcasting System Captions . . .79 - Channel Editing 44 Input List 45...
...14 Desktop Pedestal Installation 17 Vesa Wall Mounting 17 Not using the desk-type stand 18 Swivel Stand 18 Antenna or Cable Connection 19 EXTERNAL EQUIPMENT SETUP HD Receiver Setup 20 DVD Setup 23 VCR Setup 25 Other A/V Source Setup 27 PC Setup 28 USB In Setup 34 Audio Out Setup 35 WATCHING TV / CHANNEL CONTROL Remote Control Functions 36 Turning on TV 38 Channel Selection 39 Volume Adjustment 40 On-Screen Menus Selection 41 Channel Setup - Preset 58 Manual Picture Adjustment - Color Tone - Digital Broadcasting System Captions . . .79 - Channel Editing 44 Input List 45...
Owner's Manual (English)
Page 9
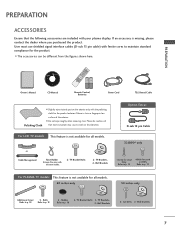
... cores to p. 18 2 - MENU BACK CC AUTO DEMO APM M/C EJECT RATIO SIMPLINK 1.5V 1.5V Remote Control, Batteries Power Cord 75Ω Round Cable Polishing Cloth I Slightly wipe stained spot on surface of that the following accessories are included with the twist holder. 2- Bolts Refer to p. 18 Refer to maintain standard compliance for stand assembly Refer to p. 18 2- Wall Brackets 2- Please be different...
... cores to p. 18 2 - MENU BACK CC AUTO DEMO APM M/C EJECT RATIO SIMPLINK 1.5V 1.5V Remote Control, Batteries Power Cord 75Ω Round Cable Polishing Cloth I Slightly wipe stained spot on surface of that the following accessories are included with the twist holder. 2- Bolts Refer to p. 18 Refer to maintain standard compliance for stand assembly Refer to p. 18 2- Wall Brackets 2- Please be different...
Owner's Manual (English)
Page 22
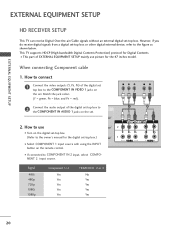
... 47 inches model. Signal 480i 480p 720p 1080i 1080p Component 1/2 Yes Yes Yes Yes Yes HDMI/DVI1, 2 or 3 No Yes Yes Yes Yes 20 I If connected to COMPONENT IN 2 input, select COMPONENT 2 input source. Y PB PR L R 1 2 2. Match the jack colors (Y = green, PB = blue, and PR = red). 2 Connect the audio output of EXTERNAL EQUIPMENT SETUP mainly use I Select COMPONENT 1 input source with using the INPUT button on the digital set-top box. (Refer to the owner's manual for Digital Contents. When connecting Component cable 1. EXTERNAL EQUIPMENT SETUP EXTERNAL EQUIPMENT SETUP...
... 47 inches model. Signal 480i 480p 720p 1080i 1080p Component 1/2 Yes Yes Yes Yes Yes HDMI/DVI1, 2 or 3 No Yes Yes Yes Yes 20 I If connected to COMPONENT IN 2 input, select COMPONENT 2 input source. Y PB PR L R 1 2 2. Match the jack colors (Y = green, PB = blue, and PR = red). 2 Connect the audio output of EXTERNAL EQUIPMENT SETUP mainly use I Select COMPONENT 1 input source with using the INPUT button on the digital set-top box. (Refer to the owner's manual for Digital Contents. When connecting Component cable 1. EXTERNAL EQUIPMENT SETUP EXTERNAL EQUIPMENT SETUP...
Owner's Manual (English)
Page 23
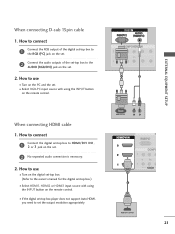
... connect 1 Connect the digital set-top box to set . How to the AUDIO (RGB/DVI) jack on the set . 2. I Turn on the remote control. RGB OUTPUT L R (DVI) 1 HDMI-DTV OUTPUT 21 RGB 1 2 When connecting HDMI cable 1. How to connect 1 Connect the RGB output of the digital set-top box to the RGB (PC) jack on the set. 2 Connect the audio outputs of the set-top box to use I If the digital set-top box player does not support Auto HDMI, you need to HDMI/DVI IN1, 2 or 3 jack on the set . 2 No separated audio connection is necessary. 2. EXTERNAL EQUIPMENT SETUP...
... connect 1 Connect the digital set-top box to set . How to the AUDIO (RGB/DVI) jack on the set . 2. I Turn on the remote control. RGB OUTPUT L R (DVI) 1 HDMI-DTV OUTPUT 21 RGB 1 2 When connecting HDMI cable 1. How to connect 1 Connect the RGB output of the digital set-top box to the RGB (PC) jack on the set. 2 Connect the audio outputs of the set-top box to use I If the digital set-top box player does not support Auto HDMI, you need to HDMI/DVI IN1, 2 or 3 jack on the set . 2 No separated audio connection is necessary. 2. EXTERNAL EQUIPMENT SETUP...
Owner's Manual (English)
Page 24
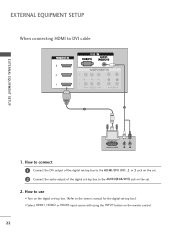
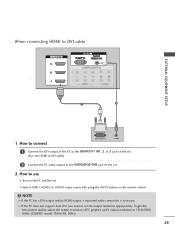
How to use I Turn on the digital set-top box. (Refer to the owner's manual for the digital set-top box.) I Select HDMI1, HDMI2 or HDMI3 input source with using the INPUT button on the set -top box to the AUDIO(RGB/DVI) jack on the remote control. 22 EXTERNAL EQUIPMENT SETUP When connecting HDMI to the HDMI/DVI IN1, 2 or 3 jack on the set. 2 Connect the audio output of the digital set . 2. How to connect 1 Connect the DVI output of the digital set-top box to DVI cable RGB 3 EXTERNAL EQUIPMENT SETUP 2 1 DVI-DTV OUTPUT L R 1.
How to use I Turn on the digital set-top box. (Refer to the owner's manual for the digital set-top box.) I Select HDMI1, HDMI2 or HDMI3 input source with using the INPUT button on the set -top box to the AUDIO(RGB/DVI) jack on the remote control. 22 EXTERNAL EQUIPMENT SETUP When connecting HDMI to the HDMI/DVI IN1, 2 or 3 jack on the set. 2 Connect the audio output of the digital set . 2. How to connect 1 Connect the DVI output of the digital set-top box to DVI cable RGB 3 EXTERNAL EQUIPMENT SETUP 2 1 DVI-DTV OUTPUT L R 1.
Owner's Manual (English)
Page 25
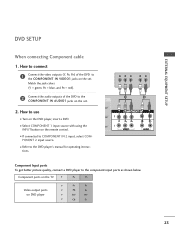
...connect a DVD player to the DVD player's manual for operating instruc- How to the COMPONENT IN AUDIO1 jacks on the DVD player, insert a DVD. PONENT 2 input source. How to connect 1 Connect the video outputs (Y, PB, PR) of the DVD to use I Refer to the component input ports as shown below. I If connected to the COMPONENT IN VIDEO1 jacks on the remote control. Component ports on the TV Y PB PR Video output ports on DVD player Y PB PR Y Pb Pr Y B-Y R-Y Y Cb Cr 23 EXTERNAL EQUIPMENT SETUP DVD SETUP When connecting Component cable 1. I Select COMPONENT...
...connect a DVD player to the DVD player's manual for operating instruc- How to the COMPONENT IN AUDIO1 jacks on the DVD player, insert a DVD. PONENT 2 input source. How to connect 1 Connect the video outputs (Y, PB, PR) of the DVD to use I Refer to the component input ports as shown below. I If connected to the COMPONENT IN VIDEO1 jacks on the remote control. Component ports on the TV Y PB PR Video output ports on DVD player Y PB PR Y Pb Pr Y B-Y R-Y Y Cb Cr 23 EXTERNAL EQUIPMENT SETUP DVD SETUP When connecting Component cable 1. I Select COMPONENT...
Owner's Manual (English)
Page 26
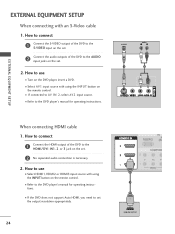
.... S-VIDEO AUDIO L R 1 2 EXTERNAL EQUIPMENT SETUP When connecting HDMI cable 1. I Refer to use I Select A V 1 input source with using the INPUT button on the set . 2. I Refer to AV IN 2, select A V 2 input source. I If connected to the DVD player's manual for operating instructions. I If the DVD does not support Auto HDMI, you need to the AUDIO input jacks on the set . 2 No separated audio connection is necessary. 2. How to connect 1 Connect the HDMI output of the DVD to set . 2 Connect the audio outputs of the DVD to use I Turn on the remote control...
.... S-VIDEO AUDIO L R 1 2 EXTERNAL EQUIPMENT SETUP When connecting HDMI cable 1. I Refer to use I Select A V 1 input source with using the INPUT button on the set . 2. I Refer to AV IN 2, select A V 2 input source. I If connected to the DVD player's manual for operating instructions. I If the DVD does not support Auto HDMI, you need to the AUDIO input jacks on the set . 2 No separated audio connection is necessary. 2. How to connect 1 Connect the HDMI output of the DVD to set . 2 Connect the audio outputs of the DVD to use I Turn on the remote control...
Owner's Manual (English)
Page 27
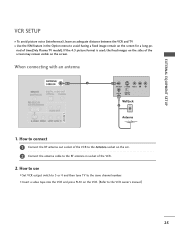
... of the VCR to the Antenna socket on the set. 2 Connect the antenna cable to the RF antenna in the Option menu to avoid having a fixed image remain on the VCR. (Refer to the VCR owner's manual.) 25 When connecting with an antenna ANTENNA/ CABLE IN 1 ANT OUT S-VIDEO VIDEO L R ANT IN OUTPUT SWITCH Wall Jack 2 Antenna 1. the fixed images on the screen. I Insert a video tape into the VCR and press PLAY on the screen for a long pe- EXTERNAL EQUIPMENT SETUP VCR SETUP I To avoid picture noise...
... of the VCR to the Antenna socket on the set. 2 Connect the antenna cable to the RF antenna in the Option menu to avoid having a fixed image remain on the VCR. (Refer to the VCR owner's manual.) 25 When connecting with an antenna ANTENNA/ CABLE IN 1 ANT OUT S-VIDEO VIDEO L R ANT IN OUTPUT SWITCH Wall Jack 2 Antenna 1. the fixed images on the screen. I Insert a video tape into the VCR and press PLAY on the screen for a long pe- EXTERNAL EQUIPMENT SETUP VCR SETUP I To avoid picture noise...
Owner's Manual (English)
Page 31
...'s output resolution to 1920x1080, 60Hz. (32LB9D* model: 1360x768, 60Hz) 29 G If the PC does not support Auto DVI, you need to DVI cable RGB EXTERNAL EQUIPMENT SETUP 1 2 1. To get the best picture quality, adjust the output resolution of the PC to the HDMI/DVI IN1, 2 or 3 jack on the set. (Use the HDMI to DVI cable) 2 Connect the PC audio output to use I Turn on the PC and the set I Select HDMI1, HDMI2 or HDMI3 input source with using the INPUT button on the set the output resolution...
...'s output resolution to 1920x1080, 60Hz. (32LB9D* model: 1360x768, 60Hz) 29 G If the PC does not support Auto DVI, you need to DVI cable RGB EXTERNAL EQUIPMENT SETUP 1 2 1. To get the best picture quality, adjust the output resolution of the PC to the HDMI/DVI IN1, 2 or 3 jack on the set. (Use the HDMI to DVI cable) 2 Connect the PC audio output to use I Turn on the PC and the set I Select HDMI1, HDMI2 or HDMI3 input source with using the INPUT button on the set the output resolution...
Owner's Manual (English)
Page 32
... PC output to another rate or adjust the brightness and contrast on the PICTURE menu until the picture is clear. The fixed image may become permanently imprinted on your TV. EXTERNAL EQUIPMENT SETUP NOTES G Depending on the graphics card, DOS mode may not work if a HDMI to another resolution, change the refresh rate to DVI Cable is in PC mode. G Check the image on the screen. There may be changed, change...
... PC output to another rate or adjust the brightness and contrast on the PICTURE menu until the picture is clear. The fixed image may become permanently imprinted on your TV. EXTERNAL EQUIPMENT SETUP NOTES G Depending on the graphics card, DOS mode may not work if a HDMI to another resolution, change the refresh rate to DVI Cable is in PC mode. G Check the image on the screen. There may be changed, change...
Owner's Manual (English)
Page 39
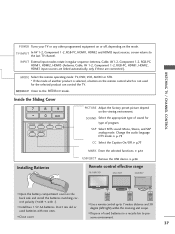
... used batteries with -). DAY + LIVE TV INPUT MODE DAY - STB MEDIA HOST WATCHING TV / CHANNEL CONTROL POWER Turns your TV or any other programmed equipment on or off, depending on the remote control which is selected, a button on the mode. SOUND Select the appropriate type of sound for the selected product can control the TV. G p.51 USB EJECT Remove the USB device. I Install two 1.5V AA batteries. MEDIAHOST Inside the Sliding Cover BACK PICTURE SOUND SAP...
... used batteries with -). DAY + LIVE TV INPUT MODE DAY - STB MEDIA HOST WATCHING TV / CHANNEL CONTROL POWER Turns your TV or any other programmed equipment on or off, depending on the remote control which is selected, a button on the mode. SOUND Select the appropriate type of sound for the selected product can control the TV. G p.51 USB EJECT Remove the USB device. I Install two 1.5V AA batteries. MEDIAHOST Inside the Sliding Cover BACK PICTURE SOUND SAP...

Owner's Manual (English)
Page 40
... the POWER, INPUT, TV INPUT, CH(D or E), Number (0~9) button on the remote control. 2 Select the viewing source by using the TV, press the POWER button on vacation, disconnect the power plug from the wall power outlet. WATCHING TV / CHANNEL CONTROL WATCHING TV /CHANNEL CONTROL TURNING ON TV 1 First, connect power cord correctly. TV INPUT INPUT STB MEDIA HOST BRIGHT - I This TV is programmed to remember which mode it was last set to standby mode. MENU BRIGHT + TIMER RATIO SIMPLINK BACK PICTURE SOUND SAP CC MARK USB EJECT...
... the POWER, INPUT, TV INPUT, CH(D or E), Number (0~9) button on the remote control. 2 Select the viewing source by using the TV, press the POWER button on vacation, disconnect the power plug from the wall power outlet. WATCHING TV / CHANNEL CONTROL WATCHING TV /CHANNEL CONTROL TURNING ON TV 1 First, connect power cord correctly. TV INPUT INPUT STB MEDIA HOST BRIGHT - I This TV is programmed to remember which mode it was last set to standby mode. MENU BRIGHT + TIMER RATIO SIMPLINK BACK PICTURE SOUND SAP CC MARK USB EJECT...
Owner's Manual (English)
Page 43
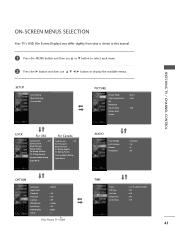
...SETUP Auto Tuning Manual Tuning Channel Edit PICTURE Picture Mode Color Temperature XD Advanced Aspect Ratio Picture Reset Screen : User1 : Cool : 16:9 LOCK For USA Lock System : Off Set Password Block Channel Movie Rating TV Rating-Children TV Rating-General Downloadable Rating Input Block For Canada Lock System Set Password Block Channel TV Rating-English TV Rating-French : Off Downloadable Rating Input Block AUDIO Sound Mode Auto Volume Balance TV Speaker : Standard : On : 0 : On OPTION Language Input Label SimpLink Key Lock Caption ISM Method Low Power Front Display...
...SETUP Auto Tuning Manual Tuning Channel Edit PICTURE Picture Mode Color Temperature XD Advanced Aspect Ratio Picture Reset Screen : User1 : Cool : 16:9 LOCK For USA Lock System : Off Set Password Block Channel Movie Rating TV Rating-Children TV Rating-General Downloadable Rating Input Block For Canada Lock System Set Password Block Channel TV Rating-English TV Rating-French : Off Downloadable Rating Input Block AUDIO Sound Mode Auto Volume Balance TV Speaker : Standard : On : 0 : On OPTION Language Input Label SimpLink Key Lock Caption ISM Method Low Power Front Display...
Owner's Manual (English)
Page 45
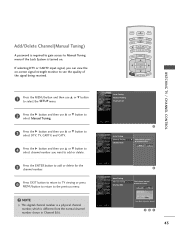
... BACK PICTURE SOUND SAP CC PICTURE SAP CC 2 Press the MARK USB EJECT G button and then use D or button to E MARK USB EJECT select Manual Tuning. 3 Press the G button and then use D or E button to select DTV, TV, CADTV, and CATV. 4 Press the G button and then use D or E button to select the SETUP menu. NOTE G This digital channel number is a physical channel number, which is turned on -screen signal strength monitor to see the quality of the signal being received. MENU BRIGHT + TIMER RATIO SIMPLINK...
... BACK PICTURE SOUND SAP CC PICTURE SAP CC 2 Press the MARK USB EJECT G button and then use D or button to E MARK USB EJECT select Manual Tuning. 3 Press the G button and then use D or E button to select DTV, TV, CADTV, and CATV. 4 Press the G button and then use D or E button to select the SETUP menu. NOTE G This digital channel number is a physical channel number, which is turned on -screen signal strength monitor to see the quality of the signal being received. MENU BRIGHT + TIMER RATIO SIMPLINK...
Owner's Manual (English)
Page 50
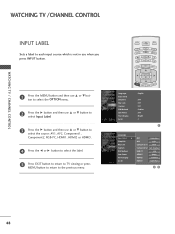
... Power Front Display Set ID TIMER RATIO SIMPLINK : English : Off : Off : Off : Orbiter : Off : Bright : 1 PICTURE SOUND MARK USB EJECT BACK CC Language Input label G SimpLink Key Lock Caption ISM Method Low Power Front Display Set ID AV1 Cable Box AV2 VCR Component1 DVD Component2 Set Top Box RGB-PC VCR HDMI1 Game HDMI2 Satellite HDMI3 Cable Box 48 TV INPUT STB MEDIA HOST BRIGHT - WATCHING TV / CHANNEL CONTROL WATCHING TV /CHANNEL CONTROL TV INPUT INPUT LABEL TV INPUT Sets a STB label to BACK select Input...
... Power Front Display Set ID TIMER RATIO SIMPLINK : English : Off : Off : Off : Orbiter : Off : Bright : 1 PICTURE SOUND MARK USB EJECT BACK CC Language Input label G SimpLink Key Lock Caption ISM Method Low Power Front Display Set ID AV1 Cable Box AV2 VCR Component1 DVD Component2 Set Top Box RGB-PC VCR HDMI1 Game HDMI2 Satellite HDMI3 Cable Box 48 TV INPUT STB MEDIA HOST BRIGHT - WATCHING TV / CHANNEL CONTROL WATCHING TV /CHANNEL CONTROL TV INPUT INPUT LABEL TV INPUT Sets a STB label to BACK select Input...

Owner's Manual (English)
Page 59
... CC Intelligent Eye (Only LCD TV models), PICTURE SOUND DynCCamic, Standard, MildPICTURE SOUND SAP Settings are not adjustable. I You can directly adjust the contrast, brightness, color, sharpness, tint. Picture Mode Color Temperature XD Advanced Aspect Ratio Picture Reset Screen : User1 : Cool : 16:9 Picture Mode G Color Temperature XD Advanced Aspect Ratio Picture Reset Screen Intelligent Eye Dynamic Standard Mild User 1 User 2 PICTURE CONTROL PICTURE SO MARK USB 57 In the User 1, and User 2 modes only, user can also use the PICTURE menu to TV viewing. STB MEDIA HOST STB...
... CC Intelligent Eye (Only LCD TV models), PICTURE SOUND DynCCamic, Standard, MildPICTURE SOUND SAP Settings are not adjustable. I You can directly adjust the contrast, brightness, color, sharpness, tint. Picture Mode Color Temperature XD Advanced Aspect Ratio Picture Reset Screen : User1 : Cool : 16:9 Picture Mode G Color Temperature XD Advanced Aspect Ratio Picture Reset Screen Intelligent Eye Dynamic Standard Mild User 1 User 2 PICTURE CONTROL PICTURE SO MARK USB 57 In the User 1, and User 2 modes only, user can also use the PICTURE menu to TV viewing. STB MEDIA HOST STB...
Owner's Manual (English)
Page 62
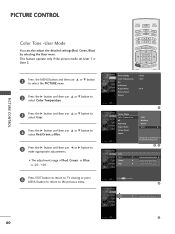
... viewing or press MENU button to return to confirm. E Red 0 E 60 TV INPUT STB MEDIA HOST BRIGHT - MENU BRIGHT + TIMER RATIO SIMPLINK Picture Mode : User1 Color Temperature : Cool XD Advanced Aspect Ratio : 16:9 Picture Reset Screen BACK PICTURE SOUND CC MARK USB EJECT Picture Mode Color Temperature XD Advanced Aspect Ratio Picture Reset Screen Cool Medium Warm User G Selection ( G or ) leads you to BACK select Color PICTURE SOUND SAP TeCC mperature. This feature operate only if the picture mode set User 1 or User 2. 1 Press the MENU button and then use...
... viewing or press MENU button to return to confirm. E Red 0 E 60 TV INPUT STB MEDIA HOST BRIGHT - MENU BRIGHT + TIMER RATIO SIMPLINK Picture Mode : User1 Color Temperature : Cool XD Advanced Aspect Ratio : 16:9 Picture Reset Screen BACK PICTURE SOUND CC MARK USB EJECT Picture Mode Color Temperature XD Advanced Aspect Ratio Picture Reset Screen Cool Medium Warm User G Selection ( G or ) leads you to BACK select Color PICTURE SOUND SAP TeCC mperature. This feature operate only if the picture mode set User 1 or User 2. 1 Press the MENU button and then use...
Owner's Manual (English)
Page 79
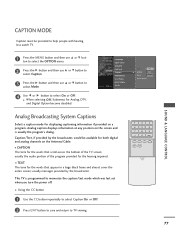
... MENU button and then use D or E button to TV viewing. 77 Language ton to select O n or O f f. CAPTION MODE Caption must be available for displaying captioning information if provided on a program. Input Label TV INPUT TV INP TV INPUT TV INPUT SimpLink IA HOST 2 Press the G button and then use D or E button to memorize the caption/text mode which was last set when you turn the power off. SOUND & LANGUAGE CONTROL Analog Broadcasting System Captions Select a caption mode for boBtAChK digital CC and analog...
... MENU button and then use D or E button to TV viewing. 77 Language ton to select O n or O f f. CAPTION MODE Caption must be available for displaying captioning information if provided on a program. Input Label TV INPUT TV INP TV INPUT TV INPUT SimpLink IA HOST 2 Press the G button and then use D or E button to memorize the caption/text mode which was last set when you turn the power off. SOUND & LANGUAGE CONTROL Analog Broadcasting System Captions Select a caption mode for boBtAChK digital CC and analog...
Owner's Manual (English)
Page 88
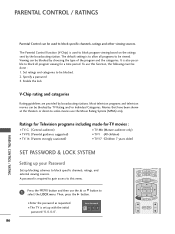
... or direct-to block specific channels, ratings and other viewing sources. I Enter the password as requested. To use this menu. 1 Press the MENU button and then use the D or E button to block specific channels, ratings, and external viewing sources. MENU BRIGHT + TIMER RATIO SIMPLINK BACK Then, press the G button. PARENTAL CONTROL / RATINGS Parental Control can be used to be blocked. 2. The Parental Control Function (V-Chip) is set up blocking schemes to select the LOCK menu. Set ratings and categories to block program viewing based...
... or direct-to block specific channels, ratings and other viewing sources. I Enter the password as requested. To use this menu. 1 Press the MENU button and then use the D or E button to block specific channels, ratings, and external viewing sources. MENU BRIGHT + TIMER RATIO SIMPLINK BACK Then, press the G button. PARENTAL CONTROL / RATINGS Parental Control can be used to be blocked. 2. The Parental Control Function (V-Chip) is set up blocking schemes to select the LOCK menu. Set ratings and categories to block program viewing based...
Owner's Manual (English)
Page 95
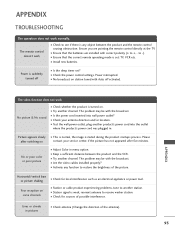
... VCR. Power is set ? I Is the sleep timer set : TV, VCR etc. APPENDIX TROUBLESHOOTING The operation does not work . to see if there is muted during the product startups process. I No broadcast on . Power interrupted. I Check the power control settings. I Check for sources of the picture. Horizontal/vertical bars or picture shaking I Try another channel. Ensure you are installed with the broadcast. I Are the video cables installed properly? I Try another channel. I Adjust Color in menu...
... VCR. Power is set ? I Is the sleep timer set : TV, VCR etc. APPENDIX TROUBLESHOOTING The operation does not work . to see if there is muted during the product startups process. I No broadcast on . Power interrupted. I Check the power control settings. I Check for sources of the picture. Horizontal/vertical bars or picture shaking I Try another channel. Ensure you are installed with the broadcast. I Are the video cables installed properly? I Try another channel. I Adjust Color in menu...


