Owner's Manual (English)
Page 5
...Schedule 65 -Change Setup 66 -Record 70 -Remind 73 DVR (Digital Video Recording) Timeshift ( Pause & Replay of Live TV 76 Instant Recording 79 Programmed Recording 82 Recorded TV Program List 83 Format Hard Disc 89 PICTURE CONTROL Watching PIP ( Picture-in-Picture)/ POP( Picture-out-of-Picture)/Twin ... Setup 22 DVD Setup 25 VCR Setup 27 Other A/V Source Setup 29 PC Setup 30 Audio Out Setup 35 WATCHING TV / CHANNEL CONTROL Remote Control Functions 36 Turning on TV 38 Channel Selection 39 Volume Adjustment 39 On-Screen Menus Selection 40 Channel Setup -Auto Scan ( EZ Scan 41 -...
...Schedule 65 -Change Setup 66 -Record 70 -Remind 73 DVR (Digital Video Recording) Timeshift ( Pause & Replay of Live TV 76 Instant Recording 79 Programmed Recording 82 Recorded TV Program List 83 Format Hard Disc 89 PICTURE CONTROL Watching PIP ( Picture-in-Picture)/ POP( Picture-out-of-Picture)/Twin ... Setup 22 DVD Setup 25 VCR Setup 27 Other A/V Source Setup 29 PC Setup 30 Audio Out Setup 35 WATCHING TV / CHANNEL CONTROL Remote Control Functions 36 Turning on TV 38 Channel Selection 39 Volume Adjustment 39 On-Screen Menus Selection 40 Channel Setup -Auto Scan ( EZ Scan 41 -...
Owner's Manual (English)
Page 6
...Darkness) Level 102 Picture Reset 103 Image Sticking Minimization( ISM) Method 104 Low-Power Picture Mode 105 Programming the Remote Control 137 IR Codes 141 External Control through RS-232C 143 SOUND & LANGUAGE CONTROL Auto Volume Leveler ( EZ SoundRite... 121 Sleep Timer Setting 122 Auto Shut-off Setting 123 PARENTAL CONTROL / RATINGS Set Password & Lock System 124 Channel Blocking 127 Movie & TV Rating 128 External Input Blocking 131 APPENDIX Troubleshooting 132 Maintenance 135 Product Specifications 136 5 User Mode 108 Balance 110 BBE - Cinema 3:2 Pulldown Mode...
...Darkness) Level 102 Picture Reset 103 Image Sticking Minimization( ISM) Method 104 Low-Power Picture Mode 105 Programming the Remote Control 137 IR Codes 141 External Control through RS-232C 143 SOUND & LANGUAGE CONTROL Auto Volume Leveler ( EZ SoundRite... 121 Sleep Timer Setting 122 Auto Shut-off Setting 123 PARENTAL CONTROL / RATINGS Set Password & Lock System 124 Channel Blocking 127 Movie & TV Rating 128 External Input Blocking 131 APPENDIX Troubleshooting 132 Maintenance 135 Product Specifications 136 5 User Mode 108 Balance 110 BBE - Cinema 3:2 Pulldown Mode...
Owner's Manual (English)
Page 7
...cable television programming by your local cable operator. Patent Notice The TV Guide On ScreenTM system is a trademark of digital television, HDTV formats include 1080i and 720p resolutions. "CableCARDTM is protected by one remote control. R DIGITAL CABLE COMPATIBILITY This digital television is used ...It has two HDMI ports that empowers you want to the HDMI (high-definition multimedia interface), LG TV with this logo works easily with one of the CableCARDTM TradeMark. LG's own special digital image generator, consisting of Dolby Laboratories. and/or one cable and produces ...
...cable television programming by your local cable operator. Patent Notice The TV Guide On ScreenTM system is a trademark of digital television, HDTV formats include 1080i and 720p resolutions. "CableCARDTM is protected by one remote control. R DIGITAL CABLE COMPATIBILITY This digital television is used ...It has two HDMI ports that empowers you want to the HDMI (high-definition multimedia interface), LG TV with this logo works easily with one of the CableCARDTM TradeMark. LG's own special digital image generator, consisting of Dolby Laboratories. and/or one cable and produces ...
Owner's Manual (English)
Page 9
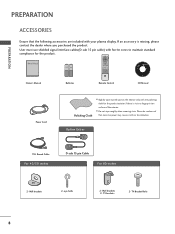
DAY + 1.5V 1.5V LCD TV PLASMA TV Owner's Manual FLASHBK APM CC AUTO DEMO M/C EJECT http://www.lgusa.com www.lg.ca Copyright© 2007 LGE, All Rights Reserved. I Slightly wipe stained spot on surface of that the following accessories are included ...cause scratch or discoloration. Option Extras 75Ω Round Cable For 42/50 inches D-sub 15 pin Cable For 60 inches 2- TV INPUT TV/VIDEO MODE Owner's Manual DAY - Owner's Manual Batteries Remote Control CD Manual Power Cord Polishing Cloth I Do not wipe roughly when removing stain. Wall brackets 2- User ...
DAY + 1.5V 1.5V LCD TV PLASMA TV Owner's Manual FLASHBK APM CC AUTO DEMO M/C EJECT http://www.lgusa.com www.lg.ca Copyright© 2007 LGE, All Rights Reserved. I Slightly wipe stained spot on surface of that the following accessories are included ...cause scratch or discoloration. Option Extras 75Ω Round Cable For 42/50 inches D-sub 15 pin Cable For 60 inches 2- TV INPUT TV/VIDEO MODE Owner's Manual DAY - Owner's Manual Batteries Remote Control CD Manual Power Cord Polishing Cloth I Do not wipe roughly when removing stain. Wall brackets 2- User ...
Owner's Manual (English)
Page 11
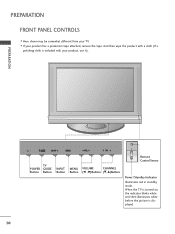
When the TV is turned on, the indicator blinks white and then illuminates white before the picture is included with your product, use it). I Here shown may be somewhat different from your product has a protection tape attached, remove the tape. PREPARATION FRONT PANEL CONTROLS I If your TV. PREPARATION TV POWER GUIDE Button Button INPUT Button MENU VOLUME CHANNEL Button (F , G)Buttons (E, D)Buttons Remote Control Sensor Power/Standby Indicator Illuminates red in standby mode. And then wipe the product with a cloth (If a polishing cloth is displayed. 10
When the TV is turned on, the indicator blinks white and then illuminates white before the picture is included with your product, use it). I Here shown may be somewhat different from your product has a protection tape attached, remove the tape. PREPARATION FRONT PANEL CONTROLS I If your TV. PREPARATION TV POWER GUIDE Button Button INPUT Button MENU VOLUME CHANNEL Button (F , G)Buttons (E, D)Buttons Remote Control Sensor Power/Standby Indicator Illuminates red in standby mode. And then wipe the product with a cloth (If a polishing cloth is displayed. 10
Owner's Manual (English)
Page 12
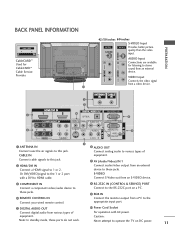
...output from an external device to the appropriate input port. CABLE IN Connect cable signals to these ports do not work. REMOTE CONTROL IN Connect your wired remote control. PREPARATION BACK PANEL INFORMATION Cable CARD CableCARD™ Used for listening to 1 or 2. COMPONENT IN Connect a ... a video device. RS-232C IN (CONTROL & SERVICE) PORT Connect to operate the TV on a PC. S-VIDEO AV IN 2 S-VIDEO AV IN 2 AV IN 2 S-VIDEO AV IN 2 AV IN 2 S-VIDEO 42/50 inches 60 inches S-VIDEO S-VIDEO Input AV IN 2 S-VIDEO AV IN 2 Provides bAeVtItNe2r picture ...
...output from an external device to the appropriate input port. CABLE IN Connect cable signals to these ports do not work. REMOTE CONTROL IN Connect your wired remote control. PREPARATION BACK PANEL INFORMATION Cable CARD CableCARD™ Used for listening to 1 or 2. COMPONENT IN Connect a ... a video device. RS-232C IN (CONTROL & SERVICE) PORT Connect to operate the TV on a PC. S-VIDEO AV IN 2 S-VIDEO AV IN 2 AV IN 2 S-VIDEO AV IN 2 AV IN 2 S-VIDEO 42/50 inches 60 inches S-VIDEO S-VIDEO Input AV IN 2 S-VIDEO AV IN 2 Provides bAeVtItNe2r picture ...
Owner's Manual (English)
Page 23
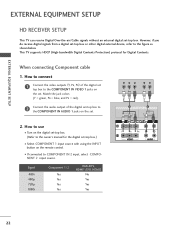
... I Turn on the digital set-top box. (Refer to COMPONENT IN 2 input, select COMPONENT 2 input source. When connecting Component cable 1. This TV supports HDCP (High-bandwidth Digital Contents Protection) protocol for the digital set-top box.) I If connected to the owner's manual for Digital Contents. How... IN VIDEO 1 jacks on the set -top box or other digital external device, refer to the COMPONENT IN AUDIO 1 jacks on the remote control. I Select COMPONENT 1 input source with using the INPUT button on the set -top box. EXTERNAL EQUIPMENT SETUP EXTERNAL EQUIPMENT SETUP HD...
... I Turn on the digital set-top box. (Refer to COMPONENT IN 2 input, select COMPONENT 2 input source. When connecting Component cable 1. This TV supports HDCP (High-bandwidth Digital Contents Protection) protocol for the digital set-top box.) I If connected to the owner's manual for Digital Contents. How... IN VIDEO 1 jacks on the set -top box or other digital external device, refer to the COMPONENT IN AUDIO 1 jacks on the remote control. I Select COMPONENT 1 input source with using the INPUT button on the set -top box. EXTERNAL EQUIPMENT SETUP EXTERNAL EQUIPMENT SETUP HD...
Owner's Manual (English)
Page 24
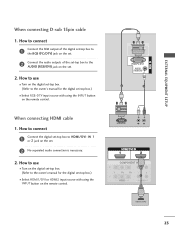
...-top box.) I Select RGB-DTV input source with using the INPUT button on the set -top box to the AUDIO (RGB/DVI) jack on the remote control. How to connect 1 Connect the digital set . 2. How to use I Turn on the digital set-top box. (Refer to the owner's manual for ....) I Select HDMI1/DVI or HDMI2 input source with using the INPUT button on the set -top box to HDMI/DVI IN 1 or 2 jack on the remote control. RGB OUTPUT L R L R AUDIO HDMI-DTV OUTPUT 23 EXTERNAL EQUIPMENT SETUP When connecting D-sub 15pin cable 1. How to connect 1 Connect the RGB output of the...
...-top box.) I Select RGB-DTV input source with using the INPUT button on the set -top box to the AUDIO (RGB/DVI) jack on the remote control. How to connect 1 Connect the digital set . 2. How to use I Turn on the digital set-top box. (Refer to the owner's manual for ....) I Select HDMI1/DVI or HDMI2 input source with using the INPUT button on the set -top box to HDMI/DVI IN 1 or 2 jack on the remote control. RGB OUTPUT L R L R AUDIO HDMI-DTV OUTPUT 23 EXTERNAL EQUIPMENT SETUP When connecting D-sub 15pin cable 1. How to connect 1 Connect the RGB output of the...
Owner's Manual (English)
Page 25
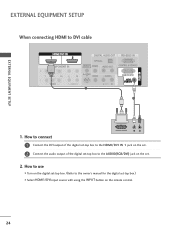
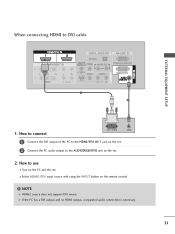
EXTERNAL EQUIPMENT SETUP When connecting HDMI to the HDMI/DVI IN 1 jack on the set. 2 Connect the audio output of the digital set-top box to DVI cable EXTERNAL EQUIPMENT SETUP AUDIO 1. How to use I Turn on the digital set-top box. (Refer to the owner's manual for the digital set-top box.) I Select HDMI1/DVI input source with using the INPUT button on the set -top box to the AUDIO(RGB/DVI) jack on the remote control. 24 How to connect DVI-DTV OUTPUT L R 1 Connect the DVI output of the digital set . 2.
EXTERNAL EQUIPMENT SETUP When connecting HDMI to the HDMI/DVI IN 1 jack on the set. 2 Connect the audio output of the digital set-top box to DVI cable EXTERNAL EQUIPMENT SETUP AUDIO 1. How to use I Turn on the digital set-top box. (Refer to the owner's manual for the digital set-top box.) I Select HDMI1/DVI input source with using the INPUT button on the set -top box to the AUDIO(RGB/DVI) jack on the remote control. 24 How to connect DVI-DTV OUTPUT L R 1 Connect the DVI output of the digital set . 2.
Owner's Manual (English)
Page 26
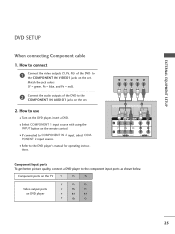
...to COMPONENT IN 2 input, select COM- AUDIO EXTERNAL EQUIPMENT SETUP DVD SETUP When connecting Component cable 1. PONENT 2 input source. tions. Component ports on the TV Y PB PR Video output ports on the set . 2. How to the DVD player's manual for operating instruc- I Refer to use I Select COMPONENT 1...jack colors (Y = green, PB = blue, and PR = red). 2 Connect the audio outputs of the DVD to the COMPONENT IN AUDIO1 jacks on the remote control. How to connect 1 Connect the video outputs (Y, PB, PR) of the DVD to the COMPONENT IN VIDEO1 jacks on DVD player Y PB PR Y...
...to COMPONENT IN 2 input, select COM- AUDIO EXTERNAL EQUIPMENT SETUP DVD SETUP When connecting Component cable 1. PONENT 2 input source. tions. Component ports on the TV Y PB PR Video output ports on the set . 2. How to the DVD player's manual for operating instruc- I Refer to use I Select COMPONENT 1...jack colors (Y = green, PB = blue, and PR = red). 2 Connect the audio outputs of the DVD to the COMPONENT IN AUDIO1 jacks on the remote control. How to connect 1 Connect the video outputs (Y, PB, PR) of the DVD to the COMPONENT IN VIDEO1 jacks on DVD player Y PB PR Y...
Owner's Manual (English)
Page 27
... use I Refer to AV IN 2, select A V 2 input source. I Select A V 1 input source with using the INPUT button on the remote control. How to use I If connected to the DVD player's manual for operating instructions. When connecting HDMI cable 1. EXTERNAL EQUIPMENT SETUP EXTERNAL EQUIPMENT SETUP ...When connecting with using the INPUT button on the remote control. I Refer to the AUDIO input jacks on the set . 2 No separated audio connection is necessary. 2. How to connect...
... use I Refer to AV IN 2, select A V 2 input source. I Select A V 1 input source with using the INPUT button on the remote control. How to use I If connected to the DVD player's manual for operating instructions. When connecting HDMI cable 1. EXTERNAL EQUIPMENT SETUP EXTERNAL EQUIPMENT SETUP ...When connecting with using the INPUT button on the remote control. I Refer to the AUDIO input jacks on the set . 2 No separated audio connection is necessary. 2. How to connect...
Owner's Manual (English)
Page 29
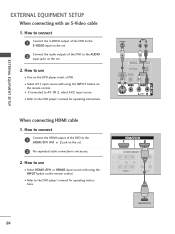
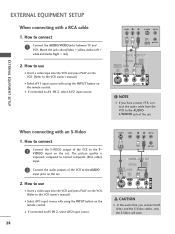
... set. The picture quality is improved; How to the VCR owner's manual.) I Select A V 1 input source with using the INPUT button on the remote control. EXTERNAL EQUIPMENT SETUP EXTERNAL EQUIPMENT SETUP When connecting with an S-Video 1. I Insert a video tape into the VCR and press PLAY on the VCR....(Refer to connect 1 Connect the S-VIDEO output of the set . 2. How to use I If connected to connect 1 Connect the AUDIO/VIDEO jacks between TV and VCR. I If connected to AV IN 2, select AV2 input source. 28 S-VIDEO VIDEO L R ANT IN OUTPUT SWITCH ANT OUT CAUTION In the ...
... set. The picture quality is improved; How to the VCR owner's manual.) I Select A V 1 input source with using the INPUT button on the remote control. EXTERNAL EQUIPMENT SETUP EXTERNAL EQUIPMENT SETUP When connecting with an S-Video 1. I Insert a video tape into the VCR and press PLAY on the VCR....(Refer to connect 1 Connect the S-VIDEO output of the set . 2. How to use I If connected to connect 1 Connect the AUDIO/VIDEO jacks between TV and VCR. I If connected to AV IN 2, select AV2 input source. 28 S-VIDEO VIDEO L R ANT IN OUTPUT SWITCH ANT OUT CAUTION In the ...

Owner's Manual (English)
Page 30
I Select AV1 input source with using the INPUT button on the remote control. How to use I Operate the corresponding external equipment. Camcorder Video Game Set 29 Match the jack colors. (Video = yellow, Audio Left = white, and Audio Right = red) 2. I If connected to connect 1 Connect the AUDIO/VIDEO jacks between TV and external equipment. OTHER A/V SOURCE SETUP AV IN 2 S-VIDEO VIDEO L/MONO AUDIO R EXTERNAL EQUIPMENT SETUP i.e) 42/50 inches VIDEO L R 1. How to AV IN 2 input, select AV2 input source.
I Select AV1 input source with using the INPUT button on the remote control. How to use I Operate the corresponding external equipment. Camcorder Video Game Set 29 Match the jack colors. (Video = yellow, Audio Left = white, and Audio Right = red) 2. I If connected to connect 1 Connect the AUDIO/VIDEO jacks between TV and external equipment. OTHER A/V SOURCE SETUP AV IN 2 S-VIDEO VIDEO L/MONO AUDIO R EXTERNAL EQUIPMENT SETUP i.e) 42/50 inches VIDEO L R 1. How to AV IN 2 input, select AV2 input source.
Owner's Manual (English)
Page 32
How to use I Turn on the PC and the set I Select HDMI1/DVI input source with using the INPUT button on the set . 2 Connect the PC audio output to DVI cable AUDIO EXTERNAL EQUIPMENT SETUP 1. NOTE HDMI2 source does not support DVI source. If the PC has a DVI output and no HDMI output, a separated audio connection is necessary. 31 When connecting HDMI to the AUDIO(RGB/DVI) jack on the remote control. How to connect DVI-PC OUTPUT AUDIO 1 Connect the DVI output of the PC to the HDMI/DVI IN 1 jack on the set . 2.
How to use I Turn on the PC and the set I Select HDMI1/DVI input source with using the INPUT button on the set . 2 Connect the PC audio output to DVI cable AUDIO EXTERNAL EQUIPMENT SETUP 1. NOTE HDMI2 source does not support DVI source. If the PC has a DVI output and no HDMI output, a separated audio connection is necessary. 31 When connecting HDMI to the AUDIO(RGB/DVI) jack on the remote control. How to connect DVI-PC OUTPUT AUDIO 1 Connect the DVI output of the PC to the HDMI/DVI IN 1 jack on the set . 2.
Owner's Manual (English)
Page 37
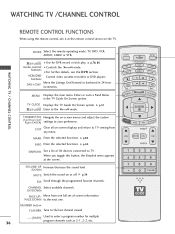
...mode control I Use for multiple program channels such as 2-1, 2-2, etc. 36 SIMPLINK APM CC AUTO DEMO M/C EJECT WATCHING TV /CHANNEL CONTROL REMOTE CONTROL FUNCTIONS When using the remote control, aim it at the screen. p.44 SIMPLINK See a list of screen information PAGE DOWN to the next one. buttons...For further details, see the D V R section. When you toggle this button, the Simplink menu appears at the remote control sensor on -screen displays and return to TV viewing from one full set of AV devices connected to the mode. CHANNEL Select available channels. buttons DAY+/DAY...
...mode control I Use for multiple program channels such as 2-1, 2-2, etc. 36 SIMPLINK APM CC AUTO DEMO M/C EJECT WATCHING TV /CHANNEL CONTROL REMOTE CONTROL FUNCTIONS When using the remote control, aim it at the screen. p.44 SIMPLINK See a list of screen information PAGE DOWN to the next one. buttons...For further details, see the D V R section. When you toggle this button, the Simplink menu appears at the remote control sensor on -screen displays and return to TV viewing from one full set of AV devices connected to the mode. CHANNEL Select available channels. buttons DAY+/DAY...
Owner's Manual (English)
Page 38
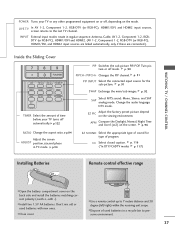
...recycle bin to preserve environment. 37 I Close cover. WATCHING TV / CHANNEL CONTROL POWER Turns your TV turns off automatically. p. 90 PIPCH-/PIPCH+ Changes the PIP channel. p. 116 (*In DTV/CADTV modes p. 117) Installing Batteries Remote control effective range I Open the battery compartment cover on the... screen. I Dispose of sound for the sub-picture. LIVE TV INPUT MODE DAY - I Use a remote control up to the last TV channel. DAY + I Install two 1.5V AA batteries. p. 96 RATIO Change the aspect ratio. p.34...
...recycle bin to preserve environment. 37 I Close cover. WATCHING TV / CHANNEL CONTROL POWER Turns your TV turns off automatically. p. 90 PIPCH-/PIPCH+ Changes the PIP channel. p. 116 (*In DTV/CADTV modes p. 117) Installing Batteries Remote control effective range I Open the battery compartment cover on the... screen. I Dispose of sound for the sub-picture. LIVE TV INPUT MODE DAY - I Use a remote control up to the last TV channel. DAY + I Install two 1.5V AA batteries. p. 96 RATIO Change the aspect ratio. p.34...
Owner's Manual (English)
Page 39
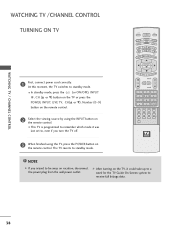
... programmed to remember which mode it could take up to a week for the TV Guide On Screen system to be away on the remote control. NOTE If you turn the TV off. At this moment, the TV switches to standby mode. DAY + 1 First, connect power cord correctly. I In standby mode, press... the (or ON/OFF), INPUT , CH (D or E) button on the TV or press the POWER, INPUT, LIVE TV, CH(D or E), Number (0~9) button on the remote control. 2 Select the viewing source by using the TV, press the POWER button on vacation, disconnect the power plug from the wall power outlet...
... programmed to remember which mode it could take up to a week for the TV Guide On Screen system to be away on the remote control. NOTE If you turn the TV off. At this moment, the TV switches to standby mode. DAY + 1 First, connect power cord correctly. I In standby mode, press... the (or ON/OFF), INPUT , CH (D or E) button on the TV or press the POWER, INPUT, LIVE TV, CH(D or E), Number (0~9) button on the remote control. 2 Select the viewing source by using the TV, press the POWER button on vacation, disconnect the power plug from the wall power outlet...

Owner's Manual (English)
Page 44
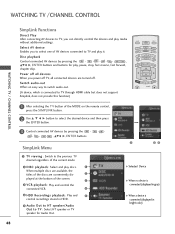
... the channels deleted from your own Favorite List. Once a channel is highlighted and then add or delete the channel to add or delete it. LIVE TV INPUT MODE DAY - You can create your Favorite List. 1 Press the MENU button and then use D or E button to select the SETUP menu. 2 Press the... Signal Main Input Sub Input Input Label Set ID G Selection ( G or ) leads you can add or delete the channel by toggling each channel on the remote control when a channel is highlighted you to the channel edit screen. 5 Press EXIT button to return to...
... the channels deleted from your own Favorite List. Once a channel is highlighted and then add or delete the channel to add or delete it. LIVE TV INPUT MODE DAY - You can create your Favorite List. 1 Press the MENU button and then use D or E button to select the SETUP menu. 2 Press the... Signal Main Input Sub Input Input Label Set ID G Selection ( G or ) leads you can add or delete the channel by toggling each channel on the remote control when a channel is highlighted you to the channel edit screen. 5 Press EXIT button to return to...
Owner's Manual (English)
Page 48
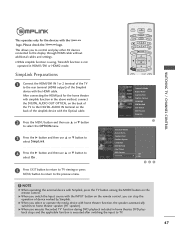
... the HDMI jack for the devices with the INPUT button on the remote control, you to control and play other AV devices connected to select On . LIVE TV INPUT MODE DAY - G When you execute 'Recorded TV' function during DVD playback included in home theater, DVD playback stops and... mode. I While simplink function is using, Timeshift function is executed after switching the input to the rear terminal (HDMI output) of the TV to TV. 47 G When you switch the Input source with the logo. SimpLink Preparations 1 Connect the HDMI/DVI IN 1or 2 terminal of the ...
... the HDMI jack for the devices with the INPUT button on the remote control, you to control and play other AV devices connected to select On . LIVE TV INPUT MODE DAY - G When you execute 'Recorded TV' function during DVD playback included in home theater, DVD playback stops and... mode. I While simplink function is using, Timeshift function is executed after switching the input to the rear terminal (HDMI output) of the TV to TV. 47 G When you switch the Input source with the logo. SimpLink Preparations 1 Connect the HDMI/DVI IN 1or 2 terminal of the ...
Owner's Manual (English)
Page 49
...no device is connected (displayed in gray) G When a device is connected (displayed in HDD. 5 Audio Out to HT speaker/Audio Out to TV : Select HT speaker or TV speaker for play, pause, stop, fast reverse, fast forward, chapter skip. Select AV device Enables you to select one of the MODE on... the remote control, press the SIMPLINK button. 2 Use D E F G button to TV through HDMI cable but does not support Simplink, does not provide this function) LIVE TV INPUT MODE DAY - Power off all devices When you power off . WATCHING...
...no device is connected (displayed in gray) G When a device is connected (displayed in HDD. 5 Audio Out to HT speaker/Audio Out to TV : Select HT speaker or TV speaker for play, pause, stop, fast reverse, fast forward, chapter skip. Select AV device Enables you to select one of the MODE on... the remote control, press the SIMPLINK button. 2 Use D E F G button to TV through HDMI cable but does not support Simplink, does not provide this function) LIVE TV INPUT MODE DAY - Power off all devices When you power off . WATCHING...


