
Owner's Manual
Page 4
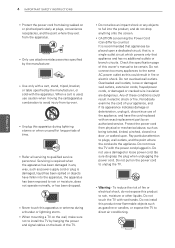
yyUse only with a cart, stand, tripod, bracket, or table specified by the manufacturer, or sold with wet hands. yyCAUTION concerning the Power Cord (Can differ by the manufacturer. Check the ...
yyUse only with a cart, stand, tripod, bracket, or table specified by the manufacturer, or sold with wet hands. yyCAUTION concerning the Power Cord (Can differ by the manufacturer. Check the ...
Owner's Manual
Page 8
... channels 46 - Connecting to use Magic Motion Remote Control 39 - When a security code is already set 55 - Connecting to a wired network 51 - Using LG Apps 61 - Connecting USB storage devices 63 - DivX registration code 72 - When watching 3D imaging 77 - Connecting a cable box 41 Turning the TV on... for the first time 42 Watching TV 43 Accessing Home Menu 44 Managing channels 44 - Viewing Videos 71 - Attaching the stand 30 - Registering Magic Motion Remote Control 39 - Using the input list 49 Using the quick menu 50 ENTERTAINMENT 50 Network Connection 50 - ...
... channels 46 - Connecting to use Magic Motion Remote Control 39 - When a security code is already set 55 - Connecting to a wired network 51 - Using LG Apps 61 - Connecting USB storage devices 63 - DivX registration code 72 - When watching 3D imaging 77 - Connecting a cable box 41 Turning the TV on... for the first time 42 Watching TV 43 Accessing Home Menu 44 Managing channels 44 - Viewing Videos 71 - Attaching the stand 30 - Registering Magic Motion Remote Control 39 - Using the input list 49 Using the quick menu 50 ENTERTAINMENT 50 Network Connection 50 - ...
Owner's Manual
Page 9
PICTURE Settings 87 - SUPPORT Settings 97 MAKING CONNECTIONS 98 Connection Overview 99 Connecting to a PC 104 - AUDIO Settings 89 - LOCK Settings 92 - Cabinet and stand 113 - TABLE OF CONTENTS 9 ENEGNLGISH 78 - Setting 3D Imaging 80 CUSTOMIZING TV SETTINGS 80 The SETUP Menu 81 Customizing Settings 81 - Composite Connection 104 Connecting ...
PICTURE Settings 87 - SUPPORT Settings 97 MAKING CONNECTIONS 98 Connection Overview 99 Connecting to a PC 104 - AUDIO Settings 89 - LOCK Settings 92 - Cabinet and stand 113 - TABLE OF CONTENTS 9 ENEGNLGISH 78 - Setting 3D Imaging 80 CUSTOMIZING TV SETTINGS 80 The SETUP Menu 81 Customizing Settings 81 - Composite Connection 104 Connecting ...

Owner's Manual
Page 23
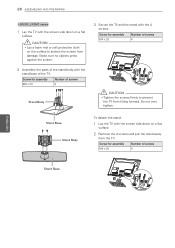
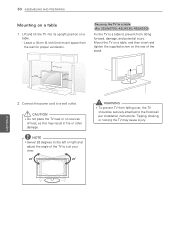
... the TV on a table or wall. yyWhen holding the TV, the screen should be at all cables. Make sure not to avoid damage. Attaching the stand If you to hold the TV as this may result in damage to protect the screen from being scratched or damaged and for assembly M5... against the screen. 2 Assemble the parts of its side or tilt towards the left or right. PZ750, PZ950, PZ950U series 1 Lay the TV with the stand base of the TV frame firmly. yyWhen transporting the TV by hand, hold the transparent part, speaker, or speaker grill area. yyIt is recommended to...
... the TV on a table or wall. yyWhen holding the TV, the screen should be at all cables. Make sure not to avoid damage. Attaching the stand If you to hold the TV as this may result in damage to protect the screen from being scratched or damaged and for assembly M5... against the screen. 2 Assemble the parts of its side or tilt towards the left or right. PZ750, PZ950, PZ950U series 1 Lay the TV with the stand base of the TV frame firmly. yyWhen transporting the TV by hand, hold the transparent part, speaker, or speaker grill area. yyIt is recommended to...

Owner's Manual
Page 24
Model 50PZ750, 50PZ950, 50PZ950U 60PZ750, 60PZ950, 60PZ950U Screw for assembly M4 x 26 M4 x 28 Number of screws 4 4 To detach the stand, 1 Lay the TV with the 4 screws. This will protect the opening at the bottom of the TV until it locks in place. When ...and dirt. - Protection cover tape ENEGNLGISH Protection cover 24 ASSEMBLING AND PREPARING 3 Secure the TV and the stand with the screen side down on a flat surface. 2 Remove the 4 screws and pull the stand away from the TV. Do not over tighten. 3 Push the supplied protection cover into the opening from tilting...
Model 50PZ750, 50PZ950, 50PZ950U 60PZ750, 60PZ950, 60PZ950U Screw for assembly M4 x 26 M4 x 28 Number of screws 4 4 To detach the stand, 1 Lay the TV with the 4 screws. This will protect the opening at the bottom of the TV until it locks in place. When ...and dirt. - Protection cover tape ENEGNLGISH Protection cover 24 ASSEMBLING AND PREPARING 3 Secure the TV and the stand with the screen side down on a flat surface. 2 Remove the 4 screws and pull the stand away from the TV. Do not over tighten. 3 Push the supplied protection cover into the opening from tilting...

Owner's Manual
Page 25
...from the TV. Make sure no objects press against the screen. 2 Assemble the parts of the stand body with the 4 screws. Model Screw for assembly LV3700, M4 x 12 LV5400, LV5500, LW5600, LW5700, LW7700 series, 47/55LW6500 65LW6500 M4 x 16 Number of the TV. Screw for assembly LV3700, M4 x 12 LV5400, ...LV5500, LW5600, LW5700, LW7700 series, 47/55LW6500 65LW6500 M4 x 16 Number of screws 4 ENEGNLGISH CAUTION yyLay a foam mat or soft protective cloth on the surface to prevent the TV from ...
...from the TV. Make sure no objects press against the screen. 2 Assemble the parts of the stand body with the 4 screws. Model Screw for assembly LV3700, M4 x 12 LV5400, LV5500, LW5600, LW5700, LW7700 series, 47/55LW6500 65LW6500 M4 x 16 Number of the TV. Screw for assembly LV3700, M4 x 12 LV5400, ...LV5500, LW5600, LW5700, LW7700 series, 47/55LW6500 65LW6500 M4 x 16 Number of screws 4 ENEGNLGISH CAUTION yyLay a foam mat or soft protective cloth on the surface to prevent the TV from ...

Owner's Manual
Page 26
... ASSEMBLING AND PREPARING LW9500 series 1 Lay the TV with the 4 screws. Stand Rear Cover 4 Secure the TV and the stand with the screen side down on a flat surface. 2 Remove the 4 screws and pull the stand away from tilting forward. Make sure no objects press against the screen. ...2 Assemble the parts of the stand body with the stand base of screws 4 CAUTION yyTighten the screws firmly to protect the screen from damage. Screw for assembly M4 x 16 Number of screws 4 Stand Body Stand Base 3 Assemble the parts of screws 4 ENEGNLGISH CAUTION yyLay...
... ASSEMBLING AND PREPARING LW9500 series 1 Lay the TV with the 4 screws. Stand Rear Cover 4 Secure the TV and the stand with the screen side down on a flat surface. 2 Remove the 4 screws and pull the stand away from tilting forward. Make sure no objects press against the screen. ...2 Assemble the parts of the stand body with the stand base of screws 4 CAUTION yyTighten the screws firmly to protect the screen from damage. Screw for assembly M4 x 16 Number of screws 4 Stand Body Stand Base 3 Assemble the parts of screws 4 ENEGNLGISH CAUTION yyLay...

Owner's Manual
Page 27
...x 26 Number of the TV. CAUTION yyLay a foam mat or soft protective cloth on a flat surface. 2 Remove the 4 screws and pull the stand away from tilting forward. ASSEMBLING AND PREPARING 27 LZ9700 series 1 Lay the TV with the 4 screws. Make sure no objects press against the screen. 2... Assemble the parts of the stand body with the screen side down on a flat surface. Screw for assembly M4 x 26 Number of screws 4 ENEGNLGISH 4 Assemble the parts of screws 4...
...x 26 Number of the TV. CAUTION yyLay a foam mat or soft protective cloth on a flat surface. 2 Remove the 4 screws and pull the stand away from tilting forward. ASSEMBLING AND PREPARING 27 LZ9700 series 1 Lay the TV with the 4 screws. Make sure no objects press against the screen. 2... Assemble the parts of the stand body with the screen side down on a flat surface. Screw for assembly M4 x 26 Number of screws 4 ENEGNLGISH 4 Assemble the parts of screws 4...
Owner's Manual
Page 28
...screws 4 CAUTION yyTighten the screws firmly to protect the screen from damage. Screw for assembly M4 x 20 Number of screws 4 Stand Body 3 Secure the TV and the stand with the screen side down on a flat surface. 28 ASSEMBLING AND PREPARING LK530, LK550 series 1 Lay the TV with the... the screen. 2 Assemble the parts of screws 4 ENEGNLGISH Stand Base Do not over tighten. Stand Base Stand Body M4X20 To detach the stand, 1 Lay the TV with the 4 screws. Screw for assembly M4 x 20 Number of the stand body with the screen side down on the surface to prevent...
...screws 4 CAUTION yyTighten the screws firmly to protect the screen from damage. Screw for assembly M4 x 20 Number of screws 4 Stand Body 3 Secure the TV and the stand with the screen side down on a flat surface. 28 ASSEMBLING AND PREPARING LK530, LK550 series 1 Lay the TV with the... the screen. 2 Assemble the parts of screws 4 ENEGNLGISH Stand Base Do not over tighten. Stand Base Stand Body M4X20 To detach the stand, 1 Lay the TV with the 4 screws. Screw for assembly M4 x 20 Number of the stand body with the screen side down on the surface to prevent...
Owner's Manual
Page 30
..., the TV should be securely attached to the floor/wall per installation instructions. CAUTION yyDo not place the TV near or on sources of the stand. 10 cm 10 cm (4 inch) 10 cm 10 cm ENEGNLGISH 2 Connect the power cord to suit your view. 20 20 WARNING yyTo prevent TV from...
..., the TV should be securely attached to the floor/wall per installation instructions. CAUTION yyDo not place the TV near or on sources of the stand. 10 cm 10 cm (4 inch) 10 cm 10 cm ENEGNLGISH 2 Connect the power cord to suit your view. 20 20 WARNING yyTo prevent TV from...

Owner's Manual
Page 33
AC IN LV3700, LV5400, LV5500, LW5600, LW5700 LW6500, LW7700 series 1 Gather and bind the cables with the cable holder on the stand cover and organize cables. AC IN ENEGNLGISH CAUTION yyDo not move the TV by accident. Then, put it back. Install the LAN cable as the ...
AC IN LV3700, LV5400, LV5500, LW5600, LW5700 LW6500, LW7700 series 1 Gather and bind the cables with the cable holder on the stand cover and organize cables. AC IN ENEGNLGISH CAUTION yyDo not move the TV by accident. Then, put it back. Install the LAN cable as the ...
Owner's Manual
Page 64
...) or higher yyNetwork environment: 100 Mb Ethernet, WLAN (IEEE 802.11g), or faster 1 Start up your network name in the anonymous collection of Nero MediaHome stand-alone yy1.2 GHz Intel® Pentium® III or AMD Sempron™ 2200+ processors yyMemory: 256 MB RAM yyGraphics card with at the More button...
...) or higher yyNetwork environment: 100 Mb Ethernet, WLAN (IEEE 802.11g), or faster 1 Start up your network name in the anonymous collection of Nero MediaHome stand-alone yy1.2 GHz Intel® Pentium® III or AMD Sempron™ 2200+ processors yyMemory: 256 MB RAM yyGraphics card with at the More button...
Owner's Manual
Page 88
... the device with the ARC feature is turned on the environment in which the TV is installed. Option AV Sync. Option Normal Normal sound mode. Stand type Optimized sound mode for a wall-mounted TV. TV Speaker SPDIF (Sony Philips Digital InterFace) Adjusts the sync of the sound from the TV's internal... the sound depending on , the device speaker is automatically used when SIMPLINK is not automatically used. AV Sync. Wall Mount Type Optimized sound mode for a stand-type TV. ENEGNLGISH
... the device with the ARC feature is turned on the environment in which the TV is installed. Option AV Sync. Option Normal Normal sound mode. Stand type Optimized sound mode for a wall-mounted TV. TV Speaker SPDIF (Sony Philips Digital InterFace) Adjusts the sync of the sound from the TV's internal... the sound depending on , the device speaker is automatically used when SIMPLINK is not automatically used. AV Sync. Wall Mount Type Optimized sound mode for a stand-type TV. ENEGNLGISH

Owner's Manual
Page 113
... on the screen and image distortions. yyIf the aspect ratio of the TV is "image burn" or "burn-in scratches on the screen. Cabinet and stand To remove dust or light dirt, wipe the cabinet with your TV screen yyIf a fixed image displays on the TV screen for the Plasma TV...
... on the screen and image distortions. yyIf the aspect ratio of the TV is "image burn" or "burn-in scratches on the screen. Cabinet and stand To remove dust or light dirt, wipe the cabinet with your TV screen yyIf a fixed image displays on the TV screen for the Plasma TV...
Owner's Manual
Page 116
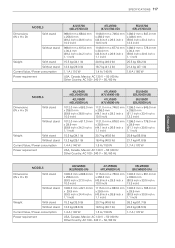
...80% Storage Temperature -20 - 60°C Storage Humidity Less than 85% MODELS Dimensions (W x H x D) With stand Without stand Weight With stand Without stand Current Value / Power consumption Power requirement 50PZ750 (50PZ750-UG) 60PZ750 (60PZ750-UG) 1185.2 mm x 782.6 mm x... A / 370 W 5.3 A / 530 W AC 100 - 240 V ~ 50 / 60 Hz MODELS Dimensions (W x H x D) With stand Without stand Weight With stand Without stand Current Value / Power consumption Power requirement 50PZ950 (50PZ950-UA) 60PZ950 (60PZ950-UA) 50PZ950U (50PZ950U-UA) 60PZ950U (60PZ950U-UA) 1175.2 mm x 787.6...
...80% Storage Temperature -20 - 60°C Storage Humidity Less than 85% MODELS Dimensions (W x H x D) With stand Without stand Weight With stand Without stand Current Value / Power consumption Power requirement 50PZ750 (50PZ750-UG) 60PZ750 (60PZ750-UG) 1185.2 mm x 782.6 mm x... A / 370 W 5.3 A / 530 W AC 100 - 240 V ~ 50 / 60 Hz MODELS Dimensions (W x H x D) With stand Without stand Weight With stand Without stand Current Value / Power consumption Power requirement 50PZ950 (50PZ950-UA) 60PZ950 (60PZ950-UA) 50PZ950U (50PZ950U-UA) 60PZ950U (60PZ950U-UA) 1175.2 mm x 787.6...
Owner's Manual
Page 117
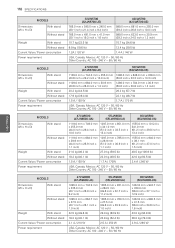
... / 60 Hz Other Country: AC 100 - 240 V ~ 50 / 60 Hz MODELS Dimensions (W x H x D) With stand Without stand Weight With stand Without stand Current Value / Power consumption Power requirement 42LV5400 (42LV5400-UB) 47LV5400 (47LV5400-UB) 55LV5400 (55LV5400-UB) 42LV5500 (42LV5500-UA) 47LV5500...50 / 60 Hz Other Country: AC 100 - 240 V ~ 50 / 60 Hz MODELS Dimensions (W x H x D) With stand Without stand Weight With stand Without stand Current Value / Power consumption Power requirement 42LW5600 (42LW5600-UA) 47LW5600 (47LW5600-UA) 55LW5600 (55LW5600-UA) 1005.0 mm x 688.0 mm...
... / 60 Hz Other Country: AC 100 - 240 V ~ 50 / 60 Hz MODELS Dimensions (W x H x D) With stand Without stand Weight With stand Without stand Current Value / Power consumption Power requirement 42LV5400 (42LV5400-UB) 47LV5400 (47LV5400-UB) 55LV5400 (55LV5400-UB) 42LV5500 (42LV5500-UA) 47LV5500...50 / 60 Hz Other Country: AC 100 - 240 V ~ 50 / 60 Hz MODELS Dimensions (W x H x D) With stand Without stand Weight With stand Without stand Current Value / Power consumption Power requirement 42LW5600 (42LW5600-UA) 47LW5600 (47LW5600-UA) 55LW5600 (55LW5600-UA) 1005.0 mm x 688.0 mm...
Owner's Manual
Page 118
...AC 100 - 240 V ~ 50 / 60 Hz MODELS Dimensions (W x H x D) With stand Without stand Weight With stand Without stand Current Value / Power consumption Power requirement 47LW6500 (47LW6500-UA) 55LW6500 (55LW6500-UA) 65LW6500 (65LW6500-UA) 1119.0 mm x 749.0 mm 1297.0 mm x 851.0 mm ... V ~ 50 / 60 Hz Other Country: AC 100 - 240 V ~ 50 / 60 Hz MODELS Dimensions (W x H x D) With stand Without stand Weight With stand Without stand Current Value / Power consumption Power requirement 47LW9500 (47LW9500-UA) 55LW9500 (55LW9500-UA) 60LW9500 (60LW9500-UA) 1095.2 mm x 734.9 mm 1265.0...
...AC 100 - 240 V ~ 50 / 60 Hz MODELS Dimensions (W x H x D) With stand Without stand Weight With stand Without stand Current Value / Power consumption Power requirement 47LW6500 (47LW6500-UA) 55LW6500 (55LW6500-UA) 65LW6500 (65LW6500-UA) 1119.0 mm x 749.0 mm 1297.0 mm x 851.0 mm ... V ~ 50 / 60 Hz Other Country: AC 100 - 240 V ~ 50 / 60 Hz MODELS Dimensions (W x H x D) With stand Without stand Weight With stand Without stand Current Value / Power consumption Power requirement 47LW9500 (47LW9500-UA) 55LW9500 (55LW9500-UA) 60LW9500 (60LW9500-UA) 1095.2 mm x 734.9 mm 1265.0...
Owner's Manual
Page 119
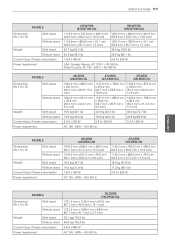
...V ~ 50 / 60 Hz Other Country: AC 100 - 240 V ~ 50 / 60 Hz MODELS Dimensions (W x H x D) With stand Without stand Weight With stand Without stand Current Value / Power consumption Power requirement 42LK530 (42LK530-UC) 47LK530 (47LK530-UC) 55LK530 (55LK530-UC) 1024.0 mm x 685.0 mm 1137.0 ... W 2.5 A / 250 W 3.2 A / 320 W AC 100 - 240V ~ 50 / 60 Hz MODELS Dimensions (W x H x D) With stand Without stand Weight With stand Without stand Current Value / Power consumption Power requirement 42LK550 (42LK550-UA) 47LK550 (47LK550-UA) 1019.0 mm x 698.0 mm x 265.0 mm 1132.0 mm x ...
...V ~ 50 / 60 Hz Other Country: AC 100 - 240 V ~ 50 / 60 Hz MODELS Dimensions (W x H x D) With stand Without stand Weight With stand Without stand Current Value / Power consumption Power requirement 42LK530 (42LK530-UC) 47LK530 (47LK530-UC) 55LK530 (55LK530-UC) 1024.0 mm x 685.0 mm 1137.0 ... W 2.5 A / 250 W 3.2 A / 320 W AC 100 - 240V ~ 50 / 60 Hz MODELS Dimensions (W x H x D) With stand Without stand Weight With stand Without stand Current Value / Power consumption Power requirement 42LK550 (42LK550-UA) 47LK550 (47LK550-UA) 1019.0 mm x 698.0 mm x 265.0 mm 1132.0 mm x ...

Specification
Page 2
...Rear) CABINET/ACCESSORIES Swivel 20º/20º VESA Compatible • (400mm x 400mm) LG Cinema 3D Glasses 4 Pair Remote Control Magic Motion & Standard (Backlit) POWER ENERGY STAR® Qualified • Voltage. 55LW6500 55" Class 3D 1080p LED LCD TV PANEL SPECIFICATIONS Screen Size Resolution TruMotion (Frame Rate) ...Sound Mode Clear Voice II 3D SPECIFICATIONS 3D 2D to 3D Converting Depth Control Level 3D Depth Control 3D to 2D CONNECTIVITY LG Smart TV LG App Store Web Browser Wi-Fi® Ready DLNA Certified® Windows 7 Certified SIMPLINK (HDMI CEC) Wireless HD ...
...Rear) CABINET/ACCESSORIES Swivel 20º/20º VESA Compatible • (400mm x 400mm) LG Cinema 3D Glasses 4 Pair Remote Control Magic Motion & Standard (Backlit) POWER ENERGY STAR® Qualified • Voltage. 55LW6500 55" Class 3D 1080p LED LCD TV PANEL SPECIFICATIONS Screen Size Resolution TruMotion (Frame Rate) ...Sound Mode Clear Voice II 3D SPECIFICATIONS 3D 2D to 3D Converting Depth Control Level 3D Depth Control 3D to 2D CONNECTIVITY LG Smart TV LG App Store Web Browser Wi-Fi® Ready DLNA Certified® Windows 7 Certified SIMPLINK (HDMI CEC) Wireless HD ...


