
Owner's Manual
Page 4
... has been damaged in any objects to fall into the apparatus, the apparatus has been exposed to be placed upon . yyCAUTION concerning the Power Cord: It is used, use of the TV. Check the specification page of time. Do not connect too many appliances to qualified service... convenience receptacles, and the point where they exit from the apparatus. Overloaded wall outlets, loose or damaged wall outlets, extension cords, frayed power cords, or damaged or cracked wire insulation are dangerous. Do not move the TV with the apparatus. Do not use attachments/accessories specified by...
... has been damaged in any objects to fall into the apparatus, the apparatus has been exposed to be placed upon . yyCAUTION concerning the Power Cord: It is used, use of the TV. Check the specification page of time. Do not connect too many appliances to qualified service... convenience receptacles, and the point where they exit from the apparatus. Overloaded wall outlets, loose or damaged wall outlets, extension cords, frayed power cords, or damaged or cracked wire insulation are dangerous. Do not move the TV with the apparatus. Do not use attachments/accessories specified by...

Owner's Manual
Page 5
...front panel of the National Electrical Code (NEC) in wire to an antenna discharge unit, size of grounding conductors, location of overhead power lines or other materials while plugged. Do not cover the product with respect to proper grounding of the mast and supporting structure, .... yyKeep the product away from LG Electronics. yyGrounding Ensure that you smell smoke or other liquids directly on it can occur. a TV with liquids, such as alcohol, thinners or benzine. Power Supply Short-circuit Breaker yyDISCONNECTING DEVICE FROM THE MAIN POWER The power outlet must be connected to a...
...front panel of the National Electrical Code (NEC) in wire to an antenna discharge unit, size of grounding conductors, location of overhead power lines or other materials while plugged. Do not cover the product with respect to proper grounding of the mast and supporting structure, .... yyKeep the product away from LG Electronics. yyGrounding Ensure that you smell smoke or other liquids directly on it can occur. a TV with liquids, such as alcohol, thinners or benzine. Power Supply Short-circuit Breaker yyDISCONNECTING DEVICE FROM THE MAIN POWER The power outlet must be connected to a...

Owner's Manual
Page 9
Composite Connection 79 Connecting to HDMI Connection 80 - DVI to a PC 79 - Screen and frame 83 - Cabinet and stand 83 - Power cord 83 Preventing "Image burn" or "Burn-in" on your TV screen 84 TROUBLESHOOTING 86 SPECIFICATIONS 94 IR CODES 96 EXTERNAL CONTROL DEVICE SETUP 104 ...
Composite Connection 79 Connecting to HDMI Connection 80 - DVI to a PC 79 - Screen and frame 83 - Cabinet and stand 83 - Power cord 83 Preventing "Image burn" or "Burn-in" on your TV screen 84 TROUBLESHOOTING 86 SPECIFICATIONS 94 IR CODES 96 EXTERNAL CONTROL DEVICE SETUP 104 ...
Owner's Manual
Page 11
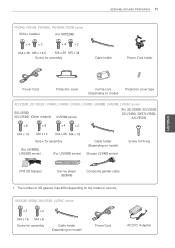
... PW340, PW350, PW350U, PW350R, PZ200 series (Other models) (For 60PZ200) x 4 x 3 x 4 x 3 M4 x 26 M5 x 14.5 M4 x 28 M5 x 24 Screw for assembly Cable holder Power Cord holder ENEGNLGISH Power Cord Protection cover Ferrite core (Depending on model) Protection cover tape 32LV2500, 32LV2520, LV3400, LV3500, LV3520, LV5300, LW5000, LW5300, LV355C series (32LV2500, 32LV2520) (Other... may differ depending on the model or country. 19/22/26LV2500, 26LV2520, LV255C series x 2 x 2 M4 x 16 M4 x 6 Screw for assembly Cable holder (Depending on model) Power Cord AC/DC Adapter
... PW340, PW350, PW350U, PW350R, PZ200 series (Other models) (For 60PZ200) x 4 x 3 x 4 x 3 M4 x 26 M5 x 14.5 M4 x 28 M5 x 24 Screw for assembly Cable holder Power Cord holder ENEGNLGISH Power Cord Protection cover Ferrite core (Depending on model) Protection cover tape 32LV2500, 32LV2520, LV3400, LV3500, LV3520, LV5300, LW5000, LW5300, LV355C series (32LV2500, 32LV2520) (Other... may differ depending on the model or country. 19/22/26LV2500, 26LV2520, LV255C series x 2 x 2 M4 x 16 M4 x 6 Screw for assembly Cable holder (Depending on model) Power Cord AC/DC Adapter
Owner's Manual
Page 12
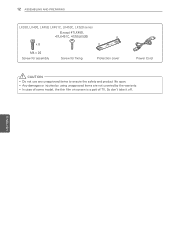
yyIn case of some model, the thin film on screen is a part of TV, So don't take it off. ENEGNLGISH 12 ASSEMBLING AND PREPARING LK330, LK430, LK450, LK451C, LK453C, LK520 series (Except 47LK450, 47LK451C, 47/55LK520) x 8 M4 x 20 Screw for assembly Screw for fixing Protection cover Power Cord CAUTION yyDo not use any unapproved items to ensure the safety and product life span. yyAny damages or injuries by using unapproved items are not covered by the warranty.
yyIn case of some model, the thin film on screen is a part of TV, So don't take it off. ENEGNLGISH 12 ASSEMBLING AND PREPARING LK330, LK430, LK450, LK451C, LK453C, LK520 series (Except 47LK450, 47LK451C, 47/55LK520) x 8 M4 x 20 Screw for assembly Screw for fixing Protection cover Power Cord CAUTION yyDo not use any unapproved items to ensure the safety and product life span. yyAny damages or injuries by using unapproved items are not covered by the warranty.

Owner's Manual
Page 13
...plug] [to the TV] [Figure 3] [Cross Section of Ferrite Core] 4 Use the ferrite core to reduce the electromagnetic interference in the power cable. Wind the power cable on the ferrite core once. ASSEMBLING AND PREPARING 13 ENEGNLGISH NOTE yyThe items supplied with your product may be changed without prior notice...If there are three ferrite cores, follow as shown in Figures 1 and 2. - If there are two ferrite cores, follow as shown in the power cable. yy( LCD ) For an optimal connection, HDMI cables and USB devices should have bezels less than 10 mm (0.39 inches) thick and...
...plug] [to the TV] [Figure 3] [Cross Section of Ferrite Core] 4 Use the ferrite core to reduce the electromagnetic interference in the power cable. Wind the power cable on the ferrite core once. ASSEMBLING AND PREPARING 13 ENEGNLGISH NOTE yyThe items supplied with your product may be changed without prior notice...If there are three ferrite cores, follow as shown in Figures 1 and 2. - If there are two ferrite cores, follow as shown in the power cable. yy( LCD ) For an optimal connection, HDMI cables and USB devices should have bezels less than 10 mm (0.39 inches) thick and...
Owner's Manual
Page 15
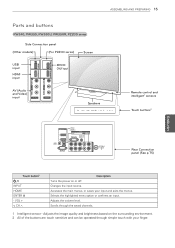
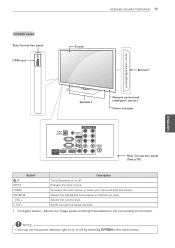
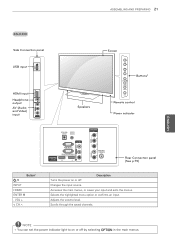
... Rear Connection panel (See p.75) ENEGNLGISH Touch button2 / I INPUT HOME ENTER ⊙ - Adjusts the volume level. Changes the input source. VOL + v CH ^ Description Turns the power on the surrounding environment. 2 All of the buttons are touch sensitive and can be operated through the saved channels. 1 Intelligent sensor -
... Rear Connection panel (See p.75) ENEGNLGISH Touch button2 / I INPUT HOME ENTER ⊙ - Adjusts the volume level. Changes the input source. VOL + v CH ^ Description Turns the power on the surrounding environment. 2 All of the buttons are touch sensitive and can be operated through the saved channels. 1 Intelligent sensor -

Owner's Manual
Page 16
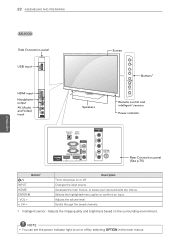
...Adjusts the image quality and brightness based on the surrounding environment. 2 All of the buttons are touch sensitive and can set the power indicator light to on or off by selecting OPTION in the main menus. Scrolls through simple touch with your input and exits the..., LV5300, LW5000, LW5300, LV355C series Screen ENEGNLGISH Speakers CH VOL ENTER HOME INPUT CH VOL ENTER HOME INPUT H Remote control and intelligent1 sensors Power indicator Touch buttons2 (Other model) (LV5300 series) UUSSBBIINN LAN OPTICAL DIGITAL AUDIO OUT VIDEO COMPONENT IN (RGB/DVI) AUDIO IN AV IN 1 ...
...Adjusts the image quality and brightness based on the surrounding environment. 2 All of the buttons are touch sensitive and can set the power indicator light to on or off by selecting OPTION in the main menus. Scrolls through simple touch with your input and exits the..., LV5300, LW5000, LW5300, LV355C series Screen ENEGNLGISH Speakers CH VOL ENTER HOME INPUT CH VOL ENTER HOME INPUT H Remote control and intelligent1 sensors Power indicator Touch buttons2 (Other model) (LV5300 series) UUSSBBIINN LAN OPTICAL DIGITAL AUDIO OUT VIDEO COMPONENT IN (RGB/DVI) AUDIO IN AV IN 1 ...
Owner's Manual
Page 17
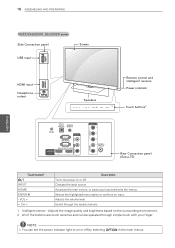
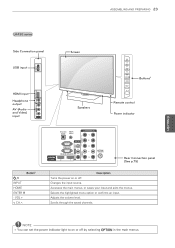
...Connection panel USB input USB IN Screen Speakers CH VOL Buttons2 ENTER HOME INPUT CH VOL Remote control and ENTER intelligent1 sensors HOME INPUT Power indicator ENEGNLGISH OPTICAL DIGITAL AUDIO OUT VIDEO COMPONENT IN (RGB/DVI) AUDIO IN AV IN PB Y PR VIDEO L/MONO AUDIO R.../ DVI IN RS-232C IN(CONTROL & SERVICE) 2 1 AUDIO L ANTENNA / CABLE IN R 2 1 3 Rear Connection panel (See p.75) / I INPUT Button2 Turns the power on or off by selecting OPTION in the main menus. Adjusts the volume level. Adjusts the image quality and brightness based on or off . Description...
...Connection panel USB input USB IN Screen Speakers CH VOL Buttons2 ENTER HOME INPUT CH VOL Remote control and ENTER intelligent1 sensors HOME INPUT Power indicator ENEGNLGISH OPTICAL DIGITAL AUDIO OUT VIDEO COMPONENT IN (RGB/DVI) AUDIO IN AV IN PB Y PR VIDEO L/MONO AUDIO R.../ DVI IN RS-232C IN(CONTROL & SERVICE) 2 1 AUDIO L ANTENNA / CABLE IN R 2 1 3 Rear Connection panel (See p.75) / I INPUT Button2 Turns the power on or off by selecting OPTION in the main menus. Adjusts the volume level. Adjusts the image quality and brightness based on or off . Description...
Owner's Manual
Page 18
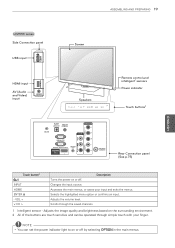
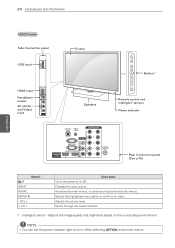
... series Side Connection panel Screen USB input USB IN HDMI input Headphone output IN 3 Speakers CH VOL ENTER HOME INPUT Remote control and intelligent1 sensors Power indicator Touch buttons2 OPTICAL DIGITAL (RGB/DVI) AUDIO OUT AUDIO IN DC-IN AV IN RGB IN (PC) VIDEO L/MONO AUDIO R / DVI IN RS-232C...) 2 1 AUDIO VIDEO R L PR PB Y COMPONENT IN ANTENNA / CABLE IN Rear Connection panel (See p.75) Touch button2 / I INPUT HOME ENTER ⊙ - VOL + v CH ^ Description Turns the power on the surrounding environment. 2 All of the buttons are touch sensitive and can set the...
... series Side Connection panel Screen USB input USB IN HDMI input Headphone output IN 3 Speakers CH VOL ENTER HOME INPUT Remote control and intelligent1 sensors Power indicator Touch buttons2 OPTICAL DIGITAL (RGB/DVI) AUDIO OUT AUDIO IN DC-IN AV IN RGB IN (PC) VIDEO L/MONO AUDIO R / DVI IN RS-232C...) 2 1 AUDIO VIDEO R L PR PB Y COMPONENT IN ANTENNA / CABLE IN Rear Connection panel (See p.75) Touch button2 / I INPUT HOME ENTER ⊙ - VOL + v CH ^ Description Turns the power on the surrounding environment. 2 All of the buttons are touch sensitive and can set the...
Owner's Manual
Page 19
...the menus. Adjusts the image quality and brightness based on the surrounding environment. 2 All of the buttons are touch sensitive and can set the power indicator light to on or off by selecting OPTION in the main menus. Changes the input source. Accesses the main menus, or saves your ...input Screen USB IN HDMI input AV (Audio and Video) AV IN 2 input IN 2 Speakers CH VOL ENTER HOME INPUT Remote control and intelligent1 sensors Power indicator Touch buttons2 OPTICAL DIGITAL AUDIO IN AUDIO OUT (RGB/DVI) DC-IN COMPONENT IN AV IN PB Y VIDEO PR VIDEO L/MONO AUDIO R RGB...
...the menus. Adjusts the image quality and brightness based on the surrounding environment. 2 All of the buttons are touch sensitive and can set the power indicator light to on or off by selecting OPTION in the main menus. Changes the input source. Accesses the main menus, or saves your ...input Screen USB IN HDMI input AV (Audio and Video) AV IN 2 input IN 2 Speakers CH VOL ENTER HOME INPUT Remote control and intelligent1 sensors Power indicator Touch buttons2 OPTICAL DIGITAL AUDIO IN AUDIO OUT (RGB/DVI) DC-IN COMPONENT IN AV IN PB Y VIDEO PR VIDEO L/MONO AUDIO R RGB...
Owner's Manual
Page 20
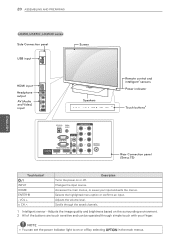
.... Adjusts the image quality and brightness based on the surrounding environment. 2 All of the buttons are touch sensitive and can set the power indicator light to on or off by selecting OPTION in the main menus. NOTE yyYou can be operated through the saved channels. 1 Intelligent ...highlighted menu option or confirms an input. Scrolls through simple touch with your input and exits the menus. VOL + v CH ^ Description Turns the power on or off . Accesses the main menus, or saves your finger. 20 ASSEMBLING AND PREPARING ENEGNLGISH LK450, LK451C, LK453C series Side Connection panel ...
.... Adjusts the image quality and brightness based on the surrounding environment. 2 All of the buttons are touch sensitive and can set the power indicator light to on or off by selecting OPTION in the main menus. NOTE yyYou can be operated through the saved channels. 1 Intelligent ...highlighted menu option or confirms an input. Scrolls through simple touch with your input and exits the menus. VOL + v CH ^ Description Turns the power on or off . Accesses the main menus, or saves your finger. 20 ASSEMBLING AND PREPARING ENEGNLGISH LK450, LK451C, LK453C series Side Connection panel ...
Owner's Manual
Page 21
... and exits the menus. Adjusts the volume level. Scrolls through the saved channels. Changes the input source. NOTE yyYou can set the power indicator light to on or off by selecting OPTION in the main menus. ASSEMBLING AND PREPARING 21 ENEGNLGISH 26LK330 Side Connection panel USB input... Headphone output AV (Audio and Video) input AV IN 2 VIDEO L/MONO AUDIO R IN 3 USB IN Speakers Screen CH VOL ENTER HOME INPUT Buttons2 Remote control Power indicator OPTICALDIGITAL AUDIO IN AUDIO OUT (RGB/DVI) / DVI IN VIDEO L/MONO AUDIO R AV IN 1 RGB IN (PC) RS-232C IN (CONTROL&SERVICE) ...
... and exits the menus. Adjusts the volume level. Scrolls through the saved channels. Changes the input source. NOTE yyYou can set the power indicator light to on or off by selecting OPTION in the main menus. ASSEMBLING AND PREPARING 21 ENEGNLGISH 26LK330 Side Connection panel USB input... Headphone output AV (Audio and Video) input AV IN 2 VIDEO L/MONO AUDIO R IN 3 USB IN Speakers Screen CH VOL ENTER HOME INPUT Buttons2 Remote control Power indicator OPTICALDIGITAL AUDIO IN AUDIO OUT (RGB/DVI) / DVI IN VIDEO L/MONO AUDIO R AV IN 1 RGB IN (PC) RS-232C IN (CONTROL&SERVICE) ...
Owner's Manual
Page 22
... 1 Intelligent sensor - Adjusts the image quality and brightness based on or off . Adjusts the volume level. NOTE yyYou can set the power indicator light to on the surrounding environment. Accesses the main menus, or saves your input and exits the menus. Selects the highlighted menu option...Audio and Video) input AV IN 2 VIDEO L/MONO AUDIO R IN 3 USB IN Speakers Screen CH VOL ENTER HOME INPUT Buttons2 Remote control and intelligent1 sensors Power indicator OPTICALDIGITAL AUDIO IN AUDIO OUT (RGB/DVI) / DVI IN VIDEO L/MONO AUDIO R AV IN 1 RGB IN (PC) RS-232C IN (CONTROL&SERVICE...
... 1 Intelligent sensor - Adjusts the image quality and brightness based on or off . Adjusts the volume level. NOTE yyYou can set the power indicator light to on the surrounding environment. Accesses the main menus, or saves your input and exits the menus. Selects the highlighted menu option...Audio and Video) input AV IN 2 VIDEO L/MONO AUDIO R IN 3 USB IN Speakers Screen CH VOL ENTER HOME INPUT Buttons2 Remote control and intelligent1 sensors Power indicator OPTICALDIGITAL AUDIO IN AUDIO OUT (RGB/DVI) / DVI IN VIDEO L/MONO AUDIO R AV IN 1 RGB IN (PC) RS-232C IN (CONTROL&SERVICE...
Owner's Manual
Page 23
... IN (PC) RS-232C IN (CONTROL&SERVICE) 2 1 2 R L PR ANTENNA / CABLE IN 1 Rear Connection panel (See p.75) Description Turns the power on or off . Changes the input source. NOTE yyYou can set the power indicator light to on or off by selecting OPTION in the main menus. Accesses the main menus, or saves... IN 3 HDMI input Headphone output VIDEO L/MONO AUDIO R AV (Audio and Video) input AV IN 2 Screen Speakers CH VOL ENTER HOME INPUT Buttons2 Remote control Power indicator Button2 / I INPUT HOME ENTER ⊙ - Scrolls through the saved channels.
... IN (PC) RS-232C IN (CONTROL&SERVICE) 2 1 2 R L PR ANTENNA / CABLE IN 1 Rear Connection panel (See p.75) Description Turns the power on or off . Changes the input source. NOTE yyYou can set the power indicator light to on or off by selecting OPTION in the main menus. Accesses the main menus, or saves... IN 3 HDMI input Headphone output VIDEO L/MONO AUDIO R AV (Audio and Video) input AV IN 2 Screen Speakers CH VOL ENTER HOME INPUT Buttons2 Remote control Power indicator Button2 / I INPUT HOME ENTER ⊙ - Scrolls through the saved channels.
Owner's Manual
Page 24
... Headphone output VIDEO L/MONO AUDIO R AV (Audio and Video) input AV IN 2 Screen Speakers CH VOL ENTER HOME INPUT Buttons2 Remote control and intelligent1 sensors Power indicator OPTICALDIGITAL (RGB/DVI) AUDIO OUT AUDIO IN COMPONENT IN Y PB VIDEO / DVI IN AUDIO VIDEO L/MONO AUDIO R AV IN 1 RGB IN (PC) RS-232C...; - Changes the input source. Selects the highlighted menu option or confirms an input. Scrolls through the saved channels. 1 Intelligent sensor - NOTE yyYou can set the power indicator light to on or off . VOL + v CH ^ Description Turns the...
... Headphone output VIDEO L/MONO AUDIO R AV (Audio and Video) input AV IN 2 Screen Speakers CH VOL ENTER HOME INPUT Buttons2 Remote control and intelligent1 sensors Power indicator OPTICALDIGITAL (RGB/DVI) AUDIO OUT AUDIO IN COMPONENT IN Y PB VIDEO / DVI IN AUDIO VIDEO L/MONO AUDIO R AV IN 1 RGB IN (PC) RS-232C...; - Changes the input source. Selects the highlighted menu option or confirms an input. Scrolls through the saved channels. 1 Intelligent sensor - NOTE yyYou can set the power indicator light to on or off . VOL + v CH ^ Description Turns the...
Owner's Manual
Page 25
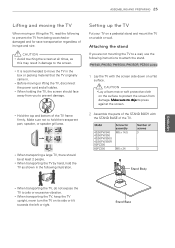
... hold the TV as this may result in . ASSEMBLING AND PREPARING 25 Lifting and moving the TV When moving or lifting the TV, disconnect the power cord and all times, as shown in the following instructions to the screen. yyIt is recommended to move the TV in the box or packing...
... hold the TV as this may result in . ASSEMBLING AND PREPARING 25 Lifting and moving the TV When moving or lifting the TV, disconnect the power cord and all times, as shown in the following instructions to the screen. yyIt is recommended to move the TV in the box or packing...
Owner's Manual
Page 30
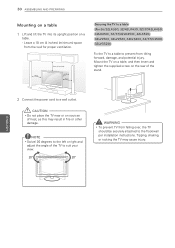
ENEGNLGISH 2 Connect the power cord to prevent from tilting forward, damage, and potential injury. Tipping, shaking, or rocking the TV may result in fire or other damage. Mount the ...
ENEGNLGISH 2 Connect the power cord to prevent from tilting forward, damage, and potential injury. Tipping, shaking, or rocking the TV may result in fire or other damage. Mount the ...
Owner's Manual
Page 32
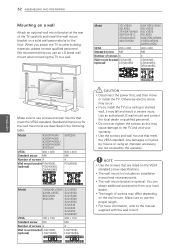
... Wall mount bracket LSW200B, (optional) LSW200BG 42/47/55LV3500 55LV5300 42LV3520 55LK520 42/47/55LW5000 47/55LW5300 42/55LV355C 400 x 400 M6 4 LSW400B, LSW400BG, DSW400BG 10 cm 10 cm (4 inches) ... of screws 4 4 Wall mount bracket LSW100B, (optional) LSW100BG LSW100B, LSW100BG CAUTION yyDisconnect the power first, and then move or install the TV. NOTE yyUse the screws that you use the ... length. yyThe wall mount bracket is optional. yyFor more information, refer to use an LG brand wall mount when mounting the TV to other building materials, please contact qualified personnel...
... Wall mount bracket LSW200B, (optional) LSW200BG 42/47/55LV3500 55LV5300 42LV3520 55LK520 42/47/55LW5000 47/55LW5300 42/55LV355C 400 x 400 M6 4 LSW400B, LSW400BG, DSW400BG 10 cm 10 cm (4 inches) ... of screws 4 4 Wall mount bracket LSW100B, (optional) LSW100BG LSW100B, LSW100BG CAUTION yyDisconnect the power first, and then move or install the TV. NOTE yyUse the screws that you use the ... length. yyThe wall mount bracket is optional. yyFor more information, refer to use an LG brand wall mount when mounting the TV to other building materials, please contact qualified personnel...

Owner's Manual
Page 33
... from being removed by holding the cable holder and power cord holder, as the cable holders may break, and injuries and damage to the TV. Cable holder CAUTION yyDo not move the TV by accident. .... 2 Fix the cable management clip firmly to the TV may occur. ASSEMBLING AND PREPARING 33 Tidying cables PW340, PW350, PW350U, PW350R, PZ200 series 1 Install the power cord holder and power cord. Cable management clip ENEGNLGISH Power cord holder 2 Gather and bind the cables with the cable holder.
... from being removed by holding the cable holder and power cord holder, as the cable holders may break, and injuries and damage to the TV. Cable holder CAUTION yyDo not move the TV by accident. .... 2 Fix the cable management clip firmly to the TV may occur. ASSEMBLING AND PREPARING 33 Tidying cables PW340, PW350, PW350U, PW350R, PZ200 series 1 Install the power cord holder and power cord. Cable management clip ENEGNLGISH Power cord holder 2 Gather and bind the cables with the cable holder.

