Owner's Manual (English)
Page 2
....lgusa.com / www.lg.ca Changing the factory default settings or enabling other features may increase power consumption that could exceed the limits necessary to quality for future reference. Record it for ENERGY STAR. LED LCD TV MEDIA BOX OWNER'S MANUAL LED LCD TV MODEL 55LHX MEDIA BOX MODEL ASW1000 LCD TV MEDIA BOX OWNER'S MANUAL LCD TV MODELS 47LH85 55LH85...
....lgusa.com / www.lg.ca Changing the factory default settings or enabling other features may increase power consumption that could exceed the limits necessary to quality for future reference. Record it for ENERGY STAR. LED LCD TV MEDIA BOX OWNER'S MANUAL LED LCD TV MODEL 55LHX MEDIA BOX MODEL ASW1000 LCD TV MEDIA BOX OWNER'S MANUAL LCD TV MODELS 47LH85 55LH85...
Owner's Manual (English)
Page 7
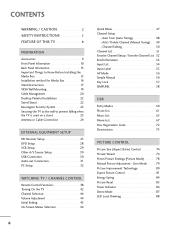
... Connection 30 Audio out Connection 31 PC Setup 32 WATCHING TV / CHANNEL CONTROL Remote Control Functions 38 Turning On the TV 42 Channel Selection 44 Volume Adjustment 44 Initial Setting 45 On-Screen Menus Selection 46 Quick Menu 47 Channel Setup... - Auto Scan (Auto Tuning 48 - Add / Delete Channel (Manual Tuning 49 - Channel Editing 50 Channel List 51 Favorite Channel Setup / Favorite Channel List . . 52 Brief Information 53 Input List 54...
... Connection 30 Audio out Connection 31 PC Setup 32 WATCHING TV / CHANNEL CONTROL Remote Control Functions 38 Turning On the TV 42 Channel Selection 44 Volume Adjustment 44 Initial Setting 45 On-Screen Menus Selection 46 Quick Menu 47 Channel Setup... - Auto Scan (Auto Tuning 48 - Add / Delete Channel (Manual Tuning 49 - Channel Editing 50 Channel List 51 Favorite Channel Setup / Favorite Channel List . . 52 Brief Information 53 Input List 54...

Owner's Manual (English)
Page 8
... - Analog Broadcasting System Captions 99 - Auto Clock Setup 102 Manual Clock Setup 103 Auto On/Off Time Setting 104 Sleep Timer Setting 105 PARENTAL CONTROL / RATINGS Set Password & Lock System 106 Channel Blocking 109 Movie & TV Rating 110 Downloadable Rating 115 External Input Blocking 116 APPENDIX Troubleshooting 117 Maintenance 120 Product Specifications 121 IR...
... - Analog Broadcasting System Captions 99 - Auto Clock Setup 102 Manual Clock Setup 103 Auto On/Off Time Setting 104 Sleep Timer Setting 105 PARENTAL CONTROL / RATINGS Set Password & Lock System 106 Channel Blocking 109 Movie & TV Rating 110 Downloadable Rating 115 External Input Blocking 116 APPENDIX Troubleshooting 117 Maintenance 120 Product Specifications 121 IR...
Owner's Manual (English)
Page 9
...display) is a digital video format created by the user to experience the best their LG HDTV has to choose a content-specific setting, "video mute" or engaging exclusive Intelligent Sensor technology. This TV contains the detailed calibrations necessary for a crisper picture. The resulting ISF "day" and... 16:9 aspect-ratio screens, and AC3 digital audio. Speakers are trademarks or registered trademarks of your TV screen for a prolonged period (2 or more hours for LCD, 1 or more stable structure for professional certification by combining advanced 120Hz technology with this code to...
...display) is a digital video format created by the user to experience the best their LG HDTV has to choose a content-specific setting, "video mute" or engaging exclusive Intelligent Sensor technology. This TV contains the detailed calibrations necessary for a crisper picture. The resulting ISF "day" and... 16:9 aspect-ratio screens, and AC3 digital audio. Speakers are trademarks or registered trademarks of your TV screen for a prolonged period (2 or more hours for LCD, 1 or more stable structure for professional certification by combining advanced 120Hz technology with this code to...
Owner's Manual (English)
Page 16
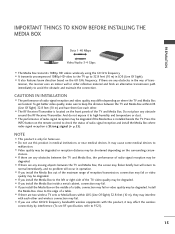
... quality may fail. Install the Media Box close to avoid the obstacle and maintain the connection. I If there are two wireless TV sets or Media Boxes within LOS (Line Of Sight) 32.8 feet (10 m) and have them face each other reflective material and finds an alternative transmission...INSTALLATION I If there are any obstacles in LOS (Line Of Sight). To get better video quality, make sure to keep the distance between the TV and Media Box, the screen may flicker briefly but will occur in medical institutions or near medical devices. I The performance of radio-signal reception and...
... quality may fail. Install the Media Box close to avoid the obstacle and maintain the connection. I If there are two wireless TV sets or Media Boxes within LOS (Line Of Sight) 32.8 feet (10 m) and have them face each other reflective material and finds an alternative transmission...INSTALLATION I If there are any obstacles in LOS (Line Of Sight). To get better video quality, make sure to keep the distance between the TV and Media Box, the screen may flicker briefly but will occur in medical institutions or near medical devices. I The performance of radio-signal reception and...
Owner's Manual (English)
Page 23
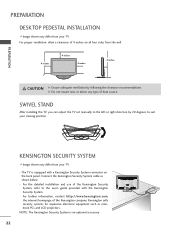
...inches 4 inches 4 inches 4 inches CAUTION G Ensure adequate ventilation by 20 degrees to suit your TV. SWIVEL STAND After installing the TV, you can adjust the TV set manually to the user's guide provided with a Kensington Security System connector on all four sides from ...your viewing position. Connect the Kensington Security System cable as notebook PCs and LCD projectors. KENSINGTON SECURITY SYSTEM I Image shown may differ from your TV...
...inches 4 inches 4 inches 4 inches CAUTION G Ensure adequate ventilation by 20 degrees to suit your TV. SWIVEL STAND After installing the TV, you can adjust the TV set manually to the user's guide provided with a Kensington Security System connector on all four sides from ...your viewing position. Connect the Kensington Security System cable as notebook PCs and LCD projectors. KENSINGTON SECURITY SYSTEM I Image shown may differ from your TV...
Owner's Manual (English)
Page 24
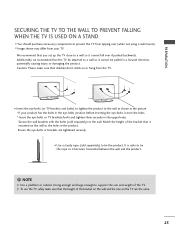
... a platform or cabinet strong enough and large enough to the wall. Match the height of the TV. I Use a sturdy rope (sold separately) to support the size and weight of the bracket that you set up the TV close to tie the product. We recommend that is safer to the wall as shown in... the upper holes. I Image shown may differ from your product has the bolts in the eye-bolts position before inserting the eye-bolts, loosen the bolts. * Insert the eye-bolts or TV...
... a platform or cabinet strong enough and large enough to the wall. Match the height of the TV. I Use a sturdy rope (sold separately) to support the size and weight of the bracket that you set up the TV close to tie the product. We recommend that is safer to the wall as shown in... the upper holes. I Image shown may differ from your product has the bolts in the eye-bolts position before inserting the eye-bolts, loosen the bolts. * Insert the eye-bolts or TV...

Owner's Manual (English)
Page 26
.... HD RECEIVER SETUP This Media Box can receive digital over-the-air/digital cable signals without an external digital set -top box to the COMPONENT IN AUDIO 1 or 2 jacks on the digital set-top box. (Refer to the COMPONENT IN VIDEO 1 or 2 jacks on the remote control. /DVI IN COMPONENT IN 1 Y... Component1 or Component2 input source using the INPUT button on the Media Box. How to connect 1 Connect the video outputs (Y, PB, PR) of the digital set -top box. Match the jack colors (Y = green, PB = blue, and PR = red). 2 Connect the audio output of the digital settop box to the ...
.... HD RECEIVER SETUP This Media Box can receive digital over-the-air/digital cable signals without an external digital set -top box to the COMPONENT IN AUDIO 1 or 2 jacks on the digital set-top box. (Refer to the COMPONENT IN VIDEO 1 or 2 jacks on the remote control. /DVI IN COMPONENT IN 1 Y... Component1 or Component2 input source using the INPUT button on the Media Box. How to connect 1 Connect the video outputs (Y, PB, PR) of the digital set -top box. Match the jack colors (Y = green, PB = blue, and PR = red). 2 Connect the audio output of the digital settop box to the ...
Owner's Manual (English)
Page 27
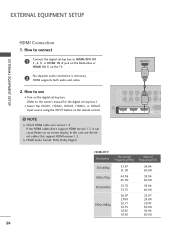
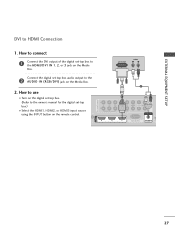
... G Check HDMI cable over version 1.3. In this case use I Select the HDMI1, HDMI2, HDMI3, HDMI4, or HDMI5 input source using the INPUT button on the TV. G HDMI Audio Format: PCM, Dolby Digital /DVI IN COMPONENT IN HDMI OUTPUT 1 1 Y 2 PB PR VIDEO L R VIDEO L(M AUDIO 3 2 1 RGB IN (PC HDMI-...separate audio connection is necessary. 2 HDMI supports both audio and video. 2. How to connect 1 Connect the digital set-top box to the owner's manual for the digital set-top box.) I Turn on the digital set-top box. (Refer to HDMI/DVI IN 1, 2, 3, or HDMI IN 4 jack on the Media Box ...
... G Check HDMI cable over version 1.3. In this case use I Select the HDMI1, HDMI2, HDMI3, HDMI4, or HDMI5 input source using the INPUT button on the TV. G HDMI Audio Format: PCM, Dolby Digital /DVI IN COMPONENT IN HDMI OUTPUT 1 1 Y 2 PB PR VIDEO L R VIDEO L(M AUDIO 3 2 1 RGB IN (PC HDMI-...separate audio connection is necessary. 2 HDMI supports both audio and video. 2. How to connect 1 Connect the digital set-top box to the owner's manual for the digital set-top box.) I Turn on the digital set-top box. (Refer to HDMI/DVI IN 1, 2, 3, or HDMI IN 4 jack on the Media Box ...
Owner's Manual (English)
Page 28
... audio output to the HDMI/DVI IN 1, 2, or 3 jack on the Media Box. How to use I Turn on the digital set-top box. (Refer to the owner's manual for the digital set -top box to the 2 AUDIO IN (RGB/DVI) jack on the remote control. /DVI IN COMPONENT IN DVI OUTPUT AUDIO...) AUDIO R 2 AUDIO IN 3 2 1 RGB IN (PC) (RGB/DVI) SE 27 EXTERNAL EQUIPMENT SETUP AV IN DVI to connect 1 Connect the DVI output of the digital set -top box.) I Select the HDMI1, HDMI2, or HDMI3 input source using the INPUT button on the Media Box. 2. How to HDMI Connection 1.
... audio output to the HDMI/DVI IN 1, 2, or 3 jack on the Media Box. How to use I Turn on the digital set-top box. (Refer to the owner's manual for the digital set -top box to the 2 AUDIO IN (RGB/DVI) jack on the remote control. /DVI IN COMPONENT IN DVI OUTPUT AUDIO...) AUDIO R 2 AUDIO IN 3 2 1 RGB IN (PC) (RGB/DVI) SE 27 EXTERNAL EQUIPMENT SETUP AV IN DVI to connect 1 Connect the DVI output of the digital set -top box.) I Select the HDMI1, HDMI2, or HDMI3 input source using the INPUT button on the Media Box. 2. How to HDMI Connection 1.
Owner's Manual (English)
Page 30
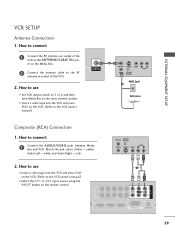
... and press PLAY on the Media Box. 2 Connect the antenna cable to the RF antenna in socket of the VCR to the VCR owner's manual.) I Set VCR output switch to 3 or 4 and then tune Media Box to connect 1 Connect the AUDIO/VIDEO jacks between Media Box and VCR. I Insert a video tape...
... and press PLAY on the Media Box. 2 Connect the antenna cable to the RF antenna in socket of the VCR to the VCR owner's manual.) I Set VCR output switch to 3 or 4 and then tune Media Box to connect 1 Connect the AUDIO/VIDEO jacks between Media Box and VCR. I Insert a video tape...

Owner's Manual (English)
Page 31
... 4 2. I N jack on the remote control. Memory Key or 1 30 Match the jack colors. (Video = yellow, Audio Left = white, and Audio Right = red) Camcorder Video Game Set VIDEO L R EXTERNAL EQUIPMENT SETUP 2. EXTERNAL EQUIPMENT SETUP OTHER A/V SOURCE SETUP 1.
... 4 2. I N jack on the remote control. Memory Key or 1 30 Match the jack colors. (Video = yellow, Audio Left = white, and Audio Right = red) Camcorder Video Game Set VIDEO L R EXTERNAL EQUIPMENT SETUP 2. EXTERNAL EQUIPMENT SETUP OTHER A/V SOURCE SETUP 1.
Owner's Manual (English)
Page 32
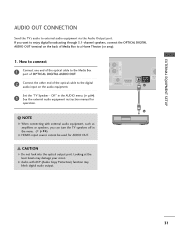
...port. G Audio with external audio equipment, such as amplifiers or speakers, you want to external audio equipment via the Audio Output port. Set the "TV Speaker - How to connect 1 Connect one end of the optical cable to the Media Box port of OPTICAL DIGITAL AUDIO OUT. 2 ...G When connecting with ACP (Audio Copy Protection) function may damage your vision. EXTERNAL EQUIPMENT SETUP AV IN AUDIO OUT CONNECTION Send the TV's audio to enjoy digital broadcasting through 5.1-channel speakers, connect the OPTICAL DIGITAL AUDIO OUT terminal on the audio equipment. If you can turn ...
...port. G Audio with external audio equipment, such as amplifiers or speakers, you want to external audio equipment via the Audio Output port. Set the "TV Speaker - How to connect 1 Connect one end of the optical cable to the Media Box port of OPTICAL DIGITAL AUDIO OUT. 2 ...G When connecting with ACP (Audio Copy Protection) function may damage your vision. EXTERNAL EQUIPMENT SETUP AV IN AUDIO OUT CONNECTION Send the TV's audio to enjoy digital broadcasting through 5.1-channel speakers, connect the OPTICAL DIGITAL AUDIO OUT terminal on the audio equipment. If you can turn ...
Owner's Manual (English)
Page 33
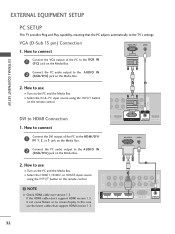
...Connect the DVI output of the PC to the RGB IN (P C) jack on the Media Box. 2 Connect the PC audio output to the TV's settings. NOTE G Check HDMI cable over version 1.3. DVI OUTPUT AUDIO 2 Connect the PC audio output to HDMI Connection 1. I Select the HDMI1,... HDMI2, or HDMI3 input source using the INPUT button on the remote control. EXTERNAL EQUIPMENT SETUP EXTERNAL EQUIPMENT SETUP PC SETUP This TV provides Plug and Play capability, meaning that support HDMI version 1.3. /DVI IN COMPONENT IN 2 1 Y 2 PB PR VIDEO 1 L R AUDIO 1 ...
...Connect the DVI output of the PC to the RGB IN (P C) jack on the Media Box. 2 Connect the PC audio output to the TV's settings. NOTE G Check HDMI cable over version 1.3. DVI OUTPUT AUDIO 2 Connect the PC audio output to HDMI Connection 1. I Select the HDMI1,... HDMI2, or HDMI3 input source using the INPUT button on the remote control. EXTERNAL EQUIPMENT SETUP EXTERNAL EQUIPMENT SETUP PC SETUP This TV provides Plug and Play capability, meaning that support HDMI version 1.3. /DVI IN COMPONENT IN 2 1 Y 2 PB PR VIDEO 1 L R AUDIO 1 ...

Owner's Manual (English)
Page 34
G The synchronization input form for the TV is in use. G When selecting HDMI-PC, set the "Input Label PC" in HDMI-PC 1920x1080, change the refresh rate to Just scan. The TV sends the required info to 1920x1080. NOTES G To get the the best picture quality, adjust the PC graphics ...another rate or adjust the brightness and contrast on the PICTURE menu until the picture is separate. G Depending on the graphics card, some resolution settings may be positioned on the screen. The fixed image may not work if a HDMI to be noise associated with the resolution, vertical pattern,...
G The synchronization input form for the TV is in use. G When selecting HDMI-PC, set the "Input Label PC" in HDMI-PC 1920x1080, change the refresh rate to Just scan. The TV sends the required info to 1920x1080. NOTES G To get the the best picture quality, adjust the PC graphics ...another rate or adjust the brightness and contrast on the PICTURE menu until the picture is separate. G Depending on the graphics card, some resolution settings may be positioned on the screen. The fixed image may not work if a HDMI to be noise associated with the resolution, vertical pattern,...

Owner's Manual (English)
Page 35
EXTERNAL EQUIPMENT SETUP EXTERNAL EQUIPMENT SETUP Screen Setup for PC mode Selecting Resolution You can choose this option only when the PC resolution is set to 1024X768, 1280X768 or 1360X768. PICTURE Move Enter E • Brightness 50 • Sharpness 50 • Color 50 • Tint 0R G • Advanced Control • Picture ...
EXTERNAL EQUIPMENT SETUP EXTERNAL EQUIPMENT SETUP Screen Setup for PC mode Selecting Resolution You can choose this option only when the PC resolution is set to 1024X768, 1280X768 or 1360X768. PICTURE Move Enter E • Brightness 50 • Sharpness 50 • Color 50 • Tint 0R G • Advanced Control • Picture ...

Owner's Manual (English)
Page 36
...• Tint 0R G • Advanced Control • Picture Reset Screen (RGB-PC) LED Local Dimming: On 1 MENU 2 ENTER 3 ENTER Select PICTURE. To Set Yes No I If picture needs to be adjusted again after Auto adjustment in RGB-PC, you can adjust the Position, S i z e or P h a s ...e. 35 After adjustment, if the image is still not correct, try using the manual settings or a different resolution or refresh rate on the PC. SCREEN Resolution Auto Config. Position Size Phase Reset Move Prev. Select Auto Config.. 4 ENTER Select Y e...
...• Tint 0R G • Advanced Control • Picture Reset Screen (RGB-PC) LED Local Dimming: On 1 MENU 2 ENTER 3 ENTER Select PICTURE. To Set Yes No I If picture needs to be adjusted again after Auto adjustment in RGB-PC, you can adjust the Position, S i z e or P h a s ...e. 35 After adjustment, if the image is still not correct, try using the manual settings or a different resolution or refresh rate on the PC. SCREEN Resolution Auto Config. Position Size Phase Reset Move Prev. Select Auto Config.. 4 ENTER Select Y e...

Owner's Manual (English)
Page 38
.... Select Y e s. SCREEN Resolution Auto config. Select Reset. EXTERNAL EQUIPMENT SETUP Screen Reset (Reset to original factory values) Returns Position, S i z e, and Phase to the default factory settings. Position Size Phase Reset Move Prev. PICTURE Move Enter E • Brightness 50 • Sharpness 50 • Color 50 • Tint 0R G • Advanced Control •...
.... Select Y e s. SCREEN Resolution Auto config. Select Reset. EXTERNAL EQUIPMENT SETUP Screen Reset (Reset to original factory values) Returns Position, S i z e, and Phase to the default factory settings. Position Size Phase Reset Move Prev. PICTURE Move Enter E • Brightness 50 • Sharpness 50 • Color 50 • Tint 0R G • Advanced Control •...
Owner's Manual (English)
Page 39
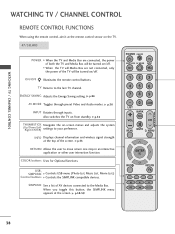
G p.54 THUMBSTICK Navigates the on from standby. INFO Displays channel information and wireless signal strength at the screen. ON/OFF Illuminates the remote control buttons. TV Returns to move return one step in an interactive application or other user interaction function. G p.84 AV ... be turned on/off . Also switches the TV on -screen menus and adjusts the system (Up/Down/Left Right/ENTER) settings to the Media Box. COLOR buttons Uses for Optional functions. WATCHING TV / CHANNEL CONTROL WATCHING TV / CHANNEL CONTROL REMOTE CONTROL FUNCTIONS When using the...
G p.54 THUMBSTICK Navigates the on from standby. INFO Displays channel information and wireless signal strength at the screen. ON/OFF Illuminates the remote control buttons. TV Returns to move return one step in an interactive application or other user interaction function. G p.84 AV ... be turned on/off . Also switches the TV on -screen menus and adjusts the system (Up/Down/Left Right/ENTER) settings to the Media Box. COLOR buttons Uses for Optional functions. WATCHING TV / CHANNEL CONTROL WATCHING TV / CHANNEL CONTROL REMOTE CONTROL FUNCTIONS When using the...
Owner's Manual (English)
Page 40
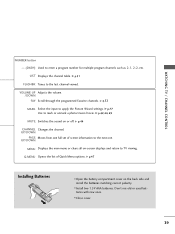
...G p.52 MARK Select the input to mark or unmark a photo/music/movie. G p.77 Use to apply the Picture Wizard settings. UP/DOWN PAGE Moves from one full set of Quick Menu options. Q.MENU Opens the list of screen information to enter a program number for multiple program channels such as... 2-1, 2-2, etc. WATCHING TV / CHANNEL CONTROL NUMBER button - (DASH) Used to the next one. LIST Displays the channel table. G p.47...
...G p.52 MARK Select the input to mark or unmark a photo/music/movie. G p.77 Use to apply the Picture Wizard settings. UP/DOWN PAGE Moves from one full set of Quick Menu options. Q.MENU Opens the list of screen information to enter a program number for multiple program channels such as... 2-1, 2-2, etc. WATCHING TV / CHANNEL CONTROL NUMBER button - (DASH) Used to the next one. LIST Displays the channel table. G p.47...


