
Owner's Manual (English)
Page 1
... that could exceed the limits necessary to qualify for future reference. LCD TV OWNER'S MANUAL 42LH90 47LH90 55LH90 Please read this manual carefully before operating your set and retain it below should you ever need service. The model and serial number of the TV is located on the back and one side of the... TV. Record it for ENERGY STAR. 1-800-243-0000 USA, Consumer User 1-888-865-3026 USA, Commercial User 1-888-542-2623 CANADA LG Customer...
... that could exceed the limits necessary to qualify for future reference. LCD TV OWNER'S MANUAL 42LH90 47LH90 55LH90 Please read this manual carefully before operating your set and retain it below should you ever need service. The model and serial number of the TV is located on the back and one side of the... TV. Record it for ENERGY STAR. 1-800-243-0000 USA, Consumer User 1-888-865-3026 USA, Commercial User 1-888-542-2623 CANADA LG Customer...
Owner's Manual (English)
Page 6
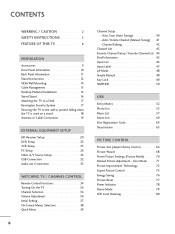
... Reset 77 Power Indicator 78 Demo Mode 79 LED Local Dimming 80 CONTENTS WARNING / CAUTION 2 SAFETY INSTRUCTIONS 3 FEATURE OF THIS TV 8 PREPARATION Accessories 9 Front Panel Information 10 Back Panel Information 11 Stand Instructions 12 VESA Wall Mounting 14 Cable Management 15 Desktop ... 26 Other A/V Source Setup 32 USB Connection 32 Audio out Connection 33 WATCHING TV / CHANNEL CONTROL Remote Control Functions 34 Turning On the TV 36 Channel Selection 36 Volume Adjustment 36 Initial Setting 37 On-Screen Menus Selection 38 Quick Menu 39 6 Channel Setup - Channel...
... Reset 77 Power Indicator 78 Demo Mode 79 LED Local Dimming 80 CONTENTS WARNING / CAUTION 2 SAFETY INSTRUCTIONS 3 FEATURE OF THIS TV 8 PREPARATION Accessories 9 Front Panel Information 10 Back Panel Information 11 Stand Instructions 12 VESA Wall Mounting 14 Cable Management 15 Desktop ... 26 Other A/V Source Setup 32 USB Connection 32 Audio out Connection 33 WATCHING TV / CHANNEL CONTROL Remote Control Functions 34 Turning On the TV 36 Channel Selection 36 Volume Adjustment 36 Initial Setting 37 On-Screen Menus Selection 38 Quick Menu 39 6 Channel Setup - Channel...
Owner's Manual (English)
Page 7
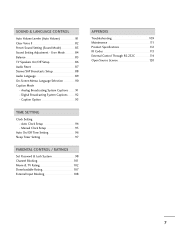
...Clear Voice II 82 Preset Sound Setting (Sound Mode 83 Sound Setting Adjustment - Auto Clock Setup 94 Manual Clock Setup 95 Auto On/Off Time Setting 96 Sleep Timer Setting 97 PARENTAL CONTROL / RATINGS Set Password & Lock System 98 Channel Blocking 101 Movie & TV Rating 102 Downloadable Rating 107 ...232C 114 Open Source License 120 7 Analog Broadcasting System Captions 91 Digital Broadcasting System Captions 92 - User Mode 84 Balance 85 TV Speakers On/Off Setup 86 Audio Reset 87 Stereo/SAP Broadcasts Setup 88 Audio Language 89 On-Screen Menus Language Selection 90 ...
...Clear Voice II 82 Preset Sound Setting (Sound Mode 83 Sound Setting Adjustment - Auto Clock Setup 94 Manual Clock Setup 95 Auto On/Off Time Setting 96 Sleep Timer Setting 97 PARENTAL CONTROL / RATINGS Set Password & Lock System 98 Channel Blocking 101 Movie & TV Rating 102 Downloadable Rating 107 ...232C 114 Open Source License 120 7 Analog Broadcasting System Captions 91 Digital Broadcasting System Captions 92 - User Mode 84 Balance 85 TV Speakers On/Off Setup 86 Audio Reset 87 Stereo/SAP Broadcasts Setup 88 Audio Language 89 On-Screen Menus Language Selection 90 ...
Owner's Manual (English)
Page 8
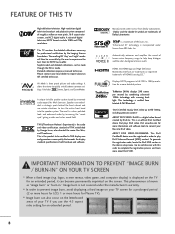
... a million or more hours for LCD, 1 or more pixels, 16:9 aspect-ratio screens, and AC3 digital audio. This TV contains the detailed calibrations necessary for professional... certification by increasing the "sweet spot", giving a wider and richer sound field. A unique invisible speaker system tuned by the user to experience the best their LG... and Thomlinson. FEATURE OF THIS TV High-definition television. THX (Thomlinson Holman's Experiment) is three preset picture and audio settings. It includes Cinema, Sports,...
... a million or more hours for LCD, 1 or more pixels, 16:9 aspect-ratio screens, and AC3 digital audio. This TV contains the detailed calibrations necessary for professional... certification by increasing the "sweet spot", giving a wider and richer sound field. A unique invisible speaker system tuned by the user to experience the best their LG... and Thomlinson. FEATURE OF THIS TV High-definition television. THX (Thomlinson Holman's Experiment) is three preset picture and audio settings. It includes Cinema, Sports,...
Owner's Manual (English)
Page 16
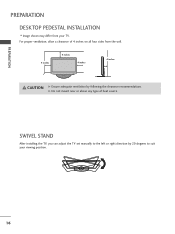
For proper ventilation, allow a clearance of heat source. G Do not mount near or above any type of 4 inches on all four sides from your viewing position. 16 SWIVEL STAND After installing the TV, you can adjust the TV set manually to the left or right direction by following the clearance recommendations. PREPARATION PREPARATION DESKTOP PEDESTAL INSTALLATION I Image shown may differ from the wall. 4 inches 4 inches 4 inches 4 inches CAUTION G Ensure adequate ventilation by 20 degrees to suit your TV.
For proper ventilation, allow a clearance of heat source. G Do not mount near or above any type of 4 inches on all four sides from your viewing position. 16 SWIVEL STAND After installing the TV, you can adjust the TV set manually to the left or right direction by following the clearance recommendations. PREPARATION PREPARATION DESKTOP PEDESTAL INSTALLATION I Image shown may differ from the wall. 4 inches 4 inches 4 inches 4 inches CAUTION G Ensure adequate ventilation by 20 degrees to suit your TV.
Owner's Manual (English)
Page 18
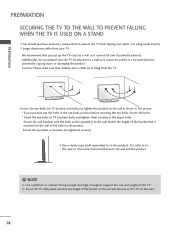
We recommend that you set up the TV close to the wall. Secure the wall brackets with the bolts (sold separately) to ... to support the size and weight of the bracket on the wall and the one on or hang from the TV. I Image shown may differ from tipping over if pushed backwards. Ensure the eye-bolts or brackets are the same.... 18 Additionally, we recommend that children don't climb on the TV are tightened securely. Caution: Please make sure that is safer to the holes in the product. I Use a sturdy rope...
We recommend that you set up the TV close to the wall. Secure the wall brackets with the bolts (sold separately) to ... to support the size and weight of the bracket on the wall and the one on or hang from the TV. I Image shown may differ from tipping over if pushed backwards. Ensure the eye-bolts or brackets are the same.... 18 Additionally, we recommend that children don't climb on the TV are tightened securely. Caution: Please make sure that is safer to the holes in the product. I Use a sturdy rope...
Owner's Manual (English)
Page 20
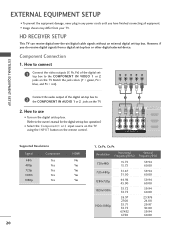
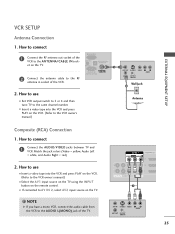
Y PB PR L R Connect the audio output of the digital settop box to the owner's manual for the digital set -top box. I Select the Component1 or 2 input source on the TV using the INPUT button on the remote control. 1 2 AV IN 1 VIDEO L(MONO) AUDIO R 3 2 2 L R 1 1 VIDEO AUDIO COMPONENT IN /DVI... the video outputs (Y, PB, PR) of the digital set-top box to 2 the COMPONENT IN AUDIO 1 or 2 jacks on the TV. How to use I Turn on the digital set-top box. (Refer to the COMPONENT IN VIDEO 1 or 2 jacks on the TV. 2. However, if you have finished connecting all equipment....
Y PB PR L R Connect the audio output of the digital settop box to the owner's manual for the digital set -top box. I Select the Component1 or 2 input source on the TV using the INPUT button on the remote control. 1 2 AV IN 1 VIDEO L(MONO) AUDIO R 3 2 2 L R 1 1 VIDEO AUDIO COMPONENT IN /DVI... the video outputs (Y, PB, PR) of the digital set-top box to 2 the COMPONENT IN AUDIO 1 or 2 jacks on the TV. How to use I Turn on the digital set-top box. (Refer to the COMPONENT IN VIDEO 1 or 2 jacks on the TV. 2. However, if you have finished connecting all equipment....
Owner's Manual (English)
Page 21
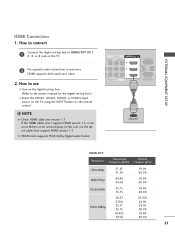
In this case use I Turn on the digital set -top box.) I Select the HDMI1, HDMI2, HDMI3, or HDMI4 input source on the TV using the INPUT button on the TV. 2 No separate audio connection is necessary. G HDMI mode supports PCM, Dolby Digital audio format. AV IN 1 VIDEO L(MONO) AUDIO R 3 2 L R... Check HDMI cable over version 1.3. How to use the latest cables that support HDMI version 1.3. How to connect 1 Connect the digital set-top box to the owner's manual for the digital set -top box. (Refer to HDMI/DVI IN 1, 2, 3, or 4 jack on the remote control. ! ( ) EXTERNAL EQUIPMENT ...
In this case use I Turn on the digital set -top box.) I Select the HDMI1, HDMI2, HDMI3, or HDMI4 input source on the TV using the INPUT button on the TV. 2 No separate audio connection is necessary. G HDMI mode supports PCM, Dolby Digital audio format. AV IN 1 VIDEO L(MONO) AUDIO R 3 2 L R... Check HDMI cable over version 1.3. How to use the latest cables that support HDMI version 1.3. How to connect 1 Connect the digital set-top box to the owner's manual for the digital set -top box. (Refer to HDMI/DVI IN 1, 2, 3, or 4 jack on the remote control. ! ( ) EXTERNAL EQUIPMENT ...
Owner's Manual (English)
Page 22
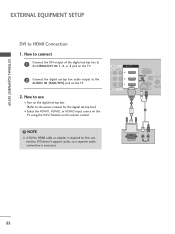
...manual for this connection. EXTERNAL EQUIPMENT SETUP EXTERNAL EQUIPMENT SETUP DVI to the HDMI/DVI IN 1, 2, or 3 jack on the TV. 2 Connect the digital set -top box.) I Turn on the digital set-top box. (Refer to the AUDIO IN (RGB/DVI) jack on the remote control. NOTE G A DVI to HDMI cable ...or adapter is necessary. How to use I Select the HDMI1, HDMI2, or HDMI3 input source on the TV using the INPUT button on the TV. 2. How to connect 1 Connect the DVI output of the digital set-top box to HDMI Connection 1. DVI OUTPUT L R AUDIO 22
...manual for this connection. EXTERNAL EQUIPMENT SETUP EXTERNAL EQUIPMENT SETUP DVI to the HDMI/DVI IN 1, 2, or 3 jack on the TV. 2 Connect the digital set -top box.) I Turn on the digital set-top box. (Refer to the AUDIO IN (RGB/DVI) jack on the remote control. NOTE G A DVI to HDMI cable ...or adapter is necessary. How to use I Select the HDMI1, HDMI2, or HDMI3 input source on the TV using the INPUT button on the TV. 2. How to connect 1 Connect the DVI output of the digital set-top box to HDMI Connection 1. DVI OUTPUT L R AUDIO 22
Owner's Manual (English)
Page 25
... SWITCH 25 I Select the A V 1 input source on the TV using the INPUT button on the TV. How to the same channel number. EXTERNAL EQUIPMENT SETUP VCR SETUP Antenna Connection 1. I Set VCR output switch to 3 or 4 and then tune TV to use I Insert a video tape into the VCR and press... PLAY on the TV. ! RGB/DVI) 1 ANTENNA/ RS-232C IN CABLE IN (CONTROL&SERVICE) 2 Connect the ...
... SWITCH 25 I Select the A V 1 input source on the TV using the INPUT button on the TV. How to the same channel number. EXTERNAL EQUIPMENT SETUP VCR SETUP Antenna Connection 1. I Set VCR output switch to 3 or 4 and then tune TV to use I Insert a video tape into the VCR and press... PLAY on the TV. ! RGB/DVI) 1 ANTENNA/ RS-232C IN CABLE IN (CONTROL&SERVICE) 2 Connect the ...
Owner's Manual (English)
Page 26
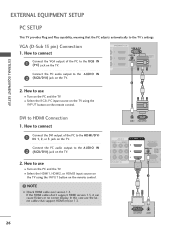
... the AUDIO IN 2 (RGB/DVI) jack on the TV. How to connect 1 Connect the DVI output of the PC to the RGB IN (P C) jack on the TV. 1 Connect the PC audio output to the TV's settings. I Select the HDMI1, HDMI2, or HDMI3 input source on the TV using the INPUT button on the remote control.... ! I ( N) 2 (RGB/DVI) jack on the PC and the TV. DVI to use I Turn on the PC and the...
... the AUDIO IN 2 (RGB/DVI) jack on the TV. How to connect 1 Connect the DVI output of the PC to the RGB IN (P C) jack on the TV. 1 Connect the PC audio output to the TV's settings. I Select the HDMI1, HDMI2, or HDMI3 input source on the TV using the INPUT button on the remote control.... ! I ( N) 2 (RGB/DVI) jack on the PC and the TV. DVI to use I Turn on the PC and the...
Owner's Manual (English)
Page 27
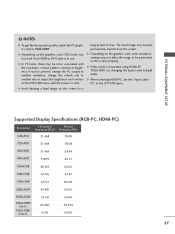
...to another resolution, change the refresh rate to be noise associated with the resolution, vertical pattern, contrast or brightness. G When selecting HDMI-PC, set the "Input Label PC" in use. G If the screen is in the OPTION menu. Supported Display Specifications (RGB-PC, HDMI-PC) ... G To get the best picture quality, adjust the PC graphics card to Just s c a n. G Depending on the graphics card, some resolution settings may become permanently imprinted on the graphics card, DOS mode may be positioned on the screen properly. G Avoid keeping a fixed image on the PICTURE...
...to another resolution, change the refresh rate to be noise associated with the resolution, vertical pattern, contrast or brightness. G When selecting HDMI-PC, set the "Input Label PC" in use. G If the screen is in the OPTION menu. Supported Display Specifications (RGB-PC, HDMI-PC) ... G To get the best picture quality, adjust the PC graphics card to Just s c a n. G Depending on the graphics card, some resolution settings may become permanently imprinted on the graphics card, DOS mode may be positioned on the screen properly. G Avoid keeping a fixed image on the PICTURE...
Owner's Manual (English)
Page 29
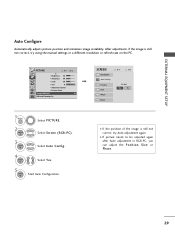
... still not correct, try Auto adjustment again. After adjustment, if the image is still not correct, try using the manual settings or a different resolution or refresh rate on the PC. To Set Yes No 1 MENU 2 ENTER 3 ENTER Select PICTURE. Select Screen (RGB-PC). Position Size Phase Reset Move Prev. I If picture needs...
... still not correct, try Auto adjustment again. After adjustment, if the image is still not correct, try using the manual settings or a different resolution or refresh rate on the PC. To Set Yes No 1 MENU 2 ENTER 3 ENTER Select PICTURE. Select Screen (RGB-PC). Position Size Phase Reset Move Prev. I If picture needs...

Owner's Manual (English)
Page 31
Select Screen (RGB-PC). To Set Yes No 1 MENU 2 ENTER 3 ENTER 4 ENTER 5 ENTER Select PICTURE. Select Y e s. 31 This feature operates only in RGB-PC mode. Position Size Phase Reset Move Prev. Select Reset. PICTURE Move Enter E • Brightness 50 • Sharpness 50 • Color 50 • Tint 0R G • Advanced Control • Picture Reset Screen (RGB-PC) LED Local Dimming :On SCREEN Resolution Auto config. EXTERNAL EQUIPMENT SETUP Screen Reset (Reset to original factory values) Returns Position, S i z e, and Phase to the default factory settings.
Select Screen (RGB-PC). To Set Yes No 1 MENU 2 ENTER 3 ENTER 4 ENTER 5 ENTER Select PICTURE. Select Y e s. 31 This feature operates only in RGB-PC mode. Position Size Phase Reset Move Prev. Select Reset. PICTURE Move Enter E • Brightness 50 • Sharpness 50 • Color 50 • Tint 0R G • Advanced Control • Picture Reset Screen (RGB-PC) LED Local Dimming :On SCREEN Resolution Auto config. EXTERNAL EQUIPMENT SETUP Screen Reset (Reset to original factory values) Returns Position, S i z e, and Phase to the default factory settings.
Owner's Manual (English)
Page 32
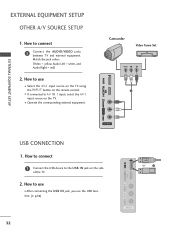
..., you use I If connected to the USB I Operate the corresponding external equipment. How to connect 1 Connect the AUDIO/VIDEO jacks between TV and external equipment. USB IN IN 4 Camcorder Video Game Set VIDEO L R 1 EXTERNAL EQUIPMENT SETUP VIDEO L/MONO AUDIO R AV IN 2 USB CONNECTION 1. I N jack on the remote control. Match the jack colors...
..., you use I If connected to the USB I Operate the corresponding external equipment. How to connect 1 Connect the AUDIO/VIDEO jacks between TV and external equipment. USB IN IN 4 Camcorder Video Game Set VIDEO L R 1 EXTERNAL EQUIPMENT SETUP VIDEO L/MONO AUDIO R AV IN 2 USB CONNECTION 1. I N jack on the remote control. Match the jack colors...
Owner's Manual (English)
Page 33
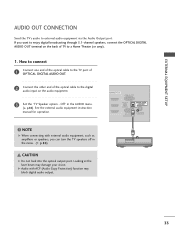
... of OPTICAL DIGITAL AUDIO OUT. 2 Connect the other end of the optical cable to the digital audio input on the back of TV to a Home Theater (or amp). 1. Looking at the laser beam may block digital audio output. /DVI IN RGB IN (PC) AUDIO IN OPTICAL DIGITAL AUDIO ... the menu. (G p.86) CAUTION G Do not look into the optical output port. If you can turn the TV speakers off in the AUDIO menu. (G p.86). EXTERNAL EQUIPMENT SETUP AUDIO OUT CONNECTION Send the TV's audio to enjoy digital broadcasting through 5.1-channel speakers, connect the OPTICAL DIGITAL AUDIO OUT terminal on the audio...
... of OPTICAL DIGITAL AUDIO OUT. 2 Connect the other end of the optical cable to the digital audio input on the back of TV to a Home Theater (or amp). 1. Looking at the laser beam may block digital audio output. /DVI IN RGB IN (PC) AUDIO IN OPTICAL DIGITAL AUDIO ... the menu. (G p.86) CAUTION G Do not look into the optical output port. If you can turn the TV speakers off in the AUDIO menu. (G p.86). EXTERNAL EQUIPMENT SETUP AUDIO OUT CONNECTION Send the TV's audio to enjoy digital broadcasting through 5.1-channel speakers, connect the OPTICAL DIGITAL AUDIO OUT terminal on the audio...
Owner's Manual (English)
Page 34
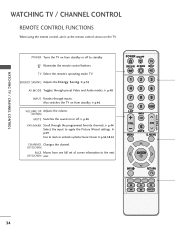
... 0 MARK FAV FLASHBK P CH A G E MUTE MENU Q. G p.48 INPUT Rotates through preset Video and Audio modes. Also switches the TV on from standby or off . G p.69 Use to apply the Picture Wizard settings. ENERGY SAVING Adjusts the Energy Saving. G p.54,58,61 CHANNEL Changes the channel. MENU ENTER INFO RETURN 34 POWER Turns the...
... 0 MARK FAV FLASHBK P CH A G E MUTE MENU Q. G p.48 INPUT Rotates through preset Video and Audio modes. Also switches the TV on from standby or off . G p.69 Use to apply the Picture Wizard settings. ENERGY SAVING Adjusts the Energy Saving. G p.54,58,61 CHANNEL Changes the channel. MENU ENTER INFO RETURN 34 POWER Turns the...
Owner's Manual (English)
Page 35
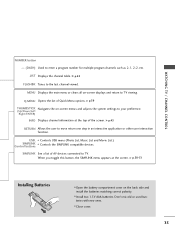
...of AV devices connected to enter a program number for multiple program channels such as 2-1, 2-2, etc. G p.45 RETURN Allows the user to TV viewing. Don't mix old or used batteries with new ones. USB, Controls USB menu (Photo List, Music List and Movie List.) SIMPLINK Control...compatible devices. I Close cover. 35 G p.50-51 Installing Batteries I Open the battery compartment cover on -screen menus and adjusts the system settings to the last channel viewed. G p.43 FLASHBK Tunes to your preference. (Up/Down/Left Right/ENTER) INFO Displays channel information at the ...
...of AV devices connected to enter a program number for multiple program channels such as 2-1, 2-2, etc. G p.45 RETURN Allows the user to TV viewing. Don't mix old or used batteries with new ones. USB, Controls USB menu (Photo List, Music List and Movie List.) SIMPLINK Control...compatible devices. I Close cover. 35 G p.50-51 Installing Batteries I Open the battery compartment cover on -screen menus and adjusts the system settings to the last channel viewed. G p.43 FLASHBK Tunes to your preference. (Up/Down/Left Right/ENTER) INFO Displays channel information at the ...
Owner's Manual (English)
Page 36
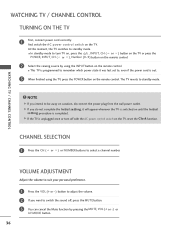
... -) button to adjust the volume. 2 If you do not complete the Initial setting, it was last set to remember which power state it will appear whenever the TV is completed. At this moment, the TV switches to select a channel number. The TV reverts to turn off , press the MUTE button. 3 You can cancel the Mute...
... -) button to adjust the volume. 2 If you do not complete the Initial setting, it was last set to remember which power state it will appear whenever the TV is completed. At this moment, the TV switches to select a channel number. The TV reverts to turn off , press the MUTE button. 3 You can cancel the Mute...
Owner's Manual (English)
Page 37
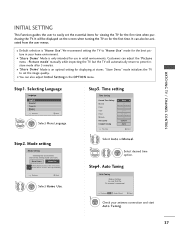
... s e. "Store Demo" mode initializes the TV to use in the OPTION menu. Step2. Store Demo Home Use Select [Home Use] to set the essential items for viewing the TV for use this TV at stores. Step4. WATCHING TV / CHANNEL CONTROL INITIAL SETTING This Function guides the user to preset instore ...mode after 5 minutes. Customers can also adjust Initial Setting in retail environments. It...
... s e. "Store Demo" mode initializes the TV to use in the OPTION menu. Step2. Store Demo Home Use Select [Home Use] to set the essential items for viewing the TV for use this TV at stores. Step4. WATCHING TV / CHANNEL CONTROL INITIAL SETTING This Function guides the user to preset instore ...mode after 5 minutes. Customers can also adjust Initial Setting in retail environments. It...


