

Owner's Manual
Page 1
OWNER'S MANUAL PLASMA TV Please read this manual carefully before operating your set and retain it for future reference. 42PT200 50PT200 42PT330 50PT330 42PT350 50PT350 50PV400 60PV400 50PV430 60PV430 50PV450 60PV450 42PT250U 50PT250U 50PV550U 60PV550U 42PT350C 50PT350C 50PV450C 60PV450C P/NO : SAC34173308 (1102-REV01) www.lg.com
OWNER'S MANUAL PLASMA TV Please read this manual carefully before operating your set and retain it for future reference. 42PT200 50PT200 42PT330 50PT330 42PT350 50PT350 50PV400 60PV400 50PV430 60PV430 50PV450 60PV450 42PT250U 50PT250U 50PV550U 60PV550U 42PT350C 50PT350C 50PV450C 60PV450C P/NO : SAC34173308 (1102-REV01) www.lg.com
Owner's Manual
Page 6
... Out Connection 27 PC Setup 28 WATCHING TV / CHANNEL CONTROL Remote Control Functions 34 Turning On TV 36 Channel Selection 36 Volume Adjustment 36 Initial Setting 37 On-Screen Menus Selection 38 Quick Menu 39 Channel Setup - Add / Delete Channel (Manual Tuning 41 - User Mode 76 Picture Improvement Technology 77 Expert... Movie List 62 DivX Registration Code 68 Deactivation 69 PICTURE CONTROL Picture Size (Aspect Ratio) Control 70 Picture Wizard 72 Energy Saving 74 Preset Picture Settings(Picture Mode 75 Manual Picture Adjustment - Auto Scan (Auto Tuning 40 -
... Out Connection 27 PC Setup 28 WATCHING TV / CHANNEL CONTROL Remote Control Functions 34 Turning On TV 36 Channel Selection 36 Volume Adjustment 36 Initial Setting 37 On-Screen Menus Selection 38 Quick Menu 39 Channel Setup - Add / Delete Channel (Manual Tuning 41 - User Mode 76 Picture Improvement Technology 77 Expert... Movie List 62 DivX Registration Code 68 Deactivation 69 PICTURE CONTROL Picture Size (Aspect Ratio) Control 70 Picture Wizard 72 Energy Saving 74 Preset Picture Settings(Picture Mode 75 Manual Picture Adjustment - Auto Scan (Auto Tuning 40 -
Owner's Manual
Page 7
...On-Screen Menus Language Selection 92 Caption Mode - Auto Clock Setup 96 Manual Clock Setup 97 Auto On/Off Time Setting 98 Sleep Timer Setting 99 PARENTAL CONTROL / RATINGS Set Password & Lock System 100 Channel Blocking 103 Movie & TV Rating 104 Downloadable Rating 109 External Input Blocking 110 ...7 Digital Broadcasting System Captions 94 - SOUND & LANGUAGE CONTROL Auto Volume Leveler (Auto Volume 82 Clear Voice II 83 Preset Sound Settings (Sound Mode) 84 Sound Setting Adjustment - Caption Option 95 TIME SETTING Clock Setting - Analog Broadcasting System Captions 93 -
...On-Screen Menus Language Selection 92 Caption Mode - Auto Clock Setup 96 Manual Clock Setup 97 Auto On/Off Time Setting 98 Sleep Timer Setting 99 PARENTAL CONTROL / RATINGS Set Password & Lock System 100 Channel Blocking 103 Movie & TV Rating 104 Downloadable Rating 109 External Input Blocking 110 ...7 Digital Broadcasting System Captions 94 - SOUND & LANGUAGE CONTROL Auto Volume Leveler (Auto Volume 82 Clear Voice II 83 Preset Sound Settings (Sound Mode) 84 Sound Setting Adjustment - Caption Option 95 TIME SETTING Clock Setting - Analog Broadcasting System Captions 93 -
Owner's Manual
Page 8
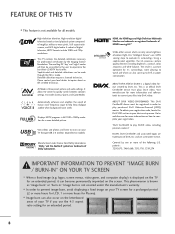
... from Dolby Laboratories. HDMI, the HDMI logo and High-Definition Multimedia Interface are trademarks of HDMI Licensing LLC." This is three preset picture and audio settings. patents : 7,295,673; 7,460,668; 7,515,710; 7,519,274 IMPORTANT INFORMATION TO PREVENT "IMAGE BURN / BURN-IN" ON YOUR TV ... files into DivX video. AV Mode is an official DivX Certified® device that plays DivX video. Using a sophisticated algorithm, the LG processes picture quality elements including brightness, contrast, color, sharpness and white balance. ABOUT DIVX VIDEO: DivX® is not available for ...
... from Dolby Laboratories. HDMI, the HDMI logo and High-Definition Multimedia Interface are trademarks of HDMI Licensing LLC." This is three preset picture and audio settings. patents : 7,295,673; 7,460,668; 7,515,710; 7,519,274 IMPORTANT INFORMATION TO PREVENT "IMAGE BURN / BURN-IN" ON YOUR TV ... files into DivX video. AV Mode is an official DivX Certified® device that plays DivX video. Using a sophisticated algorithm, the LG processes picture quality elements including brightness, contrast, color, sharpness and white balance. ABOUT DIVX VIDEO: DivX® is not available for ...
Owner's Manual
Page 18
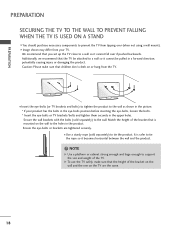
... ON A STAND s You should purchase necessary components to a wall so it cannot fall over (when not using a wall mount). Caution: Please make sure that you set up the TV close to prevent the TV from your product has the bolts in the eye-bolts position before inserting the eye-bolts, loosen...
... ON A STAND s You should purchase necessary components to a wall so it cannot fall over (when not using a wall mount). Caution: Please make sure that you set up the TV close to prevent the TV from your product has the bolts in the eye-bolts position before inserting the eye-bolts, loosen...
Owner's Manual
Page 20
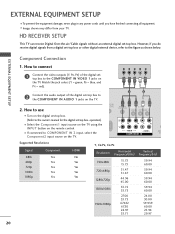
...jacks on the TV. 2. HD RECEIVER SETUP This TV can receive Digital Over-the-air/Cable signals without an external digital set -top box. How to connect 1 Connect the video outputs (Y, PB, PR) of the digital set -top box or other digital external device, refer to the owner's manual for the digital... set -top box. s If connected to the COMPONENT IN VIDEO 1 jacks on the TV. 1 2 O IN /DVI) REMOTE CONTROL IN AV IN 1 ...
...jacks on the TV. 2. HD RECEIVER SETUP This TV can receive Digital Over-the-air/Cable signals without an external digital set -top box. How to connect 1 Connect the video outputs (Y, PB, PR) of the digital set -top box or other digital external device, refer to the owner's manual for the digital... set -top box. s If connected to the COMPONENT IN VIDEO 1 jacks on the TV. 1 2 O IN /DVI) REMOTE CONTROL IN AV IN 1 ...
Owner's Manual
Page 21
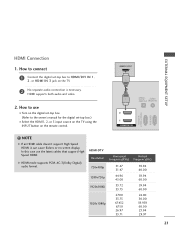
....00 23.94 29.97 21 HDMI supports both audio and video. 2. In this case use I Turn on the digital set-top box. (Refer to the owner's manual for the digital set -top box to HDMI/DVI IN 1, 2, or HDMI IN 3 jack on the remote control. How to use the latest cables... that support High Speed HDMI. How to connect 1 Connect the digital set -top box.) I Select the HDMI1, 2, or 3 input source on the TV using the INPUT button on the TV. 2 No separate audio connection is necessary. NOTE...
....00 23.94 29.97 21 HDMI supports both audio and video. 2. In this case use I Turn on the digital set-top box. (Refer to the owner's manual for the digital set -top box to HDMI/DVI IN 1, 2, or HDMI IN 3 jack on the remote control. How to use the latest cables... that support High Speed HDMI. How to connect 1 Connect the digital set -top box.) I Select the HDMI1, 2, or 3 input source on the TV using the INPUT button on the TV. 2 No separate audio connection is necessary. NOTE...
Owner's Manual
Page 22
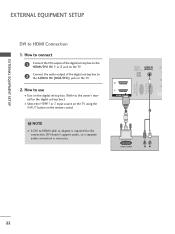
...the HDMI/DVI IN 1 or 2 jack on the TV. 2 Connect the audio output of the digital set-top box to the AUDIO IN (RGB/DVI) jack on the remote control. ! OPTICAL DIGITAL AUDIO OUT... IN (PC) 2 2 1 1 HDMI/DVI IN 1 2 DVI-DTV OUTPUT R L 22 How to use I Turn on the digital set-top box. (Refer to the owner's manual for this connection. How to connect 1 Connect the DVI output of the digital... set -top box.) I Select the HDMI1 or 2 input source on the TV using the INPUT button on ...
...the HDMI/DVI IN 1 or 2 jack on the TV. 2 Connect the audio output of the digital set-top box to the AUDIO IN (RGB/DVI) jack on the remote control. ! OPTICAL DIGITAL AUDIO OUT... IN (PC) 2 2 1 1 HDMI/DVI IN 1 2 DVI-DTV OUTPUT R L 22 How to use I Turn on the digital set-top box. (Refer to the owner's manual for this connection. How to connect 1 Connect the DVI output of the digital... set -top box.) I Select the HDMI1 or 2 input source on the TV using the INPUT button on ...

Owner's Manual
Page 25
... the VCR. (Refer to the ANTENNA/CABLE IN socket on the remote control. ANTENNA/ CABLE IN 1 2 Connect the antenna cable to the same channel number. I Set VCR output switch to 3 or 4 and then tune TV to the RF antenna in socket of the TV.
... the VCR. (Refer to the ANTENNA/CABLE IN socket on the remote control. ANTENNA/ CABLE IN 1 2 Connect the antenna cable to the same channel number. I Set VCR output switch to 3 or 4 and then tune TV to the RF antenna in socket of the TV.
Owner's Manual
Page 26
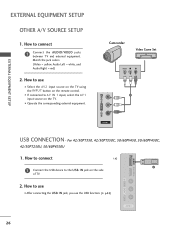
For 42/50PT350, 42/50PT350C, 50/60PV450, 50/60PV450C, 42/50PT250U, 50/60PV550U 1. Match the jack colors. (Video = yellow, Audio Left = white, and Audio Right = red) 2. How to ... INPUT button on the remote control. How to AV IN 1 input, select the A V 1 input source on the side of TV. 2. USB IN Camcorder Video Game Set VIDEO L R 1 EXTERNAL EQUIPMENT SETUP VIDEO L/MONO AUDIO R HDMI IN 3 AV IN 2 VIDEO L/MONO AUDIO R HDMI IN 3 USB IN USB CONNECTION - How to the USB I N jack...
For 42/50PT350, 42/50PT350C, 50/60PV450, 50/60PV450C, 42/50PT250U, 50/60PV550U 1. Match the jack colors. (Video = yellow, Audio Left = white, and Audio Right = red) 2. How to ... INPUT button on the remote control. How to AV IN 1 input, select the A V 1 input source on the side of TV. 2. USB IN Camcorder Video Game Set VIDEO L R 1 EXTERNAL EQUIPMENT SETUP VIDEO L/MONO AUDIO R HDMI IN 3 AV IN 2 VIDEO L/MONO AUDIO R HDMI IN 3 USB IN USB CONNECTION - How to the USB I N jack...
Owner's Manual
Page 27
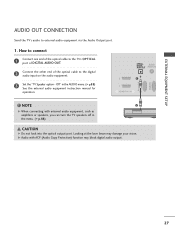
EXTERNAL EQUIPMENT SETUP (CONTROL & SERVICE) AUDIO OUT CONNECTION Send the TV's audio to the digital audio input on the audio equipment. 3 Set the "TV Speaker option - G Audio with external audio equipment, such as amplifiers or speakers, you can turn the TV speakers off in the AUDIO menu. (G p....
EXTERNAL EQUIPMENT SETUP (CONTROL & SERVICE) AUDIO OUT CONNECTION Send the TV's audio to the digital audio input on the audio equipment. 3 Set the "TV Speaker option - G Audio with external audio equipment, such as amplifiers or speakers, you can turn the TV speakers off in the AUDIO menu. (G p....
Owner's Manual
Page 29
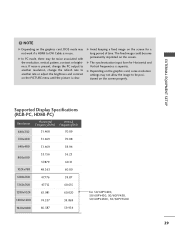
... card, DOS mode may not allow the image to DVI Cable is in use. EXTERNAL EQUIPMENT SETUP ! NOTE G Depending on the graphics card, some resolution settings may not work if a HDMI to be noise associated with the resolution, vertical pattern, contrast or brightness. G Avoid keeping a fixed image on the screen...
... card, DOS mode may not allow the image to DVI Cable is in use. EXTERNAL EQUIPMENT SETUP ! NOTE G Depending on the graphics card, some resolution settings may not work if a HDMI to be noise associated with the resolution, vertical pattern, contrast or brightness. G Avoid keeping a fixed image on the screen...
Owner's Manual
Page 31
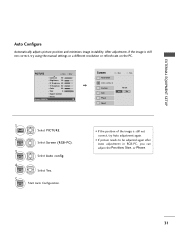
...-PC) Enter G Screen Resolution Auto config. G Position Size Phase Reset Move Prev. After adjustment, if the image is still not correct, try using the manual settings or a different resolution or refresh rate on the PC. Select Screen (RGB-PC). 3 ENTER Select Auto config. 4 ENTER Select Y e s. 5 ENTER Start Auto Configuration. • If.... • If picture needs to be adjusted again after Auto adjustment in RGB-PC, you can adjust the Position, Si ze, or Phase. 31 To Set Yes No 1 Home 2 ENTER Select PICTURE.
...-PC) Enter G Screen Resolution Auto config. G Position Size Phase Reset Move Prev. After adjustment, if the image is still not correct, try using the manual settings or a different resolution or refresh rate on the PC. Select Screen (RGB-PC). 3 ENTER Select Auto config. 4 ENTER Select Y e s. 5 ENTER Start Auto Configuration. • If.... • If picture needs to be adjusted again after Auto adjustment in RGB-PC, you can adjust the Position, Si ze, or Phase. 31 To Set Yes No 1 Home 2 ENTER Select PICTURE.
Owner's Manual
Page 33
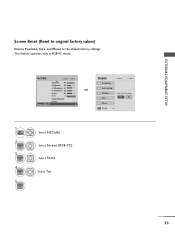
EXTERNAL EQUIPMENT SETUP Screen Reset (Reset to original factory values) Returns Position, S i z e, and Phase to the default factory settings. Position Size Initialize Settings. Select Reset. This feature operates only in RGB-PC mode. Screen Move Prev. Resolution Auto config. Yes No Phase Reset G 33 PICTURE Move E • Contrast ...
EXTERNAL EQUIPMENT SETUP Screen Reset (Reset to original factory values) Returns Position, S i z e, and Phase to the default factory settings. Position Size Initialize Settings. Select Reset. This feature operates only in RGB-PC mode. Screen Move Prev. Resolution Auto config. Yes No Phase Reset G 33 PICTURE Move E • Contrast ...

Owner's Manual
Page 35
...THUMBSTICK Navigates the on or off. Installing Batteries s Open the battery compartment cover on -screen displays and return to TV viewing from one full set of screen information to move return one . SIMPLINK Accesses the AV devices connected to mark or unmark a photo/music/movie. EXIT Clears all ...on-screen displays and returns to apply the Picture Wizard setting. Don't mix old or used batteries with new ones. UP/DOWN INFO Displays channel information at the top of Quick Menu options. Opens...
...THUMBSTICK Navigates the on or off. Installing Batteries s Open the battery compartment cover on -screen displays and return to TV viewing from one full set of screen information to move return one . SIMPLINK Accesses the AV devices connected to mark or unmark a photo/music/movie. EXIT Clears all ...on-screen displays and returns to apply the Picture Wizard setting. Don't mix old or used batteries with new ones. UP/DOWN INFO Displays channel information at the top of Quick Menu options. Opens...
Owner's Manual
Page 37
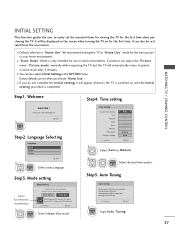
... Next Start Auto Tuning. 37 I "Store Demo" Mode is "Home Use". I Default selection is only intended for use in retail environments. Choose the setting mode you for choosing LG Next Step2. Step4. Language Selecting Language English Español Français Next 1 ENTER Select menu Language. Store Demo Home Use Select...
... Next Start Auto Tuning. 37 I "Store Demo" Mode is "Home Use". I Default selection is only intended for use in retail environments. Choose the setting mode you for choosing LG Next Step2. Step4. Language Selecting Language English Español Français Next 1 ENTER Select menu Language. Store Demo Home Use Select...
Owner's Manual
Page 38
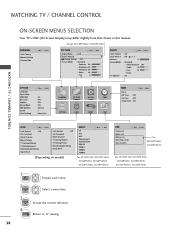
...Surround: Off • Treble 50 • Bass 50 • Reset : On OPTION Language Input Label SIMPLINK Key Lock Caption Demo Mode ISM Method Set ID Initial Setting Move Enter : On : Off : Off : Off : Normal : 1 : Home Use CHANNEL PICTURE AUDIO TIME OPTION LOCK INPUT USB TIME Clock... Rating Input Block Lock System : Off Set Password Block Channel TV Rating-English TV Rating-French Downloadable Rating Input Block (Depending on model) INPUT TV AV1 AV2 Component1 Component2 RGB-PC HDMI1 HDMI2 HDMI3 Move Enter For 42/50PT350, 42/50PT350C, 50/60PV450, 50/60PV450C...
...Surround: Off • Treble 50 • Bass 50 • Reset : On OPTION Language Input Label SIMPLINK Key Lock Caption Demo Mode ISM Method Set ID Initial Setting Move Enter : On : Off : Off : Off : Normal : 1 : Home Use CHANNEL PICTURE AUDIO TIME OPTION LOCK INPUT USB TIME Clock... Rating Input Block Lock System : Off Set Password Block Channel TV Rating-English TV Rating-French Downloadable Rating Input Block (Depending on model) INPUT TV AV1 AV2 Component1 Component2 RGB-PC HDMI1 HDMI2 HDMI3 Move Enter For 42/50PT350, 42/50PT350C, 50/60PV450, 50/60PV450C...
Owner's Manual
Page 40
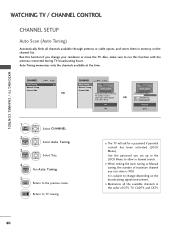
... BACK Return to TV viewing. s Memorizes all channels available through antenna or cable inputs, and stores them in the order of maximum channel you set up in the LOCK Menu to run this function if you change depending on the channel list. CHANNEL Auto Tuning Manual Tuning Channel Edit Move... Enter CHANNEL Auto Tuning Manual Tuning Channel Edit Move Enter Check your residence or move the TV. s When setting the Auto tuning or Manual tuning, the number of DTV, TV, CADTV, and CATV. 40 EXIT Return to the previous menu. WATCHING TV /...
... BACK Return to TV viewing. s Memorizes all channels available through antenna or cable inputs, and stores them in the order of maximum channel you set up in the LOCK Menu to run this function if you change depending on the channel list. CHANNEL Auto Tuning Manual Tuning Channel Edit Move... Enter CHANNEL Auto Tuning Manual Tuning Channel Edit Move Enter Check your residence or move the TV. s When setting the Auto tuning or Manual tuning, the number of DTV, TV, CADTV, and CATV. 40 EXIT Return to the previous menu. WATCHING TV /...
Owner's Manual
Page 41
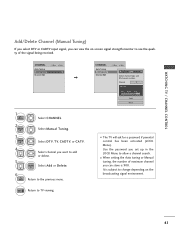
... l e t e. 6 BACK Return to TV viewing. CHANNEL Auto Tuning Manual Tuning Channel Edit Move Enter F DTV G Select channel type and RF-channel number. s When setting the Auto tuning or Manual tuning, the number of the signal being received. EXIT Return to the previous menu. It is 900. Select channel you... set up in the LOCK Menu to allow a channel search. Channel 2 DTV 2-1 Bad Normal Good Add Close s The TV will ask ...
... l e t e. 6 BACK Return to TV viewing. CHANNEL Auto Tuning Manual Tuning Channel Edit Move Enter F DTV G Select channel type and RF-channel number. s When setting the Auto tuning or Manual tuning, the number of the signal being received. EXIT Return to the previous menu. It is 900. Select channel you... set up in the LOCK Menu to allow a channel search. Channel 2 DTV 2-1 Bad Normal Good Add Close s The TV will ask ...

Owner's Manual
Page 47
...) TV AV1 AV2 Component1 Component2 Select a desired input source (except T V). s A V: Select them to view PC input. AV1 No s T V: Select it to watch DVD or a Digital set-top box. WATCHING TV / CHANNEL CONTROL 1 INPUT TV AV1 AV2 Component1 Component2 ENTER Select the desired input source. s But, when selecting "SIMPLINK -
...) TV AV1 AV2 Component1 Component2 Select a desired input source (except T V). s A V: Select them to view PC input. AV1 No s T V: Select it to watch DVD or a Digital set-top box. WATCHING TV / CHANNEL CONTROL 1 INPUT TV AV1 AV2 Component1 Component2 ENTER Select the desired input source. s But, when selecting "SIMPLINK -

