Owners Manual
Page 4
... grounded AC outlet). When mounting a TV on the wall, make the TV with wet hands. Do not use of this owner's manual to be connected to install the TV by the hanging power and signal cables on shelves above the unit). 17 GROUNDING Ensure that you turn off this apparatus or antenna during a thunder or lighting storm. a TV with something. 14 CAUTION concerning the Power Cord: It is the...
... grounded AC outlet). When mounting a TV on the wall, make the TV with wet hands. Do not use of this owner's manual to be connected to install the TV by the hanging power and signal cables on shelves above the unit). 17 GROUNDING Ensure that you turn off this apparatus or antenna during a thunder or lighting storm. a TV with something. 14 CAUTION concerning the Power Cord: It is the...
Owners Manual
Page 6
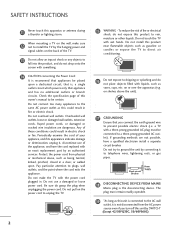
... Panel Information 8 Back Panel Information 10 Stand Instruction 11 Cable Management 12 Desktop Pedestal Installation 13 VESA Wall Mounting 13 Securing the TV to the wall to prevent falling when the TV is used on a stand 14 Swivel Stand 14 Antenna or Cable Connection 15 EXTERNAL EQUIPMENT SETUP HD Receiver Setup 16 DVD Setup 19 VCR Setup 21 Other A/V Source Setup 23 Audio Out Connection 23 USB Connection 24 PC Setup 25 WATCHING TV / CHANNEL CONTROL Remote Control Functions 30 Turning On TV 34 Channel Selection 34 Volume Adjustment 34 Initial Setting 35 On-Screen...
... Panel Information 8 Back Panel Information 10 Stand Instruction 11 Cable Management 12 Desktop Pedestal Installation 13 VESA Wall Mounting 13 Securing the TV to the wall to prevent falling when the TV is used on a stand 14 Swivel Stand 14 Antenna or Cable Connection 15 EXTERNAL EQUIPMENT SETUP HD Receiver Setup 16 DVD Setup 19 VCR Setup 21 Other A/V Source Setup 23 Audio Out Connection 23 USB Connection 24 PC Setup 25 WATCHING TV / CHANNEL CONTROL Remote Control Functions 30 Turning On TV 34 Channel Selection 34 Volume Adjustment 34 Initial Setting 35 On-Screen...
Owners Manual
Page 8
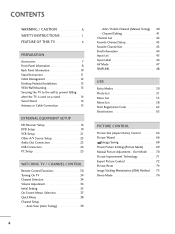
... "image burn" or "burn-in the device setup menu. Manufactured under license from Dolby Laboratories. Detailed calibration requires a licensed technician. Designed for use the 4:3 aspect ratio setting for professional certification by DivX,Inc. HDMI, the HDMI logo and High-Definition Multimedia Interface are trademarks of digital television, HDTV formats include 1080i and 720p resolutions. logos, screen menus, video game, and computer display) is an official DivX Certified device that plays...
... "image burn" or "burn-in the device setup menu. Manufactured under license from Dolby Laboratories. Detailed calibration requires a licensed technician. Designed for use the 4:3 aspect ratio setting for professional certification by DivX,Inc. HDMI, the HDMI logo and High-Definition Multimedia Interface are trademarks of digital television, HDTV formats include 1080i and 720p resolutions. logos, screen menus, video game, and computer display) is an official DivX Certified device that plays...
Owners Manual
Page 12
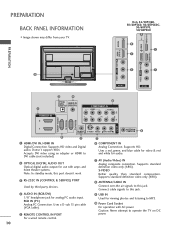
Supports HD video and Digital audio. Supports HD. S-VIDEO Better quality than standard composition. RGB IN (PC) Analog PC Connection. Uses a red, green, and blue cable for video & red and white for viewing photos and listening to MP3. 10 Power Cord Socket For operation with amps and home theater systems. Note: In standby mode, this port doesn't work. 3 RS-232C IN (CONTROL & SERVICE) PORT Used by third party devices. 6 COMPONENT IN Analog Connection. Connect cable signals to DVI cable (not included) 2 OPTICAL DIGITAL AUDIO OUT Optical digital audio output for...
Supports HD video and Digital audio. Supports HD. S-VIDEO Better quality than standard composition. RGB IN (PC) Analog PC Connection. Uses a red, green, and blue cable for video & red and white for viewing photos and listening to MP3. 10 Power Cord Socket For operation with amps and home theater systems. Note: In standby mode, this port doesn't work. 3 RS-232C IN (CONTROL & SERVICE) PORT Used by third party devices. 6 COMPONENT IN Analog Connection. Connect cable signals to DVI cable (not included) 2 OPTICAL DIGITAL AUDIO OUT Optical digital audio output for...
Owners Manual
Page 15
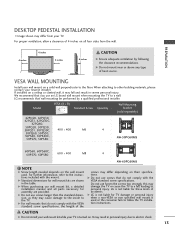
... with the VESA standard screw specifications. G When purchasing our wall mount kit, a detailed installation manual and all four sides from your nearest installer. VESA WALL MOUNTING Install your TV is turned on the wall mount used or the consumer fails to follow the TV installation instructions. G Do not use screws that wall mounting be performed by following the clearance recommendations. Do not use an LG brand wall mount when mounting the TV to the floor. PREPARATION DESKTOP PEDESTAL INSTALLATION ■ Image shown may...
... with the VESA standard screw specifications. G When purchasing our wall mount kit, a detailed installation manual and all four sides from your nearest installer. VESA WALL MOUNTING Install your TV is turned on the wall mount used or the consumer fails to follow the TV installation instructions. G Do not use screws that wall mounting be performed by following the clearance recommendations. Do not use an LG brand wall mount when mounting the TV to the floor. PREPARATION DESKTOP PEDESTAL INSTALLATION ■ Image shown may...
Owners Manual
Page 18
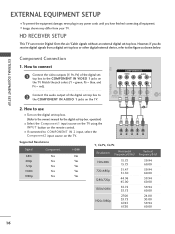
... the remote control. ■ If connected to the owner's manual for the digital set -top box to the COMPONENT IN AUDIO 1 jacks on the TV. REMOTE CONTROL IN S-VIDEO VIDEO /MONO AUDIO AN CA 2. However, if you have finished connecting all equipment. ■ Image shown may differ from a digital set -top box. Match the jack colors (Y = green, PB = blue, and PR = red). operation) ■ Select the Component1 input source on the TV using the INPUT button on the TV. 1 2 Y PB PR L R Supported Resolutions Signal...
... the remote control. ■ If connected to the owner's manual for the digital set -top box to the COMPONENT IN AUDIO 1 jacks on the TV. REMOTE CONTROL IN S-VIDEO VIDEO /MONO AUDIO AN CA 2. However, if you have finished connecting all equipment. ■ Image shown may differ from a digital set -top box. Match the jack colors (Y = green, PB = blue, and PR = red). operation) ■ Select the Component1 input source on the TV using the INPUT button on the TV. 1 2 Y PB PR L R Supported Resolutions Signal...
Owners Manual
Page 19
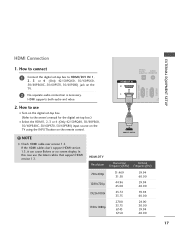
...) input source on the TV using the INPUT button on the TV. 2 No separate audio connection is necessary. How to HDMI/DVI IN 1, 2, 3 or 4 (Only 42/50PQ60, 50/60PS60, 50/60PS60C, 50/60PS70, 50/60PS80) jack on the remote control. ! In this case use ■ Turn on the digital set-top box. (Refer to the owner's manual for the digital set -top box to use the latest cables that support HDMI version 1.3. HDMI supports both audio and video. OPTICAL DIGITAL AUDIO AUDIO OUT (RGB/DVI) HDMI/DVI IN 2 1 R CO 2. If the HDMI cables don't support HDMI...
...) input source on the TV using the INPUT button on the TV. 2 No separate audio connection is necessary. How to HDMI/DVI IN 1, 2, 3 or 4 (Only 42/50PQ60, 50/60PS60, 50/60PS60C, 50/60PS70, 50/60PS80) jack on the remote control. ! In this case use ■ Turn on the digital set-top box. (Refer to the owner's manual for the digital set -top box to use the latest cables that support HDMI version 1.3. HDMI supports both audio and video. OPTICAL DIGITAL AUDIO AUDIO OUT (RGB/DVI) HDMI/DVI IN 2 1 R CO 2. If the HDMI cables don't support HDMI...
Owners Manual
Page 20
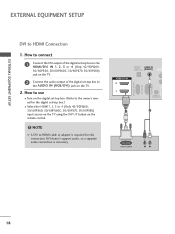
.../50PQ60, 50/60PS60, 50/60PS60C, 50/60PS70, 50/60PS80) input source on the TV using the INPUT button on the remote control. ! OPTICAL DIGITAL AUDIO OUT AUDIO IN (RGB/DVI) HDMI/DVI IN 2 1 REMOTE CONTROL IN 1 2 DVI-DTV OUTPUT R L AV IN 1 18 How to use ■ Turn on the digital set -top box to HDMI Connection 1. RGB IN (PC) RS-232C IN (CONTROL & SERVICE) EXTERNAL EQUIPMENT SETUP EXTERNAL EQUIPMENT SETUP DVI to the AUDIO IN (RGB/DVI) jack on the TV. 2. How to connect 1 Connect the DVI output of the digital set-top box to the HDMI/DVI IN...
.../50PQ60, 50/60PS60, 50/60PS60C, 50/60PS70, 50/60PS80) input source on the TV using the INPUT button on the remote control. ! OPTICAL DIGITAL AUDIO OUT AUDIO IN (RGB/DVI) HDMI/DVI IN 2 1 REMOTE CONTROL IN 1 2 DVI-DTV OUTPUT R L AV IN 1 18 How to use ■ Turn on the digital set -top box to HDMI Connection 1. RGB IN (PC) RS-232C IN (CONTROL & SERVICE) EXTERNAL EQUIPMENT SETUP EXTERNAL EQUIPMENT SETUP DVI to the AUDIO IN (RGB/DVI) jack on the TV. 2. How to connect 1 Connect the DVI output of the digital set-top box to the HDMI/DVI IN...

Owners Manual
Page 22
...IN (CONTROL & SERVICE) HDMI/DVI IN 2 1 1 HDMI-DVD OUTPUT 20 How to use ■ Select the HDMI1, 2, 3 or 4 (Only 42/50PQ60, 50/60PS60, 50/60PS60C, 50/60PS70, 50/60PS80) input source on the TV using the INPUT button on the remote control. ■ Refer to the DVD player's manual for operating instructions. How to use ■ Turn on the DVD player, insert a DVD. ■ Select the A V 1 input source on the TV using the INPUT button on the remote control. ■ Refer to the DVD player's manual for operating instructions. HDMI supports both audio and video. 2. EXTERNAL...
...IN (CONTROL & SERVICE) HDMI/DVI IN 2 1 1 HDMI-DVD OUTPUT 20 How to use ■ Select the HDMI1, 2, 3 or 4 (Only 42/50PQ60, 50/60PS60, 50/60PS60C, 50/60PS70, 50/60PS80) input source on the TV using the INPUT button on the remote control. ■ Refer to the DVD player's manual for operating instructions. How to use ■ Turn on the DVD player, insert a DVD. ■ Select the A V 1 input source on the TV using the INPUT button on the remote control. ■ Refer to the DVD player's manual for operating instructions. HDMI supports both audio and video. 2. EXTERNAL...
Owners Manual
Page 25
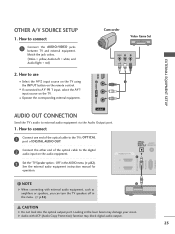
OTHER A/V SOURCE SETUP 1. Match the jack colors. (Video = yellow, Audio Left = white, and Audio Right = red) Camcorder Video Game Set VIDEO L R USB IN VIDEO L/MONO AUDIO R HDMI IN 3 EXTERNAL EQUIPMENT SETUP 2. Off" in the menu. (G p.82) CAUTION G Do not look into the optical output port. NOTE 2 G When connecting with ACP (Audio Copy Protection) function may damage your vision. How to use ■ Select the A V 2 input source on the TV using 1 the INPUT button on the remote control. ■ If connected to the digital audio input on the TV. ■...
OTHER A/V SOURCE SETUP 1. Match the jack colors. (Video = yellow, Audio Left = white, and Audio Right = red) Camcorder Video Game Set VIDEO L R USB IN VIDEO L/MONO AUDIO R HDMI IN 3 EXTERNAL EQUIPMENT SETUP 2. Off" in the menu. (G p.82) CAUTION G Do not look into the optical output port. NOTE 2 G When connecting with ACP (Audio Copy Protection) function may damage your vision. How to use ■ Select the A V 2 input source on the TV using 1 the INPUT button on the remote control. ■ If connected to the digital audio input on the TV. ■...
Owners Manual
Page 28
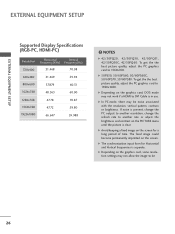
... the the best picture quality, adjust the PC graphics card to be noise associated with the resolution, vertical pattern, contrast or brightness. G In PC mode, there may not work if a HDMI to 1920x1080. G The synchronization input form for a long period of time. G Depending on the screen. G Depending on the PICTURE menu until the picture is clear. If noise is present, change the PC output to another resolution, change the refresh...
... the the best picture quality, adjust the PC graphics card to be noise associated with the resolution, vertical pattern, contrast or brightness. G In PC mode, there may not work if a HDMI to 1920x1080. G The synchronization input form for a long period of time. G Depending on the screen. G Depending on the PICTURE menu until the picture is clear. If noise is present, change the PC output to another resolution, change the refresh...

Owners Manual
Page 45
... the in-between channels. Q.Menu Aspect Ratio Picture Mode Sound Mode Caption Multi Audio Sleep Timer CH Del/Add/Fav Eject USB 16:9 Vivid Standard Off English Off F Favorite G Eject Close 1 P A CH G E or 123 456 789 0 Select your choice without waiting for the TV to select through a favorite channel list 1 P A CH G E Turn the pages. 2 RETURN Return to TV viewing. 43 FAVORITE CHANNEL SETUP Your TV's OSD (On Screen Display) may differ slightly...
... the in-between channels. Q.Menu Aspect Ratio Picture Mode Sound Mode Caption Multi Audio Sleep Timer CH Del/Add/Fav Eject USB 16:9 Vivid Standard Off English Off F Favorite G Eject Close 1 P A CH G E or 123 456 789 0 Select your choice without waiting for the TV to select through a favorite channel list 1 P A CH G E Turn the pages. 2 RETURN Return to TV viewing. 43 FAVORITE CHANNEL SETUP Your TV's OSD (On Screen Display) may differ slightly...

Owners Manual
Page 50
... rear terminal (HDMI terminal) of the TV to the previous menu. NOTE G Connect the HDMI/DVI IN or HDMI IN terminal of the SIMPLINK device with an OPTICAL cable. 48 G If a connected SIMPLINK home theater system doesn't play other AV devices connected with the INPUT button on and off . MENU ! G When you switch the Input source with HDMI cable without additional cables and settings. WATCHING TV / CHANNEL CONTROL OPTION Menu Language Audio Language Input Label SIMPLINK Key Lock Caption Demo Mode ISM Method Set...
... rear terminal (HDMI terminal) of the TV to the previous menu. NOTE G Connect the HDMI/DVI IN or HDMI IN terminal of the SIMPLINK device with an OPTICAL cable. 48 G If a connected SIMPLINK home theater system doesn't play other AV devices connected with the INPUT button on and off . MENU ! G When you switch the Input source with HDMI cable without additional cables and settings. WATCHING TV / CHANNEL CONTROL OPTION Menu Language Audio Language Input Label SIMPLINK Key Lock Caption Demo Mode ISM Method Set...

Owners Manual
Page 52
... 3 USB IN USB USB Input Port 2 Select Photo List, Music List or Movie List. G A USB storage device which requires an external power supply. G The recognition speed of the TV. When such device is not supported by USB maker. In case of the USB connector to the USB memory stick and the other end to the USB connector holder of a USB storage device may not work properly. 50 G Please connect power to four memory cards...
... 3 USB IN USB USB Input Port 2 Select Photo List, Music List or Movie List. G A USB storage device which requires an external power supply. G The recognition speed of the TV. When such device is not supported by USB maker. In case of the USB connector to the USB memory stick and the other end to the USB connector holder of a USB storage device may not work properly. 50 G Please connect power to four memory cards...
Owners Manual
Page 66
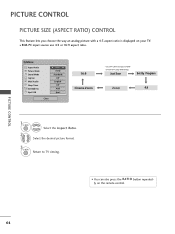
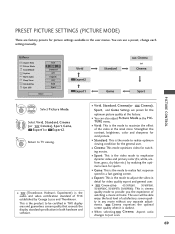
... press the RATIO button repeatedly on your TV. ■ RGB-PC input source use 4:3 or 16:9 aspect ratio. Q.Menu Aspect Ratio Picture Mode Sound Mode Caption Multi Audio Sleep Timer CH Del/Add/Fav Eject USB F 16:9 G Vivid Standard Off English Off Add Eject Close 16:9 Cinema Zoom * Only DTV/CADTV/Component/HDMIDTV/DVI-DTV (720p/1080i/1080p) Just Scan Set By Program Zoom 4:3 1 Q. PICTURE CONTROL PICTURE CONTROL PICTURE SIZE (ASPECT RATIO) CONTROL This feature lets...
... press the RATIO button repeatedly on your TV. ■ RGB-PC input source use 4:3 or 16:9 aspect ratio. Q.Menu Aspect Ratio Picture Mode Sound Mode Caption Multi Audio Sleep Timer CH Del/Add/Fav Eject USB F 16:9 G Vivid Standard Off English Off Add Eject Close 16:9 Cinema Zoom * Only DTV/CADTV/Component/HDMIDTV/DVI-DTV (720p/1080i/1080p) Just Scan Set By Program Zoom 4:3 1 Q. PICTURE CONTROL PICTURE CONTROL PICTURE SIZE (ASPECT RATIO) CONTROL This feature lets...
Owners Manual
Page 71
...; Cinema(Only 42/50PQ60, 50/60PS60, 50/60PS60C, 50/60PS70, 50/60PS80): This is the video mode to Just scan. 69 Cinema expresses the optimal screen quality when it is the mode to TV viewing. ■ (Thomlinson Holman's Experiment) is the audio and video certification standard of watching a movie at the factory. ■ You can use a preset, change each setting manually. ty in the P I CTURE menu. ■ Vivid: This...
...; Cinema(Only 42/50PQ60, 50/60PS60, 50/60PS60C, 50/60PS70, 50/60PS80): This is the video mode to Just scan. 69 Cinema expresses the optimal screen quality when it is the mode to TV viewing. ■ (Thomlinson Holman's Experiment) is the audio and video certification standard of watching a movie at the factory. ■ You can use a preset, change each setting manually. ty in the P I CTURE menu. ■ Vivid: This...

Owners Manual
Page 96
... external viewing sources. Specify a password 3. The default setting is set up blocking schemes to block specific channels, ratings and other viewing sources. Viewing can be viewed. To use the Movie Rating System (MPAA) only. For USA For Canada LOCK Move Enter Lock System : Off Set Password Block Channel Movie Rating TV Rating-Children TV Rating-General Downloadable Rating Input Block LOCK Move Enter Lock System : Off Set Password Block Channel TV Rating-English TV Rating-French Downloadable Rating Input Block Enter Password **** Close 1 MENU ENTER...
... external viewing sources. Specify a password 3. The default setting is set up blocking schemes to block specific channels, ratings and other viewing sources. Viewing can be viewed. To use the Movie Rating System (MPAA) only. For USA For Canada LOCK Move Enter Lock System : Off Set Password Block Channel Movie Rating TV Rating-Children TV Rating-General Downloadable Rating Input Block LOCK Move Enter Lock System : Off Set Password Block Channel TV Rating-English TV Rating-French Downloadable Rating Input Block Enter Password **** Close 1 MENU ENTER...
Owners Manual
Page 108
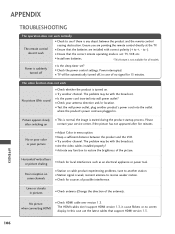
... not appeared after switching on contact your antenna direction and/or location. ■ Test the wall power outlet, plug another channel. Please after five minutes. Power is turned on some channels ■ Station or cable product experiencing problems, tune to -). ■ Ensure that the correct remote operating mode is set ? ■ Check the power control settings. Horizontal/vertical bars or picture shaking ■ Check for all models. No picture &No sound ■ Check...
... not appeared after switching on contact your antenna direction and/or location. ■ Test the wall power outlet, plug another channel. Please after five minutes. Power is turned on some channels ■ Station or cable product experiencing problems, tune to -). ■ Ensure that the correct remote operating mode is set ? ■ Check the power control settings. Horizontal/vertical bars or picture shaking ■ Check for all models. No picture &No sound ■ Check...

Owners Manual
Page 109
... input source. Picture OK & No sound ■ Press the VOL or VOLUME button. ■ Sound muted? Press MUTE button. ■ Try another channel. No sound when connecting HDMI/USB ■ Check HDMI cable over version 1.3. ■ Check USB cable over version 2.0. ■ Use normal MP3 file. *This feature is turned on background & Horizontal Noise & Incorrect position ■ Work the Auto configure or adjust clock, phase, or H/V position. (Option) Screen color is out of the speakers...
... input source. Picture OK & No sound ■ Press the VOL or VOLUME button. ■ Sound muted? Press MUTE button. ■ Try another channel. No sound when connecting HDMI/USB ■ Check HDMI cable over version 1.3. ■ Check USB cable over version 2.0. ■ Use normal MP3 file. *This feature is turned on background & Horizontal Noise & Incorrect position ■ Work the Auto configure or adjust clock, phase, or H/V position. (Option) Screen color is out of the speakers...
Owners Manual
Page 112
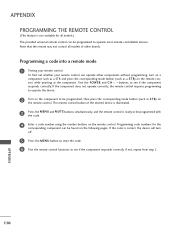
Programming a code into a remote mode 1 Testing your remote control can operate other brands. The remote control button of other components without programming, turn off. 5 Press the MENU button to store the code. 6 Test the remote control functions to be found on the remote control. APPENDIX 110 If the code is correct, the device will turn on a component such as a STB and press the corresponding mode button (such as S T B) on the remote control, while pointing at the...
Programming a code into a remote mode 1 Testing your remote control can operate other brands. The remote control button of other components without programming, turn off. 5 Press the MENU button to store the code. 6 Test the remote control functions to be found on the remote control. APPENDIX 110 If the code is correct, the device will turn on a component such as a STB and press the corresponding mode button (such as S T B) on the remote control, while pointing at the...


