
Owners Manual
Page 1
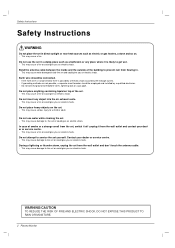
See the label attached on the back cover and quote this manual carefully before operating your dealer when you require service. Retain it for future reference. Record model number and serial number of the set . PLASMA MONITOR MODELS: 42PM4M 50PM4M 60PM4M OWNER'S MANUAL Please read this information to your set .
See the label attached on the back cover and quote this manual carefully before operating your dealer when you require service. Retain it for future reference. Record model number and serial number of the set . PLASMA MONITOR MODELS: 42PM4M 50PM4M 60PM4M OWNER'S MANUAL Please read this information to your set .
Owners Manual
Page 2
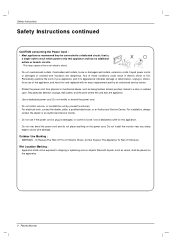
... connected. - This may cause a fire. WARNING/CAUTION TO REDUCE THE RISK OF FIRE AND ELECTRIC SHOCK, DO NOT EXPOSE THIS PRODUCT TO RAIN OR MOISTURE. 2 Plasma Monitor Do not insert any place where it from the wall outlet and don't touch the antenna cable. -
... connected. - This may cause a fire. WARNING/CAUTION TO REDUCE THE RISK OF FIRE AND ELECTRIC SHOCK, DO NOT EXPOSE THIS PRODUCT TO RAIN OR MOISTURE. 2 Plasma Monitor Do not insert any place where it from the wall outlet and don't touch the antenna cable. -
Owners Manual
Page 4
..., remove, or reinstall the unit by an authorized service centre. - Do not over bend the power cord and do not place anything on the apparatus. 4 Plasma Monitor Most appliances recommend they be connected to plugs, wall outlets, and the point where the cord exits the appliance. - Wet Location Marking : - This may...
..., remove, or reinstall the unit by an authorized service centre. - Do not over bend the power cord and do not place anything on the apparatus. 4 Plasma Monitor Most appliances recommend they be connected to plugs, wall outlets, and the point where the cord exits the appliance. - Wet Location Marking : - This may...
Owners Manual
Page 6
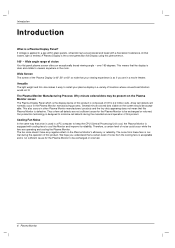
...product is defective. At that a certain level of noise from these fans is a Plasma Display Panel? The Plasma Monitor Manufacturing Process: Why minute colored dots may be acceptable. This also occurs in other Plasma Monitor manufacturers' products and the tiny dots appearing does not mean that a fan ... acceptable and is emitted. Introduction Introduction What is normal during the manufacture and operation of this product. Wide Screen The screen of the Plasma Display is 42",50" or 60" so wide that the display is equipped with a fluorescent substance. Thus a few cell defects will...
...product is defective. At that a certain level of noise from these fans is a Plasma Display Panel? The Plasma Monitor Manufacturing Process: Why minute colored dots may be acceptable. This also occurs in other Plasma Monitor manufacturers' products and the tiny dots appearing does not mean that a fan ... acceptable and is emitted. Introduction Introduction What is normal during the manufacture and operation of this product. Wide Screen The screen of the Plasma Display is 42",50" or 60" so wide that the display is equipped with a fluorescent substance. Thus a few cell defects will...
Owners Manual
Page 7
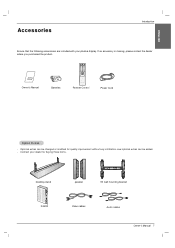
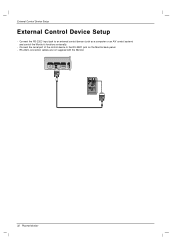
CABLE OUT AUX CONTROL DISPLAY CONTROL AC OUT AC IN D-BOX Video cables Audio cables Owner's Manual 7 Contract your plasma display. Optional extras can be changed or modified for buying these items. Desktop stand speaker Tilt wall mounting bracket ACNTAEBLNENA M.P.I. Owner's Manual 1.5V 1.5V Batteries ...
CABLE OUT AUX CONTROL DISPLAY CONTROL AC OUT AC IN D-BOX Video cables Audio cables Owner's Manual 7 Contract your plasma display. Optional extras can be changed or modified for buying these items. Desktop stand speaker Tilt wall mounting bracket ACNTAEBLNENA M.P.I. Owner's Manual 1.5V 1.5V Batteries ...

Owners Manual
Page 8
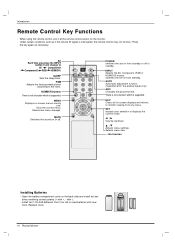
VOLUME (F , G) Buttons 5. Introduction Controls - Here shown may be somewhat different from standby or off to standby. 60PM4M VOLUME (F,G) Buttons INPUT SELECT Button 8 Plasma Monitor INPUT SELECT VOLUME INPUT SELECT VOLUME Remote Control Sensor Power Standby Indicator Illuminates red in standby mode, Illuminates green when the Set is turned ...
VOLUME (F , G) Buttons 5. Introduction Controls - Here shown may be somewhat different from standby or off to standby. 60PM4M VOLUME (F,G) Buttons INPUT SELECT Button 8 Plasma Monitor INPUT SELECT VOLUME INPUT SELECT VOLUME Remote Control Sensor Power Standby Indicator Illuminates red in standby mode, Illuminates green when the Set is turned ...
Owners Manual
Page 10
... settings. with new ones. Don't mix old or used batteries with -). • Install two 1.5V AAA batteries. Introduction Remote Control Key Functions - Replace cover. 10 Plasma Monitor MENU Displays on -screen displays and returns to standby. Selects menu item. * : No function Installing Batteries • Open the battery compartment cover on from...
... settings. with new ones. Don't mix old or used batteries with -). • Install two 1.5V AAA batteries. Introduction Remote Control Key Functions - Replace cover. 10 Plasma Monitor MENU Displays on -screen displays and returns to standby. Selects menu item. * : No function Installing Batteries • Open the battery compartment cover on from...
Owners Manual
Page 12
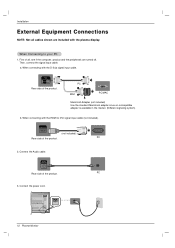
.... First of the product. Installation External Equipment Connections NOTE: Not all , see if the computer, product and the peripherals are included with the plasma display. Then, connect the signal input cable. PC MAC PC/MAC Macintosh Adapter (not included) Use the standard Macintosh adapter since an incompatible adapter... is available in the market. (Different signaling system) b. HDMI/DVI IN (not included) Rear side of the product. PC 3. a. AC IN 12 Plasma Monitor Connect the power cord. PC 2. AUDIO (RGB/DVI) Rear side of all cables shown are turned off.
.... First of the product. Installation External Equipment Connections NOTE: Not all , see if the computer, product and the peripherals are included with the plasma display. Then, connect the signal input cable. PC MAC PC/MAC Macintosh Adapter (not included) Use the standard Macintosh adapter since an incompatible adapter... is available in the market. (Different signaling system) b. HDMI/DVI IN (not included) Rear side of the product. PC 3. a. AC IN 12 Plasma Monitor Connect the power cord. PC 2. AUDIO (RGB/DVI) Rear side of all cables shown are turned off.
Owners Manual
Page 14
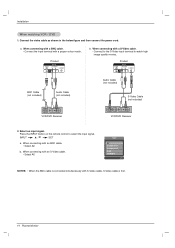
... the remote control to watch high image quality movies. When connecting with a proper colour match. When connecting with S-Video cable, S-Video cable is first. 14 Plasma Monitor Product AV IN VIDEO L-AUDIO-R S-VIDEO AV OUT b. Select an input signal. INPUT D /E SET a. Input AV Component1 Component2 RGB HDMI/DVI NOTES: • When...
... the remote control to watch high image quality movies. When connecting with a proper colour match. When connecting with S-Video cable, S-Video cable is first. 14 Plasma Monitor Product AV IN VIDEO L-AUDIO-R S-VIDEO AV OUT b. Select an input signal. INPUT D /E SET a. Input AV Component1 Component2 RGB HDMI/DVI NOTES: • When...
Owners Manual
Page 16
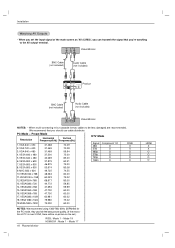
... 60.00 17. VESA 1280 x 1024 79.980 75.02 19.VESA 1600 x 1200 75.000 60.00 NOTES: We recommend using 1360*768, 60Hz (50PM4M) for the PC mode, they provide the best picture quality. (If the resolution of the main screen as 'AV (CVBS)', you can transmit the signal....VESA1024 x 768 68.677 85.00 13. Installation Watching AV Outputs • When you set .) RGB : Mode 1 ~ Mode 19 HDMI/DVI : Mode 1 ~ Mode 17 16 Plasma Monitor HDMI X X O O O O We recommend that you're watching to be no picture on the set the input signal of PC is over UXGA, there will...
... 60.00 17. VESA 1280 x 1024 79.980 75.02 19.VESA 1600 x 1200 75.000 60.00 NOTES: We recommend using 1360*768, 60Hz (50PM4M) for the PC mode, they provide the best picture quality. (If the resolution of the main screen as 'AV (CVBS)', you can transmit the signal....VESA1024 x 768 68.677 85.00 13. Installation Watching AV Outputs • When you set .) RGB : Mode 1 ~ Mode 19 HDMI/DVI : Mode 1 ~ Mode 17 16 Plasma Monitor HDMI X X O O O O We recommend that you're watching to be no picture on the set the input signal of PC is over UXGA, there will...

Owners Manual
Page 18
... Reset G Cool Normal Warm User Menu Prev. Press the MENU button and then use D / E button to select the PICTURE menu. 2. Cool Normal Warm User 18 Plasma Monitor Press the PSM button • Each press of D / E button changes the screen display as shown below . Menu Prev. 1. Press the G button and then use...
... Reset G Cool Normal Warm User Menu Prev. Press the MENU button and then use D / E button to select the PICTURE menu. 2. Cool Normal Warm User 18 Plasma Monitor Press the PSM button • Each press of D / E button changes the screen display as shown below . Menu Prev. 1. Press the G button and then use...
Owners Manual
Page 20
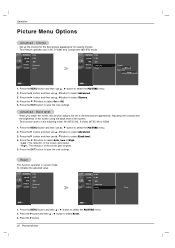
... operates in AV, S-Video and Component 480i/576i mode. Press the MENU button and then D / E button to select On or Off. 5. Press the G button. 20 Plasma Monitor Operation Picture Menu Options Advanced - PICTURE G SOUND0 PSM CSM TIME0 SPECIAL0 SCREEN0 Advanced Reset PICTURE0 PSM SOUND0 CSM TIME0 SPECIAL0 SCREEN0 Advanced Reset G Cinema...
... operates in AV, S-Video and Component 480i/576i mode. Press the MENU button and then D / E button to select On or Off. 5. Press the G button. 20 Plasma Monitor Operation Picture Menu Options Advanced - PICTURE G SOUND0 PSM CSM TIME0 SPECIAL0 SCREEN0 Advanced Reset PICTURE0 PSM SOUND0 CSM TIME0 SPECIAL0 SCREEN0 Advanced Reset G Cinema...
Owners Manual
Page 22
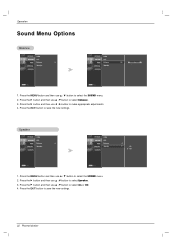
.... Press the G button and then use D / E button to save the new settings. Press the G button and then use D / E button to save the new settings. 22 Plasma Monitor Press the EXIT button to select On or Off. 4. Operation Sound Menu Options Balance PICTURE0 SSM SOUND G AVL TIME0 Balance 0 SPECIAL0 Speaker SCREEN0 PICTURE0...
.... Press the G button and then use D / E button to save the new settings. Press the G button and then use D / E button to save the new settings. 22 Plasma Monitor Press the EXIT button to select On or Off. 4. Operation Sound Menu Options Balance PICTURE0 SSM SOUND G AVL TIME0 Balance 0 SPECIAL0 Speaker SCREEN0 PICTURE0...
Owners Manual
Page 24
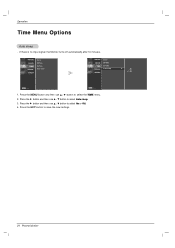
... select Auto sleep. 3. Press the EXIT button to select On or Off. 4. Press the G button and then use D / E button to save the new settings. 24 Plasma Monitor Menu Prev. 1. PICTURE0 Clock SOUND0 TIME G SPECIAL0 Off time On time Auto sleep SCREEN0 PICTURE0 SOUND0 TIME0 SPECIAL0 Clock Off time On time Auto...
... select Auto sleep. 3. Press the EXIT button to select On or Off. 4. Press the G button and then use D / E button to save the new settings. 24 Plasma Monitor Menu Prev. 1. PICTURE0 Clock SOUND0 TIME G SPECIAL0 Off time On time Auto sleep SCREEN0 PICTURE0 SOUND0 TIME0 SPECIAL0 Clock Off time On time Auto...

Owners Manual
Page 25
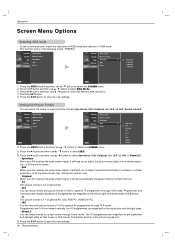
... Normal. • White wash White Wash removes permanent images from a PC/video game displayed on the Monitor's screen for prolonged periods will automatically invert the plasma display panel colour every 30 minutes. • Orb. + lnv. Press the MENU button and then use D / E button to remain on the screen. Press the G button...
... Normal. • White wash White Wash removes permanent images from a PC/video game displayed on the Monitor's screen for prolonged periods will automatically invert the plasma display panel colour every 30 minutes. • Orb. + lnv. Press the MENU button and then use D / E button to remain on the screen. Press the G button...
Owners Manual
Page 26
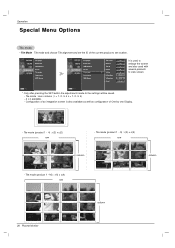
... is used to enlarge the screen and also used with several products to the settings will be saved. - Tile mode (product 1 ~16) : r(4) x c(4) row column 26 Plasma Monitor Tile mode (product 1 ~ 9) : r(3) x c(3) row column column - Menu Prev. * Only after pressing the SET button the adjustments made to view screen. Tile mode (product 1 ~ 4) : r(2) x c(2) row...
... is used to enlarge the screen and also used with several products to the settings will be saved. - Tile mode (product 1 ~16) : r(4) x c(4) row column 26 Plasma Monitor Tile mode (product 1 ~ 9) : r(3) x c(3) row column column - Menu Prev. * Only after pressing the SET button the adjustments made to view screen. Tile mode (product 1 ~ 4) : r(2) x c(2) row...
Owners Manual
Page 27
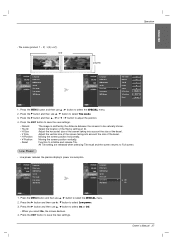
... ID Tile mode Low power Demo G Off On Menu Prev. Press the G button and then use D / E button to select Tile mode. 3. Low power reduces the plasma display's power consumption. Function to select the SPECIAL menu. 2. Moving the screen position vertically. Press the G button and then use D / E button to select Low power...
... ID Tile mode Low power Demo G Off On Menu Prev. Press the G button and then use D / E button to select Tile mode. 3. Low power reduces the plasma display's power consumption. Function to select the SPECIAL menu. 2. Moving the screen position vertically. Press the G button and then use D / E button to select Low power...
Owners Manual
Page 28
... between XD Demo on and XD Demo off. - Use it to select XD Demo. 3. To stop XD Demo, press the MENU or EXIT button. 28 Plasma Monitor Press the G button and then use this function in RGB[PC], HDMI[PC] mode. Press the MENU button and then D / E button to select the...
... between XD Demo on and XD Demo off. - Use it to select XD Demo. 3. To stop XD Demo, press the MENU or EXIT button. 28 Plasma Monitor Press the G button and then use this function in RGB[PC], HDMI[PC] mode. Press the MENU button and then D / E button to select the...
Owners Manual
Page 30
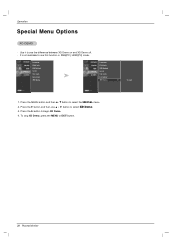
... are magnified on a vast screen through 14:9 mode. This function works in various picture formats; Press the EXIT button to save the new settings. 30 Plasma Monitor SOUND0 Manual config. Operation Screen Menu Options Selecting XGA mode -
... are magnified on a vast screen through 14:9 mode. This function works in various picture formats; Press the EXIT button to save the new settings. 30 Plasma Monitor SOUND0 Manual config. Operation Screen Menu Options Selecting XGA mode -
Owners Manual
Page 32
...) OUT IN HDMI/DVI IN RGB OUT IN AUDIO (RGB/DVI) COMPONENT IN VIDEO L-AUDIO-R 1 2 VIDEO AV IN L-AUDIO-R AV OUT S-VIDEO EXTERNAL SPEAKER R L 32 Plasma Monitor
...) OUT IN HDMI/DVI IN RGB OUT IN AUDIO (RGB/DVI) COMPONENT IN VIDEO L-AUDIO-R 1 2 VIDEO AV IN L-AUDIO-R AV OUT S-VIDEO EXTERNAL SPEAKER R L 32 Plasma Monitor
