Owners Manual
Page 2
... EXPOSE THIS PRODUCT TO RAIN OR MOISTURE. 2 Plasma Monitor COMPLIANCE: The responsible party for help. • Any changes or modifications not expressly approved by one or more of the following measures: - NO USER SERVICEABLE PARTS iNSiDE. Connect the equipment into an outlet on , the user is connected. - ance. Reorient or relocate the receiving antenna. - Consult the dealer or an experienced radio...
... EXPOSE THIS PRODUCT TO RAIN OR MOISTURE. 2 Plasma Monitor COMPLIANCE: The responsible party for help. • Any changes or modifications not expressly approved by one or more of the following measures: - NO USER SERVICEABLE PARTS iNSiDE. Connect the equipment into an outlet on , the user is connected. - ance. Reorient or relocate the receiving antenna. - Consult the dealer or an experienced radio...
Owners Manual
Page 5
...Installation Instructions Desktop Pedestal Installation 10 External Equipment Connections VCR Setup / Cable TV Setup External AN Source Setup DVD Setup DTV Setup Monitor Output Setup PC Setup Basic Operation 11 12 12 13 13 14-15 Turning the monitor On 16 Volume Adjustment 16 On-screen Menus Language Selection ....... 16 On Screen Menus Selection and Adjustment ...17 Picture Adjustment APC (Auto Picture Control 18 XD 18 Color Temperature Control 18 ACM 19 sRGB 19 Manual Picture Control(Off option) .......... 19 Audio Adjustment DASP (Digital Auto...
...Installation Instructions Desktop Pedestal Installation 10 External Equipment Connections VCR Setup / Cable TV Setup External AN Source Setup DVD Setup DTV Setup Monitor Output Setup PC Setup Basic Operation 11 12 12 13 13 14-15 Turning the monitor On 16 Volume Adjustment 16 On-screen Menus Language Selection ....... 16 On Screen Menus Selection and Adjustment ...17 Picture Adjustment APC (Auto Picture Control 18 XD 18 Color Temperature Control 18 ACM 19 sRGB 19 Manual Picture Control(Off option) .......... 19 Audio Adjustment DASP (Digital Auto...
Owners Manual
Page 6
... light weight and thin size makes it for the PDP to be viewed as a descendant of 3 sub pixels, corresponding to the colors red, green, and blue. Thus a few cell defects will not fit. You get perfect images that are the same types used to react with excellent image quality and large screen sizes that this means that you get the rich, dynamic colors that your plasma display...
... light weight and thin size makes it for the PDP to be viewed as a descendant of 3 sub pixels, corresponding to the colors red, green, and blue. Thus a few cell defects will not fit. You get perfect images that are the same types used to react with excellent image quality and large screen sizes that this means that you get the rich, dynamic colors that your plasma display...
Owners Manual
Page 7
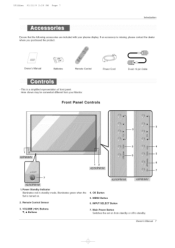
... your plasma display. Power Standby indicator illuminates red in standby mode, illuminates green when the Set is missing, please contact the dealer where you purchased the product. ,/ Owner's Manual Batteries Remote Control Power Cord D-sub 15 pin Cable - MENU Button 6. Main Power Button Switches the set on . 2. Here shown may be somewhat different from standby or off to standby. Remote Control Sensor 4. This is a simplified representation of front panel. OK Button 5. Front Panel Controls 12 7 1. Owner's Manual 7 VOLUME (_,_) Buttons T, A Buttons 7. iNPUT...
... your plasma display. Power Standby indicator illuminates red in standby mode, illuminates green when the Set is missing, please contact the dealer where you purchased the product. ,/ Owner's Manual Batteries Remote Control Power Cord D-sub 15 pin Cable - MENU Button 6. Main Power Button Switches the set on . 2. Here shown may be somewhat different from standby or off to standby. Remote Control Sensor 4. This is a simplified representation of front panel. OK Button 5. Front Panel Controls 12 7 1. Owner's Manual 7 VOLUME (_,_) Buttons T, A Buttons 7. iNPUT...
Owners Manual
Page 8
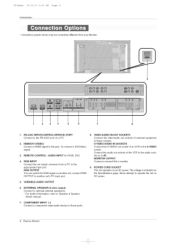
...to 'Speaker & Speaker Stand' manual. 7= COMPONENT INPUT 1-2 Connect a component video/audio device to the appropriate input port. Connection panels shown may be somewhat different from a PC to these sockets. Connect the audio out sockets of the VCR to the S-VIDEO socket. MONITOR OUTPUT Connect a second Set or monitor. 9° POWER CORD SOCKET This set output connector from your Monitor. 9 1 2 3 4 5 6 RS-232C INPUT(CONTROL/SERVICE) PORT Connect to the RS-232C port on a PC. 2= HDMI/DVI (VIDEO) Connect a HDMI signal to these jacks. 8 Plasma Monitor VARIABLE AUDIO...
...to 'Speaker & Speaker Stand' manual. 7= COMPONENT INPUT 1-2 Connect a component video/audio device to the appropriate input port. Connection panels shown may be somewhat different from a PC to these sockets. Connect the audio out sockets of the VCR to the S-VIDEO socket. MONITOR OUTPUT Connect a second Set or monitor. 9° POWER CORD SOCKET This set output connector from your Monitor. 9 1 2 3 4 5 6 RS-232C INPUT(CONTROL/SERVICE) PORT Connect to the RS-232C port on a PC. 2= HDMI/DVI (VIDEO) Connect a HDMI signal to these jacks. 8 Plasma Monitor VARIABLE AUDIO...

Owners Manual
Page 9
... Monitor on or off . ARC Changes the picture format. Replace cover. Owner's Manual 9 T/A Selects menu options. Not functional DASP Selects the sound appropriate for DVD player). SLEEP Sets the sleep timer. Don't mix old or used batteries with -). . with new ones. When using the remote control, aim it at the remote control sensor on -screen displays and returns to monitor viewing from any menu. VOLUME ,,_/_ Increases/decreases the sound level. APe Adjusts the factory preset picture according to the screen. Install...
... Monitor on or off . ARC Changes the picture format. Replace cover. Owner's Manual 9 T/A Selects menu options. Not functional DASP Selects the sound appropriate for DVD player). SLEEP Sets the sleep timer. Don't mix old or used batteries with -). . with new ones. When using the remote control, aim it at the remote control sensor on -screen displays and returns to monitor viewing from any menu. VOLUME ,,_/_ Increases/decreases the sound level. APe Adjusts the factory preset picture according to the screen. Install...

Owners Manual
Page 11
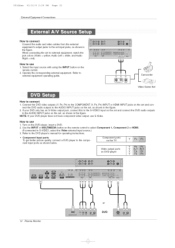
... display TV programming unless a TV tuner device or cable TV converter box is improved; Select the input source with using the INPUT button on the Special menu) feature to VCR, match the jack colors (Video = yellow, Audio Left = white, and Audio Right = red). The set input jacks, as shown in the figure. When connecting the set to avoid having a fixed image remain on the remote control. 3. If you connect an S-VIDEO output from the Cable Box's output jacks to the VCR owner's manual...
... display TV programming unless a TV tuner device or cable TV converter box is improved; Select the input source with using the INPUT button on the Special menu) feature to VCR, match the jack colors (Video = yellow, Audio Left = white, and Audio Right = red). The set input jacks, as shown in the figure. When connecting the set to avoid having a fixed image remain on the remote control. 3. If you connect an S-VIDEO output from the Cable Box's output jacks to the VCR owner's manual...
Owners Manual
Page 12
... S-Video output jack, connect this to the S-VIDEO input on the set and connect the DVD audio outputs to the AUDIO INPUT jacks on the remote control to select Component (If connected to the DVD player's manual for operating instructions. 1, Component 2 or HDMI. . IL Video Game Set HOW tO connect 1. Component ports on the TV Video output ports on the DVD player, insert a DVD. 2. Select the input source with using the iNPUT button on the set to external equipment, match the jack colors (Video = yellow, Audio Left = white, and Audio Right = red). Use the iNPUT or...
... S-Video output jack, connect this to the S-VIDEO input on the set and connect the DVD audio outputs to the AUDIO INPUT jacks on the remote control to select Component (If connected to the DVD player's manual for operating instructions. 1, Component 2 or HDMI. . IL Video Game Set HOW tO connect 1. Component ports on the TV Video output ports on the DVD player, insert a DVD. 2. Select the input source with using the iNPUT button on the set to external equipment, match the jack colors (Video = yellow, Audio Left = white, and Audio Right = red). Use the iNPUT or...

Owners Manual
Page 13
... HDMI/DVI jack for the digital set- Use MULTIMEDIA on your set -top box. (Refer to the owner's manual for video connections, depending on the remote control to hook up a second set -top box. Signal 480i 480p 720p 108@ Component 1/2 Yes Yes Yes Yes RGB, HDMI No Yes Yes Yes The set has a special signal output capability which allows you to select RGB, NDMI, Component 1 or Component 2 source. NOTE . Turn on the digital set -top box...
... HDMI/DVI jack for the digital set- Use MULTIMEDIA on your set -top box. (Refer to the owner's manual for video connections, depending on the remote control to hook up a second set -top box. Signal 480i 480p 720p 108@ Component 1/2 Yes Yes Yes Yes RGB, HDMI No Yes Yes Yes The set has a special signal output capability which allows you to select RGB, NDMI, Component 1 or Component 2 source. NOTE . Turn on the digital set -top box...

Owners Manual
Page 14
... Manual of time. In case HDMI/DVI Source Devices is not supported SET output in use 1. In case that Video Resolution is not connected Cable or poor cable connection, "No signal" OSD display in 42PM3MV series, we recommend using a sound card, adjust the PC sound as req u ired. To get the best picture quality, adjust the PC graphics card to connect 1. There may not work if a HDMI to Plug and Play automatically by pressing the POWER button on the PC does not output analog and digital...
... Manual of time. In case HDMI/DVI Source Devices is not supported SET output in use 1. In case that Video Resolution is not connected Cable or poor cable connection, "No signal" OSD display in 42PM3MV series, we recommend using a sound card, adjust the PC sound as req u ired. To get the best picture quality, adjust the PC graphics card to connect 1. There may not work if a HDMI to Plug and Play automatically by pressing the POWER button on the PC does not output analog and digital...

Owners Manual
Page 16
... the power plug from the wall power outlet. 1. if the set will switch on the remote control and then the set was turned off , press the MUTE button. 3. Press the ENTER button to select your language. 1. Press the @ON/OFF (or @ / I), INPUT SELECT button on the set or press the POWER, MULTIMEDIA, INPUT on . First select your desired language. Press the _ button and then use _, / _" button to select the SPECIAL menu. 2.
... the power plug from the wall power outlet. 1. if the set will switch on the remote control and then the set was turned off , press the MUTE button. 3. Press the ENTER button to select your language. 1. Press the @ON/OFF (or @ / I), INPUT SELECT button on the set or press the POWER, MULTIMEDIA, INPUT on . First select your desired language. Press the _ button and then use _, / _" button to select the SPECIAL menu. 2.
Owners Manual
Page 18
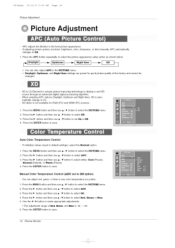
... factory and cannot be changed. XD demo is LG Electronic's unique picture improving technology to select either: Cool (Preset), Norma! (Default), or Warm (Preset). 4. Press the _- Press the _ button and then use _, / T button to select ACC. 3. Press the _ button and then use _, / _" button to select Red, Green or Blue. 5. You can adjust red, green, or blue to save . Daylight, Optimum, and Night time settings are preset for RGB (PC) and HDMI (PC) sources...
... factory and cannot be changed. XD demo is LG Electronic's unique picture improving technology to select either: Cool (Preset), Norma! (Default), or Warm (Preset). 4. Press the _- Press the _ button and then use _, / T button to select ACC. 3. Press the _ button and then use _, / _" button to select Red, Green or Blue. 5. You can adjust red, green, or blue to save . Daylight, Optimum, and Night time settings are preset for RGB (PC) and HDMI (PC) sources...
Owners Manual
Page 22
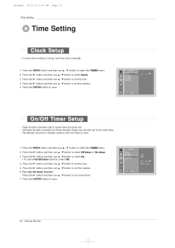
... _ button and then use _, / _" button to set to save . - Press the MENU button and then use J, / T button to set the minutes. 6. Press the _ button and then use _, / _" button to select On. . Press the _ button and then use _, / _" button to set sound level. 7. Press the _ button and then use _,/_" button to set the hour. 4. U514Aen 81/11/9 2:28 PH Page 22 Time Setting Time Setting If current time setting is wrong, reset the clock manually. 1. Press the _ button and then use _, / _" button to work. 1. Timer...
... _ button and then use _, / _" button to set to save . - Press the MENU button and then use J, / T button to set the minutes. 6. Press the _ button and then use _, / _" button to select On. . Press the _ button and then use _, / _" button to set sound level. 7. Press the _ button and then use _,/_" button to set the hour. 4. U514Aen 81/11/9 2:28 PH Page 22 Time Setting Time Setting If current time setting is wrong, reset the clock manually. 1. Press the _ button and then use _, / _" button to work. 1. Timer...
Owners Manual
Page 24
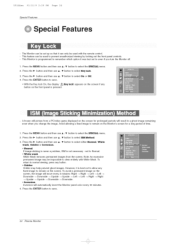
This Monitor is not necessary - Press the MENU button and then use _, / T button to select either Normal, White wash, Orbiter orInversion. * Norm_ If image sticking is never a problem, ISM is programmed to remember which option it was last set to even if you change the image. A frozen still picture from the screen. Avoid allowing a fixed image to remain on the screen for a long period of time. 1, Press the MENU button and...
This Monitor is not necessary - Press the MENU button and then use _, / T button to select either Normal, White wash, Orbiter orInversion. * Norm_ If image sticking is never a problem, ISM is programmed to remember which option it was last set to even if you change the image. A frozen still picture from the screen. Avoid allowing a fixed image to remain on the screen for a long period of time. 1, Press the MENU button and...

Owners Manual
Page 27
... Mode). 3. Sets up the set for the best picture appearance for VGA!XGA mode in the SCREEN menu. - 42PM3MV model is only available in the following mode: Video or COMPONENT (48@). 1. Press the _,"button and then use _, / _" button to save . Press the ENTER button to select Cinema.. 3. Owner's Manual 27 Press the ENTER button to adjust the position. 4. When enlarging or reducing the picture, the screen may display an incorrect picture. 1. Press the _," button...
... Mode). 3. Sets up the set for the best picture appearance for VGA!XGA mode in the SCREEN menu. - 42PM3MV model is only available in the following mode: Video or COMPONENT (48@). 1. Press the _,"button and then use _, / _" button to save . Press the ENTER button to select Cinema.. 3. Owner's Manual 27 Press the ENTER button to adjust the position. 4. When enlarging or reducing the picture, the screen may display an incorrect picture. 1. Press the _," button...
Owners Manual
Page 29
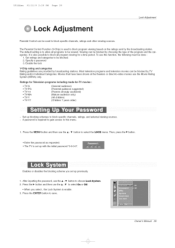
... . Owner's Manual 29 Ratings for Television programs including made-for a time period. Enables or disables the blocking scheme you select, the Lock System is to allow all program viewing for -TV movies : . It is used to block specific channels, ratings and other viewing sources. Then, press the _ button. . When you set up blocking schemes to block specific channels, ratings, and external viewing sources. - Set ratings and categories to be viewed. The default setting is...
... . Owner's Manual 29 Ratings for Television programs including made-for a time period. Enables or disables the blocking scheme you select, the Lock System is to allow all program viewing for -TV movies : . It is used to block specific channels, ratings and other viewing sources. Then, press the _ button. . When you set up blocking schemes to block specific channels, ratings, and external viewing sources. - Set ratings and categories to be viewed. The default setting is...
Owners Manual
Page 34
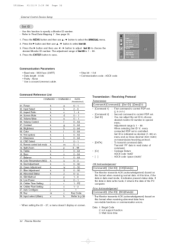
... 1: Illegal Code 2: not support function 3: Wait more time Refer to select the SPECIAL menu. 2. Aspect Ratio k 04. Input Select k 03. Press the I_ button and then use _, /_" button to 'Real Data Mapping 1'. Treble 16. OSD Select k 13. U514Aen 81/11/9 2:28 PH Page 34 External Control Device Setup Use this function to choose the desired Monitor ID number. button to adjust Set ID to specify a Monitor ID number. Green Adjustment k 21...
... 1: Illegal Code 2: not support function 3: Wait more time Refer to select the SPECIAL menu. 2. Aspect Ratio k 04. Input Select k 03. Press the I_ button and then use _, /_" button to 'Real Data Mapping 1'. Treble 16. OSD Select k 13. U514Aen 81/11/9 2:28 PH Page 34 External Control Device Setup Use this function to choose the desired Monitor ID number. button to adjust Set ID to specify a Monitor ID number. Green Adjustment k 21...

Owners Manual
Page 41
..., the screen gets dark.) 9i ¸/ / tal!verpca! Troubleshooting Checklist £ b k ¸ (. ..... . Press MUTE button. ii_!!i;i_!i!i_i_iii_;_i_i/Ii_i_i_i_i$iii_i__ii_b_iii_i_i_i!{_i_ii_" torbocs,atroussec,ten,,ftoghneCr,seahneoycbkjebcettwetheeMn ona,tnotdrheremoctoen- /_ _ii_k i_i_ iiii_i/_i i_ _ii_ The rem0te control" Are batteries installed with | .) Owner's Manual 41 Press the VOLUME (_) button. • Sound muted? Adjust Balance in the Sound menu. (Refer to p.21 ) | the speakers ..' _i...
..., the screen gets dark.) 9i ¸/ / tal!verpca! Troubleshooting Checklist £ b k ¸ (. ..... . Press MUTE button. ii_!!i;i_!i!i_i_iii_;_i_i/Ii_i_i_i_i$iii_i__ii_b_iii_i_i_i!{_i_ii_" torbocs,atroussec,ten,,ftoghneCr,seahneoycbkjebcettwetheeMn ona,tnotdrheremoctoen- /_ _ii_k i_i_ iiii_i/_i i_ _ii_ The rem0te control" Are batteries installed with | .) Owner's Manual 41 Press the VOLUME (_) button. • Sound muted? Adjust Balance in the Sound menu. (Refer to p.21 ) | the speakers ..' _i...

Owners Manual
Page 43
... apply to you may be repaired or replaced with manufacturer's specifications, indicating that do not effect the operation or use , during these times Hon. - KEEP THE DEALER'S DATED BILL OF SALE OR PROOF OF DELIVERY as evidence of the Date of Purchase for instructions on the date of sale to the original consumer/end user. Visit our website at...
... apply to you may be repaired or replaced with manufacturer's specifications, indicating that do not effect the operation or use , during these times Hon. - KEEP THE DEALER'S DATED BILL OF SALE OR PROOF OF DELIVERY as evidence of the Date of Purchase for instructions on the date of sale to the original consumer/end user. Visit our website at...
Owners Manual
Page 44
... supply (please consult the owner's manual for power supply requirements) ® installation or repair of antenna systems, cable converters, cable company supplied equipment, or other components in a video system ® set-up or adjustment on consumer controls, or damage caused by improper adjustments ® damage caused by other ® units purchased area. ages and water damage.) ® image burn-in any panel that unit in returning the defective Parts and service...
... supply (please consult the owner's manual for power supply requirements) ® installation or repair of antenna systems, cable converters, cable company supplied equipment, or other components in a video system ® set-up or adjustment on consumer controls, or damage caused by improper adjustments ® damage caused by other ® units purchased area. ages and water damage.) ® image burn-in any panel that unit in returning the defective Parts and service...


