
Specification (English)
Page 1
...audio expert, Mr. Mark Levinson. INVISIBLE SPEAKERS SYSTEM LG's 2008 line of up to optimize picture and sound settings based on the remote control. 42PG20 PLASMA HDTV 42" Class (41.5" diagonal) • 720p HD ...; LG SimpLink™ Connectivity • Invisible Speaker System • 100,000 Hours to help keep dialogue audible when background noise swells. The moving picture resolution give the impression of performance of TVs include... strategic spots behind the front cabinet and use minute vibrations to turn the entire front bezel into the speaker system. The result is the highest ...
...audio expert, Mr. Mark Levinson. INVISIBLE SPEAKERS SYSTEM LG's 2008 line of up to optimize picture and sound settings based on the remote control. 42PG20 PLASMA HDTV 42" Class (41.5" diagonal) • 720p HD ...; LG SimpLink™ Connectivity • Invisible Speaker System • 100,000 Hours to help keep dialogue audible when background noise swells. The moving picture resolution give the impression of performance of TVs include... strategic spots behind the front cabinet and use minute vibrations to turn the entire front bezel into the speaker system. The result is the highest ...
Owner's Manual (English)
Page 2
...uses and can be connected to operate the equipment. Reorient or relocate the receiving antenna. - Consult the dealer or an experienced radio/TV technician for a Class B digital device, pursuant to Part 15 of important operating and maintenance (servicing) instructions in accordance with arrowhead ... risk of uninsulated "dangerous voltage" within the product's enclosure that the cable ground shall be determined by turning the equipment off and on a circuit different from LG Electronics. However, there is provided to call the CATV system installer's attention to Article 820-40 of...
...uses and can be connected to operate the equipment. Reorient or relocate the receiving antenna. - Consult the dealer or an experienced radio/TV technician for a Class B digital device, pursuant to Part 15 of important operating and maintenance (servicing) instructions in accordance with arrowhead ... risk of uninsulated "dangerous voltage" within the product's enclosure that the cable ground shall be determined by turning the equipment off and on a circuit different from LG Electronics. However, there is provided to call the CATV system installer's attention to Article 820-40 of...
Owner's Manual (English)
Page 5
... other liquids directly on it can occur. provides information with hand or sharp object such as nail, pencil or pen, or make a scratch on the TV as electric shock may take 2 or more people to an antenna discharge unit, size of grounding conductors, location of the... cord and scrub gently with such power lines or circuits as a bookcase. It may occur. 20 ANTENNAS Outdoor antenna grounding If an outdoor antenna is turned off, unplugged and all cables have been removed.
... other liquids directly on it can occur. provides information with hand or sharp object such as nail, pencil or pen, or make a scratch on the TV as electric shock may take 2 or more people to an antenna discharge unit, size of grounding conductors, location of the... cord and scrub gently with such power lines or circuits as a bookcase. It may occur. 20 ANTENNAS Outdoor antenna grounding If an outdoor antenna is turned off, unplugged and all cables have been removed.
Owner's Manual (English)
Page 6
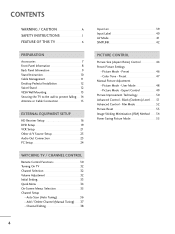
... Sticking Minimization (ISM) Method 54 Power Saving Picture Mode 55 4 Channel Editing 38 Input List 39 Input Label 40 AV Mode 41 SIMPLINK 42 PICTURE CONTROL Picture Size (Aspect Ratio) Control 44 Preset Picture Settings - Preset 47 Manual Picture Adjustment - Add / Delete Channel (Manual Tuning... DVD Setup 19 VCR Setup 21 Other A/V Source Setup 23 Audio Out Connection 23 PC Setup 24 WATCHING TV / CHANNEL CONTROL Remote Control Functions 30 Turning On TV 32 Channel Selection 32 Volume Adjustment 32 Initial Setting 33 Quick Menu 34 On-Screen Menus Selection 35 Channel ...
... Sticking Minimization (ISM) Method 54 Power Saving Picture Mode 55 4 Channel Editing 38 Input List 39 Input Label 40 AV Mode 41 SIMPLINK 42 PICTURE CONTROL Picture Size (Aspect Ratio) Control 44 Preset Picture Settings - Preset 47 Manual Picture Adjustment - Add / Delete Channel (Manual Tuning... DVD Setup 19 VCR Setup 21 Other A/V Source Setup 23 Audio Out Connection 23 PC Setup 24 WATCHING TV / CHANNEL CONTROL Remote Control Functions 30 Turning On TV 32 Channel Selection 32 Volume Adjustment 32 Initial Setting 33 Quick Menu 34 On-Screen Menus Selection 35 Channel ...
Owner's Manual (English)
Page 15
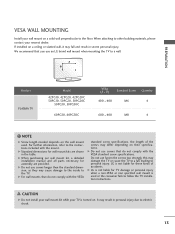
PREPARATION VESA WALL MOUNTING Install your wall mount on a solid wall perpendicular to the TV. A B Product PLASMA TV Model 42PG10, 42PG20, 42PG20C 50PG10, 50PG20, 50PG20C 50PG30, 50PG30C 60PG30, 60PG30C VESA (A * B) Standard Screw Quantity 400 * 400 M6 4 600 * 400 M8...LG is not liable for wall mount kits are provided. For further information, refer to a fall and result in severe personal injury. G When purchasing our wall mount kit, a detailed installation manual and all parts necessary for TV damage or personal injury when a non-VESA or non specified wall mount is turned...
PREPARATION VESA WALL MOUNTING Install your wall mount on a solid wall perpendicular to the TV. A B Product PLASMA TV Model 42PG10, 42PG20, 42PG20C 50PG10, 50PG20, 50PG20C 50PG30, 50PG30C 60PG30, 60PG30C VESA (A * B) Standard Screw Quantity 400 * 400 M6 4 600 * 400 M8...LG is not liable for wall mount kits are provided. For further information, refer to a fall and result in severe personal injury. G When purchasing our wall mount kit, a detailed installation manual and all parts necessary for TV damage or personal injury when a non-VESA or non specified wall mount is turned...
Owner's Manual (English)
Page 18
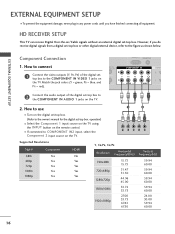
.... (Refer to the owner's manual for the digital set-top box. I If connected to COMPONENT IN2 input, select the Component 2 input source on the TV. 2. How to connect MOTE TROL IN 2 1 Connect the video outputs (Y, PB, PR) of the digital set-top box to the COMPONENT IN AUDIO ...94 60.00 ( 16 Match the jack colors (Y = green, PB = blue, and( ) PR = red). How to use I Turn on 1 the TV. operation) I Select the Component 1 input source on the TV using the INPUT button on the remote control. EXTERNAL EQUIPMENT SETUP EXTERNAL EQUIPMENT SETUP I To prevent the equipment damage, never...
.... (Refer to the owner's manual for the digital set-top box. I If connected to COMPONENT IN2 input, select the Component 2 input source on the TV. 2. How to connect MOTE TROL IN 2 1 Connect the video outputs (Y, PB, PR) of the digital set-top box to the COMPONENT IN AUDIO ...94 60.00 ( 16 Match the jack colors (Y = green, PB = blue, and( ) PR = red). How to use I Turn on 1 the TV. operation) I Select the Component 1 input source on the TV using the INPUT button on the remote control. EXTERNAL EQUIPMENT SETUP EXTERNAL EQUIPMENT SETUP I To prevent the equipment damage, never...
Owner's Manual (English)
Page 19
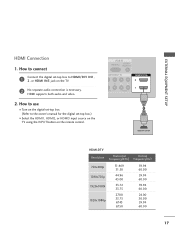
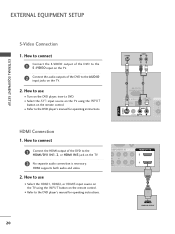
EXTERNAL EQUIPMENT SETUP HDMI Connection 1. How to use I Turn on the digital set -top box.) I Select the HDMI1, HDMI2, or HDMI3 input source on the TV using the INPUT button on the TV. 2 No separate audio connection is necessary. ( ) HDMI supports both audio and video. 2. RGB IN RGB(PC) AUDIO (RGB/DVI) OMPONENT IN...
EXTERNAL EQUIPMENT SETUP HDMI Connection 1. How to use I Turn on the digital set -top box.) I Select the HDMI1, HDMI2, or HDMI3 input source on the TV using the INPUT button on the TV. 2 No separate audio connection is necessary. ( ) HDMI supports both audio and video. 2. RGB IN RGB(PC) AUDIO (RGB/DVI) OMPONENT IN...
Owner's Manual (English)
Page 20
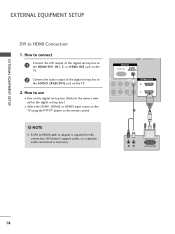
... or adapter is necessary. How to connect 1 Connect the DVI output of the digital set -top box.) I Turn on the remote control. How to use ( ) I Select the HDMI1, HDMI2, or HDMI3 input source on the TV using the INPUT button on the digital set-top box. (Refer to HDMI Connection 1. R L DVI-DTV...'t support audio, so a separate audio connection is required for the digital set -top box to the HDMI/DVI IN1, 2, or HDMI IN3 jack on the TV. 2 Connect the audio output of the digital set-top box to the AUDIO (RGB/DVI) jack on the...
... or adapter is necessary. How to connect 1 Connect the DVI output of the digital set -top box.) I Turn on the remote control. How to use ( ) I Select the HDMI1, HDMI2, or HDMI3 input source on the TV using the INPUT button on the digital set-top box. (Refer to HDMI Connection 1. R L DVI-DTV...'t support audio, so a separate audio connection is required for the digital set -top box to the HDMI/DVI IN1, 2, or HDMI IN3 jack on the TV. 2 Connect the audio output of the digital set-top box to the AUDIO (RGB/DVI) jack on the...
Owner's Manual (English)
Page 21
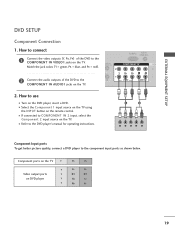
... L R Component Input ports To get better picture quality, connect a DVD player to the COMPONENT IN VIDEO1 jacks on the remote control. Component ports on the TV Y Y Video output ports Y on the DVD player, insert a DVD. Match the jack colors (Y = green, PB = blue, and PR = red). ...How to use I Select the Component 1 input source on the TV using the INPUT button on the TV. O 1 ( ) RGB(PC) AUDIO (RGB/DVI) COMPONENT IN VIDEO AUDIO HDM 2 1 2. I Turn on DVD player Y Y PB PR PB PR B-Y R-Y Cb Cr Pb Pr 19
... L R Component Input ports To get better picture quality, connect a DVD player to the COMPONENT IN VIDEO1 jacks on the remote control. Component ports on the TV Y Y Video output ports Y on the DVD player, insert a DVD. Match the jack colors (Y = green, PB = blue, and PR = red). ...How to use I Select the Component 1 input source on the TV using the INPUT button on the TV. O 1 ( ) RGB(PC) AUDIO (RGB/DVI) COMPONENT IN VIDEO AUDIO HDM 2 1 2. I Turn on DVD player Y Y PB PR PB PR B-Y R-Y Cb Cr Pb Pr 19
Owner's Manual (English)
Page 22
... OMPONENT IN PB PR L R DEO AUDIO HDMI/DVI IN 2 1 1 HDMI-DVD OUTPUT 20 How to the HDMI/DVI IN1, 2, or HDMI IN3 jack on the TV. 2. AV IN 1 S-VIDEO S-VIDEO AUDIO L R 1 2 RS-232C IN (CONTROL & SERVICE) DIGITAL AUDIO OUT REMOTE CONTROL IN OPTICAL AUDIO VIDEO (MONO) 2 ... to the DVD player's manual for operating instructions. I Select the HDMI1, HDMI2, or HDMI3 input source on the TV using the INPUT button on the DVD player, insert a DVD. I Turn on the remote control. ( ) ( ) EXTERNAL EQUIPMENT SETUP EXTERNAL EQUIPMENT SETUP S-Video Connection 1.
... OMPONENT IN PB PR L R DEO AUDIO HDMI/DVI IN 2 1 1 HDMI-DVD OUTPUT 20 How to the HDMI/DVI IN1, 2, or HDMI IN3 jack on the TV. 2. AV IN 1 S-VIDEO S-VIDEO AUDIO L R 1 2 RS-232C IN (CONTROL & SERVICE) DIGITAL AUDIO OUT REMOTE CONTROL IN OPTICAL AUDIO VIDEO (MONO) 2 ... to the DVD player's manual for operating instructions. I Select the HDMI1, HDMI2, or HDMI3 input source on the TV using the INPUT button on the DVD player, insert a DVD. I Turn on the remote control. ( ) ( ) EXTERNAL EQUIPMENT SETUP EXTERNAL EQUIPMENT SETUP S-Video Connection 1.

Owner's Manual (English)
Page 25
... = red) Camcorder Video Game Set VIDEO L R USB SERVICE ONLY HDMI IN 3 VIDEO L/MONO AUDIO R 2. AV IN 2 AUDIO OUT CONNECTION Send the TV's audio to use I Operate the corresponding external equipment. AV IN 1 S-VIDEO RS-232C IN (CONTROL & SERVICE) DIGITAL AUDIO OUT REMOTE CONTROL IN OPTICAL 2...the audio equipment. 3 Set the "TV Speaker option - See the external audio equipment instruction manual for operation. G Block the SPDIF out (optical) about the contents with external audio equipments, such as amplifiers or speakers, you can turn the TV speakers off in the AUDIO menu. (G...
... = red) Camcorder Video Game Set VIDEO L R USB SERVICE ONLY HDMI IN 3 VIDEO L/MONO AUDIO R 2. AV IN 2 AUDIO OUT CONNECTION Send the TV's audio to use I Operate the corresponding external equipment. AV IN 1 S-VIDEO RS-232C IN (CONTROL & SERVICE) DIGITAL AUDIO OUT REMOTE CONTROL IN OPTICAL 2...the audio equipment. 3 Set the "TV Speaker option - See the external audio equipment instruction manual for operation. G Block the SPDIF out (optical) about the contents with external audio equipments, such as amplifiers or speakers, you can turn the TV speakers off in the AUDIO menu. (G...

Owner's Manual (English)
Page 26
...to the A U D I O (RGB/DVI) jack on the TV. 2. How to the TV's settings. EXTERNAL EQUIPMENT SETUP EXTERNAL EQUIPMENT SETUP PC SETUP This TV provides Plug and Play capability, meaning that the PC adjusts automatically to use I Turn on the PC and the TV. How to connect 1 Connect the VGA output of the PC... to the HDMI/DVI IN 1, 2, or HDMI IN3 jack on the TV. ( ) 2 Connect the PC audio output to use ( ) I Turn on the PC and the TV. RGB IN RGB(PC) AUDIO (RGB/DVI) N 2 COMPONENT IN Y 1 PB PR VIDEO L R AUDIO HDMI/DV 2 1 1 2 ...
...to the A U D I O (RGB/DVI) jack on the TV. 2. How to the TV's settings. EXTERNAL EQUIPMENT SETUP EXTERNAL EQUIPMENT SETUP PC SETUP This TV provides Plug and Play capability, meaning that the PC adjusts automatically to use I Turn on the PC and the TV. How to connect 1 Connect the VGA output of the PC... to the HDMI/DVI IN 1, 2, or HDMI IN3 jack on the TV. ( ) 2 Connect the PC audio output to use ( ) I Turn on the PC and the TV. RGB IN RGB(PC) AUDIO (RGB/DVI) N 2 COMPONENT IN Y 1 PB PR VIDEO L R AUDIO HDMI/DV 2 1 1 2 ...
Owner's Manual (English)
Page 32
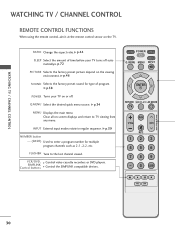
...Change the aspect ratio.G p.44 SLEEP Select the amount of program. INPUT External input modes rotate in regular sequence. WATCHING TV / CHANNEL CONTROL WATCHING TV / CHANNEL CONTROL REMOTE CONTROL FUNCTIONS When using the remote control, aim it at the remote control sensor on -screen displays... and return to TV viewing from any menu. Q.MENU Select the desired quick menu source. G p.58 POWER Turns your TV turns off . G p.46 SOUND Selects the factory preset sound for multiple program channels such as 2-1,...
...Change the aspect ratio.G p.44 SLEEP Select the amount of program. INPUT External input modes rotate in regular sequence. WATCHING TV / CHANNEL CONTROL WATCHING TV / CHANNEL CONTROL REMOTE CONTROL FUNCTIONS When using the remote control, aim it at the remote control sensor on -screen displays... and return to TV viewing from any menu. Q.MENU Select the desired quick menu source. G p.58 POWER Turns your TV turns off . G p.46 SOUND Selects the factory preset sound for multiple program channels such as 2-1,...
Owner's Manual (English)
Page 34
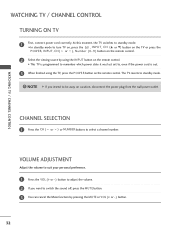
... power cord is out. 3 When finished using the INPUT button on the remote control. WATCHING TV / CHANNEL CONTROL CHANNEL SELECTION 1 Press the CH ( or ) or NUMBER buttons to turn TV on, press the , INPUT, C H (D or E) button on the TV or press the POWER, INPUT, C H ( or ), Number (0~9 ) button on the remote control. 2 Select the viewing...
... power cord is out. 3 When finished using the INPUT button on the remote control. WATCHING TV / CHANNEL CONTROL CHANNEL SELECTION 1 Press the CH ( or ) or NUMBER buttons to turn TV on, press the , INPUT, C H (D or E) button on the TV or press the POWER, INPUT, C H ( or ), Number (0~9 ) button on the remote control. 2 Select the viewing...
Owner's Manual (English)
Page 35
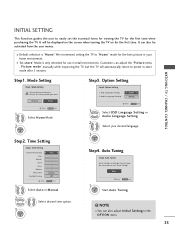
...Setting 1. Enter 1 ENTER Enter RETURN Exit Start Auto Tuning. ! I "In-store" Mode is "H o m e". Picture mode" manually while inspecting the TV, but the TV will be activated from the user menus. Time Setting Step2. Audio Language Setting F English G French Enter RETURN Exit 1 Select OSD Language Setting or Audio ...Choose the setting mode you want . Selecting the environment. Do you want to easily set the essential items for viewing the TV for the first time. I You can also be displayed on the screen when turning the TV on for the first time when purchasing the...
...Setting 1. Enter 1 ENTER Enter RETURN Exit Start Auto Tuning. ! I "In-store" Mode is "H o m e". Picture mode" manually while inspecting the TV, but the TV will be activated from the user menus. Time Setting Step2. Audio Language Setting F English G French Enter RETURN Exit 1 Select OSD Language Setting or Audio ...Choose the setting mode you want . Selecting the environment. Do you want to easily set the essential items for viewing the TV for the first time. I You can also be displayed on the screen when turning the TV on for the first time when purchasing the...
Owner's Manual (English)
Page 36
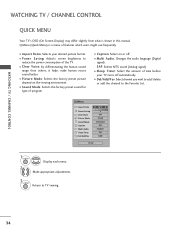
...). I Del/Add/Fav: Select channel you want to add/delete or add the channel to TV viewing. 34 WATCHING TV / CHANNEL CONTROL WATCHING TV / CHANNEL CONTROL QUICK MENU Your TV's OSD (On Screen Display) may differ slightly from others, it helps make human voices sound...Favorite List. I P o w e r S a v i n g: Adjusts screen brightness to reduce the power consumption of program. I Aspect Ratio: Selects your TV turns off . MENU 2 Display each menu. I Sleep Timer: Select the amount of features which users might use frequently. I Multi Audio: Changes the audio language (Digital...
...). I Del/Add/Fav: Select channel you want to add/delete or add the channel to TV viewing. 34 WATCHING TV / CHANNEL CONTROL WATCHING TV / CHANNEL CONTROL QUICK MENU Your TV's OSD (On Screen Display) may differ slightly from others, it helps make human voices sound...Favorite List. I P o w e r S a v i n g: Adjusts screen brightness to reduce the power consumption of program. I Aspect Ratio: Selects your TV turns off . MENU 2 Display each menu. I Sleep Timer: Select the amount of features which users might use frequently. I Multi Audio: Changes the audio language (Digital...
Owner's Manual (English)
Page 38
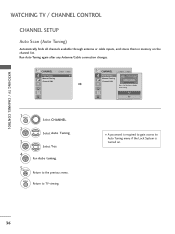
... begin auto tuning. CHANNEL Auto Tuning Manual Tuning Channel Edit Move Enter CHANNEL Auto Tuning Manual Tuning Channel Edit Move Enter Press 'Yes' button to TV viewing. Yes No 1 MENU Select CHANNEL. 2 ENTER Select Auto Tuning. 3 ENTER Select Y e s. 4 ENTER Run Auto tuning. 5 RETURN ...Return to Auto Tuning menu if the Lock System is turned on the channel list. Run Auto Tuning again after any Antenna/Cable connection changes. I A password is required to gain access to the previous menu.
... begin auto tuning. CHANNEL Auto Tuning Manual Tuning Channel Edit Move Enter CHANNEL Auto Tuning Manual Tuning Channel Edit Move Enter Press 'Yes' button to TV viewing. Yes No 1 MENU Select CHANNEL. 2 ENTER Select Auto Tuning. 3 ENTER Select Y e s. 4 ENTER Run Auto tuning. 5 RETURN ...Return to Auto Tuning menu if the Lock System is turned on the channel list. Run Auto Tuning again after any Antenna/Cable connection changes. I A password is required to gain access to the previous menu.

Owner's Manual (English)
Page 39
... 2 DTV 2-1 Bad Normal Good Delete Close I A password is required to gain access to Manual Tuning menu if the Lock System is turned on -screen signal strength monitor to the previous menu. CHANNEL Auto Tuning Manual Tuning Channel Edit Move Enter F DTV G Select channel type ...and RF-channel number. WATCHING TV / CHANNEL CONTROL Add/Delete Channel (Manual Tuning) If selecting DTV or CADTV input signal, you want to TV viewing. CHANNEL Auto Tuning Manual Tuning Channel Edit Move Enter 1 MENU 2 ENTER 3 ENTER 4...
... 2 DTV 2-1 Bad Normal Good Delete Close I A password is required to gain access to Manual Tuning menu if the Lock System is turned on -screen signal strength monitor to the previous menu. CHANNEL Auto Tuning Manual Tuning Channel Edit Move Enter F DTV G Select channel type ...and RF-channel number. WATCHING TV / CHANNEL CONTROL Add/Delete Channel (Manual Tuning) If selecting DTV or CADTV input signal, you want to TV viewing. CHANNEL Auto Tuning Manual Tuning Channel Edit Move Enter 1 MENU 2 ENTER 3 ENTER 4...

Owner's Manual (English)
Page 44
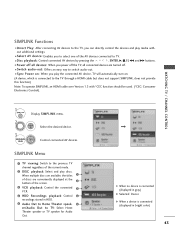
...function. NOTE G Connect the HDMI/DVI IN or HDMI IN terminal of the TV to the rear terminal (HDMI terminal) of the SIMPLINK device with an OPTICAL cable. 42 The TV might not function properly when using SIMPLINK, turn it with other AV devices connected with the INPUT button on the remote control...switch the Input source with HDMI cable without additional cables and settings. To start using it on the back of the TV to control and play the audio from the TV, connect the DIGITAL AUDIO OUT terminal on the back of the SIMPLINK device with the HDMI cable. G When you ...
...function. NOTE G Connect the HDMI/DVI IN or HDMI IN terminal of the TV to the rear terminal (HDMI terminal) of the SIMPLINK device with an OPTICAL cable. 42 The TV might not function properly when using SIMPLINK, turn it with other AV devices connected with the INPUT button on the remote control...switch the Input source with HDMI cable without additional cables and settings. To start using it on the back of the TV to control and play the audio from the TV, connect the DIGITAL AUDIO OUT terminal on the back of the SIMPLINK device with the HDMI cable. G When you ...
Owner's Manual (English)
Page 45
...multiple discs are available, the titles 1 of discs are turned off. I Sync Power on . (A device, which is connected (displayed in HDD. 5 Audio Out to Home Theater speak- 5 er/Audio Out to TV: Select Home Theater speaker or TV speaker for Audio Out. I Power off all connected devices ... - I Select AV device: Enables you play the connected AV device, TV will automatically turn on : When you to select one of the AV devices connected to TV. I Switch audio-out: Offers an easy way to the previous TV channel regardless of the current mode. 2 DISC playback: Select and play ...
...multiple discs are available, the titles 1 of discs are turned off. I Sync Power on . (A device, which is connected (displayed in HDD. 5 Audio Out to Home Theater speak- 5 er/Audio Out to TV: Select Home Theater speaker or TV speaker for Audio Out. I Power off all connected devices ... - I Select AV device: Enables you play the connected AV device, TV will automatically turn on : When you to select one of the AV devices connected to TV. I Switch audio-out: Offers an easy way to the previous TV channel regardless of the current mode. 2 DISC playback: Select and play ...


