
Owner's Manual (English)
Page 2
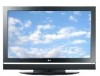
...A subset of Dolby Laboratories. TruSurround XT technology is a trademark of LG's audio/video device connected to the HDMI (high-definition multimedia interface), LG TV with this logo works easily with one remote control. LG's own special digital image generator, consisting of roughly a million or ...more pixels, 16:9 aspect-ratio screens, and AC3 digital audio. High-resolution digital ...
...A subset of Dolby Laboratories. TruSurround XT technology is a trademark of LG's audio/video device connected to the HDMI (high-definition multimedia interface), LG TV with this logo works easily with one remote control. LG's own special digital image generator, consisting of roughly a million or ...more pixels, 16:9 aspect-ratio screens, and AC3 digital audio. High-resolution digital ...

Owner's Manual (English)
Page 5
..., or sold with something. 12 Refer all servicing to be certain. Check the specification page of fire or electric shock, do not drop onto the screen with the apparatus. If grounding methods are dangerous. Do not overload wall outlets. Periodically examine the cord of these conditions could result in electric shock...
..., or sold with something. 12 Refer all servicing to be certain. Check the specification page of fire or electric shock, do not drop onto the screen with the apparatus. If grounding methods are dangerous. Do not overload wall outlets. Periodically examine the cord of these conditions could result in electric shock...

Owner's Manual (English)
Page 6
Preset 44 - Preset 45 Manual Picture Adjustment 46 - User Mode 55 Balance 56 TV Speakers On/Off Setup 57 Stereo/SAP Broadcasts Setup 58 Audio Language 59 On-Screen Menus Language Selection 60 Caption/Text 61 - Analog Broadcasting System Captions 61 - EZ... Picture - User Mode 47 XD - Color Tone - EZ Picture - Channel Editing 36 DTV Signal Strength 37 Input Source Selection 38 Input Label 39 SimpLink 40 4 PICTURE CONTROL Picture Size (Aspect Ratio) Control 42...
Preset 44 - Preset 45 Manual Picture Adjustment 46 - User Mode 55 Balance 56 TV Speakers On/Off Setup 57 Stereo/SAP Broadcasts Setup 58 Audio Language 59 On-Screen Menus Language Selection 60 Caption/Text 61 - Analog Broadcasting System Captions 61 - EZ... Picture - User Mode 47 XD - Color Tone - EZ Picture - Channel Editing 36 DTV Signal Strength 37 Input Source Selection 38 Input Label 39 SimpLink 40 4 PICTURE CONTROL Picture Size (Aspect Ratio) Control 42...
Owner's Manual (English)
Page 8
... Process: a few minute colored dots may be present on the Plasma TV screen The Plasma TV is normal during the manufacture and operation of this Plasma TV is not available for the Plasma TV to be carried out in accordance to the regulations of locations where conventional TVs do not fit. A few cell defects are easily viewable in a variety of...
... Process: a few minute colored dots may be present on the Plasma TV screen The Plasma TV is normal during the manufacture and operation of this Plasma TV is not available for the Plasma TV to be carried out in accordance to the regulations of locations where conventional TVs do not fit. A few cell defects are easily viewable in a variety of...
Owner's Manual (English)
Page 17
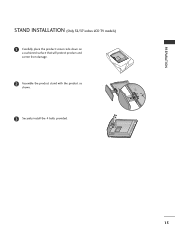
PREPARATION STAND INSTALLATION (Only 32/37 inches LCD TV models) 1 Carefully place the product screen side down on a cushioned surface that will protect product and screen from damage. 2 Assemble the product stand with the product as shown. 3 Securely install the 4 bolts provided. 15
PREPARATION STAND INSTALLATION (Only 32/37 inches LCD TV models) 1 Carefully place the product screen side down on a cushioned surface that will protect product and screen from damage. 2 Assemble the product stand with the product as shown. 3 Securely install the 4 bolts provided. 15
Owner's Manual (English)
Page 25
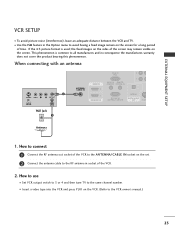
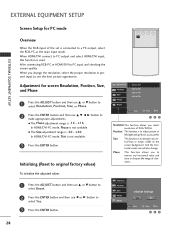
... How to use I To avoid picture noise (interference), leave an adequate distance between the VCR and TV. This phenomenon is used; If the 4:3 picture format is common to all manufactures and in socket of the screen may remain visible on the VCR. (Refer to the VCR owner's manual.) ( ) AUDIO 23 ...EXTERNAL EQUIPMENT SETUP VCR SETUP VIDEO ( ) AUDIO I Set VCR output switch to 3 or 4 and then tune TV to the same channel number. I Insert a video ...
... How to use I To avoid picture noise (interference), leave an adequate distance between the VCR and TV. This phenomenon is used; If the 4:3 picture format is common to all manufactures and in socket of the screen may remain visible on the VCR. (Refer to the VCR owner's manual.) ( ) AUDIO 23 ...EXTERNAL EQUIPMENT SETUP VCR SETUP VIDEO ( ) AUDIO I Set VCR output switch to 3 or 4 and then tune TV to the same channel number. I Insert a video ...

Owner's Manual (English)
Page 29
G Depending on your TV. G Check the image on the graphics card, DOS mode may not work if a HDMI to DVI Cable is separate. If noise is clear. tion, change the refresh rate to another rate or adjust the brightness and contrast on the screen for Horizontal and Vertical frequencies is... 59.799 1366x768 47.130 59.65 * RGB-PC mode only: 640x350, 720X400 27 G If the video doesn't fit the screen, try pressing the ADJUST button to 1360x768 (42PC5D/5DC models: 1024x768). EXTERNAL EQUIPMENT SETUP ! The fixed image may be changed, change the PC output to another resolu- G The...
G Depending on your TV. G Check the image on the graphics card, DOS mode may not work if a HDMI to DVI Cable is separate. If noise is clear. tion, change the refresh rate to another rate or adjust the brightness and contrast on the screen for Horizontal and Vertical frequencies is... 59.799 1366x768 47.130 59.65 * RGB-PC mode only: 640x350, 720X400 27 G If the video doesn't fit the screen, try pressing the ADJUST button to 1360x768 (42PC5D/5DC models: 1024x768). EXTERNAL EQUIPMENT SETUP ! The fixed image may be changed, change the PC output to another resolu- G The...
Owner's Manual (English)
Page 30
... then use D or E button to select Reset. 2 Press the ENTER button and then use D E F G button to make appropriate adjustments. And the horizontal screen size will also change the resolution, select the proper resolution in present input to left/right and up/down as the main input mode. I The... to select Y e s. 3 Press the ENTER button. In HDMI/DVI-PC mode, Phase is connected to remove any vertical bars or stripes visible on the screen background. PICTURE SOUND SAP CC ADJUST Resolution Position Size Phase 1024 x 768 1280 x 768 1360 x 768 1366 x 768 Reset D MENU Close FG E Move...
... then use D or E button to select Reset. 2 Press the ENTER button and then use D E F G button to make appropriate adjustments. And the horizontal screen size will also change the resolution, select the proper resolution in present input to left/right and up/down as the main input mode. I The... to select Y e s. 3 Press the ENTER button. In HDMI/DVI-PC mode, Phase is connected to remove any vertical bars or stripes visible on the screen background. PICTURE SOUND SAP CC ADJUST Resolution Position Size Phase 1024 x 768 1280 x 768 1360 x 768 1366 x 768 Reset D MENU Close FG E Move...

Owner's Manual (English)
Page 32
... from any menu. UP/DOWN NUMBER button - (DASH) Used to your TV turns off . MENU BRIGHT + ENTER EXIT TIMER RATIO SIMPLINK VOL MUTE FAV CH 1 2 3 4 5 6 7 8 9 0 BACK 30 BACK Tune to TV. G p.42 SIMPLINK See a list of time before your preference. G p.32 FAV Scroll through the ...the amount of AV devices connected to the last channel viewed. WATCHING TV / CHANNEL CONTROL WATCHING TV / CHANNEL CONTROL REMOTE CONTROL FUNCTIONS When using the remote control, aim it at the screen. TV INPUT POWER TV AUDIO DVD MODE CABLE INPUT VCR STB BRIGHT - MODE Select the remote...
... from any menu. UP/DOWN NUMBER button - (DASH) Used to your TV turns off . MENU BRIGHT + ENTER EXIT TIMER RATIO SIMPLINK VOL MUTE FAV CH 1 2 3 4 5 6 7 8 9 0 BACK 30 BACK Tune to TV. G p.42 SIMPLINK See a list of time before your preference. G p.32 FAV Scroll through the ...the amount of AV devices connected to the last channel viewed. WATCHING TV / CHANNEL CONTROL WATCHING TV / CHANNEL CONTROL REMOTE CONTROL FUNCTIONS When using the remote control, aim it at the screen. TV INPUT POWER TV AUDIO DVD MODE CABLE INPUT VCR STB BRIGHT - MODE Select the remote...

Owner's Manual (English)
Page 33
...preserve environment. 31 G p.61 (*In DTV/CADTV mode G p.62) ADJUST Adjust the screen resolution, position, size and phase. MENU BRIGHT + I Dispose of program. WATCHING TV / CHANNEL CONTROL POWER Turns your TV or any other programmed equipment on or off, depending on the mode. CC Select a closed... caption. TV INPUT In AV 1-2, Component 1-2, RGB-PC, HDMI1/DVI, and HDMI2 input sources, screen returns to 7 meters distance and ...
...preserve environment. 31 G p.61 (*In DTV/CADTV mode G p.62) ADJUST Adjust the screen resolution, position, size and phase. MENU BRIGHT + I Dispose of program. WATCHING TV / CHANNEL CONTROL POWER Turns your TV or any other programmed equipment on or off, depending on the mode. CC Select a closed... caption. TV INPUT In AV 1-2, Component 1-2, RGB-PC, HDMI1/DVI, and HDMI2 input sources, screen returns to 7 meters distance and ...

Owner's Manual (English)
Page 35
... Ratio Caption/Text Caption Option Language ISM Method Low Power SimpLink Plasma TV model only AUDIO Audio Language EZ Sound Balance TV Speaker TIME Auto Clock Manual Clock Off Timer On Timer Sleep Timer Auto Off 33 ON-SCREEN MENUS SELECTION Your TV's OSD (On Screen Display) may differ slightly from what is shown in this...
... Ratio Caption/Text Caption Option Language ISM Method Low Power SimpLink Plasma TV model only AUDIO Audio Language EZ Sound Balance TV Speaker TIME Auto Clock Manual Clock Off Timer On Timer Sleep Timer Auto Off 33 ON-SCREEN MENUS SELECTION Your TV's OSD (On Screen Display) may differ slightly from what is shown in this...
Owner's Manual (English)
Page 36
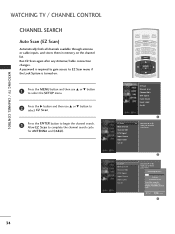
...list. Next MENU Previous 3 34 Allow EZ Scan to stop the current scan and start DIGITAL ANTENNA channel scan. Processing EZ scan... WATCHING TV / CHANNEL CONTROL WATCHING TV / CHANNEL CONTROL CHANNEL SEARCH Auto Scan (EZ Scan) Automatically finds all channels available through antenna or cable inputs, and stores them in ... ID EZ Scan Manual Scan Channel Edit DTV Signal Input Source Input Label Set ID 1 G Selection ( G or ) leads you to the EZ scan screen. EZ Scan Manual Scan Channel Edit DTV Signal Input Source Input Label Set ID 2 Selection ( G or ) leads you to the EZ scan...
...list. Next MENU Previous 3 34 Allow EZ Scan to stop the current scan and start DIGITAL ANTENNA channel scan. Processing EZ scan... WATCHING TV / CHANNEL CONTROL WATCHING TV / CHANNEL CONTROL CHANNEL SEARCH Auto Scan (EZ Scan) Automatically finds all channels available through antenna or cable inputs, and stores them in ... ID EZ Scan Manual Scan Channel Edit DTV Signal Input Source Input Label Set ID 1 G Selection ( G or ) leads you to the EZ scan screen. EZ Scan Manual Scan Channel Edit DTV Signal Input Source Input Label Set ID 2 Selection ( G or ) leads you to the EZ scan...

Owner's Manual (English)
Page 38
...at the top-left corner of that channel number. 5 Press EXIT button to return to TV viewing or press MENU button to return to the channel edit screen. 2 D E 34 36 The heart-mark will now see a screen filled with ENTER button. Both of them are displayed in gray. Press FAV button to add... when a channel is "Favorite List" in the channel list. Use the FAV button on the SETUP menu. You will appear in front of the screen. The channels in the Custom List are displayed in black, and the channels deleted from your own Favorite List. One is "Custom List" and the...
...at the top-left corner of that channel number. 5 Press EXIT button to return to TV viewing or press MENU button to return to the channel edit screen. 2 D E 34 36 The heart-mark will now see a screen filled with ENTER button. Both of them are displayed in gray. Press FAV button to add... when a channel is "Favorite List" in the channel list. Use the FAV button on the SETUP menu. You will appear in front of the screen. The channels in the Custom List are displayed in black, and the channels deleted from your own Favorite List. One is "Custom List" and the...

Owner's Manual (English)
Page 39
... Source Input Label Set ID EZ Scan Manual Scan Channel Edit DTV Signal Input Source Input Label Set ID 1 Bad Normal Good 23 37 TV INPUT POWER TV AUDIO DVD MODE CABLE INPUT VCR STB BRIGHT - DTV Signal: This function is only available when the input signal is DTV or CADTV. 1...and then use D or E button to select the SETUP menu. 2 Press the G button and then use D or E button to select DTV Signal. 3 View the on-screen signal strength monitor to see the quality of the signal being received and indicates whether you are to experience picture degradation. The higher the signal...
... Source Input Label Set ID EZ Scan Manual Scan Channel Edit DTV Signal Input Source Input Label Set ID 1 Bad Normal Good 23 37 TV INPUT POWER TV AUDIO DVD MODE CABLE INPUT VCR STB BRIGHT - DTV Signal: This function is only available when the input signal is DTV or CADTV. 1...and then use D or E button to select the SETUP menu. 2 Press the G button and then use D or E button to select DTV Signal. 3 View the on-screen signal strength monitor to see the quality of the signal being received and indicates whether you are to experience picture degradation. The higher the signal...
Owner's Manual (English)
Page 43
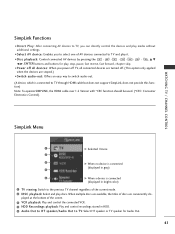
...: Consumer Electronics Control). I Power off all devices: When you power off TV, all connected devices are turned off. (This option only applied when the devices are conveniently dis- played at the bottom of the screen. 3 VCR playback: Play and control the connected VCR. 4 HDD Recordings ...playback: Play and control recordings stored in bright color) 1 TV viewing: Switch to the previous TV channel regardless of the current mode. 2 DISC playback: Select...
...: Consumer Electronics Control). I Power off all devices: When you power off TV, all connected devices are turned off. (This option only applied when the devices are conveniently dis- played at the bottom of the screen. 3 VCR playback: Play and control the connected VCR. 4 HDD Recordings ...playback: Play and control recordings stored in bright color) 1 TV viewing: Switch to the previous TV channel regardless of the current mode. 2 DISC playback: Select...
Owner's Manual (English)
Page 44
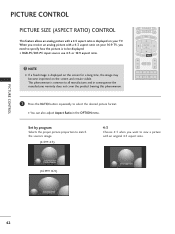
...the source's image. (4:3 4:3) 4:3 Choose 4:3 when you want to view a picture with a 4:3 aspect ratio is displayed on your 16:9 TV, you receive an analog picture with a 4:3 aspect ratio on the screen and remain visible. MENU BRIGHT + ENTER EXIT TIMER RATIO SIMPLINK VOL MUTE FAV CH 1 2 3 4 5 6 1 Press the RATIO ...or 16:9 aspect ratio. ! NOTE G If a fixed image is to be displayed. BRIGHT - Set By Program 4:3 (16:9 16:9) Set By Program 42 When you need to specify how the picture is displayed on the screen for a long time, the image may become imprinted on your...
...the source's image. (4:3 4:3) 4:3 Choose 4:3 when you want to view a picture with a 4:3 aspect ratio is displayed on your 16:9 TV, you receive an analog picture with a 4:3 aspect ratio on the screen and remain visible. MENU BRIGHT + ENTER EXIT TIMER RATIO SIMPLINK VOL MUTE FAV CH 1 2 3 4 5 6 1 Press the RATIO ...or 16:9 aspect ratio. ! NOTE G If a fixed image is to be displayed. BRIGHT - Set By Program 4:3 (16:9 16:9) Set By Program 42 When you need to specify how the picture is displayed on the screen for a long time, the image may become imprinted on your...

Owner's Manual (English)
Page 45
PICTURE CONTROL 16:9 Adjust the picture horizontally, in a linear proportion to fill the entire screen. 16:9 Horizon The screen size is, more enlarged at both vertically extended and cropped. However, the top and bottom portions of the picture will be altered, both sides, to view the picture without any alteration. The picture taking a halfway trade off between alteration and screen coverage. Zoom 1 Zoom 2 Choose Zoom 2 when you want the picture to be cropped. Zoom 2 43 Horizon Zoom 1 Choose Zoom 1 when you want to create a spectacular view.
PICTURE CONTROL 16:9 Adjust the picture horizontally, in a linear proportion to fill the entire screen. 16:9 Horizon The screen size is, more enlarged at both vertically extended and cropped. However, the top and bottom portions of the picture will be altered, both sides, to view the picture without any alteration. The picture taking a halfway trade off between alteration and screen coverage. Zoom 1 Zoom 2 Choose Zoom 2 when you want the picture to be cropped. Zoom 2 43 Horizon Zoom 1 Choose Zoom 1 when you want to create a spectacular view.

Owner's Manual (English)
Page 48
... Night Time User 1 G User 2 Selection ( G or ) leads you to the previous menu. 46 TV INPUT POWER TV AUDIO DVD MODE CABLE INPUT VCR STB BRIGHT - To control the brightness of the screen, adjust the brightness of LCD panel. 5 Press the G button and then use D or E button to... 1 or User 2. 4 Press the G button and then use F or G button to make appropriate adjustments. 6 Press EXIT button to return to TV viewing or press MENU button to return to the detailed setting screen. Contrast E 85 F 23 G G 4 G 5 PICTURE CONTROL MANUAL PICTURE ADJUSTMENT EZ Picture -
... Night Time User 1 G User 2 Selection ( G or ) leads you to the previous menu. 46 TV INPUT POWER TV AUDIO DVD MODE CABLE INPUT VCR STB BRIGHT - To control the brightness of the screen, adjust the brightness of LCD panel. 5 Press the G button and then use D or E button to... 1 or User 2. 4 Press the G button and then use F or G button to make appropriate adjustments. 6 Press EXIT button to return to TV viewing or press MENU button to return to the detailed setting screen. Contrast E 85 F 23 G G 4 G 5 PICTURE CONTROL MANUAL PICTURE ADJUSTMENT EZ Picture -

Owner's Manual (English)
Page 49
...Warm User G Selection ( G or ) leads you to confirm. 4 Red 0 F G E 5 47 User Red 0 Green 0 Blue 0 23 G Press MENU to the detailed setting screen. Color Tone - TV INPUT POWER TV AUDIO DVD MODE CABLE INPUT VCR STB BRIGHT - I The adjustment range of R e d, G r e e n, or B l u e is 20~ +20. 6 Press EXIT ...button to return to TV viewing or press MENU button to return to make appropriate adjustments. User Mode You can also adjust the detailed settings (Red, Green, Blue) by selecting ...
...Warm User G Selection ( G or ) leads you to confirm. 4 Red 0 F G E 5 47 User Red 0 Green 0 Blue 0 23 G Press MENU to the detailed setting screen. Color Tone - TV INPUT POWER TV AUDIO DVD MODE CABLE INPUT VCR STB BRIGHT - I The adjustment range of R e d, G r e e n, or B l u e is 20~ +20. 6 Press EXIT ...button to return to TV viewing or press MENU button to return to make appropriate adjustments. User Mode You can also adjust the detailed settings (Red, Green, Blue) by selecting ...

Owner's Manual (English)
Page 52
... and then use D or E button to the previous menu. 50 TV INPUT POWER TV AUDIO DVD MODE CABLE INPUT VCR STB BRIGHT - BLACK (DARKNESS) LEVEL Adjusting the contrast and the brightness of the screen using the black level of the screen. I Low The screen gets darker. EZ Picture Color Temperature XD Advanced Video Reset 1 EZ...
... and then use D or E button to the previous menu. 50 TV INPUT POWER TV AUDIO DVD MODE CABLE INPUT VCR STB BRIGHT - BLACK (DARKNESS) LEVEL Adjusting the contrast and the brightness of the screen using the black level of the screen. I Low The screen gets darker. EZ Picture Color Temperature XD Advanced Video Reset 1 EZ...


