Brochure
Page 2
... Input Input Labeling Child Lock Closed Caption CONVENIENCE FEATURES Language Auto Tuning/Programming Channel Add/Delete Favorite Channel Programming Auto/Manual Clock On/Off Timer Sleep Timer Auto Off/Auto Sleep 42" Class (42.0" measured diagonally) 1920 x 1080p 120Hz...Rear) 3 (2 Side/1 Rear) 1 (Side) 1 (Rear) 1 (Rear) 1 (Rear) 1 (Rear) 20º • (400mm x 200mm) Standard • 100V ~ 240V, 50/60Hz 42LV4400 42" Class 1080p LED LCD TV PANEL SPECIFICATIONS Screen Size Resolution TruMotion (Frame Rate) Contrast Ratio (DCR) Response Time (GTG) BROADCASTING SYSTEM Analog Digital VIDEO...
... Input Input Labeling Child Lock Closed Caption CONVENIENCE FEATURES Language Auto Tuning/Programming Channel Add/Delete Favorite Channel Programming Auto/Manual Clock On/Off Timer Sleep Timer Auto Off/Auto Sleep 42" Class (42.0" measured diagonally) 1920 x 1080p 120Hz...Rear) 3 (2 Side/1 Rear) 1 (Side) 1 (Rear) 1 (Rear) 1 (Rear) 1 (Rear) 20º • (400mm x 200mm) Standard • 100V ~ 240V, 50/60Hz 42LV4400 42" Class 1080p LED LCD TV PANEL SPECIFICATIONS Screen Size Resolution TruMotion (Frame Rate) Contrast Ratio (DCR) Response Time (GTG) BROADCASTING SYSTEM Analog Digital VIDEO...

Owners Manual
Page 1
operating LED TV MODELS 32LV24QQ-UA 42LV44QQ-UA 47LV44QQ-UA 55LV44QQ-UA P/NO : 194716001150 wwwJg,com iiiii LED TV Please read this manual carefully before your set and retain it for future reference.
operating LED TV MODELS 32LV24QQ-UA 42LV44QQ-UA 47LV44QQ-UA 55LV44QQ-UA P/NO : 194716001150 wwwJg,com iiiii LED TV Please read this manual carefully before your set and retain it for future reference.
Owners Manual
Page 4
... make the TV with something. ® CAUTION concerning the Power Cord: It is , a single outlet circuit which powers only that you turn off this owner's manual to be connected to dripping or splashing and do not drop onto the screen with the power cord plugged in a door, or walked upon a dedicated...
... make the TV with something. ® CAUTION concerning the Power Cord: It is , a single outlet circuit which powers only that you turn off this owner's manual to be connected to dripping or splashing and do not drop onto the screen with the power cord plugged in a door, or walked upon a dedicated...
Owners Manual
Page 8
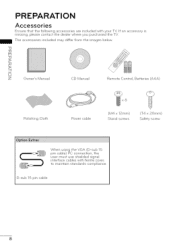
D-sub 15 pin cable 8 if an accessory is missing, please contact the dealer where you purchased the TV. The accessories included may differ from the images below. PREPARATION Accessories Ensure that the following accessories are included with ferrite cores to maintain standards compliance. q3 SO Fq X3 O Z Owner's Manual CD Manual Remote Control, Batteries (AAA) Polishing Cloth Power cable (M4 x 12ram) Stand screws (T4 x 20ram) Safety screw When using the VGA (D-sub 15 pin cable) PC connection, the user must use shielded signal interface cables with your TV.
D-sub 15 pin cable 8 if an accessory is missing, please contact the dealer where you purchased the TV. The accessories included may differ from the images below. PREPARATION Accessories Ensure that the following accessories are included with ferrite cores to maintain standards compliance. q3 SO Fq X3 O Z Owner's Manual CD Manual Remote Control, Batteries (AAA) Polishing Cloth Power cable (M4 x 12ram) Stand screws (T4 x 20ram) Safety screw When using the VGA (D-sub 15 pin cable) PC connection, the user must use shielded signal interface cables with your TV.
Owners Manual
Page 13
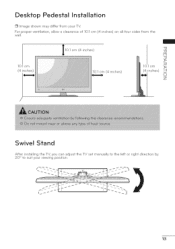
Desktop Pedestal Installation [] Image shown may differ from the wall. 10.1 cm (4 inches) 10.1 cm (4 inches) 10.1 cm (4 inches) Swivel Stand After installing the TV, you can adjust the TV set manually to the left or right direction by 20 ° to suit your TV. For proper ventilation, allow a clearance of 10.1 cm (4 inches) on all four sides from your viewing position. 13
Desktop Pedestal Installation [] Image shown may differ from the wall. 10.1 cm (4 inches) 10.1 cm (4 inches) 10.1 cm (4 inches) Swivel Stand After installing the TV, you can adjust the TV set manually to the left or right direction by 20 ° to suit your TV. For proper ventilation, allow a clearance of 10.1 cm (4 inches) on all four sides from your viewing position. 13
Owners Manual
Page 16
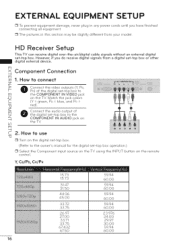
... INPUT button on the digital set -top box to connect Z _> Connect the video outputs (Y, PB, r-- PR) of Z the digital set-top box to the owner's manual for the digital set-top box operation.) [] Select the Component control. cable signals without signals from your model. Match the jack colors C (Y = green, PB : blue...
... INPUT button on the digital set -top box to connect Z _> Connect the video outputs (Y, PB, r-- PR) of Z the digital set-top box to the owner's manual for the digital set-top box operation.) [] Select the Component control. cable signals without signals from your model. Match the jack colors C (Y = green, PB : blue...
Owners Manual
Page 17
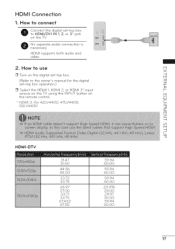
... and video. 2. How to connect Connect the digital set-top box to the owner's manual for the digital K3 set -top box. -H Fq (Refer to HDMI/DVI IN 1, 2, or 3 _ jack on Frl the remote control. i) HDM/ 3: For 42LV4400, 47LV4400, C 55LV4400 -13 Z Frl Z --t 09 Fq ---t C HDMI-DTV 31.47 31.50 44.96...
... and video. 2. How to connect Connect the digital set-top box to the owner's manual for the digital K3 set -top box. -H Fq (Refer to HDMI/DVI IN 1, 2, or 3 _ jack on Frl the remote control. i) HDM/ 3: For 42LV4400, 47LV4400, C 55LV4400 -13 Z Frl Z --t 09 Fq ---t C HDMI-DTV 31.47 31.50 44.96...

Owners Manual
Page 18
... operating instructions. 18 c DVD Setup Component Connection 1. How to use [] Turn on the digital set-top box. (Refer to the owner's manual for the digital set -top box to use [] Turn on the remote [] Refer to the COMPONENT the TV. Connect the audio output of the digital ...
... operating instructions. 18 c DVD Setup Component Connection 1. How to use [] Turn on the digital set-top box. (Refer to the owner's manual for the digital set -top box to use [] Turn on the remote [] Refer to the COMPONENT the TV. Connect the audio output of the digital ...
Owners Manual
Page 19
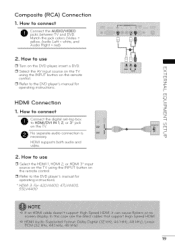
Composite (RCA) Connection 1. For 42LV4400, 55LV4400 47LV4400, _HN_C M i_ sM :: 19 Match the jack colors (Video = yellow, Audio Left = white, and Audio Right = red) 2. HDMI supports both audio and video. ... use [] Select the HDMI 1, HDMI 2, or HDMI 3* input source on the TV using the INPUT button on the remote control. [] Refer to the DVD player's manual for operating instructions. * HDMI 3.. No separate audio connection is necessary. How to use [] Turn on the DVD player, insert a DVD. [] Select the AV input source...
Composite (RCA) Connection 1. For 42LV4400, 55LV4400 47LV4400, _HN_C M i_ sM :: 19 Match the jack colors (Video = yellow, Audio Left = white, and Audio Right = red) 2. HDMI supports both audio and video. ... use [] Select the HDMI 1, HDMI 2, or HDMI 3* input source on the TV using the INPUT button on the remote control. [] Refer to the DVD player's manual for operating instructions. * HDMI 3.. No separate audio connection is necessary. How to use [] Turn on the DVD player, insert a DVD. [] Select the AV input source...
Owners Manual
Page 20
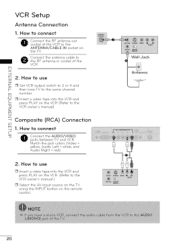
... the AV input source on the TV using the INPUT button on the VCR. (Refer to the -0 VCR owner's manual). How fo connect Connection C -8 Connect the AUDIO/VIDEO jacks between TV and VCR. VCR Setup Antenna Connection 1. IN socket on Connect the antenna cable to 3 ...
... the AV input source on the TV using the INPUT button on the VCR. (Refer to the -0 VCR owner's manual). How fo connect Connection C -8 Connect the AUDIO/VIDEO jacks between TV and VCR. VCR Setup Antenna Connection 1. IN socket on Connect the antenna cable to 3 ...
Owners Manual
Page 22
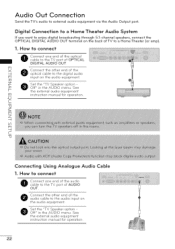
... on the back of the audio cable to external audio equipment via the Audio Output port. the external audio equipment Fq instruction manual for operation. 22 How fo connect Audio Cable 0 Connect one end of the audio cable to the TV port of AUDIO ... Speaker option Off" in the AUDIO menu. How fo connect O caobnlenectto tohnee TVendporotf tohfe OoPpTtiIcCaAl L DIGITAL AUDIO OUT. See the external audio equipment instruction manual for operation. _D C q3 Z Fq Z -4 6O Fq -4 C -8 Connecting Using Analogue 1. Digital Connection fo a Home Theater Audio System if you...
... on the back of the audio cable to external audio equipment via the Audio Output port. the external audio equipment Fq instruction manual for operation. 22 How fo connect Audio Cable 0 Connect one end of the audio cable to the TV port of AUDIO ... Speaker option Off" in the AUDIO menu. How fo connect O caobnlenectto tohnee TVendporotf tohfe OoPpTtiIcCaAl L DIGITAL AUDIO OUT. See the external audio equipment instruction manual for operation. _D C q3 Z Fq Z -4 6O Fq -4 C -8 Connecting Using Analogue 1. Digital Connection fo a Home Theater Audio System if you...
Owners Manual
Page 28
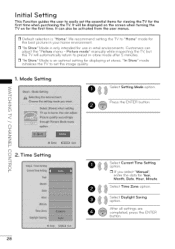
... TV. We recommend the best picture in -store mode after 5 minutes. [] "In Store" Mode is "Home". Mode Setting © T Z © -H © T ]> Z Z Fq r-- © 0 2. Picture mode" manually while inspecting the TV, but the TV will be activated from the user menus. [] Default selection is an optimal setting for Year, Month, Date, Hour... settings are completed, press the ENTER button. 28 it can adjust the "Picture menu - Press the ENTER button. 0 _ _ Select current Time Settingoption. [] If you select "Manual", enter the data for displaying at stores.
... TV. We recommend the best picture in -store mode after 5 minutes. [] "In Store" Mode is "Home". Mode Setting © T Z © -H © T ]> Z Z Fq r-- © 0 2. Picture mode" manually while inspecting the TV, but the TV will be activated from the user menus. [] Default selection is an optimal setting for Year, Month, Date, Hour... settings are completed, press the ENTER button. 28 it can adjust the "Picture menu - Press the ENTER button. 0 _ _ Select current Time Settingoption. [] If you select "Manual", enter the data for displaying at stores.

Owners Manual
Page 30
the current Select a menu item. C bO -4 Z Fq Z -4 6O 3O Display each menu. O Return to TV viewing. Z Fq Z C _> C_. MENU ADJUSTMENTS On-Screen Menus Selection Your TV's OSD (On Screen Display) may differ slightly from that shown in this manual. AV Aseclceecptiton.
the current Select a menu item. C bO -4 Z Fq Z -4 6O 3O Display each menu. O Return to TV viewing. Z Fq Z C _> C_. MENU ADJUSTMENTS On-Screen Menus Selection Your TV's OSD (On Screen Display) may differ slightly from that shown in this manual. AV Aseclceecptiton.
Owners Manual
Page 31
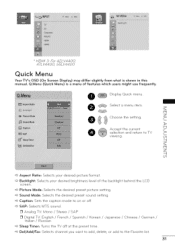
Q.Menu (Quick Menu) is shown in this manual. Z Fq Z Choose the setting. * HDMI 3: For 42LV4400, 47LV4400, ££LV4400 Quick Menu Your TV's OSD (On Screen Display) may differ slightly from what is a menu of the backlight screen. bO Z Fq Z ...
Q.Menu (Quick Menu) is shown in this manual. Z Fq Z Choose the setting. * HDMI 3: For 42LV4400, 47LV4400, ££LV4400 Quick Menu Your TV's OSD (On Screen Display) may differ slightly from what is a menu of the backlight screen. bO Z Fq Z ...
Owners Manual
Page 32
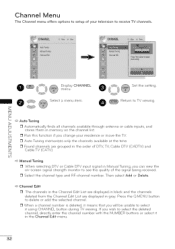
.... C bO [] Run this function if you will be unable to see the quality of DTV, TV, Cable DTV (CADTV) and Z Cable TV (CATV). --j 6O _> Manual Tuning [] When selecting DTV or Cable DTV input signal in gray. Then select Add or Delete. '_ Channel Edit [] The channels in the Channel Edit List... finds all channels available through antenna or cable inputs, and L_ stores them in the Channel Edit menu. 32 Fq [] Found channels are displayed in Manual Tuning, you can view the on the channel list. Select a menu item. Press the QMENU button to delete or add the selected channel. [] When a...
.... C bO [] Run this function if you will be unable to see the quality of DTV, TV, Cable DTV (CADTV) and Z Cable TV (CATV). --j 6O _> Manual Tuning [] When selecting DTV or Cable DTV input signal in gray. Then select Add or Delete. '_ Channel Edit [] The channels in the Channel Edit List... finds all channels available through antenna or cable inputs, and L_ stores them in the Channel Edit menu. 32 Fq [] Found channels are displayed in Manual Tuning, you can view the on the channel list. Select a menu item. Press the QMENU button to delete or add the selected channel. [] When a...
Owners Manual
Page 33
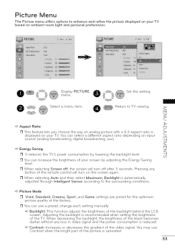
You can select a different aspect ratio depending on your TV. Adjusting the backlight is saturated. 33 You may use a preset, change each setting manually. _> Backlight: This function adjusts the brightness of the backlight behind the LCD screen. Picture Menu The Picture menu offers options to TV viewing. Z Fq _> Energy ...
You can select a different aspect ratio depending on your TV. Adjusting the backlight is saturated. 33 You may use a preset, change each setting manually. _> Backlight: This function adjusts the brightness of the backlight behind the LCD screen. Picture Menu The Picture menu offers options to TV viewing. Z Fq _> Energy ...
Owners Manual
Page 35
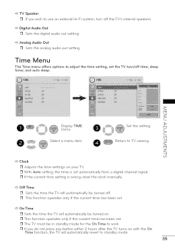
... on with the On Time function, the TV will automatically be turned on your TV. [] With Auto setting, the time is wrong, reset the clock manually. time, sleep • ©® Z Fq Z C ]> Set the L_ _@ setting.
... on with the On Time function, the TV will automatically be turned on your TV. [] With Auto setting, the time is wrong, reset the clock manually. time, sleep • ©® Z Fq Z C ]> Set the L_ _@ setting.

Owners Manual
Page 43
...(Changethe directionof the antenna). [] If an HDMIcabledoesn'tsupportHighSpeedHDMI,it up properly. Check the signal cable. _> q3 i : [] Reinstall the PC video card. q3 Fq Z [] Check the manual for the video card in the PC to see if it supports HDMI audio and how to set it can causeflickersor no screendisplay.Inthis caseusethe...
...(Changethe directionof the antenna). [] If an HDMIcabledoesn'tsupportHighSpeedHDMI,it up properly. Check the signal cable. _> q3 i : [] Reinstall the PC video card. q3 Fq Z [] Check the manual for the video card in the PC to see if it supports HDMI audio and how to set it can causeflickersor no screendisplay.Inthis caseusethe...


