Owner's Manual
Page 1
LCD TV OWNER'S MANUAL 19LH20R 22LH20R 26LH20R 32LH20R 37LH20R 42LH20R 32LF20FR 42LF20FR 32LH30FR 37LH30FR 42LH30FR 47LH30FR 42LH50YR 47LH50YR 55LH50YR 19LU50R 22LU50FR 26LU50FR 32LH70YR 42LH70YR 47LH70YR 42LH90QR 47LH90QR Please read this manual carefully before operating your set and retain it below should you ever need service. Record it for future reference. Model: Serial: P/NO : MFL58486305 (0905-REV07) www.lge.com The model and serial number of the TV is located on the back and one side of the TV.
LCD TV OWNER'S MANUAL 19LH20R 22LH20R 26LH20R 32LH20R 37LH20R 42LH20R 32LF20FR 42LF20FR 32LH30FR 37LH30FR 42LH30FR 47LH30FR 42LH50YR 47LH50YR 55LH50YR 19LU50R 22LU50FR 26LU50FR 32LH70YR 42LH70YR 47LH70YR 42LH90QR 47LH90QR Please read this manual carefully before operating your set and retain it below should you ever need service. Record it for future reference. Model: Serial: P/NO : MFL58486305 (0905-REV07) www.lge.com The model and serial number of the TV is located on the back and one side of the TV.

Owner's Manual
Page 4
...unplug it to telephone wires, lightening rods, or gas pipes. Do not make sure 12 not to install the TV by the hanging power and signal cables on shelves above the unit). 17 GROUNDING Ensure that is the disconnecting device... attention to plugs, wall outlets, and the point where the cord exits the appliance. Owner Manual 15 WARNING - To reduce the risk of the TV. 13 Do not allow an impact shock or any objects to fall into the product, and...or antenna during a thunder or lighting storm. SAFETY INSTRUCTIONS 11 Never touch this owner's manual to be certain. a TV with wet hands.
...unplug it to telephone wires, lightening rods, or gas pipes. Do not make sure 12 not to install the TV by the hanging power and signal cables on shelves above the unit). 17 GROUNDING Ensure that is the disconnecting device... attention to plugs, wall outlets, and the point where the cord exits the appliance. Owner Manual 15 WARNING - To reduce the risk of the TV. 13 Do not allow an impact shock or any objects to fall into the product, and...or antenna during a thunder or lighting storm. SAFETY INSTRUCTIONS 11 Never touch this owner's manual to be certain. a TV with wet hands.

Owner's Manual
Page 6
... CONTROL Remote Control Functions 43 Turning On the TV 46 Channel Selection 46 Volume Adjustment 46 Initializing Setup (Mode Setting 47 On-Screen Menus Selection 48 Quick Menu 49 Channel Setup - Add / Delete Channel (Manual Tuning 51 - Channel Editing 52 Channel List 53 Favorite Channel Setup 54 ...Favorite Channel List 55 Input List 56 Input Label 57 AV Mode 58 Key Lock 59 SIMPLINK 60 BLUETOOTH Bluetooth? 62 Setting the bluetooth 63 Set TV PIN 64 Bluetooth headset 65 ...
... CONTROL Remote Control Functions 43 Turning On the TV 46 Channel Selection 46 Volume Adjustment 46 Initializing Setup (Mode Setting 47 On-Screen Menus Selection 48 Quick Menu 49 Channel Setup - Add / Delete Channel (Manual Tuning 51 - Channel Editing 52 Channel List 53 Favorite Channel Setup 54 ...Favorite Channel List 55 Input List 56 Input Label 57 AV Mode 58 Key Lock 59 SIMPLINK 60 BLUETOOTH Bluetooth? 62 Setting the bluetooth 63 Set TV PIN 64 Bluetooth headset 65 ...

Owner's Manual
Page 9
...the following accessories are included with all models.) scratch or discoloration. Owner's Manual 1 4 AV MROADTEIO 2 POWER ENERGYINSAPVUINGT 753 LIST 8 6 09 VOL ...CH P A G E Remote Control 1.5V 1.5V Batteries (Some models) Power Cord * Wipe spots on the TV assembly side. (sold separately) With guide spacer Without guide spacer 12mm 12mm 9 You must connect it to the antenna... (Refer to P.19) Cable Holder (Refer to P.23) Cable Management Clip Protection Cover For 26/32/37/42LH20R, 32/37/42/47LH30FR, 42/47/55LH50YR, 42/47LH90QR (Except 55LH50YR) x 4 Bolts for stand assembly (...
...the following accessories are included with all models.) scratch or discoloration. Owner's Manual 1 4 AV MROADTEIO 2 POWER ENERGYINSAPVUINGT 753 LIST 8 6 09 VOL ...CH P A G E Remote Control 1.5V 1.5V Batteries (Some models) Power Cord * Wipe spots on the TV assembly side. (sold separately) With guide spacer Without guide spacer 12mm 12mm 9 You must connect it to the antenna... (Refer to P.19) Cable Holder (Refer to P.23) Cable Management Clip Protection Cover For 26/32/37/42LH20R, 32/37/42/47LH30FR, 42/47/55LH50YR, 42/47LH90QR (Except 55LH50YR) x 4 Bolts for stand assembly (...
Owner's Manual
Page 21
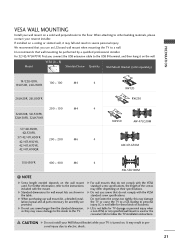
... for wall mount kits are provided. G Standard dimensions for these kinds of the screws may damage the TV or cause the TV to a fall and result in severe personal injury. G LG is not liable for assembly are shown in per- NOTE G Screw length needed depends on the wall... Install your wall mount on a solid wall perpendicular to the TV. When attaching to other building materials, please contact your nearest installer. G When purchasing our wall mount kit, a detailed installation manual and all parts necessary for TV damage or personal injury when a non-VESA or non specified ...
... for wall mount kits are provided. G Standard dimensions for these kinds of the screws may damage the TV or cause the TV to a fall and result in severe personal injury. G LG is not liable for assembly are shown in per- NOTE G Screw length needed depends on the wall... Install your wall mount on a solid wall perpendicular to the TV. When attaching to other building materials, please contact your nearest installer. G When purchasing our wall mount kit, a detailed installation manual and all parts necessary for TV damage or personal injury when a non-VESA or non specified ...

Owner's Manual
Page 24
..., 19LU50R, 22/26LU50FR) After installing the TV, you can adjust the TV manually to suit your viewing position. NOTE G 19LU50R, 22/26LU50FR have a fixed stand type without the tilt and swivel features so excessive pressure may damage the TV. 24 G Do not mount near or ... POSITIONING YOUR DISPLAY (For 19/22LH20R) I Here shown may be somewhat different from your TV. I Adjust the position of heat source. PREPARATION PREPARATION DESKTOP PEDESTAL INSTALLATION I Image shown may differ from your TV. For proper ventilation, allow a clearance of 4 inches on all four sides from the wall...
..., 19LU50R, 22/26LU50FR) After installing the TV, you can adjust the TV manually to suit your viewing position. NOTE G 19LU50R, 22/26LU50FR have a fixed stand type without the tilt and swivel features so excessive pressure may damage the TV. 24 G Do not mount near or ... POSITIONING YOUR DISPLAY (For 19/22LH20R) I Here shown may be somewhat different from your TV. I Adjust the position of heat source. PREPARATION PREPARATION DESKTOP PEDESTAL INSTALLATION I Image shown may differ from your TV. For proper ventilation, allow a clearance of 4 inches on all four sides from the wall...
Owner's Manual
Page 28
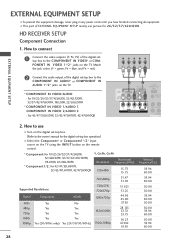
I This part of EXTERNAL EQUIPMENT SETUP mainly use I Turn on the digital set-top box. (Refer to the owner's manual for 26/32/37/42LH20R. Match the jack colors (Y = green, PB = blue, and PR = red). HD RECEIVER SETUP Component Connection 1. Y PB PR L R 2 Connect the audio output of... damage, never plug in any power cords until you have finished connecting all equipment. PONENT IN VIDEO 1*/2* jacks on the TV. * COMPONENT IN VIDEO/AUDIO : For 19/22/26/32/37/42LH20R, 32/42LF20FR, 32/37/42/47LH30FR, 19LU50R, 22/26LU50FR * COMPONENT IN VIDEO 1/AUDIO 1, COMPONENT IN VIDEO 2/AUDIO 2...
I This part of EXTERNAL EQUIPMENT SETUP mainly use I Turn on the digital set-top box. (Refer to the owner's manual for 26/32/37/42LH20R. Match the jack colors (Y = green, PB = blue, and PR = red). HD RECEIVER SETUP Component Connection 1. Y PB PR L R 2 Connect the audio output of... damage, never plug in any power cords until you have finished connecting all equipment. PONENT IN VIDEO 1*/2* jacks on the TV. * COMPONENT IN VIDEO/AUDIO : For 19/22/26/32/37/42LH20R, 32/42LF20FR, 32/37/42/47LH30FR, 19LU50R, 22/26LU50FR * COMPONENT IN VIDEO 1/AUDIO 1, COMPONENT IN VIDEO 2/AUDIO 2...
Owner's Manual
Page 29
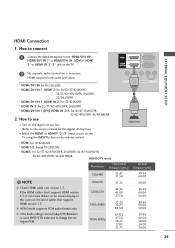
.../DTS/Bitstream in some DVDP/STB, make sure to change the setting to the owner's manual for the digital set-top box.) I Select the HDMI* or HDMI1*/2*/3* input source on the TV using the INPUT button on the TV. HDMI supports both audio and video. * HDMI/DVI IN: For 19/22LH20R * HDMI/DVI... IN 1, HDMI 2: For 26/32/37/42LH20R, 32/37/42/47LH30FR, 19LU50R, 22/26LU50FR * HDMI/DVI IN 1, HDMI IN...
.../DTS/Bitstream in some DVDP/STB, make sure to change the setting to the owner's manual for the digital set-top box.) I Select the HDMI* or HDMI1*/2*/3* input source on the TV using the INPUT button on the TV. HDMI supports both audio and video. * HDMI/DVI IN: For 19/22LH20R * HDMI/DVI... IN 1, HDMI 2: For 26/32/37/42LH20R, 32/37/42/47LH30FR, 19LU50R, 22/26LU50FR * HDMI/DVI IN 1, HDMI IN...
Owner's Manual
Page 30
... required for the digital set-top box.) I Select the HDMI*, or HDMI1* input source on the TV using the INPUT button on the TV. * HDMI/DVI IN: For 19/22LH20R * HDMI/DVI IN 1: For 26/32/37/42LH20R, 32/42LF20FR, 32/37/42/47LH30FR, 19LU50R, 22/26LU50FR * HDMI/DVI IN 1(DVI): For 42... set-top box. (Refer to HDMI Connection 1. NOTE G A DVI to PCM. 30 G HDMI mode supports PCM audio format only. How to use I Turn on the TV. 2 Connect the digital set to Dolby/DTS/Bitstream in some DVDP/STB, make sure to change the setting to HDMI cable or adapter is necessary...
... required for the digital set-top box.) I Select the HDMI*, or HDMI1* input source on the TV using the INPUT button on the TV. * HDMI/DVI IN: For 19/22LH20R * HDMI/DVI IN 1: For 26/32/37/42LH20R, 32/42LF20FR, 32/37/42/47LH30FR, 19LU50R, 22/26LU50FR * HDMI/DVI IN 1(DVI): For 42... set-top box. (Refer to HDMI Connection 1. NOTE G A DVI to PCM. 30 G HDMI mode supports PCM audio format only. How to use I Turn on the TV. 2 Connect the digital set to Dolby/DTS/Bitstream in some DVDP/STB, make sure to change the setting to HDMI cable or adapter is necessary...

Owner's Manual
Page 31
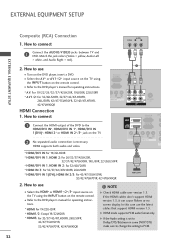
...Connect the video outputs (Y, PB, PR) of the DVD to the COMPO- I Select the Component* or Component1*/2* input source on the TV using the INPUT button on the TV. Y PB PR L R 2 Connect the audio outputs of the DVD to the component input ports as shown below. I Turn on ..., and PR = red). EXTERNAL EQUIPMENT SETUP DVD SETUP Component Connection 1. How to use I Refer to the DVD player's manual for operating instructions. * Component: For 19/22/26/32/37/42LH20R, 32/42LF20FR, 32/37/42/47LH30FR, 19LU50R, 22/26LU50FR * Component1/2: For 42/47/55LH50YR, 32/42/47LH70YR, 42/...
...Connect the video outputs (Y, PB, PR) of the DVD to the COMPO- I Select the Component* or Component1*/2* input source on the TV using the INPUT button on the TV. Y PB PR L R 2 Connect the audio outputs of the DVD to the component input ports as shown below. I Turn on ..., and PR = red). EXTERNAL EQUIPMENT SETUP DVD SETUP Component Connection 1. How to use I Refer to the DVD player's manual for operating instructions. * Component: For 19/22/26/32/37/42LH20R, 32/42LF20FR, 32/37/42/47LH30FR, 19LU50R, 22/26LU50FR * Component1/2: For 42/47/55LH50YR, 32/42/47LH70YR, 42/...
Owner's Manual
Page 32
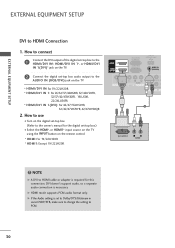
... the INPUT button on the TV. 2 No separated audio connection is set to Dolby/DTS/Bitstream in some DVDP/STB, make sure to change the setting to the DVD player's manual for operating instructions. * HDMI: For 19/22LH20R * HDMI1/2: Except 19/22LH20R * HDMI3: For 32/37/42/47LH30FR, 26LU50FR, 42/47/55LH50YR... G Check HDMI cable over version 1.3. HDMI supports both audio and video. * HDMI/DVI IN: For 19/22LH20R * HDMI/DVI IN 1, HDMI 2: For 26/32/37/42LH20R, 32/37/42/47LH30FR, 19LU50R, 22/26LU50FR * HDMI/DVI IN 1, HDMI IN 2: For 32/42LF20FR * HDMI IN 3: For 32/37/42/47LH30FR, 26LU50FR * HDMI/DVI...
... the INPUT button on the TV. 2 No separated audio connection is set to Dolby/DTS/Bitstream in some DVDP/STB, make sure to change the setting to the DVD player's manual for operating instructions. * HDMI: For 19/22LH20R * HDMI1/2: Except 19/22LH20R * HDMI3: For 32/37/42/47LH30FR, 26LU50FR, 42/47/55LH50YR... G Check HDMI cable over version 1.3. HDMI supports both audio and video. * HDMI/DVI IN: For 19/22LH20R * HDMI/DVI IN 1, HDMI 2: For 26/32/37/42LH20R, 32/37/42/47LH30FR, 19LU50R, 22/26LU50FR * HDMI/DVI IN 1, HDMI IN 2: For 32/42LF20FR * HDMI IN 3: For 32/37/42/47LH30FR, 26LU50FR * HDMI/DVI...

Owner's Manual
Page 33
How to the same channel number. I Set VCR output switch to 3 or 4 and then tune TV to use I Insert a video tape into the VCR and press PLAY on the TV. How to the VCR owner's manual.) 1 ANT OUT S-VIDEO VIDEO L R ANT IN OUTPUT SWITCH Wall Jack 2 Antenna 33 EXTERNAL EQUIPMENT SETUP VCR SETUP Antenna Connection 1. T ANTENNA IN 2 Connect the antenna cable to the RF antenna in socket of the VCR to the ANTENNA IN socket on the VCR. (Refer to connect 1 Connect the RF antenna out socket of the VCR. 2.
How to the same channel number. I Set VCR output switch to 3 or 4 and then tune TV to use I Insert a video tape into the VCR and press PLAY on the TV. How to the VCR owner's manual.) 1 ANT OUT S-VIDEO VIDEO L R ANT IN OUTPUT SWITCH Wall Jack 2 Antenna 33 EXTERNAL EQUIPMENT SETUP VCR SETUP Antenna Connection 1. T ANTENNA IN 2 Connect the antenna cable to the RF antenna in socket of the VCR to the ANTENNA IN socket on the VCR. (Refer to connect 1 Connect the RF antenna out socket of the VCR. 2.

Owner's Manual
Page 34
How to the AUDIO L/(MONO)* or AUDIO L/MONO* jack of the TV. * AUDIO L/(MONO): For 19/22/26/32/37/42LH20R, 32/42LF20FR, 32/37/42/47LH30FR, 19LU50R, 22/26LU50FR, 42/47/55LH50YR, 42/47LH90QR * AUDIO L/MONO: For 32/42/47LH70YR 34 NOTE G If you have a ... tape into the VCR and press PLAY on the VCR. (Refer to the VCR owner's manual.) I Select the A V* or A V 1*/2* input source on the TV using the INPUT button on the remote control. * A V: For 19/22/26/32/37/42LH20R, 19LU50R, 22LU50FR * A V 1/2: For 32/42LF20FR, 32/37/42/47LH30FR, 26LU50FR, 42/47/55LH50YR, 32...
How to the AUDIO L/(MONO)* or AUDIO L/MONO* jack of the TV. * AUDIO L/(MONO): For 19/22/26/32/37/42LH20R, 32/42LF20FR, 32/37/42/47LH30FR, 19LU50R, 22/26LU50FR, 42/47/55LH50YR, 42/47LH90QR * AUDIO L/MONO: For 32/42/47LH70YR 34 NOTE G If you have a ... tape into the VCR and press PLAY on the VCR. (Refer to the VCR owner's manual.) I Select the A V* or A V 1*/2* input source on the TV using the INPUT button on the remote control. * A V: For 19/22/26/32/37/42LH20R, 19LU50R, 22LU50FR * A V 1/2: For 32/42LF20FR, 32/37/42/47LH30FR, 26LU50FR, 42/47/55LH50YR, 32...

Owner's Manual
Page 42
...L(MONO) AUDIO R OUT VARIABLE AUDIO OUT ANTENNA IN AV MONITOR OUT The TV has a special signal output capability which allows you to the TV's VARIABLE AUDIO OUT jacks. VIDEO L R See the Operating Manual of the second TV or monitor 2 for VCR recording. NOTE G Component, RGB, HDMI input ...sources cannot be used for AV out. fier, according to external audio equipment via the Audio Output port. 1. AUDIO L R 2 Set up the second TV or monitor. 1. How to ...
...L(MONO) AUDIO R OUT VARIABLE AUDIO OUT ANTENNA IN AV MONITOR OUT The TV has a special signal output capability which allows you to the TV's VARIABLE AUDIO OUT jacks. VIDEO L R See the Operating Manual of the second TV or monitor 2 for VCR recording. NOTE G Component, RGB, HDMI input ...sources cannot be used for AV out. fier, according to external audio equipment via the Audio Output port. 1. AUDIO L R 2 Set up the second TV or monitor. 1. How to ...

Owner's Manual
Page 47
... ENTER Step2. Previous Next 1 ENTER Start Auto Tuning. 47 Picture Mode" manually while inspecting the TV, but the TV will be displayed on the screen when turning the TV on for the first time when purchasing the TV. Step1. Thank you for the best picture in retail environments. It can ...environment. Mode Setting WELCOME WELCOME! Store Demo Home Use Select [Home Use] to use this TV at store, select [Store Demo]. We recommend setting the TV to "Home Use" mode for choosing LG Next 1 ENTER Mode Setting Selecting the environment. Welcome Step3. It will automatically return to ...
... ENTER Step2. Previous Next 1 ENTER Start Auto Tuning. 47 Picture Mode" manually while inspecting the TV, but the TV will be displayed on the screen when turning the TV on for the first time when purchasing the TV. Step1. Thank you for the best picture in retail environments. It can ...environment. Mode Setting WELCOME WELCOME! Store Demo Home Use Select [Home Use] to use this TV at store, select [Store Demo]. We recommend setting the TV to "Home Use" mode for choosing LG Next 1 ENTER Mode Setting Selecting the environment. Welcome Step3. It will automatically return to ...

Owner's Manual
Page 48
...0000 Bluetooth Headset : Disconnected Registered Bluetooth Device My Bluetooth Info. Select a menu item. 3 ENTER Accept the current selection. 4 Return to TV viewing. CHANNEL Auto Tuning Manual Tuning Channel Edit Move Enter PICTURE Move Enter Aspect Ratio : 16:9 Energy Saving : Off Picture Mode : Vivid • Backlight 100 ...Timer : Off : Off : Off WATCHING TV / CHANNEL CONTROL INPUT TV AV Component RGB-PC HDMI1 HDMI2 Move Enter TV AV1 AV2 Component RGB-PC HDMI1 HDMI2 For 19/22/26/32/37/42LH20R, 19LU50R, 22LU50FR For 32/42LF20FR TV AV1 AV2 Component RGB-PC HDMI1 HDMI2 ...
...0000 Bluetooth Headset : Disconnected Registered Bluetooth Device My Bluetooth Info. Select a menu item. 3 ENTER Accept the current selection. 4 Return to TV viewing. CHANNEL Auto Tuning Manual Tuning Channel Edit Move Enter PICTURE Move Enter Aspect Ratio : 16:9 Energy Saving : Off Picture Mode : Vivid • Backlight 100 ...Timer : Off : Off : Off WATCHING TV / CHANNEL CONTROL INPUT TV AV Component RGB-PC HDMI1 HDMI2 Move Enter TV AV1 AV2 Component RGB-PC HDMI1 HDMI2 For 19/22/26/32/37/42LH20R, 19LU50R, 22LU50FR For 32/42LF20FR TV AV1 AV2 Component RGB-PC HDMI1 HDMI2 ...

Owner's Manual
Page 49
...: Selects the factory preset picture depend on or off automatically. I Aspect Ratio: Selects your TV turns off . I Del/Add/Fav: Select channel you want to add/delete or add the channel to TV viewing. I Caption/Text: Select on the viewing environment. I SAP: Selects MTS sound. ...Close For 19/22/26/32/37/42LH20R, 32/42LF20FR, 19LU50R, 22/26LU50FR Display each menu. 2 Make appropriate adjustments. 3 Q.MENU Return to the Favorite List. I USB Device: Select "Eject" in this manual. WATCHING TV / CHANNEL CONTROL QUICK MENU Your TV's OSD (On Screen Display) may differ...
...: Selects the factory preset picture depend on or off automatically. I Aspect Ratio: Selects your TV turns off . I Del/Add/Fav: Select channel you want to add/delete or add the channel to TV viewing. I Caption/Text: Select on the viewing environment. I SAP: Selects MTS sound. ...Close For 19/22/26/32/37/42LH20R, 32/42LF20FR, 19LU50R, 22/26LU50FR Display each menu. 2 Make appropriate adjustments. 3 Q.MENU Return to the Favorite List. I USB Device: Select "Eject" in this manual. WATCHING TV / CHANNEL CONTROL QUICK MENU Your TV's OSD (On Screen Display) may differ...

Owner's Manual
Page 50
... list. Select Auto Tuning. 3 ENTER Select Start. 4 ENTER Run A u t o t u n i n g. 5 Return to TV viewing. The previous channel information will be updated during Auto Tuning. Yes Close 1 MENU 2 ENTER Select CHANNEL. CHANNEL Auto Tuning Manual Tuning Channel Edit Move Enter CHANNEL Auto Tuning Manual Tuning Channel Edit Move Enter Check your antenna connection. MENU 50...
... list. Select Auto Tuning. 3 ENTER Select Start. 4 ENTER Run A u t o t u n i n g. 5 Return to TV viewing. The previous channel information will be updated during Auto Tuning. Yes Close 1 MENU 2 ENTER Select CHANNEL. CHANNEL Auto Tuning Manual Tuning Channel Edit Move Enter CHANNEL Auto Tuning Manual Tuning Channel Edit Move Enter Check your antenna connection. MENU 50...

Owner's Manual
Page 51
ENTER Select A d d or D e l e t e. 6 Return to add or delete. MENU 51 Select channel you want to the previous menu. RETURN Return to TV viewing. WATCHING TV / CHANNEL CONTROL Add/Delete Channel (Manual Tuning) CHANNEL Auto Tuning Manual Tuning Channel Edit Move Enter CHANNEL Auto Tuning Manual Tuning Channel Edit Move Enter F TV G Select channel type and RF-channel number. Channel 2 TV 2 Delete Close 1 MENU 2 ENTER Select CHANNEL. Select Manual Tuning. 3 ENTER 4 5 Select T V or C A T V.
ENTER Select A d d or D e l e t e. 6 Return to add or delete. MENU 51 Select channel you want to the previous menu. RETURN Return to TV viewing. WATCHING TV / CHANNEL CONTROL Add/Delete Channel (Manual Tuning) CHANNEL Auto Tuning Manual Tuning Channel Edit Move Enter CHANNEL Auto Tuning Manual Tuning Channel Edit Move Enter F TV G Select channel type and RF-channel number. Channel 2 TV 2 Delete Close 1 MENU 2 ENTER Select CHANNEL. Select Manual Tuning. 3 ENTER 4 5 Select T V or C A T V.

Owner's Manual
Page 52
...channel number is deleted, it means that you will be unable to add or delete. Return to the previous menu. CHANNEL Auto Tuning Manual Tuning Channel Edit Move Enter 2 TV CATV 2 4 6 9 11 13 14 30 51 63 Add/Delete Move CH Page Change MENU Exit Previous 1 MENU 2 ENTER Select... CHANNEL. WATCHING TV / CHANNEL CONTROL WATCHING TV / CHANNEL CONTROL Channel Editing The channels in the Channel Edit List are displayed in black and the channels deleted from the Channel Edit...
...channel number is deleted, it means that you will be unable to add or delete. Return to the previous menu. CHANNEL Auto Tuning Manual Tuning Channel Edit Move Enter 2 TV CATV 2 4 6 9 11 13 14 30 51 63 Add/Delete Move CH Page Change MENU Exit Previous 1 MENU 2 ENTER Select... CHANNEL. WATCHING TV / CHANNEL CONTROL WATCHING TV / CHANNEL CONTROL Channel Editing The channels in the Channel Edit List are displayed in black and the channels deleted from the Channel Edit...


