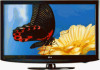
Owners Manual
Page 6
... 51 Entry Modes 54 Photo List 55 Music List 59 Picture Size (Aspect Ratio) Control 62 Picture Wizard 64 Preset Picture Settings (Picture Mode 66 Manual Picture Adjustment - User Mode .......... 67 Picture Improvement Technology 68 Expert Picture Control 69 Energy Saving 72 Picture Reset 73 Power Indicator 74 Demo Mode 75 Remote Control...stand 18 Antenna or Cable Connection 19 HD Receiver Setup 20 DVD Setup 23 VCR Setup 25 Other A/V Source Setup 27 USB Connection 28 Audio out Connection 29 PC Setup 30 Channel Setup - Add / Delete Channel (Manual Tuning) ...... 43 -
... 51 Entry Modes 54 Photo List 55 Music List 59 Picture Size (Aspect Ratio) Control 62 Picture Wizard 64 Preset Picture Settings (Picture Mode 66 Manual Picture Adjustment - User Mode .......... 67 Picture Improvement Technology 68 Expert Picture Control 69 Energy Saving 72 Picture Reset 73 Power Indicator 74 Demo Mode 75 Remote Control...stand 18 Antenna or Cable Connection 19 HD Receiver Setup 20 DVD Setup 23 VCR Setup 25 Other A/V Source Setup 27 USB Connection 28 Audio out Connection 29 PC Setup 30 Channel Setup - Add / Delete Channel (Manual Tuning) ...... 43 -

Owners Manual
Page 8
...HDMI Licensing LLC." High-resolution digital toeflervoisuigohnly baromadilclioanst oar nmd oprelaypbiaxcekls, sy1s6t:e9mascpoemcpt-orasetiod screens, and AC3 digital audio. DOLBY DIGITAL I Manufactured under CLEAR VOICE II Automatically enhances and amplifies the sound of the film for professional certification by the user to experience the best their LG HDTV...and "night" modes will then be made through the ISFccc mode. TruSurround XT technology is three preset picture and audio settings. under license from SRS Labs, Inc. It includes Cinema, Sports, and Game ...
...HDMI Licensing LLC." High-resolution digital toeflervoisuigohnly baromadilclioanst oar nmd oprelaypbiaxcekls, sy1s6t:e9mascpoemcpt-orasetiod screens, and AC3 digital audio. DOLBY DIGITAL I Manufactured under CLEAR VOICE II Automatically enhances and amplifies the sound of the film for professional certification by the user to experience the best their LG HDTV...and "night" modes will then be made through the ISFccc mode. TruSurround XT technology is three preset picture and audio settings. under license from SRS Labs, Inc. It includes Cinema, Sports, and Game ...
Owners Manual
Page 18
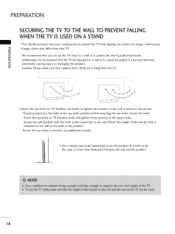
... attached to a wall so it cannot be pulled in the product. Insert the eye-bolts or TV brackets/bolts and tighten them securely in the picture. Ensure the eye-bolts or brackets are tightened securely. Use a sturdy rope (sold separately) to the wall. PREPARATION SECURING THE TV TO THE WALL TO...
... attached to a wall so it cannot be pulled in the product. Insert the eye-bolts or TV brackets/bolts and tighten them securely in the picture. Ensure the eye-bolts or brackets are tightened securely. Use a sturdy rope (sold separately) to the wall. PREPARATION SECURING THE TV TO THE WALL TO...

Owners Manual
Page 19
Antenna (Analog or Digital) _D Wall Antenna Socket or Outdoor Antenna without a Cable Box m Connections. _D For optimum picture quality, adjust antenna direction if needed. © z Multi-family Dwellings/Apartments Wall (Connect to wall antenna socket) Antenna Socket Outdoor Antenna (... about antennas and Digital TV. 19 ANTENNA OR CABLE CONNECTION 1. Cable Cable TV Wall Jack _F Coaxial Wire (7S ohm) 01T_o improve the picture quality in a poor signal area, please purchase a signal amplifier and install properly. 01_If the antenna needs to be split for assistance. 0_ ...
Antenna (Analog or Digital) _D Wall Antenna Socket or Outdoor Antenna without a Cable Box m Connections. _D For optimum picture quality, adjust antenna direction if needed. © z Multi-family Dwellings/Apartments Wall (Connect to wall antenna socket) Antenna Socket Outdoor Antenna (... about antennas and Digital TV. 19 ANTENNA OR CABLE CONNECTION 1. Cable Cable TV Wall Jack _F Coaxial Wire (7S ohm) 01T_o improve the picture quality in a poor signal area, please purchase a signal amplifier and install properly. 01_If the antenna needs to be split for assistance. 0_ ...

Owners Manual
Page 23
... the DVD player, insert a DVD. MVDatctho x -t the jack colors (Y = green, PB = blue, and PR = red). DVD SETUP Component Connection 1. Component Input ports To get better picture quality, connect a DVD player to connect O tCheonnCeOcMt PtOheNEvNidTeo ouINtpuVtsIDE(YO, PjBac, kPsRo)n otfhetheTVD. How to use -t 01T_urn on the remote control. 01R_efer to the COMPONENT...
... the DVD player, insert a DVD. MVDatctho x -t the jack colors (Y = green, PB = blue, and PR = red). DVD SETUP Component Connection 1. Component Input ports To get better picture quality, connect a DVD player to connect O tCheonnCeOcMt PtOheNEvNidTeo ouINtpuVtsIDE(YO, PjBac, kPsRo)n otfhetheTVD. How to use -t 01T_urn on the remote control. 01R_efer to the COMPONENT...

Owners Manual
Page 32
m x m _o z m X:) c m z m c "0 Select PICTURE. Select Screen (RGB-PC). Select the desired resolution. 32 You can choose the resolution in RGB-PC mode. EXTERNALEQUIPMENT SETUP Screen Setup for PC mode Selecting Resolution You can use this function only when the PC resolution is set to 1024X768, 1280X768 or 1360X768. Select Resolution. The Position, Phase, and Size can also be adjusted.
m x m _o z m X:) c m z m c "0 Select PICTURE. Select Screen (RGB-PC). Select the desired resolution. 32 You can choose the resolution in RGB-PC mode. EXTERNALEQUIPMENT SETUP Screen Setup for PC mode Selecting Resolution You can use this function only when the PC resolution is set to 1024X768, 1280X768 or 1360X768. Select Resolution. The Position, Phase, and Size can also be adjusted.

Owners Manual
Page 33
Select Auto Config.. Select Screen (RGB-PC). Start Auto Configuration. 01_If the position of the image is still not correct, try Auto adjustment again. 011If_ picture needs to be adjusted again after Auto adjustment in RGB-PC, you can adjust the Position, Phase. After adjustment, if the image is still not correct, try using the manual settings or a different resolution or refresh rate on the PC. Select Yes. Size or 33 Auto Configure Automatically adjusts picture position and minimizes image instability. r'_ x m z m c m z m c Select PICTURE.
Select Auto Config.. Select Screen (RGB-PC). Start Auto Configuration. 01_If the position of the image is still not correct, try Auto adjustment again. 011If_ picture needs to be adjusted again after Auto adjustment in RGB-PC, you can adjust the Position, Phase. After adjustment, if the image is still not correct, try using the manual settings or a different resolution or refresh rate on the PC. Select Yes. Size or 33 Auto Configure Automatically adjusts picture position and minimizes image instability. r'_ x m z m c m z m c Select PICTURE.

Owners Manual
Page 34
... vertical bars or stripes visible on the screen background. EXTERNALEQUIPMENT SETUP Adjustment for screen Position, Size, and Phase If the picture is to adjust picture to left/right and up/down as you to minimize any horizontal noise and clear or sharpen the image of characters. ...34 m x m z m _D c m z m c Select PICTURE. Make appropriate adjustments. 01_Position: This function is not clear after auto adjustment and especially if characters are still trembling, adjust the picture phase manually. This feature operates only in RGB-PC mode. Select Position, Size, or...
... vertical bars or stripes visible on the screen background. EXTERNALEQUIPMENT SETUP Adjustment for screen Position, Size, and Phase If the picture is to adjust picture to left/right and up/down as you to minimize any horizontal noise and clear or sharpen the image of characters. ...34 m x m z m _D c m z m c Select PICTURE. Make appropriate adjustments. 01_Position: This function is not clear after auto adjustment and especially if characters are still trembling, adjust the picture phase manually. This feature operates only in RGB-PC mode. Select Position, Size, or...

Owners Manual
Page 35
m x m _o z m c m z m c -0 Select PICTURE. Select Yes. 3S Screen Reset (Reset to original factory values) Returns Position, Size, and Phase to the default factory settings. This feature operates only in RGB-PC mode. Select Reset. Select Screen (RGB-PC).
m x m _o z m c m z m c -0 Select PICTURE. Select Yes. 3S Screen Reset (Reset to original factory values) Returns Position, Size, and Phase to the default factory settings. This feature operates only in RGB-PC mode. Select Reset. Select Screen (RGB-PC).

Owners Manual
Page 36
... button, the SIMPLINK menu appears at the screen. _ p.51-53 FAV Scroll through the programmed Favorite channels. _ p.46 MARK Select the input to apply the Picture Wizard settings. _ p.65 Use to TV. INFO Displays channel information at the top of the screen. _ p.47 AV MODE Toggles through inputs. RETURN Allows the...
... button, the SIMPLINK menu appears at the screen. _ p.51-53 FAV Scroll through the programmed Favorite channels. _ p.46 MARK Select the input to apply the Picture Wizard settings. _ p.65 Use to TV. INFO Displays channel information at the top of the screen. _ p.47 AV MODE Toggles through inputs. RETURN Allows the...

Owners Manual
Page 39
... the TV on for displaying at stores. N -r" z Step1. Step4. Selecting Language Step3. We recommend setting the TV to "Home Use" mode for the best picture in your antenna connection and start Auto Tuning. 39 Time setting < N -r" > Z Z fT1 N O Z _ Select Menu Language. _m O Step2. Check...will automatically return to set the essential items for viewing the TV for use in retail environments. It can adjust the "Picture menu - Picture mode" manually while inspecting the TV, but the TV will be activated from the user menus. 01_Default selection is an optimal...
... the TV on for displaying at stores. N -r" z Step1. Step4. Selecting Language Step3. We recommend setting the TV to "Home Use" mode for the best picture in your antenna connection and start Auto Tuning. 39 Time setting < N -r" > Z Z fT1 N O Z _ Select Menu Language. _m O Step2. Check...will automatically return to set the essential items for viewing the TV for use in retail environments. It can adjust the "Picture menu - Picture mode" manually while inspecting the TV, but the TV will be activated from the user menus. 01_Default selection is an optimal...

Owners Manual
Page 41
Q.Menu (Quick Menu) is shown in order to eject a USB N device. -r > z z fT1 N © Z © Return to TV viewing. 41 Make appropriate adjustments. As Display each menu. Aspect Ratio: Selects your desired picture format. [] Picture Mode: Selects the desired preset picture setting. ((1_ Sound Mode: Selects the desired preset sound setting. ((@)) Multi Audio: Changes the ... automatically. -r" [] Del/Add/Fav: Select channel you want to add/delete or z add the channel to the Favorite List. [_ Caption: Select on or off. < !_ USB Device: Select "Eject" in this manual.
Q.Menu (Quick Menu) is shown in order to eject a USB N device. -r > z z fT1 N © Z © Return to TV viewing. 41 Make appropriate adjustments. As Display each menu. Aspect Ratio: Selects your desired picture format. [] Picture Mode: Selects the desired preset picture setting. ((1_ Sound Mode: Selects the desired preset sound setting. ((@)) Multi Audio: Changes the ... automatically. -r" [] Del/Add/Fav: Select channel you want to add/delete or z add the channel to the Favorite List. [_ Caption: Select on or off. < !_ USB Device: Select "Eject" in this manual.

Owners Manual
Page 50
... TV / CHANNEL CONTROL AV MODE AV Mode toggles through preset Video and Audio settings. ! Sound Mode" respectively. > z 01_If you select "Cinema" in AV mode, the z "Picture Mode" and "Sound Mode" fT1 return to select the desired source. N -r" z 0_,If you select "Off" in AV mode, < Press the AV MODE button repeatedly... Z 01C_inema: Optimizes video and audio for watching movies. © 01S_port: Optimizes video and audio for watching sports events. 01G_ ame: Optimizes video and audio for "PICTURE menu - N © H Off: Disables the AV MODE...
... TV / CHANNEL CONTROL AV MODE AV Mode toggles through preset Video and Audio settings. ! Sound Mode" respectively. > z 01_If you select "Cinema" in AV mode, the z "Picture Mode" and "Sound Mode" fT1 return to select the desired source. N -r" z 0_,If you select "Off" in AV mode, < Press the AV MODE button repeatedly... Z 01C_inema: Optimizes video and audio for watching movies. © 01S_port: Optimizes video and audio for watching sports events. 01G_ ame: Optimizes video and audio for "PICTURE menu - N © H Off: Disables the AV MODE...

Owners Manual
Page 62
PICTURE CONTROL PICTURE SIZE (ASPECT RATIO) CONTROL This feature lets you choose the way an analog picture with a 4:3 aspect ratio is displayed on input source (analog broadcasting, digital broadcasting, aux). C _D m © z _D Select PICTURE. © Select Aspect Ratio. _ You can select a different aspect ratio depending on your TV. Return to the previous menu. Ratio in Select the desired picture format. You can also adjust Aspect the Q.MENU. Return to TV viewing. 62
PICTURE CONTROL PICTURE SIZE (ASPECT RATIO) CONTROL This feature lets you choose the way an analog picture with a 4:3 aspect ratio is displayed on input source (analog broadcasting, digital broadcasting, aux). C _D m © z _D Select PICTURE. © Select Aspect Ratio. _ You can select a different aspect ratio depending on your TV. Return to the previous menu. Ratio in Select the desired picture format. You can also adjust Aspect the Q.MENU. Return to TV viewing. 62

Owners Manual
Page 63
...HDMI-DTV/DVI-DTV (720p/1080i/1080p) input source. m b. ^ or v button: Move the image on the screen. 63 The adjustment range is activated. Notes: If there is noise on the edges of video signals are cropped 1-27o. However, the top and bottom portions of the picture...without any alteration. to match (4:3-_ 4:3) (16:9 -_ 16:9) Cinema Zoom Choose Cinema Zoom when you want to view the picture without distortion. Note: When enlarging or reducing the picture, the image may become distorted. 0_ < or > button: Adjust proportion of Zoom. This enlarges an image with an ...
...HDMI-DTV/DVI-DTV (720p/1080i/1080p) input source. m b. ^ or v button: Move the image on the screen. 63 The adjustment range is activated. Notes: If there is noise on the edges of video signals are cropped 1-27o. However, the top and bottom portions of the picture...without any alteration. to match (4:3-_ 4:3) (16:9 -_ 16:9) Cinema Zoom Choose Cinema Zoom when you want to view the picture without distortion. Note: When enlarging or reducing the picture, the image may become distorted. 0_ < or > button: Adjust proportion of Zoom. This enlarges an image with an ...

Owners Manual
Page 64
Adjust Color. Adjust Black Level. 64 Adjust Tint. When you can calibrate the screen quality by adjusting the Black and White Level etc. Adjust White Level. PICTURE CONTROL PICTURE WIZARD This feature lets you adjust the picture quality of the changes you "O Select PICTURE. You can see the example of the original image. N C _D Select Picture r_ N Wizard. © Z _D © Adjust Picture Wizard. or High, you adjust the image to calibrate the screen quality by easily following each step. Use this to Low, Recommended made.
Adjust Color. Adjust Black Level. 64 Adjust Tint. When you can calibrate the screen quality by adjusting the Black and White Level etc. Adjust White Level. PICTURE CONTROL PICTURE WIZARD This feature lets you adjust the picture quality of the changes you "O Select PICTURE. You can see the example of the original image. N C _D Select Picture r_ N Wizard. © Z _D © Adjust Picture Wizard. or High, you adjust the image to calibrate the screen quality by easily following each step. Use this to Low, Recommended made.

Owners Manual
Page 65
Z _o © Save. Finish the Picture Wizard. 01_If you stop the setting before the final ste G the changes will not be saved to the TV. 0_Once the Picture Wizard sets the picture quality_ Energy Saving is changed to apply the © settings. Adjust Backlight. -O N C _o m N Select input source to Off automatically. 65 Adjust Vertical Sharpness. Adjust Horizontal Sharpness.
Z _o © Save. Finish the Picture Wizard. 01_If you stop the setting before the final ste G the changes will not be saved to the TV. 0_Once the Picture Wizard sets the picture quality_ Energy Saving is changed to apply the © settings. Adjust Backlight. -O N C _o m N Select input source to Off automatically. 65 Adjust Vertical Sharpness. Adjust Horizontal Sharpness.

Owners Manual
Page 66
...a fast gaming screen. 010Erx_pert: This is the mode to adjust the video in 66 Strengthen the contrast, brightness, color and sharpness for vivid picture. 01S_tandard: This is the mode to realize Return to TV viewing. Return to the previous menu. You can also adjust.... Mode in detail for video quality expert and general user. 01Y_ou can use a preset, change each setting manually. PICTURE CONTROL PRESETPICTURE SETTINGS (PICTURE MODE) There are preset for the optimum picture quality at the factory. 01V_ivid: This is the mode to maximize the effect of the video in the retail store....
...a fast gaming screen. 010Erx_pert: This is the mode to adjust the video in 66 Strengthen the contrast, brightness, color and sharpness for vivid picture. 01S_tandard: This is the mode to realize Return to TV viewing. Return to the previous menu. You can also adjust.... Mode in detail for video quality expert and general user. 01Y_ou can use a preset, change each setting manually. PICTURE CONTROL PRESETPICTURE SETTINGS (PICTURE MODE) There are preset for the optimum picture quality at the factory. 01V_ivid: This is the mode to maximize the effect of the video in the retail store....
Owners Manual
Page 67
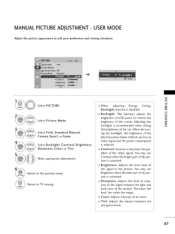
...the previous menu. dient of the set. You may use Make appropriate adjustments. Brightness: Adjusts the base level of the picture is recommended when setting Select Vivid, Standard, Natural, Cinema, Sport, or Game. You may use Brightness when the dark ...The lower the level, the softer the image. m N Backlight: This function adjusts the O brightness of LCD panel, to TV viewing. When decreasing the backlight, the brightness of the picture is saturated. Contrast when the bright part of the black becomes darker without any loss in Select Backlight, ...
...the previous menu. dient of the set. You may use Make appropriate adjustments. Brightness: Adjusts the base level of the picture is recommended when setting Select Vivid, Standard, Natural, Cinema, Sport, or Game. You may use Brightness when the dark ...The lower the level, the softer the image. m N Backlight: This function adjusts the O brightness of LCD panel, to TV viewing. When decreasing the backlight, the brightness of the picture is saturated. Contrast when the bright part of the black becomes darker without any loss in Select Backlight, ...

Owners Manual
Page 68
Return to the previous menu. O Select Advanced Control. Make appropriate adjustments. Return to TV viewing. 68 Select your desired options. Reset "O N C m N O Z Select PICTURE. PICTURE CONTROL PICTURE IMPROVEMENT TECHNOLOGY You can set the video value according to the special video screen. To reset to the factory default after making adjustments to each input source, execute the Picture function for each Picture Mode. You can calibrate the screen for each Picture Mode or set the video seeing differently for each input.
Return to the previous menu. O Select Advanced Control. Make appropriate adjustments. Return to TV viewing. 68 Select your desired options. Reset "O N C m N O Z Select PICTURE. PICTURE CONTROL PICTURE IMPROVEMENT TECHNOLOGY You can set the video value according to the special video screen. To reset to the factory default after making adjustments to each input source, execute the Picture function for each Picture Mode. You can calibrate the screen for each Picture Mode or set the video seeing differently for each input.

