
Owners Manual
Page 1
OWNER'S MANUAL LCD TV Please read this manual carefully before operating your set and retain it for future reference. 32LG710H 37LG710H 42LG710H 32LD650H 37LD650H 42LD650H 47LD650H 55LD650H 32LD655H 37LD655H 42LD655H P/NO : SAC34134301 (1007-REV02) www.lg.com
OWNER'S MANUAL LCD TV Please read this manual carefully before operating your set and retain it for future reference. 32LG710H 37LG710H 42LG710H 32LD650H 37LD650H 42LD650H 47LD650H 55LD650H 32LD655H 37LD655H 42LD655H P/NO : SAC34134301 (1007-REV02) www.lg.com

Owners Manual
Page 4
..., or walked upon a dedicated circuit; a TV with an exact replacement part by an authorized servicer. Do not touch the TV with resolution of this owner's manual to be connected to a three-prong grouned AC outlet) If grounding methods are not possible, have the cord replaced with a three-prong grounded AC plug...
..., or walked upon a dedicated circuit; a TV with an exact replacement part by an authorized servicer. Do not touch the TV with resolution of this owner's manual to be connected to a three-prong grouned AC outlet) If grounding methods are not possible, have the cord replaced with a three-prong grounded AC plug...

Owners Manual
Page 6
... CONTROL Auto Volume Leveler (Auto Volume 67 Preset Sound Settings (Sound Mode) 68 Sound Setting Adjustment - Add / Delete Channel (Manual Tuning 43 - Caption Option 80 Channel Editing 44 Channel Label 44 Input List 45 Example Electronic Program Guide 46 USB Entry Modes ... Extra Contents 55 PICTURE CONTROL PIP (Picture-In-Picture 56 Picture Size (Aspect Ratio) Control 58 Preset Picture Settings (Picture Mode 61 Manual Picture Adjustment - CONTENTS WARNING / CAUTION 2 SAFETY INSTRUCTIONS 3 FEATURES OF THIS TV 8 PREPARATION Accessories 9 Front Panel Information 10 Back...
... CONTROL Auto Volume Leveler (Auto Volume 67 Preset Sound Settings (Sound Mode) 68 Sound Setting Adjustment - Add / Delete Channel (Manual Tuning 43 - Caption Option 80 Channel Editing 44 Channel Label 44 Input List 45 Example Electronic Program Guide 46 USB Entry Modes ... Extra Contents 55 PICTURE CONTROL PIP (Picture-In-Picture 56 Picture Size (Aspect Ratio) Control 58 Preset Picture Settings (Picture Mode 61 Manual Picture Adjustment - CONTENTS WARNING / CAUTION 2 SAFETY INSTRUCTIONS 3 FEATURES OF THIS TV 8 PREPARATION Accessories 9 Front Panel Information 10 Back...

Owners Manual
Page 7
TIME SETTING Clock Setting - Auto Clock Setup 81 Manual Clock Setup 82 Auto On/Off Time Setting 83 Sleep Timer Setting 84 PARENTAL CONTROL / RATINGS Set Password & Lock System 85 Channel Blocking 88 Movie & ...
TIME SETTING Clock Setting - Auto Clock Setup 81 Manual Clock Setup 82 Auto On/Off Time Setting 83 Sleep Timer Setting 84 PARENTAL CONTROL / RATINGS Set Password & Lock System 85 Channel Blocking 88 Movie & ...

Owners Manual
Page 9
The accessories included may cause scratches or discoloration. For 32/37/42LG710H Remote Control, Batteries Power Cord Optional Extras D-sub 15 pin Cable When using the VGA (D-sub 15 pin cable) PC connection, the user ... stand Nuts for stand fixing fixing fixing (Refer to P.20) (Refer to P.20) (Refer to P.20) Screw for Power Cord (Refer to P.20) 9 PREPARATION Owner's Manual x 2 CD Manual TV GUIDESTB POWER PORTAL DVD INFOVCR i RETURN MENU 1 .:/, 4 GHI VOL ALPHA/NUCMC REMOMVEUTE 2 CH P A G E ABC 7 5 3 PQRS JKL DEF 8 6 TUV MNO 0 9 &@ WXYZ PIP ...
The accessories included may cause scratches or discoloration. For 32/37/42LG710H Remote Control, Batteries Power Cord Optional Extras D-sub 15 pin Cable When using the VGA (D-sub 15 pin cable) PC connection, the user ... stand Nuts for stand fixing fixing fixing (Refer to P.20) (Refer to P.20) (Refer to P.20) Screw for Power Cord (Refer to P.20) 9 PREPARATION Owner's Manual x 2 CD Manual TV GUIDESTB POWER PORTAL DVD INFOVCR i RETURN MENU 1 .:/, 4 GHI VOL ALPHA/NUCMC REMOMVEUTE 2 CH P A G E ABC 7 5 3 PQRS JKL DEF 8 6 TUV MNO 0 9 &@ WXYZ PIP ...

Owners Manual
Page 19
PREPARATION PREPARATION DESKTOP PEDESTAL INSTALLATION I Image shown may differ from the wall. 4 inches 4 inches 4 inches 4 inches CAUTION G Ensure adequate ventilation by following the clearance recommendations. SWIVEL STAND After installing the TV, you can adjust the TV set manually to the left or right direction to suit your TV. G Do not mount near or above any type of 4 inches on all four sides from your viewing position. 20°: 47/55LD650H 90°: Other Models 19 For proper ventilation, allow a clearance of heat source.
PREPARATION PREPARATION DESKTOP PEDESTAL INSTALLATION I Image shown may differ from the wall. 4 inches 4 inches 4 inches 4 inches CAUTION G Ensure adequate ventilation by following the clearance recommendations. SWIVEL STAND After installing the TV, you can adjust the TV set manually to the left or right direction to suit your TV. G Do not mount near or above any type of 4 inches on all four sides from your viewing position. 20°: 47/55LD650H 90°: Other Models 19 For proper ventilation, allow a clearance of heat source.

Owners Manual
Page 22
G When purchasing our wall mount kit, a detailed installation manual and all parts necessary for these kinds of accidents. G Do not use screws that do not comply with the VESA standard screw specifications. LG is used . CAUTION G Do not install your wall mount kit while the TV is not liable for wall mount kits... or cause the TV to a fall, leading to electric shock. 22 PREPARATION PREPARATION ! Do not use fasten the screws too strongly, this may result in . G LG is plugged in personal injury due to personal injury.
G When purchasing our wall mount kit, a detailed installation manual and all parts necessary for these kinds of accidents. G Do not use screws that do not comply with the VESA standard screw specifications. LG is used . CAUTION G Do not install your wall mount kit while the TV is not liable for wall mount kits... or cause the TV to a fall, leading to electric shock. 22 PREPARATION PREPARATION ! Do not use fasten the screws too strongly, this may result in . G LG is plugged in personal injury due to personal injury.

Owners Manual
Page 26
... as shown below. Match the jack colors (Y = green, PB = blue, and PR = red). 2 Connect the audio output of the digital settop box to the owner's manual for the digital set-top box.) I Select Component input source using the INPUT button on the TV. 2. Y PB PR L R TV-LINK CFG 1 LAN 2 (SERVICE ONLY...
... as shown below. Match the jack colors (Y = green, PB = blue, and PR = red). 2 Connect the audio output of the digital settop box to the owner's manual for the digital set-top box.) I Select Component input source using the INPUT button on the TV. 2. Y PB PR L R TV-LINK CFG 1 LAN 2 (SERVICE ONLY...

Owners Manual
Page 27
RJP INTERFACE VID 1 ! How to connect 1 Connect the digital set-top box to the owner's manual for the digital set-top box.) I Turn on the digital set-top box. (Refer to HDMI/DVI IN 1 (DVI) or 2 jack on the remote control. ...
RJP INTERFACE VID 1 ! How to connect 1 Connect the digital set-top box to the owner's manual for the digital set-top box.) I Turn on the digital set-top box. (Refer to HDMI/DVI IN 1 (DVI) or 2 jack on the remote control. ...

Owners Manual
Page 28
... HDMI cable or adapter is necessary. 28 How to use I Turn on the remote control. EXTERNAL EQUIPMENT SETUP EXTERNAL EQUIPMENT SETUP DVI to the owner's manual for this connection.
... HDMI cable or adapter is necessary. 28 How to use I Turn on the remote control. EXTERNAL EQUIPMENT SETUP EXTERNAL EQUIPMENT SETUP DVI to the owner's manual for this connection.

Owners Manual
Page 29
... connect Y PB PR L R EXTERNAL EQUIPMENT SETUP 1 Connect the video outputs (Y, PB, PR) of the DVD to the DVD player's manual for operating instructions. HDMI supports both audio and video. I Turn on the TV. 2. CCOOMMPPOONNEENNTTININ Component Input ports To get better picture quality,...RESET U RGB(PC) R (S AUDIO (RGB/DVI) RGB IN I Refer to the COMPONENT IN VIDEO jacks on the TV. How to the DVD player's manual for operating instructions. VIDEO AAUUDDIIOO / I Refer to use I Select the Component input source on the TV using the INPUT button on the TV. 2 No...
... connect Y PB PR L R EXTERNAL EQUIPMENT SETUP 1 Connect the video outputs (Y, PB, PR) of the DVD to the DVD player's manual for operating instructions. HDMI supports both audio and video. I Turn on the TV. 2. CCOOMMPPOONNEENNTTININ Component Input ports To get better picture quality,...RESET U RGB(PC) R (S AUDIO (RGB/DVI) RGB IN I Refer to the COMPONENT IN VIDEO jacks on the TV. How to the DVD player's manual for operating instructions. VIDEO AAUUDDIIOO / I Refer to use I Select the Component input source on the TV using the INPUT button on the TV. 2 No...

Owners Manual
Page 30
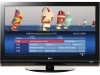
... OUT ! AV IN 1 AUDIO /MONO VIDEO 30 NOTE G If you have a mono VCR, connect the audio cable from the VCR to the VCR owner's manual.) Antenna Composite (RCA) Connection 1. Match the jack colors (Video = yellow, Audio Left = white, and Audio Right = red) ANT OUT R L VIDEO ...(interference), leave an adequate distance between TV and VCR. TV. 1 S-VIDEO VIDEO L R ANT OUT 2 Connect the antenna cable to the VCR owner's manual.) I Insert a video tape into the VCR and press PLAY on the remote control. EXTERNAL EQUIPMENT SETUP EXTERNAL EQUIPMENT SETUP VCR SETUP I . How to connect...
... OUT ! AV IN 1 AUDIO /MONO VIDEO 30 NOTE G If you have a mono VCR, connect the audio cable from the VCR to the VCR owner's manual.) Antenna Composite (RCA) Connection 1. Match the jack colors (Video = yellow, Audio Left = white, and Audio Right = red) ANT OUT R L VIDEO ...(interference), leave an adequate distance between TV and VCR. TV. 1 S-VIDEO VIDEO L R ANT OUT 2 Connect the antenna cable to the VCR owner's manual.) I Insert a video tape into the VCR and press PLAY on the remote control. EXTERNAL EQUIPMENT SETUP EXTERNAL EQUIPMENT SETUP VCR SETUP I . How to connect...

Owners Manual
Page 35
..... EXTERNAL EQUIPMENT SETUP Auto Configure Automatically adjusts picture position and minimizes image instability. After adjustment, if the image is still not correct, try using the manual settings or a different resolution or refresh rate on the PC. Select Y e s. 5 ENTER Start Auto Configuration. • If the position of the image is still not...
..... EXTERNAL EQUIPMENT SETUP Auto Configure Automatically adjusts picture position and minimizes image instability. After adjustment, if the image is still not correct, try using the manual settings or a different resolution or refresh rate on the PC. Select Y e s. 5 ENTER Start Auto Configuration. • If the position of the image is still not...

Owners Manual
Page 36
... will also change. Make appropriate adjustments. I S i z e: This function is not clear after auto adjustment and especially if characters are still trembling, adjust the picture phase manually. Select Screen (RGB-PC). PICTURE Move Enter E • Brightness 50 • Sharpness 50 • Color 50 • Tint 0R G • Advanced Control • Picture Reset...
... will also change. Make appropriate adjustments. I S i z e: This function is not clear after auto adjustment and especially if characters are still trembling, adjust the picture phase manually. Select Screen (RGB-PC). PICTURE Move Enter E • Brightness 50 • Sharpness 50 • Color 50 • Tint 0R G • Advanced Control • Picture Reset...

Owners Manual
Page 41
CHANNEL Auto Tuning Manual Tuning Channel Edit Channel Label Move Enter PICTURE Move Enter Aspect Ratio : 16:9 Picture Mode : Standard • BackLight 90 • Contrast 90 • Brightness 50 &#... to TV viewing. WATCHING TV / CHANNEL CONTROL ON-SCREEN MENUS SELECTION Your TV's OSD (On Screen Display) may differ slightly from that shown in this manual. NOTE G Infinite Sound: For 32/37/42/47/55LD650H, 32/37/42LD655H 41 INPUT TV AV1 AV2 Component RGB-PC HDMI1 HDMI2 Move Enter USB...
CHANNEL Auto Tuning Manual Tuning Channel Edit Channel Label Move Enter PICTURE Move Enter Aspect Ratio : 16:9 Picture Mode : Standard • BackLight 90 • Contrast 90 • Brightness 50 &#... to TV viewing. WATCHING TV / CHANNEL CONTROL ON-SCREEN MENUS SELECTION Your TV's OSD (On Screen Display) may differ slightly from that shown in this manual. NOTE G Infinite Sound: For 32/37/42/47/55LD650H, 32/37/42LD655H 41 INPUT TV AV1 AV2 Component RGB-PC HDMI1 HDMI2 Move Enter USB...

Owners Manual
Page 42
... Select Y e s. 4 ENTER Run Auto tuning. 5 RETURN Return to TV viewing. The previous channel information will be updated during Auto Tuning. CHANNEL Auto Tuning Manual Tuning Channel Edit Channel Label Move Enter CHANNEL Auto Tuning Manual Tuning Channel Edit Channel Label Move Enter Check your antenna connection. MENU Return to the previous menu.
... Select Y e s. 4 ENTER Run Auto tuning. 5 RETURN Return to TV viewing. The previous channel information will be updated during Auto Tuning. CHANNEL Auto Tuning Manual Tuning Channel Edit Channel Label Move Enter CHANNEL Auto Tuning Manual Tuning Channel Edit Channel Label Move Enter Check your antenna connection. MENU Return to the previous menu.

Owners Manual
Page 43
...the signal being received. WATCHING TV / CHANNEL CONTROL Add/Delete Channel (Manual Tuning) If selecting DIGITAL input signal, you want to TV viewing. CHANNEL Auto Tuning Manual Tuning Channel Edit Channel Label Move Enter CHANNEL Auto Tuning Manual Tuning Channel Edit Channel Label Move Enter F DIGITAL G Select channel ...MENU 2 ENTER Select CHANNEL. MENU Return to add or delete. Select channel you can view the on-screen signal strength monitor to Manual Tuning menu if the Lock System is turned on. 43 ENTER Select A d d or D e l e t e. 6 RETURN Return to the previous menu...
...the signal being received. WATCHING TV / CHANNEL CONTROL Add/Delete Channel (Manual Tuning) If selecting DIGITAL input signal, you want to TV viewing. CHANNEL Auto Tuning Manual Tuning Channel Edit Channel Label Move Enter CHANNEL Auto Tuning Manual Tuning Channel Edit Channel Label Move Enter F DIGITAL G Select channel ...MENU 2 ENTER Select CHANNEL. MENU Return to add or delete. Select channel you can view the on-screen signal strength monitor to Manual Tuning menu if the Lock System is turned on. 43 ENTER Select A d d or D e l e t e. 6 RETURN Return to the previous menu...

Owners Manual
Page 44
...deleted channel, directly enter the channel number with the NUMBER buttons or select it using CH button during TV viewing. CHANNEL Auto Tuning Manual Tuning Channel Edit Channel Label Move Enter WATCHING TV / CHANNEL CONTROL 1 MENU 2 ENTER 3 ENTER Select CHANNEL. MENU Return to... is deleted, it means that you will be unable to the previous menu. Select a channel. CHANNEL Auto Tuning Manual Tuning Channel Edit Channel Label Move Enter CHANNEL Auto Tuning Manual Tuning Channel Edit Channel Label Move Enter Channel ANALOG 2-0 Logo F Disney G 1 MENU Select CHANNEL. 2 ENTER ...
...deleted channel, directly enter the channel number with the NUMBER buttons or select it using CH button during TV viewing. CHANNEL Auto Tuning Manual Tuning Channel Edit Channel Label Move Enter WATCHING TV / CHANNEL CONTROL 1 MENU 2 ENTER 3 ENTER Select CHANNEL. MENU Return to... is deleted, it means that you will be unable to the previous menu. Select a channel. CHANNEL Auto Tuning Manual Tuning Channel Edit Channel Label Move Enter CHANNEL Auto Tuning Manual Tuning Channel Edit Channel Label Move Enter Channel ANALOG 2-0 Logo F Disney G 1 MENU Select CHANNEL. 2 ENTER ...

Owners Manual
Page 61
... the surrounding conditions. I S p o r t: This is changed to realize fast response speed in a fast gaming screen. 61 PICTURE CONTROL You can use a preset, change each setting manually, , or use the Intelligent Sensor. I Intelligent Sensor: The most natural screen status. I When selecting Intelligent Sensor is automatically adjusted according to emphasize dynamic video and...
... the surrounding conditions. I S p o r t: This is changed to realize fast response speed in a fast gaming screen. 61 PICTURE CONTROL You can use a preset, change each setting manually, , or use the Intelligent Sensor. I Intelligent Sensor: The most natural screen status. I When selecting Intelligent Sensor is automatically adjusted according to emphasize dynamic video and...

Owners Manual
Page 62
... • Tint 0R G E 1 MENU Select PICTURE. 2 ENTER 3 ENTER 4 ENTER 5 ENTER Select Picture Mode. Select Backlight, Contrast, Brightness, Sharpness, Color, or Tint. E PICTURE CONTROL PICTURE CONTROL MANUAL PICTURE ADJUSTMENT - Select Vivid, Standard, Natural, Cinema, Sport or Game. MENU Return to suit your preference and viewing situations. I Color: Adjusts intensity of all colors...
... • Tint 0R G E 1 MENU Select PICTURE. 2 ENTER 3 ENTER 4 ENTER 5 ENTER Select Picture Mode. Select Backlight, Contrast, Brightness, Sharpness, Color, or Tint. E PICTURE CONTROL PICTURE CONTROL MANUAL PICTURE ADJUSTMENT - Select Vivid, Standard, Natural, Cinema, Sport or Game. MENU Return to suit your preference and viewing situations. I Color: Adjusts intensity of all colors...


