
Owner's Manual (English)
Page 3
... the literature accompanying the appliance. The lightning flash with the limits for help. This equipment generates, uses and can be of sufficient magnitude to rain or moisture. Reorient or relocate the receiving antenna. - Increase the separation between the equipment and receiver. - NOTE TO CABLE/TV INSTALLER This reminder is connected. - NO USER SERVICEABLE PARTS INSIDE. WARNING / CAUTION To prevent fire...
... the literature accompanying the appliance. The lightning flash with the limits for help. This equipment generates, uses and can be of sufficient magnitude to rain or moisture. Reorient or relocate the receiving antenna. - Increase the separation between the equipment and receiver. - NOTE TO CABLE/TV INSTALLER This reminder is connected. - NO USER SERVICEABLE PARTS INSIDE. WARNING / CAUTION To prevent fire...
Owner's Manual (English)
Page 6
... Channel ( Manual Tuning) . . 41 - Color Tone - TruM 62 Picture Reset 63 SOUND & LANGUAGE CONTROL Auto Volume Leveler ( Auto Volume 64 Preset Sound Settings( Sound Mode 65 Sound Setting Adjustment - Preset 55 - Digital Broadcasting System Captions . . .75 - Caption Option 76 CONTENTS WARNING / CAUTION 1 SAFETY INSTRUCTIONS 2 FEATURES OF THIS TV 6 PREPARATION Accessories 7 Front Panel Controls 8 Back Panel Information 10 Attaching the TV to a Wall 12 Stand Installation 13 Back Cover for Wire Arrangement 14 Desktop Pedestal Installation 16 Vesa Wall Mounting 16 Antenna...
... Channel ( Manual Tuning) . . 41 - Color Tone - TruM 62 Picture Reset 63 SOUND & LANGUAGE CONTROL Auto Volume Leveler ( Auto Volume 64 Preset Sound Settings( Sound Mode 65 Sound Setting Adjustment - Preset 55 - Digital Broadcasting System Captions . . .75 - Caption Option 76 CONTENTS WARNING / CAUTION 1 SAFETY INSTRUCTIONS 2 FEATURES OF THIS TV 6 PREPARATION Accessories 7 Front Panel Controls 8 Back Panel Information 10 Attaching the TV to a Wall 12 Stand Installation 13 Back Cover for Wire Arrangement 14 Desktop Pedestal Installation 16 Vesa Wall Mounting 16 Antenna...

Owner's Manual (English)
Page 11
PREPARATION 37/42/47/52LB5D CH VOL ENTER MENU INPUT /I CHANNEL (E,D) Buttons VOLUME (F,G) Buttons ENTER Button MENU Button INPUT Button POWER Button Intelligent Eye Adjusts picture according to the surrounding conditions. Remote Control Sensor Power/Standby Indicator • illuminates red in standby mode. • illuminates green when the set is switched on. 9
PREPARATION 37/42/47/52LB5D CH VOL ENTER MENU INPUT /I CHANNEL (E,D) Buttons VOLUME (F,G) Buttons ENTER Button MENU Button INPUT Button POWER Button Intelligent Eye Adjusts picture according to the surrounding conditions. Remote Control Sensor Power/Standby Indicator • illuminates red in standby mode. • illuminates green when the set is switched on. 9
Owner's Manual (English)
Page 20
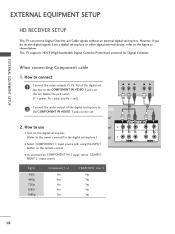
... jack colors (Y = green, PB = blue, and PR = red). 2 Connect the audio output of the digital set top box to the COMPONENT IN VIDEO 1 jacks on the set -top bo(xDV.)I) I If connected to the figure as shown below. I Select COMPONENT 1 input source with using the INPUT button on the remote control. This TV supports HDCP (High-bandwidth Digital Contents Protection) protocol for the digital set . EXTERNAL EQUIPMENT SETUP EXTERNAL EQUIPMENT SETUP HD RECEIVER SETUP This TV can receive Digital Over-the-air/Cable signals...
... jack colors (Y = green, PB = blue, and PR = red). 2 Connect the audio output of the digital set top box to the COMPONENT IN VIDEO 1 jacks on the set -top bo(xDV.)I) I If connected to the figure as shown below. I Select COMPONENT 1 input source with using the INPUT button on the remote control. This TV supports HDCP (High-bandwidth Digital Contents Protection) protocol for the digital set . EXTERNAL EQUIPMENT SETUP EXTERNAL EQUIPMENT SETUP HD RECEIVER SETUP This TV can receive Digital Over-the-air/Cable signals...
Owner's Manual (English)
Page 21
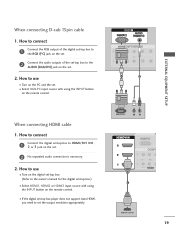
... the remote control. How to HDMI/DVI IN1, 2 or 3 jack on the remote control. How to use I Turn on the digital set-top box. (Refer to the owner's manual for the digital set-top box.) I If the digital set-top box player does not support Auto HDMI, you need to set -top box to use I Select RGB-PC input source with using the INPUT button on the PC and the set. RGB OUTPUT L R (DVI) 1 HDMI-DTV OUTPUT 19 How to the AUDIO (RGB/DVI) jack on the set . 2 No separated audio connection is necessary. 2. I Select...
... the remote control. How to HDMI/DVI IN1, 2 or 3 jack on the remote control. How to use I Turn on the digital set-top box. (Refer to the owner's manual for the digital set-top box.) I If the digital set-top box player does not support Auto HDMI, you need to set -top box to use I Select RGB-PC input source with using the INPUT button on the PC and the set. RGB OUTPUT L R (DVI) 1 HDMI-DTV OUTPUT 19 How to the AUDIO (RGB/DVI) jack on the set . 2 No separated audio connection is necessary. 2. I Select...
Owner's Manual (English)
Page 22
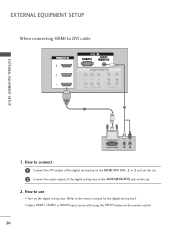
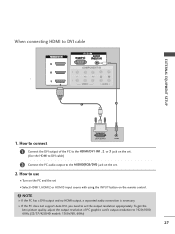
How to connect 1 Connect the DVI output of the digital set-top box to the HDMI/DVI IN1, 2 or 3 jack on the set. 2 Connect the audio output of the digital set-top box to the AUDIO(RGB/DVI) jack on the set -top box.) I Turn on the remote control. 20 How to DVI cable RGB 3 EXTERNAL EQUIPMENT SETUP 2 1 DVI-DTV OUTPUT L R 1. EXTERNAL EQUIPMENT SETUP When connecting HDMI to use I Select HDMI1, HDMI2 or HDMI3 input source with using the INPUT button on the digital set-top box. (Refer to the owner's manual for the digital set . 2.
How to connect 1 Connect the DVI output of the digital set-top box to the HDMI/DVI IN1, 2 or 3 jack on the set. 2 Connect the audio output of the digital set-top box to the AUDIO(RGB/DVI) jack on the set -top box.) I Turn on the remote control. 20 How to DVI cable RGB 3 EXTERNAL EQUIPMENT SETUP 2 1 DVI-DTV OUTPUT L R 1. EXTERNAL EQUIPMENT SETUP When connecting HDMI to use I Select HDMI1, HDMI2 or HDMI3 input source with using the INPUT button on the digital set-top box. (Refer to the owner's manual for the digital set . 2.
Owner's Manual (English)
Page 23
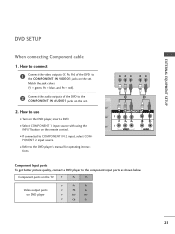
...Component Input ports To get better picture quality, connect a DVD player to the DVD player's manual for operating instruc- I Turn on the set . 2. EXTERNAL EQUIPMENT SETUP DVD SETUP When connecting Component cable 1. I Select COMPONENT 1 input source with using the INPUT button on DVD player Y PB PR Y Pb Pr Y B-Y R-Y Y Cb Cr 21 Component ports on the TV Y PB PR Video output ports on the remote control. Match the jack colors (Y = green, PB = blue, and PR = red). 2 Connect the audio outputs of the DVD to COMPONENT IN 2 input, select COM- I Refer to the component...
...Component Input ports To get better picture quality, connect a DVD player to the DVD player's manual for operating instruc- I Turn on the set . 2. EXTERNAL EQUIPMENT SETUP DVD SETUP When connecting Component cable 1. I Select COMPONENT 1 input source with using the INPUT button on DVD player Y PB PR Y Pb Pr Y B-Y R-Y Y Cb Cr 21 Component ports on the TV Y PB PR Video output ports on the remote control. Match the jack colors (Y = green, PB = blue, and PR = red). 2 Connect the audio outputs of the DVD to COMPONENT IN 2 input, select COM- I Refer to the component...
Owner's Manual (English)
Page 24
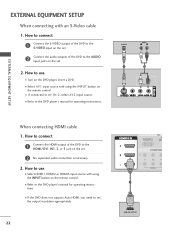
... S-VIDEO output of the DVD to the DVD player's manual for operating instructions. S-VIDEO AUDIO L R 1 2 EXTERNAL EQUIPMENT SETUP When connecting HDMI cable 1. I Refer to the S-VIDEO input on the set . 2. How to use I Turn on the set . 2 Connect the audio outputs of the DVD to the DVD player's manual for operating instructions. I If the DVD does not support Auto HDMI, you need to the AUDIO input jacks on the DVD player, insert a DVD. I If connected to use I Select HDMI1, HDMI2 or HDMI3 input source with using the INPUT button on the remote control. How...
... S-VIDEO output of the DVD to the DVD player's manual for operating instructions. S-VIDEO AUDIO L R 1 2 EXTERNAL EQUIPMENT SETUP When connecting HDMI cable 1. I Refer to the S-VIDEO input on the set . 2. How to use I Turn on the set . 2 Connect the audio outputs of the DVD to the DVD player's manual for operating instructions. I If the DVD does not support Auto HDMI, you need to the AUDIO input jacks on the DVD player, insert a DVD. I If connected to use I Select HDMI1, HDMI2 or HDMI3 input source with using the INPUT button on the remote control. How...
Owner's Manual (English)
Page 25
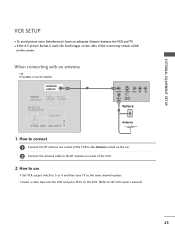
... How to connect 1 Connect the RF antenna out socket of the VCR to the Antenna socket on the set. 2 Connect the antenna cable to the RF antenna in socket of the screen may remain visible on the screen. I If the 4:3 picture format is used; When connecting with an antenna i.e) 37/42LB4D, 37/42/47/52LB5D ANTENNA/ CABLE IN 1 ANT OUT S-VIDEO VIDEO L R ANT IN OUTPUT SWITCH Wall Jack 2 Antenna 1. the fixed images on the VCR. (Refer to the same channel number.
... How to connect 1 Connect the RF antenna out socket of the VCR to the Antenna socket on the set. 2 Connect the antenna cable to the RF antenna in socket of the screen may remain visible on the screen. I If the 4:3 picture format is used; When connecting with an antenna i.e) 37/42LB4D, 37/42/47/52LB5D ANTENNA/ CABLE IN 1 ANT OUT S-VIDEO VIDEO L R ANT IN OUTPUT SWITCH Wall Jack 2 Antenna 1. the fixed images on the VCR. (Refer to the same channel number.
Owner's Manual (English)
Page 29
... does not support Auto DVI, you need to use I Turn on the remote control. To get the best picture quality, adjust the output resolution of the PC to the HDMI/DVI IN1, 2 or 3 jack on the set. (Use the HDMI to DVI cable) 2 Connect the PC audio output to the AUDIO(RGB/DVI) jack on the set I Select HDMI1, HDMI2 or HDMI3 input source with using the INPUT button on the PC and the set . 2. When connecting HDMI to 1920x1080, 60Hz.(32/37/42LB4D models: 1360x768, 60Hz...
... does not support Auto DVI, you need to use I Turn on the remote control. To get the best picture quality, adjust the output resolution of the PC to the HDMI/DVI IN1, 2 or 3 jack on the set. (Use the HDMI to DVI cable) 2 Connect the PC audio output to the AUDIO(RGB/DVI) jack on the set I Select HDMI1, HDMI2 or HDMI3 input source with using the INPUT button on the PC and the set . 2. When connecting HDMI to 1920x1080, 60Hz.(32/37/42LB4D models: 1360x768, 60Hz...

Owner's Manual (English)
Page 30
..., change the PC output to another resolution, change the PC graphic card or consult the manufacturer of time. G The synchronization input form for a long period of the PC graphic card. EXTERNAL EQUIPMENT SETUP NOTES G Depending on the graphics card, DOS mode may not work if a HDMI to another rate or adjust the brightness and contrast on the PICTURE menu until the picture is clear. EXTERNAL EQUIPMENT SETUP...
..., change the PC output to another resolution, change the PC graphic card or consult the manufacturer of time. G The synchronization input form for a long period of the PC graphic card. EXTERNAL EQUIPMENT SETUP NOTES G Depending on the graphics card, DOS mode may not work if a HDMI to another rate or adjust the brightness and contrast on the PICTURE menu until the picture is clear. EXTERNAL EQUIPMENT SETUP...
Owner's Manual (English)
Page 37
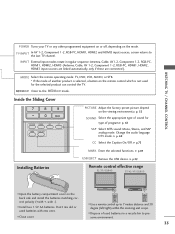
... and HDMI3 input sources, screen returns to the MEDIAHOST mode. MEDIAHOST MEDIAHOST Enter to the last TV channel. DAY + I Use a remote control up to preserve environment. 35 MEDIAHOST Inside the Sliding Cover BACK PICTURE SOUND SAP CC MARK USB EJECT PICTURE Adjust the factory preset picture depend on the mode. G p.73 Installing Batteries MARK Enter the selected functions. Change the audio language DTV mode. G p. 69 CC Select the Caption On/Off. INPUT External input modes rotate in...
... and HDMI3 input sources, screen returns to the MEDIAHOST mode. MEDIAHOST MEDIAHOST Enter to the last TV channel. DAY + I Use a remote control up to preserve environment. 35 MEDIAHOST Inside the Sliding Cover BACK PICTURE SOUND SAP CC MARK USB EJECT PICTURE Adjust the factory preset picture depend on the mode. G p.73 Installing Batteries MARK Enter the selected functions. Change the audio language DTV mode. G p. 69 CC Select the Caption On/Off. INPUT External input modes rotate in...

Owner's Manual (English)
Page 38
... reverts to standby mode. MENU BRIGHT + TIMER RATIO SIMPLINK BACK PICTURE SOUND SAP CC MARK USB EJECT 36 I This TV is programmed to remember which mode it was last set to, even if you intend to be away on vacation, disconnect the power plug from the wall power outlet. NOTE G If you turn the TV off. 3 When finished using the INPUT button on the remote control. I In standby mode, press the (or...
... reverts to standby mode. MENU BRIGHT + TIMER RATIO SIMPLINK BACK PICTURE SOUND SAP CC MARK USB EJECT 36 I This TV is programmed to remember which mode it was last set to, even if you intend to be away on vacation, disconnect the power plug from the wall power outlet. NOTE G If you turn the TV off. 3 When finished using the INPUT button on the remote control. I In standby mode, press the (or...
Owner's Manual (English)
Page 43
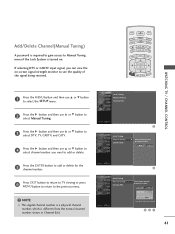
... access to select the SETUP menu. MENU BRIGHT + TIMER RATIO SIMPLINK TV IN WATCHING TV / CHANNEL CONTROL 1 Press the MENU button and then use D or E button to select channel number you can view the on . D E DTV G 12 DTV 12-0 Bad Normal Good Press to delete the channel. 41 Auto Tuning Manual Tuning Channel Edit BACK PI PICTURE SOUND CC MARK USB EJECT Auto Tuning Manual Tuning Channel Edit G Select channel type and RF-channel number. DTV 2 Auto Tuning Manual Tuning Channel Edit Select channel type and RF-channel number. TV INPUT...
... access to select the SETUP menu. MENU BRIGHT + TIMER RATIO SIMPLINK TV IN WATCHING TV / CHANNEL CONTROL 1 Press the MENU button and then use D or E button to select channel number you can view the on . D E DTV G 12 DTV 12-0 Bad Normal Good Press to delete the channel. 41 Auto Tuning Manual Tuning Channel Edit BACK PI PICTURE SOUND CC MARK USB EJECT Auto Tuning Manual Tuning Channel Edit G Select channel type and RF-channel number. DTV 2 Auto Tuning Manual Tuning Channel Edit Select channel type and RF-channel number. TV INPUT...
Owner's Manual (English)
Page 46
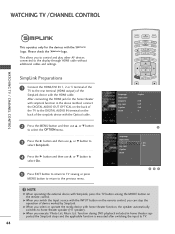
... speaker automatically switches to the display through HDMI cable without additional cables and settings. G When you to control and play other AV devices connected to home theater speaker (HT speaker). This allows you select or operate the media device with the INPUT button on the remote control. TV INPUT STB MEDIA HOST BRIGHT - NOTE G When operating the external device with the logo. Please check the logo. TIMER RATIO SIMPLINK Language Input label SimpLink Key Lock Caption Set ID : English...
... speaker automatically switches to the display through HDMI cable without additional cables and settings. G When you to control and play other AV devices connected to home theater speaker (HT speaker). This allows you select or operate the media device with the INPUT button on the remote control. TV INPUT STB MEDIA HOST BRIGHT - NOTE G When operating the external device with the logo. Please check the logo. TIMER RATIO SIMPLINK Language Input label SimpLink Key Lock Caption Set ID : English...
Owner's Manual (English)
Page 57
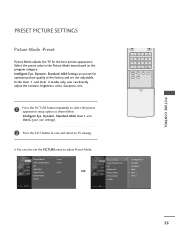
... also use the PICTURE menu to TV viewing. BACK PICTURE SOUND SAP CC MARK USB EJECT PICTURE S MARK US PICTURE CONTROL 1 Press the PICTURE button repeatedly to select the picture appearance setup option as shown below : Intelligent Eye, Dynamic, Standard, Mild, User1, and User2 (your own settings). 2 Press the EXIT button to save and return to adjust Picture Mode. Select the preset value in the Picture Mode menu based on the BACK program category. Picture Mode Color Temperature XD Advanced Aspect Ratio Picture Reset Screen...
... also use the PICTURE menu to TV viewing. BACK PICTURE SOUND SAP CC MARK USB EJECT PICTURE S MARK US PICTURE CONTROL 1 Press the PICTURE button repeatedly to select the picture appearance setup option as shown below : Intelligent Eye, Dynamic, Standard, Mild, User1, and User2 (your own settings). 2 Press the EXIT button to save and return to adjust Picture Mode. Select the preset value in the Picture Mode menu based on the BACK program category. Picture Mode Color Temperature XD Advanced Aspect Ratio Picture Reset Screen...
Owner's Manual (English)
Page 60
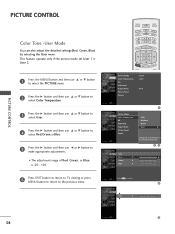
... CONTROL PICTURE CONTROL TV INPUT TV INPUT STB MEDIA HOST STB MEDIA HOST Color Tone -User Mode You can also adjust the detailed settings(Red, Green, Blue) by selecting the User menu. MENU BRIGHT + TIMER RATIO SIMPLINK Picture Mode : User1 Color Temperature : Cool XD Advanced Aspect Ratio : 16:9 Picture Reset Screen BACK PICTURE SOUND CC MARK USB EJECT Picture Mode Color Temperature XD Advanced Aspect Ratio Picture Reset Screen Cool Medium Warm User G Selection ( G or ) leads you to the previous menu. E Red 0 E 58 BACK 2 Press the G button and then use...
... CONTROL PICTURE CONTROL TV INPUT TV INPUT STB MEDIA HOST STB MEDIA HOST Color Tone -User Mode You can also adjust the detailed settings(Red, Green, Blue) by selecting the User menu. MENU BRIGHT + TIMER RATIO SIMPLINK Picture Mode : User1 Color Temperature : Cool XD Advanced Aspect Ratio : 16:9 Picture Reset Screen BACK PICTURE SOUND CC MARK USB EJECT Picture Mode Color Temperature XD Advanced Aspect Ratio Picture Reset Screen Cool Medium Warm User G Selection ( G or ) leads you to the previous menu. E Red 0 E 58 BACK 2 Press the G button and then use...
Owner's Manual (English)
Page 84
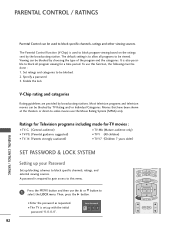
... theaters or direct-to-video movies use the D or E button to block specific channels, ratings, and external viewing sources. Most television programs and television movies can be blocked by broadcasting stations. The Parental Control Function (V-Chip) is set up blocking schemes to select the LOCK menu. Viewing can be used to be blocked. 2. Set ratings and categories to block program viewing based on the ratings sent by choosing the type of the program and the...
... theaters or direct-to-video movies use the D or E button to block specific channels, ratings, and external viewing sources. Most television programs and television movies can be blocked by broadcasting stations. The Parental Control Function (V-Chip) is set up blocking schemes to select the LOCK menu. Viewing can be used to be blocked. 2. Set ratings and categories to block program viewing based on the ratings sent by choosing the type of the program and the...
Owner's Manual (English)
Page 91
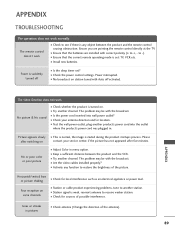
... the correct remote operating mode is suddenly turned off activated. Power is set ? No picture & No sound I Is the sleep timer set : TV, VCR etc. Please after five minutes. The problem may be with Auto off I Check whether the product is any function to receive weaker station. Horizontal/vertical bars or picture shaking I Check antenna (Change the direction of the antenna). 89 No or poor color or poor picture I Adjust Color in pictures I Check...
... the correct remote operating mode is suddenly turned off activated. Power is set ? No picture & No sound I Is the sleep timer set : TV, VCR etc. Please after five minutes. The problem may be with Auto off I Check whether the product is any function to receive weaker station. Horizontal/vertical bars or picture shaking I Check antenna (Change the direction of the antenna). 89 No or poor color or poor picture I Adjust Color in pictures I Check...
Owner's Manual (English)
Page 96
... properly the remote control need not be programmed. APPENDIX PROGRAMMING THE REMOTE CONTROL The provided universal remote control can operate each device without programming, turn on the device (such as a VCR) and press the corresponding mode button on the mode button will be turned off. After blinking twice, this code is successful. 4 Press the MENU button to see if the device responds properly. APPENDIX 94 When pressing the button, the light blinks at the same time for...
... properly the remote control need not be programmed. APPENDIX PROGRAMMING THE REMOTE CONTROL The provided universal remote control can operate each device without programming, turn on the device (such as a VCR) and press the corresponding mode button on the mode button will be turned off. After blinking twice, this code is successful. 4 Press the MENU button to see if the device responds properly. APPENDIX 94 When pressing the button, the light blinks at the same time for...


