Owner's Manual (English)
Page 6
... Receiver Setup 18 DVD Setup 21 VCR Setup 23 Other A/V Source Setup 25 PC Setup 26 USB In Setup 32 Audio Out Setup 33 WATCHING TV / CHANNEL CONTROL Remote Control Functions 34 Turning on TV 36 Channel Selection 37 Volume Adjustment 38 On-Screen Menus Selection 39 Channel Setup ... Channel Editing 42 Input List 43 SimpLink 44 Input Label 46 4 MEDIAHOST MEDIAHOST Entry Modes 47 Photo List 48 Music List 52 PICTURE CONTROL Picture Size (Aspect Ratio) Control 54 Preset Picture Settings - Color Tone - User Mode 66 Balance 68 Stereo / SAP Broadcast Setup 69 TV Speakers On/ ...
... Receiver Setup 18 DVD Setup 21 VCR Setup 23 Other A/V Source Setup 25 PC Setup 26 USB In Setup 32 Audio Out Setup 33 WATCHING TV / CHANNEL CONTROL Remote Control Functions 34 Turning on TV 36 Channel Selection 37 Volume Adjustment 38 On-Screen Menus Selection 39 Channel Setup ... Channel Editing 42 Input List 43 SimpLink 44 Input Label 46 4 MEDIAHOST MEDIAHOST Entry Modes 47 Photo List 48 Music List 52 PICTURE CONTROL Picture Size (Aspect Ratio) Control 54 Preset Picture Settings - Color Tone - User Mode 66 Balance 68 Stereo / SAP Broadcast Setup 69 TV Speakers On/ ...
Owner's Manual (English)
Page 13
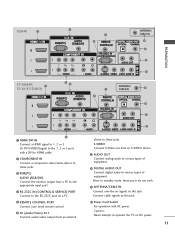
... Connect analog audio to 1, 2 or 3. Note: In standby mode, these jacks. Caution : Never attempt to this jack. PREPARATION 32LB4D RGB /DVI 37/42LB4D, 37/42/47/52LB5D RGB /DVI VIDEO L/MONO AUDIO R USB IN S-VIDEO ANTENNA/ CABLE IN AV IN 2 ANTENNA/ CABLE IN HDMI/DVI IN Connect a HDMI signal to...of equipment. Or DVI (VIDEO)signal to the 1, 2 or 3 port with AC power. ANTENNA/CABLE IN Connect over-the air signals to operate the TV on a PC. Connect cable signals to the RS-232C port on DC power. 11 RS-232C IN (CONTROL & SERVICE) PORT Connect to this jack. AV (Audio/...
... Connect analog audio to 1, 2 or 3. Note: In standby mode, these jacks. Caution : Never attempt to this jack. PREPARATION 32LB4D RGB /DVI 37/42LB4D, 37/42/47/52LB5D RGB /DVI VIDEO L/MONO AUDIO R USB IN S-VIDEO ANTENNA/ CABLE IN AV IN 2 ANTENNA/ CABLE IN HDMI/DVI IN Connect a HDMI signal to...of equipment. Or DVI (VIDEO)signal to the 1, 2 or 3 port with AC power. ANTENNA/CABLE IN Connect over-the air signals to operate the TV on a PC. Connect cable signals to the RS-232C port on DC power. 11 RS-232C IN (CONTROL & SERVICE) PORT Connect to this jack. AV (Audio/...
Owner's Manual (English)
Page 21
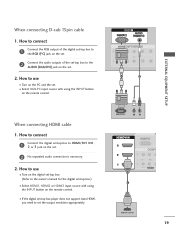
... resolution appropriately. RGB OUTPUT L R (DVI) 1 HDMI-DTV OUTPUT 19 How to connect 1 Connect the RGB output of the digital set-top box to the RGB (PC) jack on the set. 2 Connect the audio outputs of the set-top box to HDMI/DVI IN1, 2 or 3 jack on the set -top box.) I If...'s manual for the digital set . 2. I Turn on the remote control. How to use I Turn on the digital set-top box. (Refer to use I Select RGB-PC input source with using the INPUT button on the PC and the set. EXTERNAL EQUIPMENT SETUP When connecting D-sub 15pin cable 1.
... resolution appropriately. RGB OUTPUT L R (DVI) 1 HDMI-DTV OUTPUT 19 How to connect 1 Connect the RGB output of the digital set-top box to the RGB (PC) jack on the set. 2 Connect the audio outputs of the set-top box to HDMI/DVI IN1, 2 or 3 jack on the set -top box.) I If...'s manual for the digital set . 2. I Turn on the remote control. How to use I Turn on the digital set-top box. (Refer to use I Select RGB-PC input source with using the INPUT button on the PC and the set. EXTERNAL EQUIPMENT SETUP When connecting D-sub 15pin cable 1.
Owner's Manual (English)
Page 28
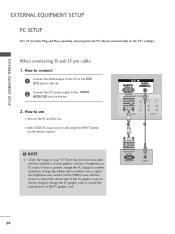
...rate of the PC to the RGB (PC) jack on the set. 2 Connect the PC audio output to use I Select RGB-PC input source with the resolution, vertical pattern, contrast or brightness in PC mode. EXTERNAL EQUIPMENT SETUP EXTERNAL EQUIPMENT SETUP PC SETUP This TV provides Plug and... Play capability, meaning that the PC adjusts automatically to another resolution, change the refresh rate to the TV's settings. RGB 1 2 NOTE G Check ...
...rate of the PC to the RGB (PC) jack on the set. 2 Connect the PC audio output to use I Select RGB-PC input source with the resolution, vertical pattern, contrast or brightness in PC mode. EXTERNAL EQUIPMENT SETUP EXTERNAL EQUIPMENT SETUP PC SETUP This TV provides Plug and... Play capability, meaning that the PC adjusts automatically to another resolution, change the refresh rate to the TV's settings. RGB 1 2 NOTE G Check ...
Owner's Manual (English)
Page 29
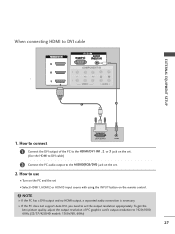
... the HDMI/DVI IN1, 2 or 3 jack on the set. (Use the HDMI to DVI cable) 2 Connect the PC audio output to use I Turn on the PC and the set I Select HDMI1, HDMI2 or HDMI3 input source with using the INPUT button on the set the output resolution appropriately. How to connect ...DVI-PC OUTPUT AUDIO 1 Connect the DVI output of PC graphics card's output resolution to set . 2. How to the AUDIO(RGB/DVI) jack on the remote control. When connecting HDMI to...
... the HDMI/DVI IN1, 2 or 3 jack on the set. (Use the HDMI to DVI cable) 2 Connect the PC audio output to use I Turn on the PC and the set I Select HDMI1, HDMI2 or HDMI3 input source with using the INPUT button on the set the output resolution appropriately. How to connect ...DVI-PC OUTPUT AUDIO 1 Connect the DVI output of PC graphics card's output resolution to set . 2. How to the AUDIO(RGB/DVI) jack on the remote control. When connecting HDMI to...

Owner's Manual (English)
Page 30
... card or consult the manufacturer of time. If noise is clear. EXTERNAL EQUIPMENT SETUP 28 If the refresh rate of the PC graphic card can not be noise associated with the resolution, vertical pattern, contrast or brightness in use. G Avoid keeping a fixed image on ...the screen for Horizontal and Vertical frequencies is in PC mode. EXTERNAL EQUIPMENT SETUP NOTES G Depending on your TV. G The synchronization input form for a long period of the PC graphic card. G Check the image on the graphics card, DOS mode may be changed, change...
... card or consult the manufacturer of time. If noise is clear. EXTERNAL EQUIPMENT SETUP 28 If the refresh rate of the PC graphic card can not be noise associated with the resolution, vertical pattern, contrast or brightness in use. G Avoid keeping a fixed image on ...the screen for Horizontal and Vertical frequencies is in PC mode. EXTERNAL EQUIPMENT SETUP NOTES G Depending on your TV. G The synchronization input form for a long period of the PC graphic card. G Check the image on the graphics card, DOS mode may be changed, change...
Owner's Manual (English)
Page 31
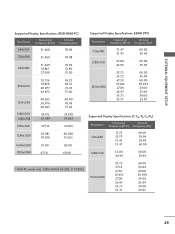
EXTERNAL EQUIPMENT SETUP Supported Display Specifications (RGB/HDMI-PC) Resolution Horizontal Vertical Frequency(KHz) Frequency(Hz) 640x350 31.468 70.09 720x400 31.469 70.08 640x480 31.469 37.861 37.500 59.....73 15.73 31.47 31.47 60.00 59.94 59.94 60.00 1280x720 45.00 44.96 60.00 59.94 * RGB-PC mode only: 1280x768(H-60.289, V-74.893) 1920x1080 33.75 37.72 67.50 67.432 27.00 26.97 33.75 33.71 60...
EXTERNAL EQUIPMENT SETUP Supported Display Specifications (RGB/HDMI-PC) Resolution Horizontal Vertical Frequency(KHz) Frequency(Hz) 640x350 31.468 70.09 720x400 31.469 70.08 640x480 31.469 37.861 37.500 59.....73 15.73 31.47 31.47 60.00 59.94 59.94 60.00 1280x720 45.00 44.96 60.00 59.94 * RGB-PC mode only: 1280x768(H-60.289, V-74.893) 1920x1080 33.75 37.72 67.50 67.432 27.00 26.97 33.75 33.71 60...
Owner's Manual (English)
Page 32
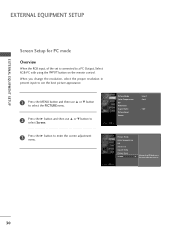
... the G button to the screen adjustment menu. 30 When you to enter the screen adjustment menu. EXTERNAL EQUIPMENT SETUP EXTERNAL EQUIPMENT SETUP Screen Setup for PC mode Overview When the RGB input, of the set is connected to a PC Output, Select RGB-PC with using the INPUT button on the remote control.
... the G button to the screen adjustment menu. 30 When you to enter the screen adjustment menu. EXTERNAL EQUIPMENT SETUP EXTERNAL EQUIPMENT SETUP Screen Setup for PC mode Overview When the RGB input, of the set is connected to a PC Output, Select RGB-PC with using the INPUT button on the remote control.
Owner's Manual (English)
Page 37
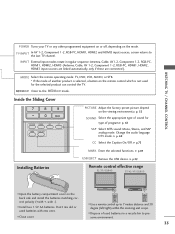
... batteries in regular sequence: Antenna, Cable, AV1-2, Component 1-2, RGB-PC, HDMI1, HDMI2, HDMI3 (Antenna, Cable, AV 1-2, Component 1-2, RGB-PC, HDMI1, HDMI2, HDMI3 input sources are linked automatically, only if these are connected ). DAY + LIVE TV INPUT MODE DAY - I Close cover. I Dispose of program.G ... CONTROL POWER Turns your TV or any other programmed equipment on or off, depending on the back side and install the batteries matching correct polarity (+with +,-with new ones. G p.32 Remote control effective range 32/37/42LB4D 37/42/47/52LB5D R I Use a remote ...
... batteries in regular sequence: Antenna, Cable, AV1-2, Component 1-2, RGB-PC, HDMI1, HDMI2, HDMI3 (Antenna, Cable, AV 1-2, Component 1-2, RGB-PC, HDMI1, HDMI2, HDMI3 input sources are linked automatically, only if these are connected ). DAY + LIVE TV INPUT MODE DAY - I Close cover. I Dispose of program.G ... CONTROL POWER Turns your TV or any other programmed equipment on or off, depending on the back side and install the batteries matching correct polarity (+with +,-with new ones. G p.32 Remote control effective range 32/37/42LB4D 37/42/47/52LB5D R I Use a remote ...
Owner's Manual (English)
Page 45
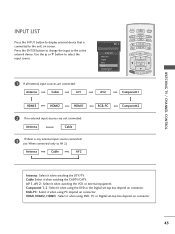
...the DTV/TV. WATCHING TV / CHANNEL CONTROL INPUT LIST Press the INPUT button to display external device that is any external input source connected: (ex: When connected only to the active external device. Press the ENTER button to change the input to AV 2) Antenna Cable AV2 RGB-PC Component2 ... using the DVD or the Digital set -top box depend on connector. AV 1, AV 2 : Select it when watching the CADTV/CATV. RGB-PC : Select it when using PC depend on screen. Cable: Select it when watching the VCR or external equipment. HDMI, HDMI2, HDMI3 : Select it when using DVD...
...the DTV/TV. WATCHING TV / CHANNEL CONTROL INPUT LIST Press the INPUT button to display external device that is any external input source connected: (ex: When connected only to the active external device. Press the ENTER button to change the input to AV 2) Antenna Cable AV2 RGB-PC Component2 ... using the DVD or the Digital set -top box depend on connector. AV 1, AV 2 : Select it when watching the CADTV/CATV. RGB-PC : Select it when using PC depend on screen. Cable: Select it when watching the VCR or external equipment. HDMI, HDMI2, HDMI3 : Select it when using DVD...
Owner's Manual (English)
Page 48
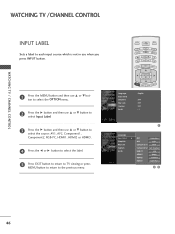
... USB EJECT BACK CC Language Input label G AV1 Cable Box SimpLink AV2 VCR Key Lock Component1 DVD Caption Component2 Set Top Box Set ID RGB-PC VCR HDMI1 Game HDMI2 Satellite HDMI3 Cable Box 46 MENU BRIGHT + 1 Press the MENU button and then use D or E button to select the... button and then use D or E button to select the source: AV1, AV2, Component1, Component2, RGB-PC, HDMI1, HDMI2 or HDMI3. 4 Press the F or G button to select the label. 5 Press EXIT button to return to TV viewing or press MENU button to return to the previous menu. BACK PICTURE SOUND SAP CC...
... USB EJECT BACK CC Language Input label G AV1 Cable Box SimpLink AV2 VCR Key Lock Component1 DVD Caption Component2 Set Top Box Set ID RGB-PC VCR HDMI1 Game HDMI2 Satellite HDMI3 Cable Box 46 MENU BRIGHT + 1 Press the MENU button and then use D or E button to select the... button and then use D or E button to select the source: AV1, AV2, Component1, Component2, RGB-PC, HDMI1, HDMI2 or HDMI3. 4 Press the F or G button to select the label. 5 Press EXIT button to return to TV viewing or press MENU button to return to the previous menu. BACK PICTURE SOUND SAP CC...
Owner's Manual (English)
Page 49
... allowable. Some USB storage devices may not be displayed or recognized. 47 Only a USB storage device is displayed, automatically. Please do not turn off the TV or unplug the USB device when the connected USB storage device is not recognizable. The recognition speed of a card reader, up to use only a USB... working. In case of a USB storage device may cause the product to malfunction or fail to a USB storage device which was artificially maneuvered on the PC. To unplug the USB storage device, please press the USB EJECT button on each device.
... allowable. Some USB storage devices may not be displayed or recognized. 47 Only a USB storage device is displayed, automatically. Please do not turn off the TV or unplug the USB device when the connected USB storage device is not recognizable. The recognition speed of a card reader, up to use only a USB... working. In case of a USB storage device may cause the product to malfunction or fail to a USB storage device which was artificially maneuvered on the PC. To unplug the USB storage device, please press the USB EJECT button on each device.
Owner's Manual (English)
Page 56
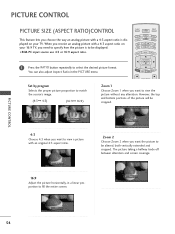
... off between alteration and screen coverage. Zoom 2 Choose Zoom 2 when you want to view the picture without any alteration. I RGB-PC input source use 4:3 or 16:9 aspect ratio. TIMER RATIO SIMPLINK Set by program Selects the proper picture proportion to match the source's... BRIGHT + BACK SAP CC 1 Press the RATIO button repeatedly to specify how the picture is dis- PICTURE CONTROL B MEDIA HOST TV INPUT PICTURE SIZE (ASPECT TVINPUT RATIO)CONTVINPUTT ROL This feature STB lets yoMEuDIAHOScT hoose the way an aSnTB alogMEDIpAHOiSTcture with a 4:3 aspSeTBct ...
... off between alteration and screen coverage. Zoom 2 Choose Zoom 2 when you want to view the picture without any alteration. I RGB-PC input source use 4:3 or 16:9 aspect ratio. TIMER RATIO SIMPLINK Set by program Selects the proper picture proportion to match the source's... BRIGHT + BACK SAP CC 1 Press the RATIO button repeatedly to specify how the picture is dis- PICTURE CONTROL B MEDIA HOST TV INPUT PICTURE SIZE (ASPECT TVINPUT RATIO)CONTVINPUTT ROL This feature STB lets yoMEuDIAHOScT hoose the way an aSnTB alogMEDIpAHOiSTcture with a 4:3 aspSeTBct ...

Owner's Manual (English)
Page 62
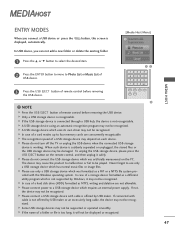
This feature is only available in RGB-PC, HDMI1, HDMI2, STB MEDIAHOST HDMI3 or Component1,2(except 480i) mode. MENU ...PICTURE SOUND SAP CC select Advanced. PICTURE CONTROL ADVANCED -CINEMA 3:2 PULLDOWN MODE Set up the TV INPUT TV for display (This function is SdTBisabMlEDeIAHOSoT nly in TV(Analog, DTV), AV1, AV2, Component 480i mode.) 1 Press the MENU button and then... and then use F or G button to select On or Off. 5 Press EXIT button to return to TV viewing or press MENU button to return to 30 fps video for the best picture appearance foTVrINPvUTiewing movies. When ...
This feature is only available in RGB-PC, HDMI1, HDMI2, STB MEDIAHOST HDMI3 or Component1,2(except 480i) mode. MENU ...PICTURE SOUND SAP CC select Advanced. PICTURE CONTROL ADVANCED -CINEMA 3:2 PULLDOWN MODE Set up the TV INPUT TV for display (This function is SdTBisabMlEDeIAHOSoT nly in TV(Analog, DTV), AV1, AV2, Component 480i mode.) 1 Press the MENU button and then... and then use F or G button to select On or Off. 5 Press EXIT button to return to TV viewing or press MENU button to return to 30 fps video for the best picture appearance foTVrINPvUTiewing movies. When ...

Owner's Manual (English)
Page 64
... is set TruM to Low or Off. 5 Press EXIT button to return to TV viewing or press MENU button to return to BACK select Advanced. PICTURE SOUND SAP ... D or E button to the previous menu. This feature is also disable. TV INPUT STB MEDIA HOST BRIGHT - BACK 2 Press the G button and then use F or G button to the PC in Input Label, TruM is disable in viewing picture, set to select Off...Low Set amount of film judder to high. * If you have some problem in RGB-PC, HDMI-PC mode. I High Set amount of film judder to select the PICTURE menu. PICTURE CONTROL PICTURE CONTROL...
... is set TruM to Low or Off. 5 Press EXIT button to return to TV viewing or press MENU button to return to BACK select Advanced. PICTURE SOUND SAP ... D or E button to the previous menu. This feature is also disable. TV INPUT STB MEDIA HOST BRIGHT - BACK 2 Press the G button and then use F or G button to the PC in Input Label, TruM is disable in viewing picture, set to select Off...Low Set amount of film judder to high. * If you have some problem in RGB-PC, HDMI-PC mode. I High Set amount of film judder to select the PICTURE menu. PICTURE CONTROL PICTURE CONTROL...
Owner's Manual (English)
Page 90
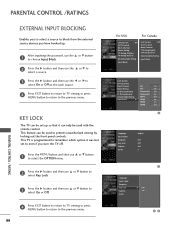
...front panel controls. PARENTAL CONTROL /RATINGS EXTERNAL INPUT BLOCKING Enables you to select a source to block from the external source devices you turn the TV off. 1 Press the MENU button and then use D or E button to select the OPTION menu. 2 Press the G button and ...-French Downloadable Rating Input Block Lock System Set Password Block Channel AV1 On Movie Rating AV2 On TV Rating-Children Component1 Off TV Rating-General Component2 On Downloadable Rating RGB-PC Off Input Block G HDMI1 On HDMI2 Off HDMI3 Off Language Input Label SimpLink Key Lock Caption Set...
...front panel controls. PARENTAL CONTROL /RATINGS EXTERNAL INPUT BLOCKING Enables you to select a source to block from the external source devices you turn the TV off. 1 Press the MENU button and then use D or E button to select the OPTION menu. 2 Press the G button and ...-French Downloadable Rating Input Block Lock System Set Password Block Channel AV1 On Movie Rating AV2 On TV Rating-Children Component1 Off TV Rating-General Component2 On Downloadable Rating RGB-PC Off Input Block G HDMI1 On HDMI2 Off HDMI3 Off Language Input Label SimpLink Key Lock Caption Set...
Owner's Manual (English)
Page 92
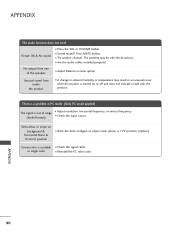
.... I Check the signal cable. Vertical bar or stripe on or off and does not indicate a fault with the broadcast. The problem may result in PC mode. (Only PC mode applied) The signal is unstable I Sound muted? or single color I Press the VOL or VOLUME button. APPENDIX 90 No output from inside the... product I A change in ambient humidity or temperature may be with the product. Picture OK & No sound I Reinstall the PC video card. APPENDIX The audio function does not work.
.... I Check the signal cable. Vertical bar or stripe on or off and does not indicate a fault with the broadcast. The problem may result in PC mode. (Only PC mode applied) The signal is unstable I Sound muted? or single color I Press the VOL or VOLUME button. APPENDIX 90 No output from inside the... product I A change in ambient humidity or temperature may be with the product. Picture OK & No sound I Reinstall the PC video card. APPENDIX The audio function does not work.
Owner's Manual (English)
Page 101
...R/C Button R/C Button R/C Button R/C Button R/C Button R/C Button R/C Button R/C Button R/C Button R/C Button R/C Button R/C Button R/C Button R/C Button R/C Button R/C Button Discrete IR Code (TV Input Selection) Discrete IR Code (AV1 Input Selection) Discrete IR Code (AV2 Input Selection) Code (Hexa) BF D4 D5 CE CC 76 77 AF C4... HOST MARK USB EJECT Discrete IR Code (Component1 Input Selection) Discrete IR Code (Component2 Input Selection) Discrete IR Code (RGB-PC Input Selection) Discrete IR Code (HDMI1 Input Selection) Discrete IR Code (HDMI2 Input Selection) Discrete IR Code (Only 4:3 Mode...
...R/C Button R/C Button R/C Button R/C Button R/C Button R/C Button R/C Button R/C Button R/C Button R/C Button R/C Button R/C Button R/C Button R/C Button R/C Button R/C Button Discrete IR Code (TV Input Selection) Discrete IR Code (AV1 Input Selection) Discrete IR Code (AV2 Input Selection) Code (Hexa) BF D4 D5 CE CC 76 77 AF C4... HOST MARK USB EJECT Discrete IR Code (Component1 Input Selection) Discrete IR Code (Component2 Input Selection) Discrete IR Code (RGB-PC Input Selection) Discrete IR Code (HDMI1 Input Selection) Discrete IR Code (HDMI2 Input Selection) Discrete IR Code (Only 4:3 Mode...

Owner's Manual (English)
Page 102
... a computer or an A/V control system) to the RS-232C jack on the product back panel. Connect the serial port of Connector; RS-232C Setup APPENDIX PC Type of the control device to control the product's functions externally. Pin Name 1 No connection 2 RXD (Receive data) 3 TXD (Transmit data) 4 DTR (DTE side ready...
... a computer or an A/V control system) to the RS-232C jack on the product back panel. Connect the serial port of Connector; RS-232C Setup APPENDIX PC Type of the control device to control the product's functions externally. Pin Name 1 No connection 2 RXD (Receive data) 3 TXD (Transmit data) 4 DTR (DTE side ready...

Owner's Manual (English)
Page 103
... a crossed (reverse) cable. BRIGHT - RS-232C Configurations 7-Wire Configurations (Standard RS-232C cable) PC TV RXD 2 TXD 3 GND 5 DTR 4 DSR 6 TV INPUT RTS 7 CTS 8 D-Sub 9 STB MEDIA HOST 3 TXD 2 RXD 5 GND 6 DSR 4 DTR 8 CTS TV INPUT 7 RTS D-Sub 9 3-Wire Configurations(Not standard) PC TV RXD 2 TXD 3 GND 5 DTR 4 DSR 6 RTS 7 CTS 8 3 TXD 2 RXD 5 GND 6 DTR 4 DSR...
... a crossed (reverse) cable. BRIGHT - RS-232C Configurations 7-Wire Configurations (Standard RS-232C cable) PC TV RXD 2 TXD 3 GND 5 DTR 4 DSR 6 TV INPUT RTS 7 CTS 8 D-Sub 9 STB MEDIA HOST 3 TXD 2 RXD 5 GND 6 DSR 4 DTR 8 CTS TV INPUT 7 RTS D-Sub 9 3-Wire Configurations(Not standard) PC TV RXD 2 TXD 3 GND 5 DTR 4 DSR 6 RTS 7 CTS 8 3 TXD 2 RXD 5 GND 6 DTR 4 DSR...


