
Owner's Manual (English)
Page 6
... Menus Language Selection 72 Caption Mode - CONTENTS WARNING / CAUTION 1 SAFETY INSTRUCTIONS 2 FEATURES OF THIS TV 6 PREPARATION Accessories 7 Front Panel Controls 8 Back Panel Information 10 Attaching the TV to a Wall 12 Stand Installation 13 Back Cover for Wire Arrangement 14 Desktop Pedestal Installation 16 Vesa ...USB In Setup 32 Audio Out Setup 33 WATCHING TV / CHANNEL CONTROL Remote Control Functions 34 Turning on TV 36 Channel Selection 37 Volume Adjustment 38 On-Screen Menus Selection 39 Channel Setup - Channel Editing 42 Input List 43 SimpLink 44 Input Label 46 4...
... Menus Language Selection 72 Caption Mode - CONTENTS WARNING / CAUTION 1 SAFETY INSTRUCTIONS 2 FEATURES OF THIS TV 6 PREPARATION Accessories 7 Front Panel Controls 8 Back Panel Information 10 Attaching the TV to a Wall 12 Stand Installation 13 Back Cover for Wire Arrangement 14 Desktop Pedestal Installation 16 Vesa ...USB In Setup 32 Audio Out Setup 33 WATCHING TV / CHANNEL CONTROL Remote Control Functions 34 Turning on TV 36 Channel Selection 37 Volume Adjustment 38 On-Screen Menus Selection 39 Channel Setup - Channel Editing 42 Input List 43 SimpLink 44 Input Label 46 4...
Owner's Manual (English)
Page 10
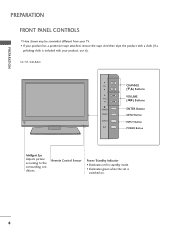
... is included with your product has a protection tape attached, remove the tape. I If your product, use it). 32/37/42LB4D CH CHANNEL (E,D) Buttons VOLUME VOL (F,G) Buttons ENTER MENU ENTER Button MENU Button INPUT INPUT Button R /I Here shown may be somewhat different ...from your TV. And then wipe the product with a cloth (If a polishing cloth is switched on. 8 PREPARATION PREPARATION FRONT PANEL CONTROLS I POWER Button Intelligent Eye Adjusts picture according to the surrounding conditions.
... is included with your product has a protection tape attached, remove the tape. I If your product, use it). 32/37/42LB4D CH CHANNEL (E,D) Buttons VOLUME VOL (F,G) Buttons ENTER MENU ENTER Button MENU Button INPUT INPUT Button R /I Here shown may be somewhat different ...from your TV. And then wipe the product with a cloth (If a polishing cloth is switched on. 8 PREPARATION PREPARATION FRONT PANEL CONTROLS I POWER Button Intelligent Eye Adjusts picture according to the surrounding conditions.
Owner's Manual (English)
Page 12
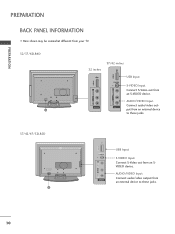
... device to these jacks. 37/42/47/52LB5D VIDEO L/MONO AUDIO R USB IN S-VIDEO AV IN 2 USB Input S-VIDEO Input Connect S-Video out from an S-VIDEO device. PREPARATION PREPARATION BACK PANEL INFORMATION I Here shown may be somewhat different from your TV. 32/37/42LB4D VIDEO L/MONO AUDIO R USB IN... S-VIDEO AV IN 2 VIDEO L/MONO AUDIO R VIDEO L/MONO AUDIO R USB IN USB IN 32 inches S-VIDEO AV IN 2 AV IN 2 37/42 inches USB IN USB IN...
... device to these jacks. 37/42/47/52LB5D VIDEO L/MONO AUDIO R USB IN S-VIDEO AV IN 2 USB Input S-VIDEO Input Connect S-Video out from an S-VIDEO device. PREPARATION PREPARATION BACK PANEL INFORMATION I Here shown may be somewhat different from your TV. 32/37/42LB4D VIDEO L/MONO AUDIO R USB IN... S-VIDEO AV IN 2 VIDEO L/MONO AUDIO R VIDEO L/MONO AUDIO R USB IN USB IN 32 inches S-VIDEO AV IN 2 AV IN 2 37/42 inches USB IN USB IN...
Owner's Manual (English)
Page 59
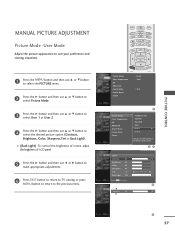
... MANUAL PICTURE ADJUSTMENT STB MEDIA HOST STB MEDIA HOST Picture Mode -User Mode Adjust the picture appearance to confirm. MENU BRIGHT + TV INP TIMER RATIO SIMPLINK Picture Mode : User1 1 Press the MENU button and then use D or E button to select the PICTURE menu. ...I [Back Light] To control the brightness of screen, adjust the brightness of LCD panel . User1 Contrast 85 Brightness 50 Color 50 Sharpness 50 Tint 0 R Back Light 100 Press MENU to suit your preference and viewing situations. G G E...
... MANUAL PICTURE ADJUSTMENT STB MEDIA HOST STB MEDIA HOST Picture Mode -User Mode Adjust the picture appearance to confirm. MENU BRIGHT + TV INP TIMER RATIO SIMPLINK Picture Mode : User1 1 Press the MENU button and then use D or E button to select the PICTURE menu. ...I [Back Light] To control the brightness of screen, adjust the brightness of LCD panel . User1 Contrast 85 Brightness 50 Color 50 Sharpness 50 Tint 0 R Back Light 100 Press MENU to suit your preference and viewing situations. G G E...
Owner's Manual (English)
Page 90
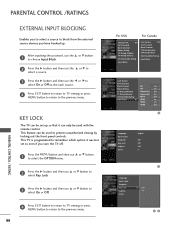
This TV is programmed to remember which option it can be used to prevent unauthorized viewing by locking out the front panel controls. This feature can only be used with the remote control. PARENTAL CONTROL /RATINGS EXTERNAL INPUT BLOCKING Enables you to select a source... to block from the external source devices you turn the TV off. 1 Press the MENU button and then ...
This TV is programmed to remember which option it can be used to prevent unauthorized viewing by locking out the front panel controls. This feature can only be used with the remote control. PARENTAL CONTROL /RATINGS EXTERNAL INPUT BLOCKING Enables you to select a source... to block from the external source devices you turn the TV off. 1 Press the MENU button and then ...
Owner's Manual (English)
Page 102
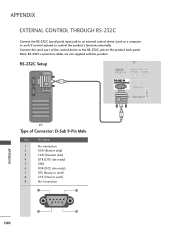
... data) 4 DTR (DTE side ready) 5 GND 6 DSR (DCE side ready) 7 RTS (Ready to send) 8 CTS (Clear to the RS-232C jack on the product back panel. APPENDIX EXTERNAL CONTROL THROUGH RS-232C Connect the RS-232C (serial port) input jack to an external control device (such as a computer or an A/V control...
... data) 4 DTR (DTE side ready) 5 GND 6 DSR (DCE side ready) 7 RTS (Ready to send) 8 CTS (Clear to the RS-232C jack on the product back panel. APPENDIX EXTERNAL CONTROL THROUGH RS-232C Connect the RS-232C (serial port) input jack to an external control device (such as a computer or an A/V control...
Owner's Manual (English)
Page 107
...) on/off Data 1: Lock on Acknowledgement [m][ ][Set ID][ ][OK/NG][Data][x] If you're not using the remote control and front panel controls on the TV, use this mode. See page 105. Transmission [k][t][ ][Set ID][ ][Data][Cr] Data Min: 0 ~ Max: 64(*transmit by Hexadecimal ...~ Max : 64(*transmit by Hexadecimal code) *Refer to 'Real data mapping 1'. Remote Control Lock Mode (Command2:m) To lock the remote control and the front panel controls on Acknowledgement [l][ ][Set ID][ ][OK/NG][Data][x] 14. See page 105. Transmission [k][j][ ][Set ID][ ][Data][Cr] Data Red : 0 ~ ...
...) on/off Data 1: Lock on Acknowledgement [m][ ][Set ID][ ][OK/NG][Data][x] If you're not using the remote control and front panel controls on the TV, use this mode. See page 105. Transmission [k][t][ ][Set ID][ ][Data][Cr] Data Min: 0 ~ Max: 64(*transmit by Hexadecimal ...~ Max : 64(*transmit by Hexadecimal code) *Refer to 'Real data mapping 1'. Remote Control Lock Mode (Command2:m) To lock the remote control and the front panel controls on Acknowledgement [l][ ][Set ID][ ][OK/NG][Data][x] 14. See page 105. Transmission [k][j][ ][Set ID][ ][Data][Cr] Data Red : 0 ~ ...


