
Owner's Manual (English)
Page 6
... System Captions . . .75 - Caption Option 76 CONTENTS WARNING / CAUTION 1 SAFETY INSTRUCTIONS 2 FEATURES OF THIS TV 6 PREPARATION Accessories 7 Front Panel Controls 8 Back Panel Information 10 Attaching the TV to a Wall 12 Stand Installation 13 Back Cover for Wire Arrangement 14 Desktop Pedestal Installation 16 Vesa Wall Mounting 16...Audio Language 71 On-Screen Menus Language Selection 72 Caption Mode - Cinema 3:2 Pulldown Mode 60 Advanced - Channel Editing 42 Input List 43 SimpLink 44 Input Label 46 4 MEDIAHOST MEDIAHOST Entry Modes 47 Photo List 48 Music List 52 ...
... System Captions . . .75 - Caption Option 76 CONTENTS WARNING / CAUTION 1 SAFETY INSTRUCTIONS 2 FEATURES OF THIS TV 6 PREPARATION Accessories 7 Front Panel Controls 8 Back Panel Information 10 Attaching the TV to a Wall 12 Stand Installation 13 Back Cover for Wire Arrangement 14 Desktop Pedestal Installation 16 Vesa Wall Mounting 16...Audio Language 71 On-Screen Menus Language Selection 72 Caption Mode - Cinema 3:2 Pulldown Mode 60 Advanced - Channel Editing 42 Input List 43 SimpLink 44 Input Label 46 4 MEDIAHOST MEDIAHOST Entry Modes 47 Photo List 48 Music List 52 ...
Owner's Manual (English)
Page 10
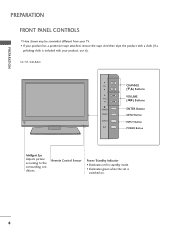
...37/42LB4D CH CHANNEL (E,D) Buttons VOLUME VOL (F,G) Buttons ENTER MENU ENTER Button MENU Button INPUT INPUT Button R /I POWER Button Intelligent Eye Adjusts picture according to the surrounding conditions. PREPARATION PREPARATION FRONT PANEL ...CONTROLS I If your product has a protection tape attached, remove the tape. Remote Control Sensor Power/Standby Indicator • illuminates red in standby mode. • illuminates green when the set is included with a cloth (If a polishing cloth is switched on. 8 I Here shown may be somewhat different from your TV...
...37/42LB4D CH CHANNEL (E,D) Buttons VOLUME VOL (F,G) Buttons ENTER MENU ENTER Button MENU Button INPUT INPUT Button R /I POWER Button Intelligent Eye Adjusts picture according to the surrounding conditions. PREPARATION PREPARATION FRONT PANEL ...CONTROLS I If your product has a protection tape attached, remove the tape. Remote Control Sensor Power/Standby Indicator • illuminates red in standby mode. • illuminates green when the set is included with a cloth (If a polishing cloth is switched on. 8 I Here shown may be somewhat different from your TV...
Owner's Manual (English)
Page 12
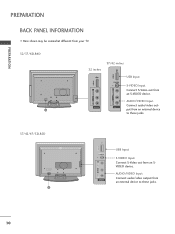
.../video out- PREPARATION PREPARATION BACK PANEL INFORMATION I Here shown may be somewhat different from your TV. 32/37/42LB4D VIDEO L/MONO AUDIO R USB IN S-VIDEO AV IN 2 VIDEO L/MONO AUDIO R VIDEO L/MONO AUDIO R USB IN USB IN 32 inches S-VIDEO AV IN 2 AV IN 2 37/42 inches USB IN USB IN VIDEO... AV IN 2 AV IN 2 VIDEO L/MONO AUDIO R USB IN USB Input S-VIDEO Input Connect S-Video out from an external device to these jacks. 37/42/47/52LB5D VIDEO L/MONO AUDIO R USB IN S-VIDEO AV IN 2 USB Input S-VIDEO Input Connect S-Video out from an SVIDEO device. AUDIO/VIDEO Input Connect...
.../video out- PREPARATION PREPARATION BACK PANEL INFORMATION I Here shown may be somewhat different from your TV. 32/37/42LB4D VIDEO L/MONO AUDIO R USB IN S-VIDEO AV IN 2 VIDEO L/MONO AUDIO R VIDEO L/MONO AUDIO R USB IN USB IN 32 inches S-VIDEO AV IN 2 AV IN 2 37/42 inches USB IN USB IN VIDEO... AV IN 2 AV IN 2 VIDEO L/MONO AUDIO R USB IN USB Input S-VIDEO Input Connect S-Video out from an external device to these jacks. 37/42/47/52LB5D VIDEO L/MONO AUDIO R USB IN S-VIDEO AV IN 2 USB Input S-VIDEO Input Connect S-Video out from an SVIDEO device. AUDIO/VIDEO Input Connect...
Owner's Manual (English)
Page 59
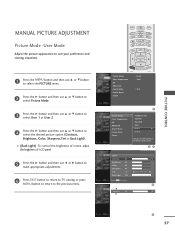
... use F or G button to make appropriate adjustments. 6 Press EXIT button to return to TV viewing or press MENU button to return to select Picture Mode. I [Back Light] To control the brightness of screen, adjust the brightness of LCD panel . Picture Mode Color Temperature XD Advanced Aspect Ratio Picture Reset Screen Intelligent Eye Dynamic...
... use F or G button to make appropriate adjustments. 6 Press EXIT button to return to TV viewing or press MENU button to return to select Picture Mode. I [Back Light] To control the brightness of screen, adjust the brightness of LCD panel . Picture Mode Color Temperature XD Advanced Aspect Ratio Picture Reset Screen Intelligent Eye Dynamic...
Owner's Manual (English)
Page 90
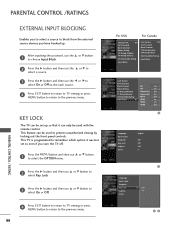
... viewing by locking out the front panel controls. PARENTAL CONTROL / RATING KEY LOCK The TV can only be used with the remote control. PARENTAL CONTROL /RATINGS EXTERNAL INPUT BLOCKING Enables you to select a source to block from the external source devices you turn the TV off. 1 Press the MENU button... or E to select a source. 3 Press the G button and then use D or E button to select On or Off. 4 Press EXIT button to return to TV viewing or press MENU button to return to the previous menu. 88 For USA For Canada Lock System : Off Set Password Block Channel Movie Rating...
... viewing by locking out the front panel controls. PARENTAL CONTROL / RATING KEY LOCK The TV can only be used with the remote control. PARENTAL CONTROL /RATINGS EXTERNAL INPUT BLOCKING Enables you to select a source to block from the external source devices you turn the TV off. 1 Press the MENU button... or E to select a source. 3 Press the G button and then use D or E button to select On or Off. 4 Press EXIT button to return to TV viewing or press MENU button to return to the previous menu. 88 For USA For Canada Lock System : Off Set Password Block Channel Movie Rating...
Owner's Manual (English)
Page 102
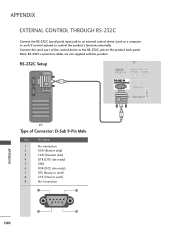
Connect the serial port of Connector; RS-232C Setup APPENDIX PC Type of the control device to the RS-232C jack on the product back panel. Pin Name 1 No connection 2 RXD (Receive data) 3 TXD (Transmit data) 4 DTR (DTE side ready) 5 GND 6 DSR (DCE side ready) 7 RTS (Ready to send) 8 CTS (Clear ...
Connect the serial port of Connector; RS-232C Setup APPENDIX PC Type of the control device to the RS-232C jack on the product back panel. Pin Name 1 No connection 2 RXD (Receive data) 3 TXD (Transmit data) 4 DTR (DTE side ready) 5 GND 6 DSR (DCE side ready) 7 RTS (Ready to send) 8 CTS (Clear ...
Owner's Manual (English)
Page 107
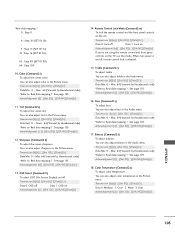
... 1'. See page 105. Acknowledgement [k][ ][Set ID][ ][OK/NG][Data][x] 13. OSD Select (Command2:l) To select OSD (On Screen Display) on the TV, use this mode. Transmission [k][m][ ][Set ID][ ][Data][Cr] Data 0: Lock off Data 1: Lock on Acknowledgement [m][ ][Set ID][ ][OK/NG][Data...][x] If you're not using the remote control and front panel controls on /off , remote control lock is on Acknowledgement [l][ ][Set ID][ ][OK/NG][Data][x] 14. Transmission [k][t][ ][Set ID][ ][Data][Cr] Data...
... 1'. See page 105. Acknowledgement [k][ ][Set ID][ ][OK/NG][Data][x] 13. OSD Select (Command2:l) To select OSD (On Screen Display) on the TV, use this mode. Transmission [k][m][ ][Set ID][ ][Data][Cr] Data 0: Lock off Data 1: Lock on Acknowledgement [m][ ][Set ID][ ][OK/NG][Data...][x] If you're not using the remote control and front panel controls on /off , remote control lock is on Acknowledgement [l][ ][Set ID][ ][OK/NG][Data][x] 14. Transmission [k][t][ ][Set ID][ ][Data][Cr] Data...


