Owner's Manual (English)
Page 2
... trademarks of a full digital image processor, six different main picture quality factors. High-resolution digital television broadcast and playback system composed of digital television, HDTV formats include 1080i and 720p resolutions. LG TV with one cable and produces the highest quality digital images and...XT is incorporated under license from SRS Labs, Inc. TruSurround XT technology is a trademark of LG's audio/video device connected to the HDMI (high-definition multimedia interface), LG TV with this logo works easily with this logo can play MP3 music from a MP3 player, ...
... trademarks of a full digital image processor, six different main picture quality factors. High-resolution digital television broadcast and playback system composed of digital television, HDTV formats include 1080i and 720p resolutions. LG TV with one cable and produces the highest quality digital images and...XT is incorporated under license from SRS Labs, Inc. TruSurround XT technology is a trademark of LG's audio/video device connected to the HDMI (high-definition multimedia interface), LG TV with this logo works easily with this logo can play MP3 music from a MP3 player, ...
Owner's Manual (English)
Page 4
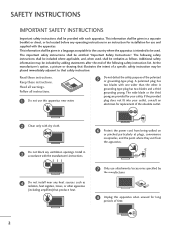
... the manufacturer's instructions. 4 Do not install near water. 5 Do not defeat the safety purpose of the polarized or grounding-type plug. At the manufacturer's option, a picture or drawing that illustrates the intent of the obsolete outlet. 2 Clean only with dry cloth. 3 Do not block any operating instructions in accordance with each...
... the manufacturer's instructions. 4 Do not install near water. 5 Do not defeat the safety purpose of the polarized or grounding-type plug. At the manufacturer's option, a picture or drawing that illustrates the intent of the obsolete outlet. 2 Clean only with dry cloth. 3 Do not block any operating instructions in accordance with each...
Owner's Manual (English)
Page 6
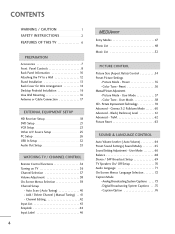
... 34 Turning on TV 36 Channel Selection 37 Volume Adjustment 38 On-Screen Menus Selection 39 Channel Setup - Channel Editing 42 Input List 43 SimpLink 44 Input Label 46 4 MEDIAHOST MEDIAHOST Entry Modes 47 Photo List 48 Music List 52 PICTURE CONTROL Picture Size (Aspect Ratio) Control 54 Preset Picture Settings - TruM 62 Picture Reset 63...
... 34 Turning on TV 36 Channel Selection 37 Volume Adjustment 38 On-Screen Menus Selection 39 Channel Setup - Channel Editing 42 Input List 43 SimpLink 44 Input Label 46 4 MEDIAHOST MEDIAHOST Entry Modes 47 Photo List 48 Music List 52 PICTURE CONTROL Picture Size (Aspect Ratio) Control 54 Preset Picture Settings - TruM 62 Picture Reset 63...
Owner's Manual (English)
Page 10
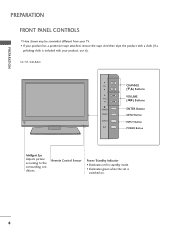
...the set is included with your product, use it). 32/37/42LB4D CH CHANNEL (E,D) Buttons VOLUME VOL (F,G) Buttons ENTER MENU ENTER Button MENU Button INPUT INPUT Button R /I POWER Button Intelligent Eye Adjusts picture according to the surrounding conditions. And then wipe the product with a... cloth (If a polishing cloth is switched on. 8 I If your TV. PREPARATION PREPARATION FRONT PANEL CONTROLS I Here shown may be somewhat...
...the set is included with your product, use it). 32/37/42LB4D CH CHANNEL (E,D) Buttons VOLUME VOL (F,G) Buttons ENTER MENU ENTER Button MENU Button INPUT INPUT Button R /I POWER Button Intelligent Eye Adjusts picture according to the surrounding conditions. And then wipe the product with a... cloth (If a polishing cloth is switched on. 8 I If your TV. PREPARATION PREPARATION FRONT PANEL CONTROLS I Here shown may be somewhat...
Owner's Manual (English)
Page 11
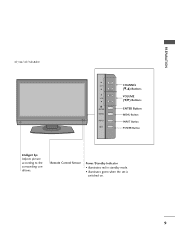
Remote Control Sensor Power/Standby Indicator • illuminates red in standby mode. • illuminates green when the set is switched on. 9 PREPARATION 37/42/47/52LB5D CH VOL ENTER MENU INPUT /I CHANNEL (E,D) Buttons VOLUME (F,G) Buttons ENTER Button MENU Button INPUT Button POWER Button Intelligent Eye Adjusts picture according to the surrounding conditions.
Remote Control Sensor Power/Standby Indicator • illuminates red in standby mode. • illuminates green when the set is switched on. 9 PREPARATION 37/42/47/52LB5D CH VOL ENTER MENU INPUT /I CHANNEL (E,D) Buttons VOLUME (F,G) Buttons ENTER Button MENU Button INPUT Button POWER Button Intelligent Eye Adjusts picture according to the surrounding conditions.
Owner's Manual (English)
Page 14
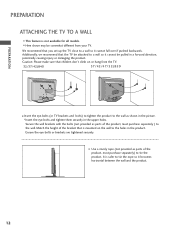
... A WALL I Here shown may be pulled in a forward direction, potentially causing injury or damaging the product. We recommend that the TV be attached to a wall so it becomes horizontal between the wall and the product. 12 Match the height of the product, must purchase separately ) to... of the product, must purchase separately) to tie the rope so it cannot be somewhat different from the TV. 32/37/42LB4D 37/42/47/52LB5D I Use a sturdy rope (not provided as shown in the picture. *Insert the eye-bolts and tighten them securely in the upper holes. I This feature is mounted on ...
... A WALL I Here shown may be pulled in a forward direction, potentially causing injury or damaging the product. We recommend that the TV be attached to a wall so it becomes horizontal between the wall and the product. 12 Match the height of the product, must purchase separately ) to... of the product, must purchase separately) to tie the rope so it cannot be somewhat different from the TV. 32/37/42LB4D 37/42/47/52LB5D I Use a sturdy rope (not provided as shown in the picture. *Insert the eye-bolts and tighten them securely in the upper holes. I This feature is mounted on ...
Owner's Manual (English)
Page 19
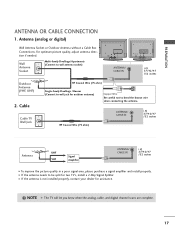
For optimum picture quality, adjust antenna direction if needed. Cable Cable TV Wall Jack RF Coaxial Wire (75 ohm) Single-family Dwellings /Houses (Connect to wall jack for two TV's, install a 2-Way Signal Splitter. NOTE The TV will let you know when the analog, cable, and digital channel scans...Wire (75 ohm) ANTENNA/ CABLE IN i.e) 37/42/47 /52 inches Antenna UHF Signal VHF Amplifier ANTENNA/ CABLE IN i.e) 37/42/47 /52 inches I If the antenna is not installed properly, contact your dealer for assistance. I To improve the picture quality in a poor signal area, please purchase a...
For optimum picture quality, adjust antenna direction if needed. Cable Cable TV Wall Jack RF Coaxial Wire (75 ohm) Single-family Dwellings /Houses (Connect to wall jack for two TV's, install a 2-Way Signal Splitter. NOTE The TV will let you know when the analog, cable, and digital channel scans...Wire (75 ohm) ANTENNA/ CABLE IN i.e) 37/42/47 /52 inches Antenna UHF Signal VHF Amplifier ANTENNA/ CABLE IN i.e) 37/42/47 /52 inches I If the antenna is not installed properly, contact your dealer for assistance. I To improve the picture quality in a poor signal area, please purchase a...
Owner's Manual (English)
Page 23
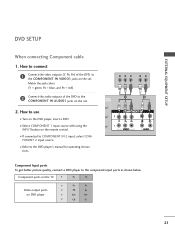
... audio outputs of the DVD to the DVD player's manual for operating instruc- Component ports on the TV Y PB PR Video output ports on the set . 2. Y PB PR L R 1 2 Component Input ports To get better picture quality, connect a DVD player to the COMPONENT IN AUDIO1 jacks on the remote control. PONENT 2 input source...
... audio outputs of the DVD to the DVD player's manual for operating instruc- Component ports on the TV Y PB PR Video output ports on the set . 2. Y PB PR L R 1 2 Component Input ports To get better picture quality, connect a DVD player to the COMPONENT IN AUDIO1 jacks on the remote control. PONENT 2 input source...
Owner's Manual (English)
Page 25
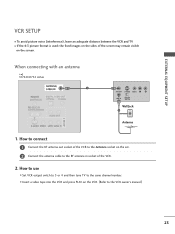
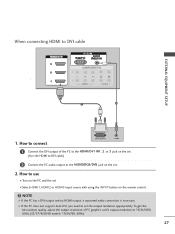
When connecting with an antenna i.e) 37/42/47/52 inches ANTENNA/ CABLE IN 1 ANT OUT S-VIDEO VIDEO L R ANT IN OUTPUT SWITCH Wall Jack 2 Antenna 1. How to connect 1 Connect the RF antenna out ... VCR owner's manual.) 23 How to use I Set VCR output switch to 3 or 4 and then tune TV to the RF antenna in socket of the screen may remain visible on the screen. I If the 4:3 picture format is used; the fixed images on the sides of the VCR. 2. EXTERNAL EQUIPMENT SETUP VCR SETUP...
When connecting with an antenna i.e) 37/42/47/52 inches ANTENNA/ CABLE IN 1 ANT OUT S-VIDEO VIDEO L R ANT IN OUTPUT SWITCH Wall Jack 2 Antenna 1. How to connect 1 Connect the RF antenna out ... VCR owner's manual.) 23 How to use I Set VCR output switch to 3 or 4 and then tune TV to the RF antenna in socket of the screen may remain visible on the screen. I If the 4:3 picture format is used; the fixed images on the sides of the VCR. 2. EXTERNAL EQUIPMENT SETUP VCR SETUP...
Owner's Manual (English)
Page 26
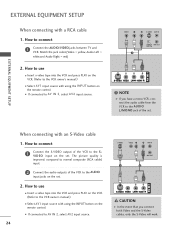
I If connected to connect 1 Connect the AUDIO/VIDEO jacks between TV and VCR. I Select AV1 input source with a RCA cable 1. The picture quality is improved; How to the AUDIO input jacks on the set . When connecting with using the INPUT button on the remote control. compared to ...
I If connected to connect 1 Connect the AUDIO/VIDEO jacks between TV and VCR. I Select AV1 input source with a RCA cable 1. The picture quality is improved; How to the AUDIO input jacks on the set . When connecting with using the INPUT button on the remote control. compared to ...
Owner's Manual (English)
Page 28
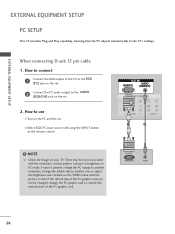
...cable 1. RGB 1 2 NOTE G Check the image on the set. 2 Connect the PC audio output to the TV's settings. RGB OUTPUT AUDIO 26 EXTERNAL EQUIPMENT SETUP EXTERNAL EQUIPMENT SETUP PC SETUP This TV provides Plug and Play capability, meaning that the PC adjusts automatically to the AUDIO (RGB/DVI) jack on...PC mode. There may be changed, change the refresh rate to another rate or adjust the brightness and contrast on the VIDEO menu until the picture is clear. I Turn on the remote control. If noise is present, change the PC output to another resolution, change the PC graphic card...
...cable 1. RGB 1 2 NOTE G Check the image on the set. 2 Connect the PC audio output to the TV's settings. RGB OUTPUT AUDIO 26 EXTERNAL EQUIPMENT SETUP EXTERNAL EQUIPMENT SETUP PC SETUP This TV provides Plug and Play capability, meaning that the PC adjusts automatically to the AUDIO (RGB/DVI) jack on...PC mode. There may be changed, change the refresh rate to another rate or adjust the brightness and contrast on the VIDEO menu until the picture is clear. I Turn on the remote control. If noise is present, change the PC output to another resolution, change the PC graphic card...
Owner's Manual (English)
Page 29
... is necessary. How to the AUDIO(RGB/DVI) jack on the remote control. When connecting HDMI to 1920x1080, 60Hz.(32/37/42LB4D models: 1360x768, 60Hz) 27 To get the best picture quality, adjust the output resolution of the PC to the HDMI/DVI IN1, 2 or 3 jack on the set. (Use the HDMI...
... is necessary. How to the AUDIO(RGB/DVI) jack on the remote control. When connecting HDMI to 1920x1080, 60Hz.(32/37/42LB4D models: 1360x768, 60Hz) 27 To get the best picture quality, adjust the output resolution of the PC to the HDMI/DVI IN1, 2 or 3 jack on the set. (Use the HDMI...

Owner's Manual (English)
Page 30
... period of time. The fixed image may become permanently imprinted on your TV. EXTERNAL EQUIPMENT SETUP 28 If noise is present, change the PC output to another rate or adjust the brightness and contrast on the PICTURE menu until the picture is clear. If the refresh rate of the PC graphic card can...
... period of time. The fixed image may become permanently imprinted on your TV. EXTERNAL EQUIPMENT SETUP 28 If noise is present, change the PC output to another rate or adjust the brightness and contrast on the PICTURE menu until the picture is clear. If the refresh rate of the PC graphic card can...

Owner's Manual (English)
Page 32
...RGB input, of the set is connected to enter the screen adjustment menu. Picture Mode Color Temperature XD Advanced Aspect Ratio Picture Reset Screen : User1 : Cool : 16:9 Picture Mode Color Temperature XD Advanced Aspect Ratio Picture Reset Screen G Selection ( G or ) leads you change the resolution,... select the proper resolution in present input to see the best picture appearance. 1 Press the MENU button and then use D or E button to select the PICTURE menu. 2 Press the G button and then use D or E button to select Screen. 3 Press the...
...RGB input, of the set is connected to enter the screen adjustment menu. Picture Mode Color Temperature XD Advanced Aspect Ratio Picture Reset Screen : User1 : Cool : 16:9 Picture Mode Color Temperature XD Advanced Aspect Ratio Picture Reset Screen G Selection ( G or ) leads you change the resolution,... select the proper resolution in present input to see the best picture appearance. 1 Press the MENU button and then use D or E button to select the PICTURE menu. 2 Press the G button and then use D or E button to select Screen. 3 Press the...

Owner's Manual (English)
Page 33
I The Phase adjustment range is -16 ~ +16. Size This function is to adjust picture to select Yes. 3 Press the ENTER button. And the horizontal screen size will also change. Phase This function allows you to minimize any horizontal noise ...
I The Phase adjustment range is -16 ~ +16. Size This function is to adjust picture to select Yes. 3 Press the ENTER button. And the horizontal screen size will also change. Phase This function allows you to minimize any horizontal noise ...
Owner's Manual (English)
Page 37
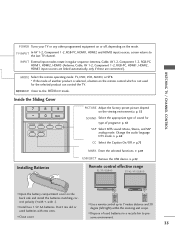
... + LIVE TV INPUT MODE DAY - INPUT External input modes rotate in a recycle bin to the last TV channel. Change.... STB MEDIA HOST WATCHING TV / CHANNEL CONTROL POWER Turns your TV or any other programmed equipment... on or off, depending on the back side and install the batteries matching correct polarity (+with +,-with new ones. MEDIAHOST Inside the Sliding Cover BACK PICTURE SOUND SAP CC MARK USB EJECT PICTURE Adjust the factory preset picture...scope. LIVE TV INPUT MODE DAY - I Open the battery compartment cover on the mode. TV INPUT In ...
... + LIVE TV INPUT MODE DAY - INPUT External input modes rotate in a recycle bin to the last TV channel. Change.... STB MEDIA HOST WATCHING TV / CHANNEL CONTROL POWER Turns your TV or any other programmed equipment... on or off, depending on the back side and install the batteries matching correct polarity (+with +,-with new ones. MEDIAHOST Inside the Sliding Cover BACK PICTURE SOUND SAP CC MARK USB EJECT PICTURE Adjust the factory preset picture...scope. LIVE TV INPUT MODE DAY - I Open the battery compartment cover on the mode. TV INPUT In ...

Owner's Manual (English)
Page 38
... on vacation, disconnect the power plug from the wall power outlet. MENU BRIGHT + TIMER RATIO SIMPLINK BACK PICTURE SOUND SAP CC MARK USB EJECT 36 At this moment, the TV switches to standby mode. The TV reverts to standby mode. I In standby mode, press the (or ON/OFF), INPUT, CH (D or ...E) button on the TV or press the POWER, INPUT, TV INPUT, CH(D or E), Number (0~9) button on the remote control. 2...
... on vacation, disconnect the power plug from the wall power outlet. MENU BRIGHT + TIMER RATIO SIMPLINK BACK PICTURE SOUND SAP CC MARK USB EJECT 36 At this moment, the TV switches to standby mode. The TV reverts to standby mode. I In standby mode, press the (or ON/OFF), INPUT, CH (D or ...E) button on the TV or press the POWER, INPUT, TV INPUT, CH(D or E), Number (0~9) button on the remote control. 2...

Owner's Manual (English)
Page 39
TV INPUT STB MEDIA HOST TIMER RATIO SIMPLINK BACK PICTURE SOUND SAP CC MARK USB EJECT WATCHING TV / CHANNEL CONTROL 37 CHANNEL SELECTION 1 Press the CH D or E or NUMBER buttons to select a channel number.
TV INPUT STB MEDIA HOST TIMER RATIO SIMPLINK BACK PICTURE SOUND SAP CC MARK USB EJECT WATCHING TV / CHANNEL CONTROL 37 CHANNEL SELECTION 1 Press the CH D or E or NUMBER buttons to select a channel number.
Owner's Manual (English)
Page 40
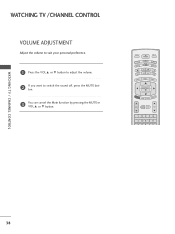
MENU BRIGHT + TIMER RATIO SIMPLINK BACK PICTURE SAP CC MARK USB EJECT 38 STB MEDIA HOST 1 Press the VOL D or E button to adjust the volume. 2 If you want to suit your personal preferTVeINnPUcT e. BACK PICTURE SOUND SAP CC MARK USB EJECT TV INPUT STB MEDIA HOST BRIGHT - WATCHING TV / CHANNEL CONTROL WATCHING TV /CHANNEL CONTROL VOLUME ADJUSTMENT Adjust the volume to switch the sound off, press the MUTE button. 3 You can cancel the Mute function by pressing the MUTE or VOL D or E button.
MENU BRIGHT + TIMER RATIO SIMPLINK BACK PICTURE SAP CC MARK USB EJECT 38 STB MEDIA HOST 1 Press the VOL D or E button to adjust the volume. 2 If you want to suit your personal preferTVeINnPUcT e. BACK PICTURE SOUND SAP CC MARK USB EJECT TV INPUT STB MEDIA HOST BRIGHT - WATCHING TV / CHANNEL CONTROL WATCHING TV /CHANNEL CONTROL VOLUME ADJUSTMENT Adjust the volume to switch the sound off, press the MUTE button. 3 You can cancel the Mute function by pressing the MUTE or VOL D or E button.
Owner's Manual (English)
Page 41
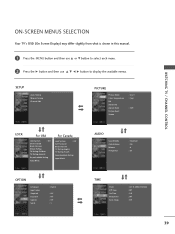
...PICTURE Picture Mode Color Temperature XD Advanced Aspect Ratio Picture Reset Screen : User1 : Cool : 16:9 LOCK For USA Lock System : Off Set Password Block Channel Movie Rating TV Rating-Children TV Rating-General Downloadable Rating Input Block For Canada Lock System Set Password Block Channel TV Rating-English TV... Input Block OPTION Language Input Label SimpLink Key Lock Caption Set ID : English : Off : Off : Off : 1 AUDIO Sound Mode Auto Volume Balance TV Speaker : Standard : On : 0 : On TIME Clock Off Time On Time Sleep Time Auto Sleep : Oct 19, 2006, 03:44 AM : ...
...PICTURE Picture Mode Color Temperature XD Advanced Aspect Ratio Picture Reset Screen : User1 : Cool : 16:9 LOCK For USA Lock System : Off Set Password Block Channel Movie Rating TV Rating-Children TV Rating-General Downloadable Rating Input Block For Canada Lock System Set Password Block Channel TV Rating-English TV... Input Block OPTION Language Input Label SimpLink Key Lock Caption Set ID : English : Off : Off : Off : 1 AUDIO Sound Mode Auto Volume Balance TV Speaker : Standard : On : 0 : On TIME Clock Off Time On Time Sleep Time Auto Sleep : Oct 19, 2006, 03:44 AM : ...

