

Owner's Manual
Page 1
...'S MANUAL LCD TV MODELS 37LF6* 42LF6* 47LF6* 52LF6* 37LF7* 42LF7* 37LY9* 42LY9* 47LY9* 52LY9* PLASMA TV MODELS 50PF9* 60PF9* Please read this information to 1996) ID Number(s): 4560: 37LY95 4534: 42LY95 4558: 47LY95 4537: 42LF65 4605: 42LY96 4607: 52LY96 4609: 42LF66 4611: 52LF65 4725: 42LF75 4615: 60PF96 4551: 60PF95 4535: 37LF65 4536... (1991 to your set . Trade Mark of the set . Retain it for future reference. See the label attached on the back cover and quote this manual carefully before operating your dealer when you require service.
...'S MANUAL LCD TV MODELS 37LF6* 42LF6* 47LF6* 52LF6* 37LF7* 42LF7* 37LY9* 42LY9* 47LY9* 52LY9* PLASMA TV MODELS 50PF9* 60PF9* Please read this information to 1996) ID Number(s): 4560: 37LY95 4534: 42LY95 4558: 47LY95 4537: 42LF65 4605: 42LY96 4607: 52LY96 4609: 42LF66 4611: 52LF65 4725: 42LF75 4615: 60PF96 4551: 60PF95 4535: 37LF65 4536... (1991 to your set . Trade Mark of the set . Retain it for future reference. See the label attached on the back cover and quote this manual carefully before operating your dealer when you require service.

Owner's Manual
Page 20
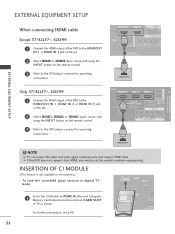
... 2 jack on the set. 2 Turn on the digital set-top box. (Refer to the owner's manual for the digital set-top box.) 3 Select HDMI1 or HDMI2 input source with using the INPUT button on... the set -top box. ANTENNA IN RGB IN (Refer to the owner's manual for the digital set-top box.) 3 Select HDMI1, HDMI2 or HDMI3 input source with using the INPUT...RGB IN RGB(PC) AUD (RG ANTENNA IN OPTICAL COMPONENT I VIDEO AUDIO DIGITAL AUDIO OUT RS-232C IN 1(CONTROL & SERVICE) AV 1 AV Only 37/42LF7*, 42LY99 PCMCIA CARD SLOT EJECT HDMI/DVI IN 1 HDMI IN 2 HDMI IN 3 ...
... 2 jack on the set. 2 Turn on the digital set-top box. (Refer to the owner's manual for the digital set-top box.) 3 Select HDMI1 or HDMI2 input source with using the INPUT button on... the set -top box. ANTENNA IN RGB IN (Refer to the owner's manual for the digital set-top box.) 3 Select HDMI1, HDMI2 or HDMI3 input source with using the INPUT...RGB IN RGB(PC) AUD (RG ANTENNA IN OPTICAL COMPONENT I VIDEO AUDIO DIGITAL AUDIO OUT RS-232C IN 1(CONTROL & SERVICE) AV 1 AV Only 37/42LF7*, 42LY99 PCMCIA CARD SLOT EJECT HDMI/DVI IN 1 HDMI IN 2 HDMI IN 3 ...

Owner's Manual
Page 21
...box to HDMI/DVI IN 1 jack on the set . Turn on the digital set-top box. (Refer to the owner's manual for the digital set -top box.) RS-232C IN (CONTROL & SERVICE) ANTENNA IN RGB(PC) OPTICAL AUDIO IN (RGB/DVI) RGB IN VIDEO AUDIO 1 COMPONENT IN 2 DIGITAL AUDIO OUT AV ...(RGB/DVI) jack on the set . RS-232C IN 1 RS-232C IN 2 3 Turn on the digital set-top box. (Refer to the owner's (CONTROL & SERVICE) manual for the digital set -top box.) AV 1 AV 2 4 Select HDMI1 input source with using the INPUT I IN 1 HDMI IN 2 button on thAeVr1emoAtVe2control. EXTERNAL EQUIPMENT ...
...box to HDMI/DVI IN 1 jack on the set . Turn on the digital set-top box. (Refer to the owner's manual for the digital set -top box.) RS-232C IN (CONTROL & SERVICE) ANTENNA IN RGB(PC) OPTICAL AUDIO IN (RGB/DVI) RGB IN VIDEO AUDIO 1 COMPONENT IN 2 DIGITAL AUDIO OUT AV ...(RGB/DVI) jack on the set . RS-232C IN 1 RS-232C IN 2 3 Turn on the digital set-top box. (Refer to the owner's (CONTROL & SERVICE) manual for the digital set -top box.) AV 1 AV 2 4 Select HDMI1 input source with using the INPUT I IN 1 HDMI IN 2 button on thAeVr1emoAtVe2control. EXTERNAL EQUIPMENT ...
Owner's Manual
Page 24
...NOTE G TV can receive the video and audio signal simultaneously with using the INPUT button on the set. RS-232C IN (CONTROL & SERVICE) ANTENNA IN RGB(PC) OPTICAL AUDIO IN (RGB/DVI) RGB IN 2 Select HDMI1, HDMI2 or HDMI3 input source with using the INPUT...HDMI IN 2 jack on the remote control. 3 Refer to the DVD player's manual for operating instructions. VIDEO AUDIO 1 COMPONENT IN 3 Refer to the DVD player's manual for operating instructions. ! To view the scrambled (pay) services in all countries.) - EXTERNAL EQUIPMENT SETUP DIGITAL AUDIO OUT Only 37/42LF7*, ...
...NOTE G TV can receive the video and audio signal simultaneously with using the INPUT button on the set. RS-232C IN (CONTROL & SERVICE) ANTENNA IN RGB(PC) OPTICAL AUDIO IN (RGB/DVI) RGB IN 2 Select HDMI1, HDMI2 or HDMI3 input source with using the INPUT...HDMI IN 2 jack on the remote control. 3 Refer to the DVD player's manual for operating instructions. VIDEO AUDIO 1 COMPONENT IN 3 Refer to the DVD player's manual for operating instructions. ! To view the scrambled (pay) services in all countries.) - EXTERNAL EQUIPMENT SETUP DIGITAL AUDIO OUT Only 37/42LF7*, ...
Owner's Manual
Page 27
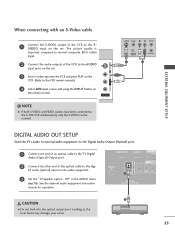
... the digi- Looking at the laser beam may damage your vision. 25 tal audio (optical) input on the set. See the external audio equipment instruction manual for operation. AV IN 3 ! AV IN 3 ANTENNA IN 1OPTICAL COMP VIDEO AUDIO 3 Set the "TV Speaker option - The picture quality is IN ...to the S-VHS VCR simultaneously, only the S-VIDEO can be received. RS-232C IN (CONTROL & SERVICE) 2 CAUTION GDo not look into the VCR and press PLAY on the VCR. (Refer to the VCR owner's manual.) 4 Select AV3 input source with an S-Video cable VIDEO 1 AUCDIOonnect the S-VIDEO output of the...
... the digi- Looking at the laser beam may damage your vision. 25 tal audio (optical) input on the set. See the external audio equipment instruction manual for operation. AV IN 3 ! AV IN 3 ANTENNA IN 1OPTICAL COMP VIDEO AUDIO 3 Set the "TV Speaker option - The picture quality is IN ...to the S-VHS VCR simultaneously, only the S-VIDEO can be received. RS-232C IN (CONTROL & SERVICE) 2 CAUTION GDo not look into the VCR and press PLAY on the VCR. (Refer to the VCR owner's manual.) 4 Select AV3 input source with an S-Video cable VIDEO 1 AUCDIOonnect the S-VIDEO output of the...

Owner's Manual
Page 43
... on auto tuning select YES with using the F or G button. Auto Tuning G Manual Tuning Programme Edit 5V Antenna Power Software Update Diagnostics CI Information 1 Start 2 Auto Tuning 0 0 UHF CH. The message "All service-information will be deleted. 1 Press the MENU button and then D or E button...the G button and then D or E button to select Auto Tuning. 3 Press the G button to automatically find and store all the stored service information will appear. WATCHING TV / PROGRAMME CONTROL AUTO PROGRAMME TUNING (IN DIGITAL MODE) Use it to begin auto tuning. If you start auto ...
... on auto tuning select YES with using the F or G button. Auto Tuning G Manual Tuning Programme Edit 5V Antenna Power Software Update Diagnostics CI Information 1 Start 2 Auto Tuning 0 0 UHF CH. The message "All service-information will be deleted. 1 Press the MENU button and then D or E button...the G button and then D or E button to select Auto Tuning. 3 Press the G button to automatically find and store all the stored service information will appear. WATCHING TV / PROGRAMME CONTROL AUTO PROGRAMME TUNING (IN DIGITAL MODE) Use it to begin auto tuning. If you start auto ...

Owner's Manual
Page 49
DIAGNOSTICS (IN DIGITAL MODE ONLY) This function enables you to normal TV viewing. It's displayed the signal information and service name of the turned MUX. SBealeckct 3 47 Model / Type Tr:an3s7mLCitt2eDr -:ETCeracom_Mux_2 Serial No. Si:g6n0a4l SKtGre0n0g0t0h006 53% Software Version : 1.1.0 Signal ...TEXT EXIT OK BACK MENU INFO i EXIT GUIDE OK VOL Q.VIEW PR MUTE FAV VOL PR MUTE 1 2 3 SETUPO Auto Tuning PICTUREO Manual Tuning AUDIOO Programme Edit 5V Antenna Power TIMEO Software Update OPTIONO Diagnostics SCREENO CI Information Move MENU Prev. 1 Auto Tuning...
DIAGNOSTICS (IN DIGITAL MODE ONLY) This function enables you to normal TV viewing. It's displayed the signal information and service name of the turned MUX. SBealeckct 3 47 Model / Type Tr:an3s7mLCitt2eDr -:ETCeracom_Mux_2 Serial No. Si:g6n0a4l SKtGre0n0g0t0h006 53% Software Version : 1.1.0 Signal ...TEXT EXIT OK BACK MENU INFO i EXIT GUIDE OK VOL Q.VIEW PR MUTE FAV VOL PR MUTE 1 2 3 SETUPO Auto Tuning PICTUREO Manual Tuning AUDIOO Programme Edit 5V Antenna Power TIMEO Software Update OPTIONO Diagnostics SCREENO CI Information Move MENU Prev. 1 Auto Tuning...

Owner's Manual
Page 50
When the module is only for illustration and the menu options and screen format will vary according to the Digital pay services). SETUPO Auto Tuning PICTUREO Manual Tuning AUDIOO Programme Edit 5V Antenna Power TIMEO Software Update OPTIONO Diagnostics SCREENO CI Information Move MENU Prev. 1 WATCHING TV / ...the EXIT button to return to normal TV viewing. • This OSD is inserted to CI slot, you can 't watch some scrambled services (pay services provider. • It's possible for you often can't hear the sound. There might be applied based on after inserting the CI Module...
When the module is only for illustration and the menu options and screen format will vary according to the Digital pay services). SETUPO Auto Tuning PICTUREO Manual Tuning AUDIOO Programme Edit 5V Antenna Power TIMEO Software Update OPTIONO Diagnostics SCREENO CI Information Move MENU Prev. 1 WATCHING TV / ...the EXIT button to return to normal TV viewing. • This OSD is inserted to CI slot, you can 't watch some scrambled services (pay services provider. • It's possible for you often can't hear the sound. There might be applied based on after inserting the CI Module...

Owner's Manual
Page 51
... AUDIOO Programme Edit TIMEO OPTIONO SCREENO Move MENU Prev. 1 Auto Tuning Manual Tuning Programme Edit G System BG Storage From 2 Start 2 345 49 The station name is completed, the Programme Edit menu appears on the Storage ... HOLD FAV VOL PR MUTE 1 2 3 4 5 6 7 8 9 LIST 0 Q.VIEW POSITION SLEEP INDEX HOLD TIME ? When auto tuning is stored for stations which broadcast VPS (Video Programme Service), PDC (Programme Delivery Control) or TELETEXT data. See the 'Programme Edit' section to select System. If no station name can be assigned to select Storage...
... AUDIOO Programme Edit TIMEO OPTIONO SCREENO Move MENU Prev. 1 Auto Tuning Manual Tuning Programme Edit G System BG Storage From 2 Start 2 345 49 The station name is completed, the Programme Edit menu appears on the Storage ... HOLD FAV VOL PR MUTE 1 2 3 4 5 6 7 8 9 LIST 0 Q.VIEW POSITION SLEEP INDEX HOLD TIME ? When auto tuning is stored for stations which broadcast VPS (Video Programme Service), PDC (Programme Delivery Control) or TELETEXT data. See the 'Programme Edit' section to select System. If no station name can be assigned to select Storage...

Owner's Manual
Page 62
Remote Control Buttons Function YELLOW Change to Guide or Timer list mode Save Timer Record/Remind F or G Select Type, Service, Date or Start/End time D or E Function setting Button Function in Record/Remind Setting Mode - This function is available only when recording equipment ...information on or off GUIDE/EXIT Switch off EPG PICTURE CONTROL Button Function in Timer List Mode Remote Control Buttons Function YELLOW Add new Manual Timer setting mode GREEN Enter Timer list editing mode RED Delete the selected item BLUE Change to Guide mode D or E Select Timer list 60...
Remote Control Buttons Function YELLOW Change to Guide or Timer list mode Save Timer Record/Remind F or G Select Type, Service, Date or Start/End time D or E Function setting Button Function in Record/Remind Setting Mode - This function is available only when recording equipment ...information on or off GUIDE/EXIT Switch off EPG PICTURE CONTROL Button Function in Timer List Mode Remote Control Buttons Function YELLOW Add new Manual Timer setting mode GREEN Enter Timer list editing mode RED Delete the selected item BLUE Change to Guide mode D or E Select Timer list 60...


