
Owner's Manual
Page 9
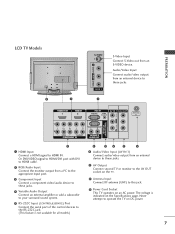
... VIDEO L/MONO AUDIO R PREPARATION MI IN 2 MI IN 2 LCD TV Models HDMI/DVI IN 1 HDMI IN 2 1 2 COMPONENT IN 9 1 R AUDIO L/MONO VIDEO HDMI/DVI IN 1 R1GB IN HDMI IN 2 RGB IN AV IN 1 AV OUT HDMI/DVI IN 1 AV IN 1 AV OUT HDMI IN 2 2 COMPONENT IN VARIABLE AUDIO OUT 1 R AUDIO L/MONO VIDEO 2...3 RGB IN Component InpuAtV IN 1 AV OUT Connect a component video/audio device to these jacks. Or DVI(CVOMIDPONEEONT I)Nsignal to HDMI/DVI VARIABLE AUDIO OUT port with DVI to HDMI cable. 2 RGB/Audio Input Connect the monitor output from an external device to these jacks.
... VIDEO L/MONO AUDIO R PREPARATION MI IN 2 MI IN 2 LCD TV Models HDMI/DVI IN 1 HDMI IN 2 1 2 COMPONENT IN 9 1 R AUDIO L/MONO VIDEO HDMI/DVI IN 1 R1GB IN HDMI IN 2 RGB IN AV IN 1 AV OUT HDMI/DVI IN 1 AV IN 1 AV OUT HDMI IN 2 2 COMPONENT IN VARIABLE AUDIO OUT 1 R AUDIO L/MONO VIDEO 2...3 RGB IN Component InpuAtV IN 1 AV OUT Connect a component video/audio device to these jacks. Or DVI(CVOMIDPONEEONT I)Nsignal to HDMI/DVI VARIABLE AUDIO OUT port with DVI to HDMI cable. 2 RGB/Audio Input Connect the monitor output from an external device to these jacks.

Owner's Manual
Page 16
...Antenna AV IN 3 S-VIDEO AV IN 2 AV IN 3 Multi-family Dwellings/Apartments (Connect to wall antenna socket) HDMI/DVI IN 1 HDMI IN 2 RGB IN HDMI/DVI IN 1 HDMI IN 2 RGB IN HDMI/DVI IN HDMI IN AV 1 AV 2 1 2 ANTENNA IN RGB IN COMPONENT IN VIDEO AUDIO AV IN 1 AV OUT VARIABLE ... to CwOaMllPjOaNcEkNTfoINr outdoor anAVtUAeDRnIIOnABaOL)UET AV IN 2 RS-232C IN (CONTROL & SERVICE) R AUDIO L/MONO VIDEO R AUDIO L/MONO VIDEO Antenna UHHDMFI/DVI IN HDMI/DVI IN 1 1 HDMI IN HDMI IN 2 Signal 2 Amplifier 11 VHF RGB IN RGB IN AV IN 1 AV OUT AV IN 1 AV OUT ANTENNA IN 2 2 ■ In...
...Antenna AV IN 3 S-VIDEO AV IN 2 AV IN 3 Multi-family Dwellings/Apartments (Connect to wall antenna socket) HDMI/DVI IN 1 HDMI IN 2 RGB IN HDMI/DVI IN 1 HDMI IN 2 RGB IN HDMI/DVI IN HDMI IN AV 1 AV 2 1 2 ANTENNA IN RGB IN COMPONENT IN VIDEO AUDIO AV IN 1 AV OUT VARIABLE ... to CwOaMllPjOaNcEkNTfoINr outdoor anAVtUAeDRnIIOnABaOL)UET AV IN 2 RS-232C IN (CONTROL & SERVICE) R AUDIO L/MONO VIDEO R AUDIO L/MONO VIDEO Antenna UHHDMFI/DVI IN HDMI/DVI IN 1 1 HDMI IN HDMI IN 2 Signal 2 Amplifier 11 VHF RGB IN RGB IN AV IN 1 AV OUT AV IN 1 AV OUT ANTENNA IN 2 2 ■ In...
Owner's Manual
Page 17
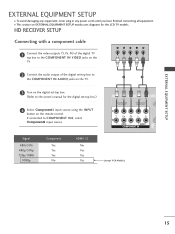
... audio output of the digital set-top box to the COMPONENT IN AUDIO jacks on the TV. 1 2 3 Turn on the digital set -top box.) HDMI DVI IN HDMI IN 4 Select Component1 input source using the INPUT button on EXTERNAL EQUIPMENT SETUP mainly uses diagrams for the digital set -top box. (Refer to...
... audio output of the digital set-top box to the COMPONENT IN AUDIO jacks on the TV. 1 2 3 Turn on the digital set -top box.) HDMI DVI IN HDMI IN 4 Select Component1 input source using the INPUT button on EXTERNAL EQUIPMENT SETUP mainly uses diagrams for the digital set -top box. (Refer to...
Owner's Manual
Page 18
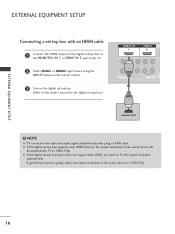
... using the INPUT button on the remote control. 3 Turn on the TV. 2 Select HDMI1 or HDMI2 input source using a HDMI cable. G If the digital set-top box player does not support Auto HDMI, you need to 1280x720p. To get the best picture quality, adjust the output resolution of the digital set -top... output resolution of the source device will be automatically TV to TV the output resolution appropriately. G If the digital set -top box to the HDMI/DVI IN 1 or HDMI IN 2 jack on the digital set-top box. (Refer to the owner's manual for the digital set-top box.) HHDDMMI DI/DVVI ININ...
... using the INPUT button on the remote control. 3 Turn on the TV. 2 Select HDMI1 or HDMI2 input source using a HDMI cable. G If the digital set-top box player does not support Auto HDMI, you need to 1280x720p. To get the best picture quality, adjust the output resolution of the digital set -top... output resolution of the source device will be automatically TV to TV the output resolution appropriately. G If the digital set -top box to the HDMI/DVI IN 1 or HDMI IN 2 jack on the digital set-top box. (Refer to the owner's manual for the digital set-top box.) HHDDMMI DI/DVVI ININ...
Owner's Manual
Page 19
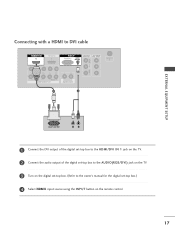
Connecting with a HDMI to DVI cable HHDDMMI DI/DVVI ININ 1 HDMI IN RGB IN RGB(PC) AUDIO (RGB/DVI) RGB(PC) AUDIO (RGB/DVI) AV IN 1 AV OUT L/MONO 1 2 EXTERNAL EQUIPMENT SETUP 1 Connect the DVI output of the digital set-top box to the HDMI/DVI IN 1 jack on the TV. 2 Connect the audio output of the digital set-top box to the AUDIO(RGB/DVI) jack on the TV. 3 Turn on the digital set-top box. (Refer to the owner's manual for the digital set-top box.) 4 Select HDMI1 input source using the INPUT button on the remote control. 17
Connecting with a HDMI to DVI cable HHDDMMI DI/DVVI ININ 1 HDMI IN RGB IN RGB(PC) AUDIO (RGB/DVI) RGB(PC) AUDIO (RGB/DVI) AV IN 1 AV OUT L/MONO 1 2 EXTERNAL EQUIPMENT SETUP 1 Connect the DVI output of the digital set-top box to the HDMI/DVI IN 1 jack on the TV. 2 Connect the audio output of the digital set-top box to the AUDIO(RGB/DVI) jack on the TV. 3 Turn on the digital set-top box. (Refer to the owner's manual for the digital set-top box.) 4 Select HDMI1 input source using the INPUT button on the remote control. 17
Owner's Manual
Page 20
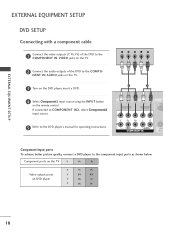
... to the COMPONENT IN VIDEO jacks on the TV. 2 Connect the audio outputs of the DVD to the component input ports as shown below. HDMI DVI IN HDMI IN RG If connected to COMPONENT IN2, select Component2 input source. 1 5 Refer to the DVD player's manual for operating instructions. 2 VIDEO AUDIO COMPONENT IN...
... to the COMPONENT IN VIDEO jacks on the TV. 2 Connect the audio outputs of the DVD to the component input ports as shown below. HDMI DVI IN HDMI IN RG If connected to COMPONENT IN2, select Component2 input source. 1 5 Refer to the DVD player's manual for operating instructions. 2 VIDEO AUDIO COMPONENT IN...
Owner's Manual
Page 21
... AUDIO input jacks on the TV. 3 Turn on the DVD player, insert a DVD. 4 Select AV2 input source using the INPUT button on the remote control. HDMI IN ENT IN 2 Connect the audio outputs of the DVD to the S VIDEO input on the remote control. 5 Refer to the DVD player owner's manual...
... AUDIO input jacks on the TV. 3 Turn on the DVD player, insert a DVD. 4 Select AV2 input source using the INPUT button on the remote control. HDMI IN ENT IN 2 Connect the audio outputs of the DVD to the S VIDEO input on the remote control. 5 Refer to the DVD player owner's manual...
Owner's Manual
Page 22
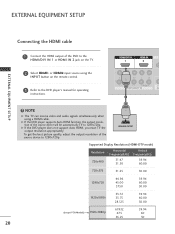
..., adjust the output resolution of the source device will be automatically TV to 1280x720p. G If the DVD player does not support Auto HDMI, you must TV the output resolution appropriately. NOTE G The TV can receive video and audio signals simultaneously when using the INPUT button ...on the TV. 2 Select HDMI1 or HDMI2 input source using a HDMI cable. G If the DVD player supports Auto HDMI function, the output resolution of the source device to 1280x720p. EXTERNAL EQUIPMENT SETUP 1 2 COMPONENT IN Connecting the...
..., adjust the output resolution of the source device will be automatically TV to 1280x720p. G If the DVD player does not support Auto HDMI, you must TV the output resolution appropriately. NOTE G The TV can receive video and audio signals simultaneously when using the INPUT button ...on the TV. 2 Select HDMI1 or HDMI2 input source using a HDMI cable. G If the DVD player supports Auto HDMI function, the output resolution of the source device to 1280x720p. EXTERNAL EQUIPMENT SETUP 1 2 COMPONENT IN Connecting the...
Owner's Manual
Page 23
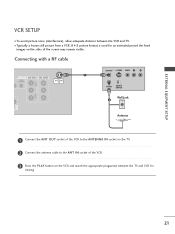
If 4:3 picture format is used for viewing. HDMI DVI IN HDMI IN 21 Connecting with a RF cable AUDIO (RGB/DVI) AV IN 1 AV OUT ANTENNA IN ANT OUT S-VIDEO VIDEO L R 1 ANT IN OUTPUT SWITCH Wall Jack 2 ...
If 4:3 picture format is used for viewing. HDMI DVI IN HDMI IN 21 Connecting with a RF cable AUDIO (RGB/DVI) AV IN 1 AV OUT ANTENNA IN ANT OUT S-VIDEO VIDEO L R 1 ANT IN OUTPUT SWITCH Wall Jack 2 ...
Owner's Manual
Page 24
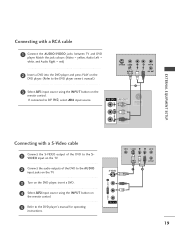
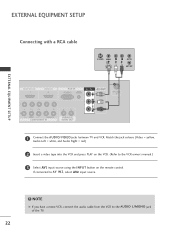
... jack of the TV. 22 VIDEO L/MONO A EXTERNAL EQUIPMENT SETUP AV IN 2 Connecting with a RCA cable S-VIDEO VIDEO L R ANT IN OUTPUT SWITCH ANT OUT HDMI DVI IN HDMI IN 1 RGB(PC) AAVV IINN 11 AV OUT AUDIO (RGB/DVI) R AUDIO L/MONO VIDEO L/MONO EXTERNAL EQUIPMENT SETUP 1 Connect the AUDIO/VIDEO jacks between...
... jack of the TV. 22 VIDEO L/MONO A EXTERNAL EQUIPMENT SETUP AV IN 2 Connecting with a RCA cable S-VIDEO VIDEO L R ANT IN OUTPUT SWITCH ANT OUT HDMI DVI IN HDMI IN 1 RGB(PC) AAVV IINN 11 AV OUT AUDIO (RGB/DVI) R AUDIO L/MONO VIDEO L/MONO EXTERNAL EQUIPMENT SETUP 1 Connect the AUDIO/VIDEO jacks between...
Owner's Manual
Page 25
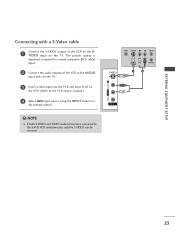
VIDEO L/MONO AUDIO R VIDEO S-VIDEO L R ANT IN S-VIDEO OUTPUT SWITCH ANT OUT 1 2 AV IN 2 HDMI DVI IN HDMI IN AV IN 1 R AUDIO L/MONO VIDEO 23 compared to normal composite (RCA cable) input. 2 Connect the audio outputs of the VCR to the S VIDEO input ...
VIDEO L/MONO AUDIO R VIDEO S-VIDEO L R ANT IN S-VIDEO OUTPUT SWITCH ANT OUT 1 2 AV IN 2 HDMI DVI IN HDMI IN AV IN 1 R AUDIO L/MONO VIDEO 23 compared to normal composite (RCA cable) input. 2 Connect the audio outputs of the VCR to the S VIDEO input ...

Owner's Manual
Page 27
NOTE G When connecting with the amplifier. EXTERNAL EQUIPMENT SETUP EXTERNAL STEREO HDMI DVI IN Use to connected either an external amplifier, or add a subwoofer to your surround sound system. 1 Connect the input jack of the stereo amplifier to the VARIABLE AUDIO OUT jacks on the TV. 2 Set up your speakers through your analog stereo amplifier, according to the instructions provided with external audio equipments, such as amplifiers or speakers, please turn the TV speakers off. (G p.65) 25 HDMI IN VARIABLE AUDIO OUT 1 !
NOTE G When connecting with the amplifier. EXTERNAL EQUIPMENT SETUP EXTERNAL STEREO HDMI DVI IN Use to connected either an external amplifier, or add a subwoofer to your surround sound system. 1 Connect the input jack of the stereo amplifier to the VARIABLE AUDIO OUT jacks on the TV. 2 Set up your speakers through your analog stereo amplifier, according to the instructions provided with external audio equipments, such as amplifiers or speakers, please turn the TV speakers off. (G p.65) 25 HDMI IN VARIABLE AUDIO OUT 1 !
Owner's Manual
Page 28
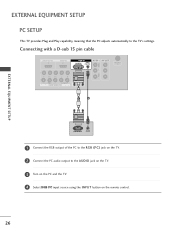
EXTERNAL EQUIPMENT SETUP EXTERNAL EQUIPMENT SETUP PC SETUP This TV provides Plug and Play capability, meaning that the PC adjusts automatically to the AUDIO jack on the TV. 3 Turn on the PC and the TV. 4 Select RGB PC input source using the INPUT button on the TV. 2 Connect the PC audio output to the TV's settings. Connecting with a D-sub 15 pin cable HDMI DVI IN HDMI IN RGB IN RGB(PC) AUDIO (RGB/DVI) RGB(PC) AUDIO (RGB/DVI) AV IN 1 AV OUT L/MONO 1 2 RGB OUTPUT AUDIO 1 Connect the RGB output of the PC to the RGB (P C) jack on the remote control. 26
EXTERNAL EQUIPMENT SETUP EXTERNAL EQUIPMENT SETUP PC SETUP This TV provides Plug and Play capability, meaning that the PC adjusts automatically to the AUDIO jack on the TV. 3 Turn on the PC and the TV. 4 Select RGB PC input source using the INPUT button on the TV. 2 Connect the PC audio output to the TV's settings. Connecting with a D-sub 15 pin cable HDMI DVI IN HDMI IN RGB IN RGB(PC) AUDIO (RGB/DVI) RGB(PC) AUDIO (RGB/DVI) AV IN 1 AV OUT L/MONO 1 2 RGB OUTPUT AUDIO 1 Connect the RGB output of the PC to the RGB (P C) jack on the remote control. 26
Owner's Manual
Page 31
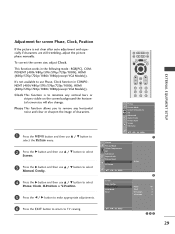
... auto adjustment and especially if characters are still trembling, adjust the picture phase manually. This function works in COMPONENT (480i/480p/576i/576p/720p/1080i), HDMI (480p/576p/720p/1080i/1080p(except VGA Models)). Manual Config. Adjustment for screen Phase, Clock, Position If the picture is to minimize any horizontal noise... adjustments. 6 Press the EXIT button to return to use Phase, Clock function in the following mode : RGB[PC], COMPONENT (480i/480p/576i/576p/720p/1080i), HDMI (480p/576p/720p/1080i/1080p(except VGA Models)). To correct the screen size, adjust Clock.
... auto adjustment and especially if characters are still trembling, adjust the picture phase manually. This function works in COMPONENT (480i/480p/576i/576p/720p/1080i), HDMI (480p/576p/720p/1080i/1080p(except VGA Models)). Manual Config. Adjustment for screen Phase, Clock, Position If the picture is to minimize any horizontal noise... adjustments. 6 Press the EXIT button to return to use Phase, Clock function in the following mode : RGB[PC], COMPONENT (480i/480p/576i/576p/720p/1080i), HDMI (480p/576p/720p/1080i/1080p(except VGA Models)). To correct the screen size, adjust Clock.

Owner's Manual
Page 46
... DE F G OK MENU 1 G Off On 4 Press the EXIT button to return to select SIM- PLINK. 3 Press the G button and then D / E button to the display through HDMI cable without additional cables and settings. WATCHING TV / PROGRAMME CONTROL This fundtion operates only with devices with the SIMPLINK logo. INPUT TV INPUT POWER MODE...
... DE F G OK MENU 1 G Off On 4 Press the EXIT button to return to select SIM- PLINK. 3 Press the G button and then D / E button to the display through HDMI cable without additional cables and settings. WATCHING TV / PROGRAMME CONTROL This fundtion operates only with devices with the SIMPLINK logo. INPUT TV INPUT POWER MODE...

Owner's Manual
Page 47
...operate a media device with the VARIABLE AUDIO OUT cable. G After connecting the HDMI terminal for the home theatre with the HDMI cable. NOTE G Connect the HDMI/DVI IN or HDMI IN terminal of the TV to the rear terminal (HDMI terminal) of the AV devices connected to the TV, you can directly control...OK button to select the desired SIMPLINK source. 1 TV viewing : Switch to the previous TV programme regardless of the TV to the TV through a HDMI cable but does not support SIMPLINK, does not provide this function. DE OK Selected Device When no device is connected (displayed in gray) When a ...
...operate a media device with the VARIABLE AUDIO OUT cable. G After connecting the HDMI terminal for the home theatre with the HDMI cable. NOTE G Connect the HDMI/DVI IN or HDMI IN terminal of the TV to the rear terminal (HDMI terminal) of the AV devices connected to the TV, you can directly control...OK button to select the desired SIMPLINK source. 1 TV viewing : Switch to the previous TV programme regardless of the TV to the TV through a HDMI cable but does not support SIMPLINK, does not provide this function. DE OK Selected Device When no device is connected (displayed in gray) When a ...

Owner's Manual
Page 48
... Watching PIP/Double Window Press the P I /II PIP PR- button to access the sub picture. The selected programme number is available in the Component, RGB, HDMI mode. (But, it can't adjust 480i/576i resolution of Component mode.) INPUT TV INPUT POWER MODE TV DVD RATIO VCR SIMPLINK PIP TEXT I P button to...
... Watching PIP/Double Window Press the P I /II PIP PR- button to access the sub picture. The selected programme number is available in the Component, RGB, HDMI mode. (But, it can't adjust 480i/576i resolution of Component mode.) INPUT TV INPUT POWER MODE TV DVD RATIO VCR SIMPLINK PIP TEXT I P button to...
Owner's Manual
Page 51
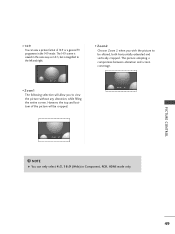
... However, the top and bottom of 14:9 or a general TV programme in the 14:9 mode. • 14:9 You can only select 4 : 3, 1 6 : 9 (Wide) in Component, RGB, HDMI mode only. Zoom2 DE Zooml DE ! The 14:9 screen is viewed in the same way as in 4:3, but is magnified to the left and right...
... However, the top and bottom of 14:9 or a general TV programme in the 14:9 mode. • 14:9 You can only select 4 : 3, 1 6 : 9 (Wide) in Component, RGB, HDMI mode only. Zoom2 DE Zooml DE ! The 14:9 screen is viewed in the same way as in 4:3, but is magnified to the left and right...
Owner's Manual
Page 56
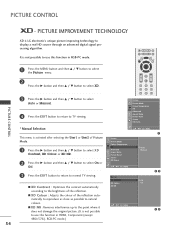
...Temperature XD Advanced Aspect Ratio Picture Reset Screen XD Demo PICTURE CONTROL * Manual Selection DE F G OK MENU 1 This menu is LG electronic's unique picture improving technology to display a real HD source through an advanced digital signal processing algorithm. Picture Picture Mode Colour Temperature...the contract automatically according to the brightness of the reflection automatically to reproduce as close as possible to use this function in HDMI, Component (except 480i/576i), RGB-PC mode.) 54 PICTURE IMPROVEMENT TECHNOLOGY XD is activated after selecting the User1 or User2...
...Temperature XD Advanced Aspect Ratio Picture Reset Screen XD Demo PICTURE CONTROL * Manual Selection DE F G OK MENU 1 This menu is LG electronic's unique picture improving technology to display a real HD source through an advanced digital signal processing algorithm. Picture Picture Mode Colour Temperature...the contract automatically according to the brightness of the reflection automatically to reproduce as close as possible to use this function in HDMI, Component (except 480i/576i), RGB-PC mode.) 54 PICTURE IMPROVEMENT TECHNOLOGY XD is activated after selecting the User1 or User2...
Owner's Manual
Page 59
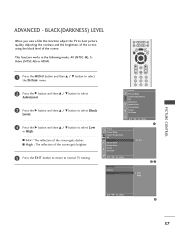
This function works in the following mode: AV (NTSC-M), SVideo (NTSC-M) or HDMI. 1 Press the MENU button and then D / E button to select the Picture menu. 2 Press the G button and then D / E button to select Advanced. 3 Press the G button and ...
This function works in the following mode: AV (NTSC-M), SVideo (NTSC-M) or HDMI. 1 Press the MENU button and then D / E button to select the Picture menu. 2 Press the G button and then D / E button to select Advanced. 3 Press the G button and ...


