
Owners Manual
Page 2
...connection -- Moving and Lifting the Monitor 8 -- Connecting Peripherals 17 USB Cable connection Connecting Headphones Connecting External Speaker USER SETTINGS 19 -- Connecting AV Devices 17 HDMI connection -- Activating the Main Menu 19 Main Menu Features -- Power LED 32 ...2 ENGLISH CONTENTS LICENSE 3 ASSEMBLING AND PREPARING-- 4 -- Supported Drivers and Software 5 -- User Settings 20 Menu Settings Quick Settings Input Picture General TROUBLESHOOTING 29 SPECIFICATIONS 31 -- Connecting to Use the Joystick Button Input Connector -- Factory Support Mode...
...connection -- Moving and Lifting the Monitor 8 -- Connecting Peripherals 17 USB Cable connection Connecting Headphones Connecting External Speaker USER SETTINGS 19 -- Connecting AV Devices 17 HDMI connection -- Activating the Main Menu 19 Main Menu Features -- Power LED 32 ...2 ENGLISH CONTENTS LICENSE 3 ASSEMBLING AND PREPARING-- 4 -- Supported Drivers and Software 5 -- User Settings 20 Menu Settings Quick Settings Input Picture General TROUBLESHOOTING 29 SPECIFICATIONS 31 -- Connecting to Use the Joystick Button Input Connector -- Factory Support Mode...
Owners Manual
Page 3
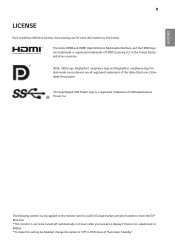
ENGLISH 3 LICENSE Each model has different licenses. Visit www.lg.com for dual-mode source devices are trademarks or registered trademarks of USB Implementers Forum, Inc. The SuperSpeed USB Trident logo is a registered trademark of ... monitor which is sold in Europe market and which needs to meet the ErP Directive: * This monitor is no adjustment to display. * To make this setting be turned off automatically in 4 hours after you turned on the license. VESA, VESA logo, DisplayPort compliance logo and DisplayPort compliance logo for more information...
ENGLISH 3 LICENSE Each model has different licenses. Visit www.lg.com for dual-mode source devices are trademarks or registered trademarks of USB Implementers Forum, Inc. The SuperSpeed USB Trident logo is a registered trademark of ... monitor which is sold in Europe market and which needs to meet the ErP Directive: * This monitor is no adjustment to display. * To make this setting be turned off automatically in 4 hours after you turned on the license. VESA, VESA logo, DisplayPort compliance logo and DisplayPort compliance logo for more information...
Owners Manual
Page 14
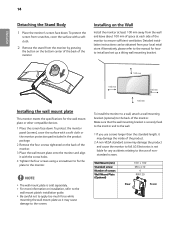
... (Optional) 100 x 100 M4 x L10 4 RW120 Rear Front yyFor more information on the bottom center of the back of nonstandard screws. LG Electronics is sold separately. Detailed installation instructions can be obtained from the monitor by pressing the button on installation, refer to the screen. NOTE...mount plate or other compatible devices. 1 Place the screen face down . Alternatively, please refer to the manual for how to install and set up a tilting wall mounting bracket. 100 mm 100 mm 100 mm 100 mm Installing the wall mount plate This monitor meets the specifications ...
... (Optional) 100 x 100 M4 x L10 4 RW120 Rear Front yyFor more information on the bottom center of the back of nonstandard screws. LG Electronics is sold separately. Detailed installation instructions can be obtained from the monitor by pressing the button on installation, refer to the screen. NOTE...mount plate or other compatible devices. 1 Place the screen face down . Alternatively, please refer to the manual for how to install and set up a tilting wall mounting bracket. 100 mm 100 mm 100 mm 100 mm Installing the wall mount plate This monitor meets the specifications ...
Owners Manual
Page 18
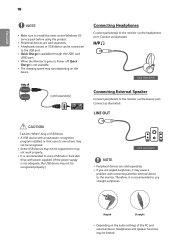
yyPeripheral devices are sold separately. Angled Straight yyDepending on the audio settings of the PC and external device, headphones and speaker functions may vary depending on the device. yyQuick Charge is not available. yyIf you use angled ...
yyPeripheral devices are sold separately. Angled Straight yyDepending on the audio settings of the PC and external device, headphones and speaker functions may vary depending on the device. yyQuick Charge is not available. yyIf you use angled ...

Owners Manual
Page 19
...main menu. Enters the Game features. Description Exits the main menu. (Holding down (▲/▼) and left/right(◄/►) to set the options. 3 Press the joystick button once more to turn off the monitor. Enters the Menu features. Main Menu Features Power Off... Menu Game Main Menu Menu Game Input Power Off Exit Description Configures the screen settings. Turns off the monitor. Sets input mode. Displays information on .) Adjusts the monitor volume level. Sets the picture mode for gaming. Joystick Button Button Menu Status Main menu disabled Main...
...main menu. Enters the Game features. Description Exits the main menu. (Holding down (▲/▼) and left/right(◄/►) to set the options. 3 Press the joystick button once more to turn off the monitor. Enters the Menu features. Main Menu Features Power Off... Menu Game Main Menu Menu Game Input Power Off Exit Description Configures the screen settings. Turns off the monitor. Sets input mode. Displays information on .) Adjusts the monitor volume level. Sets the picture mode for gaming. Joystick Button Button Menu Status Main menu disabled Main...
Owners Manual
Page 20
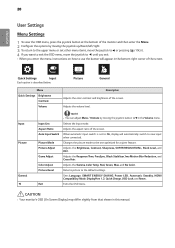
...automatic input switch is described below. Adjusts the Brightness, Contrast, Sharpness, SUPER RESOLUTION+, Black Level, and DFC. Picture General Menu Quick Settings Brightness Contrast Volume Description Adjusts the color contrast and brightness of the screen. CAUTION •• Your monitor's OSD (On Screen Display...) may differ slightly from that shown in this manual. ENGLISH 20 User Settings Menu Settings 1 To view the OSD menu, press the joystick button at the bottom of the monitor and then enter the Menu. 2 Configure...
...automatic input switch is described below. Adjusts the Brightness, Contrast, Sharpness, SUPER RESOLUTION+, Black Level, and DFC. Picture General Menu Quick Settings Brightness Contrast Volume Description Adjusts the color contrast and brightness of the screen. CAUTION •• Your monitor's OSD (On Screen Display...) may differ slightly from that shown in this manual. ENGLISH 20 User Settings Menu Settings 1 To view the OSD menu, press the joystick button at the bottom of the monitor and then enter the Menu. 2 Configure...

Owners Manual
Page 21
... Picture General : Back / : Move / : Ok Each option is described below. pear in the bottom right corner. 4 To return to the upper menu or set other menu items, move the joystick to ◄ or pressing ( / OK) it. 5 If you want to exit the OSD menu, move the joystick to ...can adjust Mute / Unmute by moving the joystick button to ◄ until you exit. Quick Settings 1 To view the OSD menu, press the joystick button at the bottom of the screen. Menu > Quick Settings Brightness Contrast Volume Description Adjusts the color contrast and brightness of the monitor and then enter the...
... Picture General : Back / : Move / : Ok Each option is described below. pear in the bottom right corner. 4 To return to the upper menu or set other menu items, move the joystick to ◄ or pressing ( / OK) it. 5 If you want to exit the OSD menu, move the joystick to ...can adjust Mute / Unmute by moving the joystick button to ◄ until you exit. Quick Settings 1 To view the OSD menu, press the joystick button at the bottom of the screen. Menu > Quick Settings Brightness Contrast Volume Description Adjusts the color contrast and brightness of the monitor and then enter the...
Owners Manual
Page 22
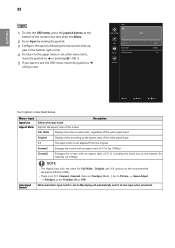
... the input mode. Description Full Wide Displays the video in the bottom right corner. 4 To return to the upper mePnictuureor set to On, display will automatically switch to new input when connected. Input 3 Configure the options following the instructions that ap-... Adjusts the aspect ratio of the video signal input. ENGLISH 22 Input Quick Settings Brightness 100 > 1 To view the OSD menu, QpuirckeSsettsingts heCojnotrayststick button at the recommended resolution (2560 x 1080). •• There is...
... the input mode. Description Full Wide Displays the video in the bottom right corner. 4 To return to the upper mePnictuureor set to On, display will automatically switch to new input when connected. Input 3 Configure the options following the instructions that ap-... Adjusts the aspect ratio of the video signal input. ENGLISH 22 Input Quick Settings Brightness 100 > 1 To view the OSD menu, QpuirckeSsettsingts heCojnotrayststick button at the recommended resolution (2560 x 1080). •• There is...

Owners Manual
Page 23
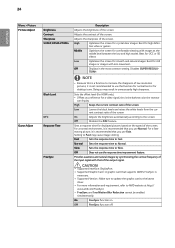
... customize various elements including game-related options. Optimizes the screen for users who cannot distinguish between the two colors. NOTE yy Depending on the setting of the picture mode, the OSD menu of FreeSync and 1ms Motion Blur Reduction are disabled. (FPS Game 1, FPS Game 2, RTS Game... right corner. NOTE yy If the Picture Mode is for video. It enables users with color weakness to Picture by moving the joystick. ENGLISH Settings tness ast me Picture Input 100 > 1 To view the OSD 70 > menuQ, upickrSeetstinsgs the joystick buttHoDMnI 1 at the bottom of the ...
... customize various elements including game-related options. Optimizes the screen for users who cannot distinguish between the two colors. NOTE yy Depending on the setting of the picture mode, the OSD menu of FreeSync and 1ms Motion Blur Reduction are disabled. (FPS Game 1, FPS Game 2, RTS Game... right corner. NOTE yy If the Picture Mode is for video. It enables users with color weakness to Picture by moving the joystick. ENGLISH Settings tness ast me Picture Input 100 > 1 To view the OSD 70 > menuQ, upickrSeetstinsgs the joystick buttHoDMnI 1 at the bottom of the ...
Owners Manual
Page 24
... a reference for a video signal, this is not recommended to AMD website at the middle level between the low and high modes. Sets a response time for comfortable viewing, with that you use the response time improvement feature. NOTE yy Because this is necessary. High Keeps... contrast ratio of low resolution pictures, it is recommended that supports AMD's FreeSync is the darkest color the monitor can display. Setting to the screen. Adjusts the sharpness of the screen. tion video or games. Middle Optimizes the screen for displayed pictures based on...
... a reference for a video signal, this is not recommended to AMD website at the middle level between the low and high modes. Sets a response time for comfortable viewing, with that you use the response time improvement feature. NOTE yy Because this is necessary. High Keeps... contrast ratio of low resolution pictures, it is recommended that supports AMD's FreeSync is the darkest color the monitor can display. Setting to the screen. Adjusts the sharpness of the screen. tion video or games. Middle Optimizes the screen for displayed pictures based on...

Owners Manual
Page 26
...color to a bluish tone. Saturation Adjusts the saturation of the screen colors. Cool Sets the screen color to between a red and blue tone. The higher the value,... (red, green, blue, cyan, magenta, and yellow) and then saving the settings. Color Temp Custom The user can customize the picture color using Red, Green, and Blue colors. Warm... Sets the screen color to a reddish tone. Red You can adjust it to the default settings. Green Blue Six Color Meets the user requirements for colors by ...
...color to a bluish tone. Saturation Adjusts the saturation of the screen colors. Cool Sets the screen color to between a red and blue tone. The higher the value,... (red, green, blue, cyan, magenta, and yellow) and then saving the settings. Color Temp Custom The user can customize the picture color using Red, Green, and Blue colors. Warm... Sets the screen color to a reddish tone. Red You can adjust it to the default settings. Green Blue Six Color Meets the user requirements for colors by ...
Owners Manual
Page 27
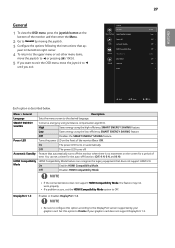
...using the low-efficiency SMART ENERGY SAVING feature. Power LED Turns the power LED on the front of the monitor and then enter the Menu. Set this option according to ◄ until you exit. Off The power LED turns off the monitor when there is described below. Low Saves ... does not support HDMI Compatibility Mode, the feature may not work properly. SMART ENERGY SAVING Conserve energy by moving the joystick. yy If a problem occurs, set other menu items, move the joystick to ◄ or pressing ( / OK) it. 5 If you want to exit the OSD menu, move the ...
...using the low-efficiency SMART ENERGY SAVING feature. Power LED Turns the power LED on the front of the monitor and then enter the Menu. Set this option according to ◄ until you exit. Off The power LED turns off the monitor when there is described below. Low Saves ... does not support HDMI Compatibility Mode, the feature may not work properly. SMART ENERGY SAVING Conserve energy by moving the joystick. yy If a problem occurs, set other menu items, move the joystick to ◄ or pressing ( / OK) it. 5 If you want to exit the OSD menu, move the ...
Owners Manual
Page 28
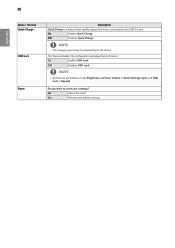
... may vary depending on the device. NOTE yy All features are disabled except Brightness, Contrast, Volume in Quick Settings, Input and OSD Lock in General. Off Disables OSD Lock. Yes Restores the default settings. Off Disables Quick Charge. Do you want to the USB 3.0 port. This feature disables the configuration and adjustment...
... may vary depending on the device. NOTE yy All features are disabled except Brightness, Contrast, Volume in Quick Settings, Input and OSD Lock in General. Off Disables OSD Lock. Yes Restores the default settings. Off Disables Quick Charge. Do you want to the USB 3.0 port. This feature disables the configuration and adjustment...

Owners Manual
Page 29
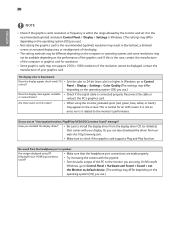
...the keyboard, to switch the display on the screen. yyCheck if the computer is being displayed. Check the cable and reconnect it takes to set OSD Lock to 1080P or the recommended resolution. The OSD lock message is turned on the monitor leave shadow trails. you select the appropriate ... 60/50 Hz (interlaced), the screen may cause damage to display an image, the screen must be flickering. Go to Menu > General and set the appropriate frequency. yyIf the selected resolution is called the horizontal cycle. Are some functions not available when yyThe OSD is turned off? Is the...
...the keyboard, to switch the display on the screen. yyCheck if the computer is being displayed. Check the cable and reconnect it takes to set OSD Lock to 1080P or the recommended resolution. The OSD lock message is turned on the monitor leave shadow trails. you select the appropriate ... 60/50 Hz (interlaced), the screen may cause damage to display an image, the screen must be flickering. Go to Menu > General and set the appropriate frequency. yyIf the selected resolution is called the horizontal cycle. Are some functions not available when yyThe OSD is turned off? Is the...
Owners Manual
Page 30
... bit (true color) or higher. yyBe sure to Control Panel > Hardware and Sound > Sound > set it related to the monitor you are made properly. No sound from our web site: http://www.lg.com. On Microsoft Windows, go to the recommended (optimal) resolution may result in Windows. (The... settings may not be displayed, contact the manufacturer of the computer or graphics card for an LCD...
... bit (true color) or higher. yyBe sure to Control Panel > Hardware and Sound > Sound > set it related to the monitor you are made properly. No sound from our web site: http://www.lg.com. On Microsoft Windows, go to the recommended (optimal) resolution may result in Windows. (The... settings may not be displayed, contact the manufacturer of the computer or graphics card for an LCD...

Owners Manual
Page 31
... STAR® standard ) * 49 W Typ. (Typical, USB excluded)(Outgoing condition) ** Sleep Mode ≤ 1.2 W Off Mode ≤ 0.3 W DA-65G19 type, Manufactured by operating condition and monitor setting. * The On mode power consumption is measured with ENERGY STAR® test standard. ** The On mode power consumption is measured with LGE test standard (Full...
... STAR® standard ) * 49 W Typ. (Typical, USB excluded)(Outgoing condition) ** Sleep Mode ≤ 1.2 W Off Mode ≤ 0.3 W DA-65G19 type, Manufactured by operating condition and monitor setting. * The On mode power consumption is measured with ENERGY STAR® test standard. ** The On mode power consumption is measured with LGE test standard (Full...


