
User Manual
Page 1
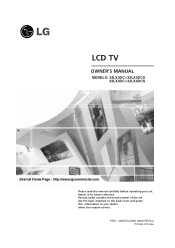
Record model number and serial number of the set . P/NO : 3828TUL309G (0606-REV04) Printed in Korea See the label attached on the back cover and quote this manual carefully before operating your dealer when you require service. LCD TV OWNER'S MANUAL MODELS: 32LX3DC 32LX3DCS 32LX4DC 32LX4DCS Internet Home Page : http://www.lgcommercial.com Please read this information to your set . Retain it for future reference.
Record model number and serial number of the set . P/NO : 3828TUL309G (0606-REV04) Printed in Korea See the label attached on the back cover and quote this manual carefully before operating your dealer when you require service. LCD TV OWNER'S MANUAL MODELS: 32LX3DC 32LX3DCS 32LX4DC 32LX4DCS Internet Home Page : http://www.lgcommercial.com Please read this information to your set . Retain it for future reference.
User Manual
Page 3
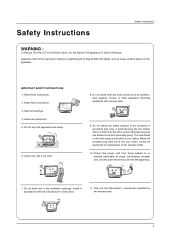
Owner's Manual 2. Keep these instructions. Clean only with the manufacturer's instructions. 11. Do not defeat the safety purpose of the ventilation openings. Install in accordance with a dry ...
Owner's Manual 2. Keep these instructions. Clean only with the manufacturer's instructions. 11. Do not defeat the safety purpose of the ventilation openings. Install in accordance with a dry ...
User Manual
Page 4
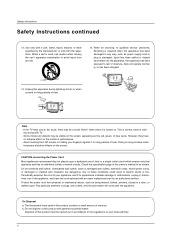
Unplug this owner's manual to be certain. ing wrong with the apparatus. Check the specification page of time. On Disposal a. Do not dispose of your appliance, and if its ...
Unplug this owner's manual to be certain. ing wrong with the apparatus. Check the specification page of time. On Disposal a. Do not dispose of your appliance, and if its ...
User Manual
Page 5
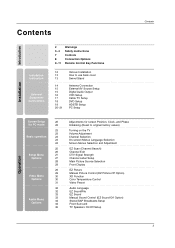
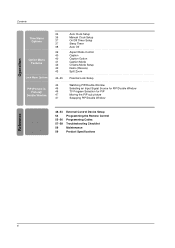
... Screen Menus Selection and Adjustment EZ Scan (Channel Search) Channel Edit DTV Signal Strength Channel Label Setup Main Picture Source Selection Front Display EZ Picture Manual Picture Control (EZ Picture-Off Option) XD Function Color Temperature Control Video Preset Audio Language EZ SoundRite EZ Sound...
... Screen Menus Selection and Adjustment EZ Scan (Channel Search) Channel Edit DTV Signal Strength Channel Label Setup Main Picture Source Selection Front Display EZ Picture Manual Picture Control (EZ Picture-Off Option) XD Function Color Temperature Control Video Preset Audio Language EZ SoundRite EZ Sound...
User Manual
Page 6
...-inPicture)/ Double Window 36 36 37 37 38 39 40 40 41 42 42 43 44~45 46 46 46 47 47 Auto Clock Setup Manual Clock Setup On/Off Timer Setup Sleep Timer Auto Off Aspect Ratio Control Caption Caption Option Caption Mode Cinema Mode Setup Demo (Review) Split Zoom...
...-inPicture)/ Double Window 36 36 37 37 38 39 40 40 41 42 42 43 44~45 46 46 46 47 47 Auto Clock Setup Manual Clock Setup On/Off Timer Setup Sleep Timer Auto Off Aspect Ratio Control Caption Caption Option Caption Mode Cinema Mode Setup Demo (Review) Split Zoom...
User Manual
Page 7
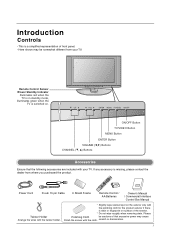
... MUTE VOL SAP CH RATIO CC FLASHBK SURF POWER TIMER 1.5V 1.5V Power Cord D-sub 15 pin Cable 6 Shield Foams Remote Control / AA Batteries Owner's Manual / Commercial Interface Control Box Manual Twister Holder Arrange the wires with the twister holder. * Slightly wipe stained spot on .
... MUTE VOL SAP CH RATIO CC FLASHBK SURF POWER TIMER 1.5V 1.5V Power Cord D-sub 15 pin Cable 6 Shield Foams Remote Control / AA Batteries Owner's Manual / Commercial Interface Control Box Manual Twister Holder Arrange the wires with the twister holder. * Slightly wipe stained spot on .
User Manual
Page 15
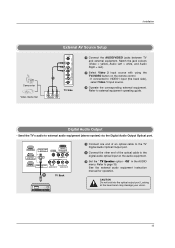
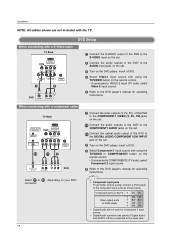
... button on the audio equipment. 3 Set the " TV Speaker option - CAUTION Do not look into the optical output port. See the external audio equipment instruction manual for operation. Installation Camcorder Video Game Set External AV Source Setup S-VIDEO VIDEO 2 R (MONO) L VIDEO AUDIO COMPONENT 2 VIDEO 1 TV Side R AUDIO L VIDEO 1 Connect the AUDIO...
... button on the audio equipment. 3 Set the " TV Speaker option - CAUTION Do not look into the optical output port. See the external audio equipment instruction manual for operation. Installation Camcorder Video Game Set External AV Source Setup S-VIDEO VIDEO 2 R (MONO) L VIDEO AUDIO COMPONENT 2 VIDEO 1 TV Side R AUDIO L VIDEO 1 Connect the AUDIO...
User Manual
Page 16
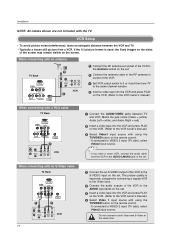
...- The picture quality is used; compared to connecting a regular VCR to the Video input. 2 Connect the audio outputs of the VCR to the VCR owner's manual.) When connecting with a RCA cable TV Back DVI INPUT (PC/DTV INPUT) S-VIDEO R AUDIO L/MONO VIDEO VIDEO1 COMPONENT1 R L AUDIO INPUT VIDEO INPUT Antenna ...the AUDIO L/MONO jack of the set . 3 Insert a video tape into the VCR and press PLAY on the VCR. (Refer to the VCR owner's manual.) 3 Select Video1 input source with an antenna TV Back DVI INPUT (PC/DTV INPUT) S-VIDEO R AUDIO L/MONO VIDEO VIDEO1 COMPONENT1 R L AUDIO INPUT ...
...- The picture quality is used; compared to connecting a regular VCR to the Video input. 2 Connect the audio outputs of the VCR to the VCR owner's manual.) When connecting with a RCA cable TV Back DVI INPUT (PC/DTV INPUT) S-VIDEO R AUDIO L/MONO VIDEO VIDEO1 COMPONENT1 R L AUDIO INPUT VIDEO INPUT Antenna ...the AUDIO L/MONO jack of the set . 3 Insert a video tape into the VCR and press PLAY on the VCR. (Refer to the VCR owner's manual.) 3 Select Video1 input source with an antenna TV Back DVI INPUT (PC/DTV INPUT) S-VIDEO R AUDIO L/MONO VIDEO VIDEO1 COMPONENT1 R L AUDIO INPUT ...
User Manual
Page 18
... the TV/VIDEO button on the remote control. - If connected to VIDEO 2 input (TV side), select Video 2 input source. 5 Refer to the DVD player's manual for operating instructions. Select 2-1 or 2-2 , depending on DVD player Y Pb Pr Y B-Y R-Y Y Cb Cr Y PB PR • Digital Audio will not ...work for operating instructions. If connected to COMPONENT2 (TV side), select Component 2 input source. 5 Refer to the DVD player's manual for Component 2 input source. • Digital Audio operation has priority if Digital Audio and AUDIO L/R are not included with the TV DVD Setup...
... the TV/VIDEO button on the remote control. - If connected to VIDEO 2 input (TV side), select Video 2 input source. 5 Refer to the DVD player's manual for operating instructions. Select 2-1 or 2-2 , depending on DVD player Y Pb Pr Y B-Y R-Y Y Cb Cr Y PB PR • Digital Audio will not ...work for operating instructions. If connected to COMPONENT2 (TV side), select Component 2 input source. 5 Refer to the DVD player's manual for Component 2 input source. • Digital Audio operation has priority if Digital Audio and AUDIO L/R are not included with the TV DVD Setup...
User Manual
Page 19
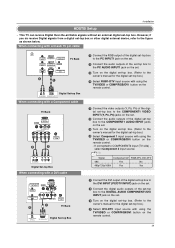
...AUDIO INPUT1 jack on the set. 3 Turn on the digital set-top box. (Refer to the owner's manual for the digital set-top box.) 4 Select RGB1-DTV input source with using the TV/VIDEO or COMP/RGB.../DVI INPUT jack on the set. 3 Turn on the digital set-top box. (Refer to the owner's manual for the digital set -top box.) 4 Select DVI-DTV input source with using the TV/VIDEO or COMP/...air/Cable signals without an external digital set -top box or other digital external device, refer to the owner's manual for the digital set -top box.) 4 Select Component 1 input source with using the TV/VIDEO or COMP/...
...AUDIO INPUT1 jack on the set. 3 Turn on the digital set-top box. (Refer to the owner's manual for the digital set-top box.) 4 Select RGB1-DTV input source with using the TV/VIDEO or COMP/RGB.../DVI INPUT jack on the set. 3 Turn on the digital set-top box. (Refer to the owner's manual for the digital set -top box.) 4 Select DVI-DTV input source with using the TV/VIDEO or COMP/...air/Cable signals without an external digital set -top box or other digital external device, refer to the owner's manual for the digital set -top box.) 4 Select Component 1 input source with using the TV/VIDEO or COMP/...

User Manual
Page 22
... operation. (For RGB1-DTV input source, Position and Reset are not adjustable. - Press ENTER button and then use D / E / F / G buttons to original factory values) - You can manually adjust picture position and minimize image shaking for PC mode - Adjustment for screen Position, Clock, and Phase Mini Glossary Position This function is -30 ~ +30...
... operation. (For RGB1-DTV input source, Position and Reset are not adjustable. - Press ENTER button and then use D / E / F / G buttons to original factory values) - You can manually adjust picture position and minimize image shaking for PC mode - Adjustment for screen Position, Clock, and Phase Mini Glossary Position This function is -30 ~ +30...

User Manual
Page 24
...Speaker LOCK SETUP VIDEO AUDIO TIME Aspect Ratio Caption Caption Mode Caption Option Language Cinema Demo OPTIONG LOCK SETUP VIDEO AUDIO TIME G Auto Clock Manual Clock Off Timer On Timer Sleep Timer Auto Off OPTION LOCK • The OSD (On Screen Display) function enables you to adjust the... screen status conveniently since it provides graphical presentation. • In this manual, the OSD (On Screen Display) may be different from your TV's because it is just example to display the available menus. Movie Rating TV...
...Speaker LOCK SETUP VIDEO AUDIO TIME Aspect Ratio Caption Caption Mode Caption Option Language Cinema Demo OPTIONG LOCK SETUP VIDEO AUDIO TIME G Auto Clock Manual Clock Off Timer On Timer Sleep Timer Auto Off OPTION LOCK • The OSD (On Screen Display) function enables you to adjust the... screen status conveniently since it provides graphical presentation. • In this manual, the OSD (On Screen Display) may be different from your TV's because it is just example to display the available menus. Movie Rating TV...

User Manual
Page 29
...select the picture appearance setup option as shown below: Off (your preference and viewing situations. Adjust the picture appearance to adjust EZ Picture. 2. Manual Picture Control (EZ Picture-Off option) - Press the G button and then use the VIDEO menu to suit your own settings), Day Light... Picture menu based on the program category. - When adjusting Video menu options (contrast, brightness, color, sharpness, tint, and color temperature) manually, EZ Picture automatically changes to select the VIDEO menu. 2. Press EXIT button to return to TV viewing or press MENU button to return ...
...select the picture appearance setup option as shown below: Off (your preference and viewing situations. Adjust the picture appearance to adjust EZ Picture. 2. Manual Picture Control (EZ Picture-Off option) - Press the G button and then use the VIDEO menu to suit your own settings), Day Light... Picture menu based on the program category. - When adjusting Video menu options (contrast, brightness, color, sharpness, tint, and color temperature) manually, EZ Picture automatically changes to select the VIDEO menu. 2. Press EXIT button to return to TV viewing or press MENU button to return ...

User Manual
Page 33
... button to select the appropriate sound setup as shown below: Off (your taste and room situations. When adjusting sound options (treble, bass, and front surround) manually, EZ Sound automatically switches Off. 1. Press the SOUND button repeatedly to select the AUDIO menu. 2. Press the G button and then use F / G ... suit your own settings), Normal, Stadium, Theater, and Music. • You can also adjust EZ Sound in the AUDIO menu. 2. Manual Sound Control (EZ Sound-Off option) - EZ Sound lets you enjoy the best sound without any special adjustment because the TV sets the ...
... button to select the appropriate sound setup as shown below: Off (your taste and room situations. When adjusting sound options (treble, bass, and front surround) manually, EZ Sound automatically switches Off. 1. Press the SOUND button repeatedly to select the AUDIO menu. 2. Press the G button and then use F / G ... suit your own settings), Normal, Stadium, Theater, and Music. • You can also adjust EZ Sound in the AUDIO menu. 2. Manual Sound Control (EZ Sound-Off option) - EZ Sound lets you enjoy the best sound without any special adjustment because the TV sets the ...

User Manual
Page 36
... button to select your viewing area time zone: Eastern, Central, Mountain, Pacific, Alaska, or Hawaii. 5. Press the G button and then use D / E button to select Manual Clock. 3. The time is set the year, date, and time options. 4. G Off On Time Zone Eastern 1. Press the G button and then use D / E button...the year, date, or time option. If current time setting is set incorrectly by the broadcasting station. - SETUP VIDEO AUDIO TIME Auto Clock Manual Clock Off Timer On Timer Sleep Timer Auto Off OPTION LOCK MENU Prev. Once selected, use F / G button to the previous menu. ...
... button to select your viewing area time zone: Eastern, Central, Mountain, Pacific, Alaska, or Hawaii. 5. Press the G button and then use D / E button to select Manual Clock. 3. The time is set the year, date, and time options. 4. G Off On Time Zone Eastern 1. Press the G button and then use D / E button...the year, date, or time option. If current time setting is set incorrectly by the broadcasting station. - SETUP VIDEO AUDIO TIME Auto Clock Manual Clock Off Timer On Timer Sleep Timer Auto Off OPTION LOCK MENU Prev. Once selected, use F / G button to the previous menu. ...

User Manual
Page 37
... count down from the number of minutes selected. 3. Press the G button and then use D / E button to set the minutes. 6. SETUP VIDEO AUDIO TIME Auto Clock Manual Clock Off Timer On Timer Sleep Timer Auto Off OPTION LOCK MENU Prev. Press the G button and then use D / E button to set the sound level...
... count down from the number of minutes selected. 3. Press the G button and then use D / E button to set the minutes. 6. SETUP VIDEO AUDIO TIME Auto Clock Manual Clock Off Timer On Timer Sleep Timer Auto Off OPTION LOCK MENU Prev. Press the G button and then use D / E button to set the sound level...

User Manual
Page 38
.... 38 Press EXIT button to return to TV viewing or press MENU button to return to select Off or On. 4. Auto Off SETUP Auto Clock Manual Clock VIDEO Off Timer AUDIO On Timer Sleep Timer TIME Auto Off G Off On OPTION LOCK MENU Prev. 1. Press the G button and then use D / E button...
.... 38 Press EXIT button to return to TV viewing or press MENU button to return to select Off or On. 4. Auto Off SETUP Auto Clock Manual Clock VIDEO Off Timer AUDIO On Timer Sleep Timer TIME Auto Off G Off On OPTION LOCK MENU Prev. 1. Press the G button and then use D / E button...

User Manual
Page 53
...][ ][OK/NG][Data][x] * In case Video/S-video is selected automatically by TV, use only single video input. * In case Video/S-video is selected by user manually, use separate Video/S-video input. 25. IR Codes Code (Hexa) 0x0B 0x08 0xC4 0xC5 0x98 0x79 0x0E 0x10 ~ 0x19 0x4C 0x1A 0x09 0x02 0x03 0x00... 0x61 0x70 0x80 * In case Video/S-video is selected automatically by TV, use only single video input. * In case Video/S-video is selected by user manually, use separate Video/S-video input. Reference 24.
...][ ][OK/NG][Data][x] * In case Video/S-video is selected automatically by TV, use only single video input. * In case Video/S-video is selected by user manually, use separate Video/S-video input. 25. IR Codes Code (Hexa) 0x0B 0x08 0xC4 0xC5 0x98 0x79 0x0E 0x10 ~ 0x19 0x4C 0x1A 0x09 0x02 0x03 0x00... 0x61 0x70 0x80 * In case Video/S-video is selected automatically by TV, use only single video input. * In case Video/S-video is selected by user manually, use separate Video/S-video input. Reference 24.


