
Owners Manual
Page 4
... not be placed on or pinched particularly at plugs, convenience receptacles, and the point where they exit from the apparatus. --' 7. Read these instructions. 3. Protect the power cord from being walked on the apparatus. Only use this apparatus near any of the ventilation openings. IMPORTANT SAFETY INSTRUCTIONS 1. Keep these instructions. 2. shall be...
... not be placed on or pinched particularly at plugs, convenience receptacles, and the point where they exit from the apparatus. --' 7. Read these instructions. 3. Protect the power cord from being walked on the apparatus. Only use this apparatus near any of the ventilation openings. IMPORTANT SAFETY INSTRUCTIONS 1. Keep these instructions. 2. shall be...
Owners Manual
Page 5
... discontinue use caution when moving the cart / apparatus combination to the regulations of time. Do not overload wall outlets. Avoid touching the LCD screen or holding your appliance, and if its appearance indicates damage or deterioration, unplug it for long periods of your local authority. 5...closed in this product with an exact replacement part by the manufacturer, or sold with TV. - However, they be placed upon . This is normal, there is , a single outlet circuit which powers only that is noth- Disposal of this apparatus during lightning storms or when unused for ...
... discontinue use caution when moving the cart / apparatus combination to the regulations of time. Do not overload wall outlets. Avoid touching the LCD screen or holding your appliance, and if its appearance indicates damage or deterioration, unplug it for long periods of your local authority. 5...closed in this product with an exact replacement part by the manufacturer, or sold with TV. - However, they be placed upon . This is normal, there is , a single outlet circuit which powers only that is noth- Disposal of this apparatus during lightning storms or when unused for ...
Owners Manual
Page 8
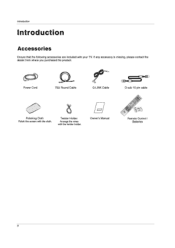
l=1 Owner's Manual D-sub 15 pin cable {03 1.0/) 1A1 Remote Control / Batteries 8 Introduction Introduction Accessories Ensure that the following accessories are included with the twister holder. Twister Holder Arrange the wires with your TV. If any accessory is missing, please contact the dealer from where you purchased the product. Power Cord 7552 Round Cable G-LINK Cable Polishing Cloth Polish the screen with the cloth.
l=1 Owner's Manual D-sub 15 pin cable {03 1.0/) 1A1 Remote Control / Batteries 8 Introduction Introduction Accessories Ensure that the following accessories are included with the twister holder. Twister Holder Arrange the wires with your TV. If any accessory is missing, please contact the dealer from where you purchased the product. Power Cord 7552 Round Cable G-LINK Cable Polishing Cloth Polish the screen with the cloth.
Owners Manual
Page 9
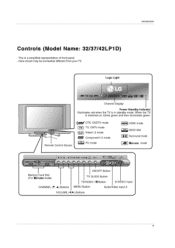
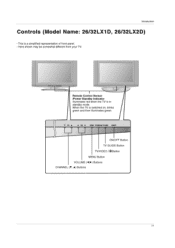
...Light 1 qrnvo®ate EZD iCHISSMBS Ham) 441(Al Channel Display Power Standby Indicator Illuminates red when the TV is switched on, blinks green and then illuminates green. (lin/ DTV, CADTV mode 2 TV TV, CATV mode CIO Videol-2 mode Component) -2 mode Remote Control Sensor... PC mode IJONfTOA Hi= HDMI mode MEM IEEE1394 0.4 Surround mode Xsruoio mode C f -G---EM= h4.O4(..vs,...re ,0 . ,100.19 V CH • VOL D. This is a simplified representation of front panel. - Introduction Controls (Model Name: 32...
...Light 1 qrnvo®ate EZD iCHISSMBS Ham) 441(Al Channel Display Power Standby Indicator Illuminates red when the TV is switched on, blinks green and then illuminates green. (lin/ DTV, CADTV mode 2 TV TV, CATV mode CIO Videol-2 mode Component) -2 mode Remote Control Sensor... PC mode IJONfTOA Hi= HDMI mode MEM IEEE1394 0.4 Surround mode Xsruoio mode C f -G---EM= h4.O4(..vs,...re ,0 . ,100.19 V CH • VOL D. This is a simplified representation of front panel. - Introduction Controls (Model Name: 32...
Owners Manual
Page 11
This is in standby mode. Introduction Controls (Model Name: 26/32LX1D, 26/32LX2D) - Here shown may be somewhat different from your TV. Remote Control Sensor /Power Standby Indicator Illuminates red when the TV is a simplified representation of front panel. - When the TV is switched on, blinks green and then illuminates green. ♦ CH ♦ Al V0L ► MENU 'VVIDEO,'0.) TV &ADE °HOFF ON/OFF Button TV GUIDE Button TVNIDEO /®Button MENU Button VOLUME (4,►) Buttons CHANNEL (V, ♦) Buttons 11
This is in standby mode. Introduction Controls (Model Name: 26/32LX1D, 26/32LX2D) - Here shown may be somewhat different from your TV. Remote Control Sensor /Power Standby Indicator Illuminates red when the TV is a simplified representation of front panel. - When the TV is switched on, blinks green and then illuminates green. ♦ CH ♦ Al V0L ► MENU 'VVIDEO,'0.) TV &ADE °HOFF ON/OFF Button TV GUIDE Button TVNIDEO /®Button MENU Button VOLUME (4,►) Buttons CHANNEL (V, ♦) Buttons 11
Owners Manual
Page 14
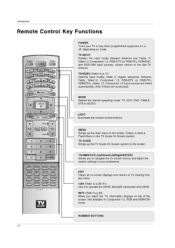
...operate the DVHS, MicroMV camcorder and DSTB. CABLE VCR STB • AX MENU XSTUOIO PAy, Go or ENTER 0 • POWER Turns your preference. TV INPUT Rotates the input mode between Antenna and Cable. EXIT Clears all on top of the screen. Introduction Remote Control Key Functions... NPU r iv AUDIO ■ POWER ( 1 CVO MODE - r XI T 1394 MARK 000° • PAGE VUI MUTE CH V PAGE 2 3 4 5 6 7 8 9 0 FLASHER( PIP PIP CH- MENU Brings up the TV Guide On Screen system to TV viewing from any other programmed equipment on or off, ...
...operate the DVHS, MicroMV camcorder and DSTB. CABLE VCR STB • AX MENU XSTUOIO PAy, Go or ENTER 0 • POWER Turns your preference. TV INPUT Rotates the input mode between Antenna and Cable. EXIT Clears all on top of the screen. Introduction Remote Control Key Functions... NPU r iv AUDIO ■ POWER ( 1 CVO MODE - r XI T 1394 MARK 000° • PAGE VUI MUTE CH V PAGE 2 3 4 5 6 7 8 9 0 FLASHER( PIP PIP CH- MENU Brings up the TV Guide On Screen system to TV viewing from any other programmed equipment on or off, ...
Owners Manual
Page 15
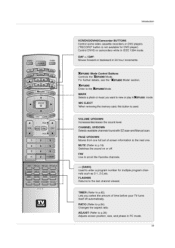
...) Used to the last channel viewed. ADJUST (Refer to the next one full set of time before your TV turns itself off . Introduction TVNPLII POWER TV DVD` IODE CAULL S TB '44 L 1')P MENU 44 I+ TUIVT XSTU010 Tv (30,4 X17- 1394 MARK °C)C) -• • PAGrE • VOL MUTEFW) CH PAGkE V 1 2 3 4 5 6 7 8 9 0 FLASHBK PIP PIPCH-PIPCH.PIPINPUT...
...) Used to the last channel viewed. ADJUST (Refer to the next one full set of time before your TV turns itself off . Introduction TVNPLII POWER TV DVD` IODE CAULL S TB '44 L 1')P MENU 44 I+ TUIVT XSTU010 Tv (30,4 X17- 1394 MARK °C)C) -• • PAGrE • VOL MUTEFW) CH PAGkE V 1 2 3 4 5 6 7 8 9 0 FLASHBK PIP PIPCH-PIPCH.PIPINPUT...

Owners Manual
Page 17
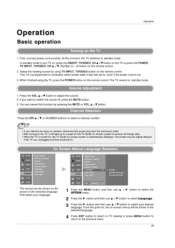
... Set ID MENU 4 Antenna Cable Vldeol Video2 Component) 11, Component2 ROB-PC HDMI/DVI • Antenna: Select it when watching the TV/DTV. • Cable: Select it when watching the CATV/CADTV. • Videol-2: Select it when using PC or Digital set-top... 1 When every external equipment is not connected- When some External Equipment is connected: (ex: When connected to Video 2) TV 4 HDMI/DVI Video2 I 'A, 2 3 5 6 8 9 0 FLASHBK PIP PIP CH. Introduction -tv rpm- ( ) POWER TIVIX 0 DVD - A GI I I RGB-DTV (or RGB-PC) • You can also select Main Input in...
... Set ID MENU 4 Antenna Cable Vldeol Video2 Component) 11, Component2 ROB-PC HDMI/DVI • Antenna: Select it when watching the TV/DTV. • Cable: Select it when watching the CATV/CADTV. • Videol-2: Select it when using PC or Digital set-top... 1 When every external equipment is not connected- When some External Equipment is connected: (ex: When connected to Video 2) TV 4 HDMI/DVI Video2 I 'A, 2 3 5 6 8 9 0 FLASHBK PIP PIP CH. Introduction -tv rpm- ( ) POWER TIVIX 0 DVD - A GI I I RGB-DTV (or RGB-PC) • You can also select Main Input in...
Owners Manual
Page 18
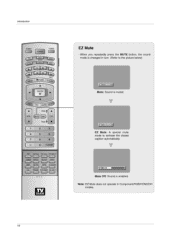
... is changed in Component/RGB/HDMI/DVI modes. 18 EZ Mute EZ Mute: A special mute mode to the picture below) Mute: Sound is enabled. Introduction TV INPUT POWER TV 0010 CND DEE CAL 0 VCR S TO DPS ma4u Xs I 'imp • N./ oUIDE ENTER 0 • EX" - Note: EZ Mute does not operate in turn. (Refer...
... is changed in Component/RGB/HDMI/DVI modes. 18 EZ Mute EZ Mute: A special mute mode to the picture below) Mute: Sound is enabled. Introduction TV INPUT POWER TV 0010 CND DEE CAL 0 VCR S TO DPS ma4u Xs I 'imp • N./ oUIDE ENTER 0 • EX" - Note: EZ Mute does not operate in turn. (Refer...
Owners Manual
Page 20
... on the back cover and insert. It ti Option * Arrange the signal input cable and the power cord by holder, as necessary. (To install various wires, refer to p.21-41.) 3 Align the holes on the TV back panel with the protuberances on its stand 30° to the left or right to... cover. Wire Arrangement - Installation How to provide the optimum viewing angle. 20 Pull the cables through the hole on the set. -71 11 Swivel Stand (32/37/42LP1D, 26/32LX2D only) -
... on the back cover and insert. It ti Option * Arrange the signal input cable and the power cord by holder, as necessary. (To install various wires, refer to p.21-41.) 3 Align the holes on the TV back panel with the protuberances on its stand 30° to the left or right to... cover. Wire Arrangement - Installation How to provide the optimum viewing angle. 20 Pull the cables through the hole on the set. -71 11 Swivel Stand (32/37/42LP1D, 26/32LX2D only) -
Owners Manual
Page 37
...Search, Skip. ' Note: • Skip- On skipping, Search (44 Pause (II) and Play (a.) are displayed on the connected equipment. Connected Equipment to Generic, the power of the DVHS with IEEE 1394 Cable. • DVHS • Pre 10.0116 • 1:•: 20 (') POMI Ell an • •00 When watching ... Time 7. The control panel OSD of DVHS is for a fast search. Installation Connect the IEEE1394 Cable DVHS Connect the IEEE 1394 jack of the TV to the IEEE 1394 jack of DVHS is completely pull out and then connect again. • When searching the screen (14.0+) , the DVHS...
...Search, Skip. ' Note: • Skip- On skipping, Search (44 Pause (II) and Play (a.) are displayed on the connected equipment. Connected Equipment to Generic, the power of the DVHS with IEEE 1394 Cable. • DVHS • Pre 10.0116 • 1:•: 20 (') POMI Ell an • •00 When watching ... Time 7. The control panel OSD of DVHS is for a fast search. Installation Connect the IEEE1394 Cable DVHS Connect the IEEE 1394 jack of the TV to the IEEE 1394 jack of DVHS is completely pull out and then connect again. • When searching the screen (14.0+) , the DVHS...
Owners Manual
Page 44
...displays the Welcome Screen. Press ENTER button to begin Setup. • "Remind me again" returns you power Off the TV and then power it ON. 3. Deady to do the following: 1. rod*, 04.1P/kars CP, TV Ka Pr., Seto EwaNell* EMS keyenyoarlY wrotela typo drop 44 If you have a Cable box connected, ...Gude On Screen eastern now prep the GU ley on the Reminder Screen. Press ENTER button to watching TV and stops the reminder screen from appearing upon power On. when you select "Set up TV Guide On Screen now" on yOUIr 1V remote at any Law *h vfrould pew Ike to de moot...
...displays the Welcome Screen. Press ENTER button to begin Setup. • "Remind me again" returns you power Off the TV and then power it ON. 3. Deady to do the following: 1. rod*, 04.1P/kars CP, TV Ka Pr., Seto EwaNell* EMS keyenyoarlY wrotela typo drop 44 If you have a Cable box connected, ...Gude On Screen eastern now prep the GU ley on the Reminder Screen. Press ENTER button to watching TV and stops the reminder screen from appearing upon power On. when you select "Set up TV Guide On Screen now" on yOUIr 1V remote at any Law *h vfrould pew Ike to de moot...
Owners Manual
Page 52
...changes and close the menu. • If a Panel Menu contains more Schedule choices Moves to close this menu. • Pressing Menu is on TV 6.--7- ; It also appears when you press ENTER button on a show starting in the future. • When a Panel Menu appears, the ...show options Remind Options 0 SCheduientRiPder 4 dateFiDflii Ar5-4 start ni2 03 folir -arr-► channel 1 42 Inputr(n Ai na ► power on an odometer, where these options. 52 auto tune TV 4- ► frequency 4- 17i7-ie-► S:- Press Menu to Cancel. jr . a all.O 11 14. .1.1Old Shows for...
...changes and close the menu. • If a Panel Menu contains more Schedule choices Moves to close this menu. • Pressing Menu is on TV 6.--7- ; It also appears when you press ENTER button on a show starting in the future. • When a Panel Menu appears, the ...show options Remind Options 0 SCheduientRiPder 4 dateFiDflii Ar5-4 start ni2 03 folir -arr-► channel 1 42 Inputr(n Ai na ► power on an odometer, where these options. 52 auto tune TV 4- ► frequency 4- 17i7-ie-► S:- Press Menu to Cancel. jr . a all.O 11 14. .1.1Old Shows for...
Owners Manual
Page 55
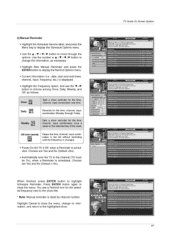
..., from which you can choose to display a list of wee.. Press ENTER button to set frequency, when, automatically power On, and auto-tune the TV. CI 'WOO e4I fe tobtoos: AEI 55 TV Guide On Screen System • is currently airing. e s EIRE M I •• • 4. closes... r , adVilibertee WINO OleO- AMett. Set Recording- closes the menu, changes no information, and returns to the Search Service Bar. TV a. k. Use the • button to Service Bar- Highlight a show is Eg 2. Go to highlight a subcategory (for example, All). 3.
..., from which you can choose to display a list of wee.. Press ENTER button to set frequency, when, automatically power On, and auto-tune the TV. CI 'WOO e4I fe tobtoos: AEI 55 TV Guide On Screen System • is currently airing. e s EIRE M I •• • 4. closes... r , adVilibertee WINO OleO- AMett. Set Recording- closes the menu, changes no information, and returns to the Search Service Bar. TV a. k. Use the • button to Service Bar- Highlight a show is Eg 2. Go to highlight a subcategory (for example, All). 3.

Owners Manual
Page 61
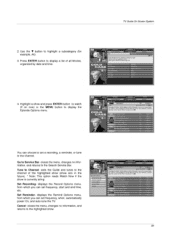
... Off (Default = On). Press ENTER button again to highlight Done. When finished, press ENTER button to close the menu, change default settings in the TV Guide On Screen system. Choices are No, Small, Large, and Last Used (Default = Last Used). • The Info Box size rotation when the... INFO button is powered On. Highlight General Default Options, and press the Menu key to the highlighted option. Highlight Go to Service Bar to Ito (Moat Opt,on ob...
... Off (Default = On). Press ENTER button again to highlight Done. When finished, press ENTER button to close the menu, change default settings in the TV Guide On Screen system. Choices are No, Small, Large, and Last Used (Default = Last Used). • The Info Box size rotation when the... INFO button is powered On. Highlight General Default Options, and press the Menu key to the highlighted option. Highlight Go to Service Bar to Ito (Moat Opt,on ob...
Owners Manual
Page 62
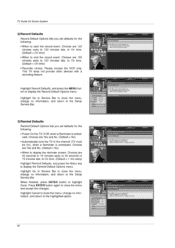
... 4.--7+711-.•• • ▪ e.o• • 3)Remind Defaults Remind Default Options lets you set defaults for the following : • Power On the TV, if Off, when a Reminder is scheduled. pro% Wroll III OMIT NW., TO WIWI *WOW TO •a.* w COCLADSE I areort Wellloder I.* •...11.11,... Choices are 120 minutes early to 120 minutes late, to the highlighted option. - It•rtm, IF .1 ... a . dolatet 07I1O, Tv otcod delault, wet. Press ENTER button again to close the menu, change no information, and return to On time. (Default = On time) •...
... 4.--7+711-.•• • ▪ e.o• • 3)Remind Defaults Remind Default Options lets you set defaults for the following : • Power On the TV, if Off, when a Reminder is scheduled. pro% Wroll III OMIT NW., TO WIWI *WOW TO •a.* w COCLADSE I areort Wellloder I.* •...11.11,... Choices are 120 minutes early to 120 minutes late, to the highlighted option. - It•rtm, IF .1 ... a . dolatet 07I1O, Tv otcod delault, wet. Press ENTER button again to close the menu, change no information, and return to On time. (Default = On time) •...
Owners Manual
Page 66
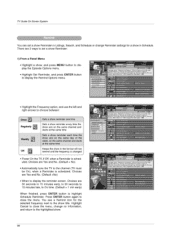
... PIPPAPsIIISPP• PS Wont at the same time Keeps the show in the list but will not remind until the frequency is changed • Power On the TV, if Off, when a Reminder is scheduled. You see a Remind icon for a show in Schedule. sawrearo.• trapainerg . • some.NC- 7T watairmiiVe-7.; ...time Sets a show reminder each time the show airs on the same day of the week, on the same channel and starts at -.; .1 ea. I . TV Guide On Screen System Remind You can set a show Reminder: 1) From a Panel Menu TX • Highlight a show, and press MENU button to display the...
... PIPPAPsIIISPP• PS Wont at the same time Keeps the show in the list but will not remind until the frequency is changed • Power On the TV, if Off, when a Reminder is scheduled. You see a Remind icon for a show in Schedule. sawrearo.• trapainerg . • some.NC- 7T watairmiiVe-7.; ...time Sets a show reminder each time the show airs on the same day of the week, on the same channel and starts at -.; .1 ea. I . TV Guide On Screen System Remind You can set a show Reminder: 1) From a Panel Menu TX • Highlight a show, and press MENU button to display the...
Owners Manual
Page 67
... press ENTER button to highlight Schedule Reminder. ts.d 14.r." 'Mod hon. Choices are Yes and No (Default =No). • Automatically tune the TV to the channel (TV must be On), when a Reminder is displayed. • Highlight the Frequency option, and use the button to choose among Once, Daily, Weekly, ...,:PCIDJ • Once W. Off (not cancel) Keeps the time, channel, input combination in the list without reminding until the frequency is changed. • Power On the TV, if Off, when a Reminder is listed by channel number. vow • ivgn,pi* ow, *ea on this selected day of Rome...
... press ENTER button to highlight Schedule Reminder. ts.d 14.r." 'Mod hon. Choices are Yes and No (Default =No). • Automatically tune the TV to the channel (TV must be On), when a Reminder is displayed. • Highlight the Frequency option, and use the button to choose among Once, Daily, Weekly, ...,:PCIDJ • Once W. Off (not cancel) Keeps the time, channel, input combination in the list without reminding until the frequency is changed. • Power On the TV, if Off, when a Reminder is listed by channel number. vow • ivgn,pi* ow, *ea on this selected day of Rome...
Owners Manual
Page 69
...CABLE The menus can cancel this point on, the on the remote control . 2. In standby mode to turn TV on, press the ON/OFF, TVNIDEO, CH ♦ / ♦ button on the TV or press the POWER, TV INPUT, TVNIDEO, CH ♦ / ♦, Number (0 - 9) button on -screen menus will take up ... this function by using the TV, press the POWER button on the remote control. This TV is out. 3. When finished using TV INPUT, TVNIDEO button on the TV 1. Press the VOL ♦ / ♦ button to , even if the power cord is programmed to remember which power state it will be slightly ...
...CABLE The menus can cancel this point on, the on the remote control . 2. In standby mode to turn TV on, press the ON/OFF, TVNIDEO, CH ♦ / ♦ button on the TV or press the POWER, TV INPUT, TVNIDEO, CH ♦ / ♦, Number (0 - 9) button on -screen menus will take up ... this function by using the TV, press the POWER button on the remote control. This TV is out. 3. When finished using TV INPUT, TVNIDEO button on the TV 1. Press the VOL ♦ / ♦ button to , even if the power cord is programmed to remember which power state it will be slightly ...

Owners Manual
Page 86
...want the DTV/CADTV Captions to the previous menu. MENU Pr•sioxs Choose the language you turn the power off. 1 Use the CC button repeatedly to select Caption Off, CC1, CC2, CC3, CC4, Textl,... on the screen. tion languages: English, Spanish, or French. 4 Press EXIT button to return to TV viewing or press MENU button to return to appear in a large black frame and almost cover the entire... screen; Caption/Text, if provided by the broadcaster. 4 Press EXIT button to return to TV viewing or press MENU button to return to select caption: CCI, CC2, CC3, CC4, Textl, Text2,...
...want the DTV/CADTV Captions to the previous menu. MENU Pr•sioxs Choose the language you turn the power off. 1 Use the CC button repeatedly to select Caption Off, CC1, CC2, CC3, CC4, Textl,... on the screen. tion languages: English, Spanish, or French. 4 Press EXIT button to return to TV viewing or press MENU button to return to appear in a large black frame and almost cover the entire... screen; Caption/Text, if provided by the broadcaster. 4 Press EXIT button to return to TV viewing or press MENU button to return to select caption: CCI, CC2, CC3, CC4, Textl, Text2,...


