
User Manual
Page 5
... powers only that appliances be placed upon . Pay particular attention to telephone wires, lightening rods, or gas pipes. Be sure do not drop onto the screen with liquids, such as gasoline or candles or expose the TV to direct air conditioning. 16 Do not expose to a three-prong grouned AC outlet...
... powers only that appliances be placed upon . Pay particular attention to telephone wires, lightening rods, or gas pipes. Be sure do not drop onto the screen with liquids, such as gasoline or candles or expose the TV to direct air conditioning. 16 Do not expose to a three-prong grouned AC outlet...
User Manual
Page 6
.... Do not clean with a hand or sharp object such as nail, pencil or pen, or make a scratch on the screen, appearing as tiny red, green, or blue spots. Avoid touching the LCD screen or holding your TV where there is turned on the front panel of mercury. Do not dispose of this... must be a small "flicker" when it can occur. This is normal, there is turned off, unplugged and all cables have no adverse effect on the screen. Doing so may produce some protection against or put stress on .
.... Do not clean with a hand or sharp object such as nail, pencil or pen, or make a scratch on the screen, appearing as tiny red, green, or blue spots. Avoid touching the LCD screen or holding your TV where there is turned on the front panel of mercury. Do not dispose of this... must be a small "flicker" when it can occur. This is normal, there is turned off, unplugged and all cables have no adverse effect on the screen. Doing so may produce some protection against or put stress on .
User Manual
Page 7
...Clear Voice II 66 Balance 67 TV Speakers On/Off Setup 68 Audio Reset 69 Stereo/SAP Broadcast Setup 70 Audio Language 71 On-Screen Menus Language Selection 72 Caption Mode - Film Mode 60 Picture Reset 61 Demo mode 61 SOUND & LANGUAGE CONTROL Auto Volume Leveler (...PC Setup 27 USB Connection 33 WATCHING TV / CHANNEL CONTROL Remote Control Functions 34 Turning On TV 36 Channel Selection 36 Volume Adjustment 36 On-Screen Menus Selection 37 Channel Setup - Eye Care 59 Advanced Control - Add / Delete Channel (Manual Tuning 39 - Color Tone Preset 55 Manual Picture...
...Clear Voice II 66 Balance 67 TV Speakers On/Off Setup 68 Audio Reset 69 Stereo/SAP Broadcast Setup 70 Audio Language 71 On-Screen Menus Language Selection 72 Caption Mode - Film Mode 60 Picture Reset 61 Demo mode 61 SOUND & LANGUAGE CONTROL Auto Volume Leveler (...PC Setup 27 USB Connection 33 WATCHING TV / CHANNEL CONTROL Remote Control Functions 34 Turning On TV 36 Channel Selection 36 Volume Adjustment 36 On-Screen Menus Selection 37 Channel Setup - Eye Care 59 Advanced Control - Add / Delete Channel (Manual Tuning 39 - Color Tone Preset 55 Manual Picture...
User Manual
Page 9
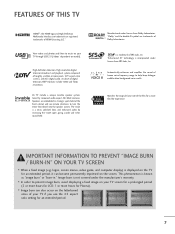
...keep dialogue audible when background noise swells. TruSurround XT technology is a trademark of your TV through USB 2.0 ('videos' dependent on model). LG TV include a unique invisible speaker system, tuned by increasing the "sweet spot", giving a wider and richer sound field. Automatically enhances ...manufacturer's warranty. ■ In order to turn the entire front bezel into the speaker system. Image burn is displayed on your TV screen for a prolonged period (2 or more hours for LCD, 1 or more hours for an extended period. 7 High-resolution digital television broadcast...
...keep dialogue audible when background noise swells. TruSurround XT technology is a trademark of your TV through USB 2.0 ('videos' dependent on model). LG TV include a unique invisible speaker system, tuned by increasing the "sweet spot", giving a wider and richer sound field. Automatically enhances ...manufacturer's warranty. ■ In order to turn the entire front bezel into the speaker system. Image burn is displayed on your TV screen for a prolonged period (2 or more hours for LCD, 1 or more hours for an extended period. 7 High-resolution digital television broadcast...
User Manual
Page 14
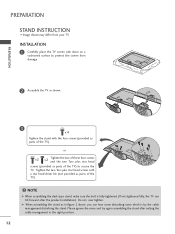
Tighten the two Torx plus star head screws (provided as in the right position. 12 Do not over tighten. INSTALLATION 1 Carefully place the TV screen side down on a cushioned surface to secure the TV. NOTE G When assembling the desk type stand, make sure the bolt is by the cable management ... of these four screws and the two Torx plus star head screws with the four screws (provided as parts of the TV) to protect the screen from your TV. Please ignore the noise and try again assembling the stand after setting the cable management in figure 2 above, you can hear some...
Tighten the two Torx plus star head screws (provided as in the right position. 12 Do not over tighten. INSTALLATION 1 Carefully place the TV screen side down on a cushioned surface to secure the TV. NOTE G When assembling the desk type stand, make sure the bolt is by the cable management ... of these four screws and the two Torx plus star head screws with the four screws (provided as parts of the TV) to protect the screen from your TV. Please ignore the noise and try again assembling the stand after setting the cable management in figure 2 above, you can hear some...
User Manual
Page 15
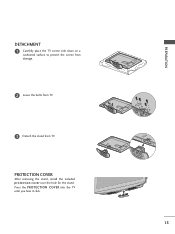
PREPARATION DETACHMENT 1 Carefully place the TV screen side down on a cushioned surface to protect the screen from damage. 2 Loose the bolts from TV. 3 Detach the stand from TV. PROTECTION COVER After removing the stand, install the included protection cover over the hole for the stand. Press the PROTECTION COVER into the TV until you hear it click. 13
PREPARATION DETACHMENT 1 Carefully place the TV screen side down on a cushioned surface to protect the screen from damage. 2 Loose the bolts from TV. 3 Detach the stand from TV. PROTECTION COVER After removing the stand, install the included protection cover over the hole for the stand. Press the PROTECTION COVER into the TV until you hear it click. 13
User Manual
Page 30
... Cable is present, change the PC output to another resolution, change the refresh rate to another rate or adjust the brightness and contrast on the screen. If noise is in use too long RGB-PC cable, there might be noise associated with the resolution, vertical pattern, contrast or brightness. The fixed... 70.06 59.870 60.015 60.020 60.00 59.934 ! G Depending on the graphics card, some resolution settings may be a noise on the screen properly. 28 G In PC mode, there may not allow the image to 1920x1080(For 37/42LH260H, 37LH265H), 1360x768(The others). When you use . NOTES G ...
... Cable is present, change the PC output to another resolution, change the refresh rate to another rate or adjust the brightness and contrast on the screen. If noise is in use too long RGB-PC cable, there might be noise associated with the resolution, vertical pattern, contrast or brightness. The fixed... 70.06 59.870 60.015 60.020 60.00 59.934 ! G Depending on the graphics card, some resolution settings may be a noise on the screen properly. 28 G In PC mode, there may not allow the image to 1920x1080(For 37/42LH260H, 37LH265H), 1360x768(The others). When you use . NOTES G ...
User Manual
Page 31
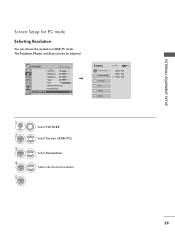
... resolution. 29 PICTURE Move E • Contrast 50 • Brightness 50 • Sharpness 50 • Color 50 • Tint 0R • Advanced Control • Picture Reset Screen (RGB-PC) Enter G Screen Resolution G Auto config. Select Screen (RGB-PC). The Position, Phase, and Size can choose the resolution in RGB-PC mode. EXTERNAL EQUIPMENT SETUP...
... resolution. 29 PICTURE Move E • Contrast 50 • Brightness 50 • Sharpness 50 • Color 50 • Tint 0R • Advanced Control • Picture Reset Screen (RGB-PC) Enter G Screen Resolution G Auto config. Select Screen (RGB-PC). The Position, Phase, and Size can choose the resolution in RGB-PC mode. EXTERNAL EQUIPMENT SETUP...
User Manual
Page 32
... • Sharpness 50 • Color 50 • Tint 0R • Advanced Control • Picture Reset Screen (RGB-PC) Enter G Screen Resolution Auto config. Yes No 1 MENU 2 ENTER Select PICTURE. G Position Size Phase Reset Move MENU Prev. Select Screen (RGB-PC). 3 ENTER 4 ENTER Select Auto config.. Auto Config. Select Y e s. 5 ENTER Start Auto Configuration. •...
... • Sharpness 50 • Color 50 • Tint 0R • Advanced Control • Picture Reset Screen (RGB-PC) Enter G Screen Resolution Auto config. Yes No 1 MENU 2 ENTER Select PICTURE. G Position Size Phase Reset Move MENU Prev. Select Screen (RGB-PC). 3 ENTER 4 ENTER Select Auto config.. Auto Config. Select Y e s. 5 ENTER Start Auto Configuration. •...
User Manual
Page 33
...50 • Color 50 • Tint 0R • Advanced Control • Picture Reset Screen (RGB-PC) Enter G Screen Resolution Auto config. Select Screen (RGB-PC). EXTERNAL EQUIPMENT SETUP Adjustment for screen Position, Size, and Phase If the picture is to adjust picture to left/right and ...PC mode. D F G E 1 MENU 2 ENTER 3 ENTER 4 ENTER 5 ENTER Select PICTURE. Position G Size Phase Reset Move MENU Prev. And the horizontal screen size will also change. ■ P h a s e: This function allows you prefer. ■ S i z e: This function is to remove any vertical bars or...
...50 • Color 50 • Tint 0R • Advanced Control • Picture Reset Screen (RGB-PC) Enter G Screen Resolution Auto config. Select Screen (RGB-PC). EXTERNAL EQUIPMENT SETUP Adjustment for screen Position, Size, and Phase If the picture is to adjust picture to left/right and ...PC mode. D F G E 1 MENU 2 ENTER 3 ENTER 4 ENTER 5 ENTER Select PICTURE. Position G Size Phase Reset Move MENU Prev. And the horizontal screen size will also change. ■ P h a s e: This function allows you prefer. ■ S i z e: This function is to remove any vertical bars or...
User Manual
Page 34
... (Reset to original factory values) Returns Position, S i z e, and Phase to the default factory settings. Position Size Initialize Settings. Select Reset. Select Y e s. 32 Select Screen (RGB-PC). This feature operates only in RGB-PC mode. Yes No Phase Reset G 1 MENU 2 ENTER 3 ENTER 4 ENTER 5 ENTER Select PICTURE. PICTURE Move E •... Contrast 50 • Brightness 50 • Sharpness 50 • Color 50 • Tint 0R • Advanced Control • Picture Reset Screen (RGB-PC) Enter G Screen Resolution Move MENU Prev.
... (Reset to original factory values) Returns Position, S i z e, and Phase to the default factory settings. Position Size Initialize Settings. Select Reset. Select Y e s. 32 Select Screen (RGB-PC). This feature operates only in RGB-PC mode. Yes No Phase Reset G 1 MENU 2 ENTER 3 ENTER 4 ENTER 5 ENTER Select PICTURE. PICTURE Move E •... Contrast 50 • Brightness 50 • Sharpness 50 • Color 50 • Tint 0R • Advanced Control • Picture Reset Screen (RGB-PC) Enter G Screen Resolution Move MENU Prev.

User Manual
Page 36
...VCR/DVD control buttons Control video cassette recorders or DVD players. RETURN SAP EJECT 34 MENU Displays the main menu or clears all on-screen displays and return to mark or unmark a photo/music. TIMER Select the amount of time before your preference. EJECT Eject the USB ...device. THUMBSTICK Navigates the on-screen menus and adjusts the system (Up/Down/Left Right/ENTER) settings to move return one step in an interactive RETURN application or other ...
...VCR/DVD control buttons Control video cassette recorders or DVD players. RETURN SAP EJECT 34 MENU Displays the main menu or clears all on-screen displays and return to mark or unmark a photo/music. TIMER Select the amount of time before your preference. EJECT Eject the USB ...device. THUMBSTICK Navigates the on-screen menus and adjusts the system (Up/Down/Left Right/ENTER) settings to move return one step in an interactive RETURN application or other ...

User Manual
Page 37
... or used batteries with -). ■ Install two 1.5V AAA batteries. FLASHBK Tunes to the next one. UP/DOWN PAGE Move from one full set of screen information to the last channel viewed. UP/DOWN Installing Batteries ■ Loose the bolt on the battery compartment cover. ■ Open the battery compartment cover...
... or used batteries with -). ■ Install two 1.5V AAA batteries. FLASHBK Tunes to the next one. UP/DOWN PAGE Move from one full set of screen information to the last channel viewed. UP/DOWN Installing Batteries ■ Loose the bolt on the battery compartment cover. ■ Open the battery compartment cover...
User Manual
Page 39
... Enter 37 Select a menu item. 3 ENTER Enter to the pop up menu. 4 MENU Return to TV viewing. WATCHING TV / CHANNEL CONTROL ON-SCREEN MENUS SELECTION Your TV's OSD (On Screen Display) may differ slightly from that shown in this manual. CHANNEL Auto Tuning Manual Tuning Channel Edit Channel Label Move Enter PICTURE...
... Enter 37 Select a menu item. 3 ENTER Enter to the pop up menu. 4 MENU Return to TV viewing. WATCHING TV / CHANNEL CONTROL ON-SCREEN MENUS SELECTION Your TV's OSD (On Screen Display) may differ slightly from that shown in this manual. CHANNEL Auto Tuning Manual Tuning Channel Edit Channel Label Move Enter PICTURE...
User Manual
Page 41
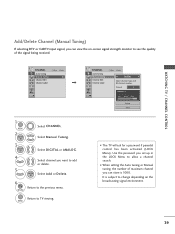
... Auto Tuning Manual Tuning Channel Edit Channel Label Move Enter 1 MENU 2 ENTER Select CHANNEL. It is 1000. Select channel you want to change depending on -screen signal strength monitor to see the quality of maximum channel you set up in the LOCK Menu to allow a channel search. ■ When setting the...
... Auto Tuning Manual Tuning Channel Edit Channel Label Move Enter 1 MENU 2 ENTER Select CHANNEL. It is 1000. Select channel you want to change depending on -screen signal strength monitor to see the quality of maximum channel you set up in the LOCK Menu to allow a channel search. ■ When setting the...
User Manual
Page 47
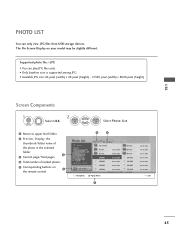
... baseline scan is supported among JPG. • Available JPG size: 64 pixel (width) x 64 pixel (height) - 15360 pixel (width) x 8640 pixel (height) Screen Components 1 MENU Select U S B. 2 ENTER ENTER Select Photo List. 1 Moves to upper level folder 2 Preview: Display the thumbnail/folder name of the photo in ... model may be slightly different. Supported photo file: *.JPG • You can only view .JPG files from USB storage devices. The On-Screen Display on 1 the remote control 3 4 Photo List Drive1 JMJ001 1366x768, 125KB Up Folder Page 2/3 No Marked Up Folder KY101 06/10/...
... baseline scan is supported among JPG. • Available JPG size: 64 pixel (width) x 64 pixel (height) - 15360 pixel (width) x 8640 pixel (height) Screen Components 1 MENU Select U S B. 2 ENTER ENTER Select Photo List. 1 Moves to upper level folder 2 Preview: Display the thumbnail/folder name of the photo in ... model may be slightly different. Supported photo file: *.JPG • You can only view .JPG files from USB storage devices. The On-Screen Display on 1 the remote control 3 4 Photo List Drive1 JMJ001 1366x768, 125KB Up Folder Page 2/3 No Marked Up Folder KY101 06/10/...

User Manual
Page 48
... Select the desired Popup menu. ■ Use the C H button to navigate in a slide show of the marked photos. G Unmark All: Deselect all photos on the screen. tos in the folder in the photo page. ■ Use the MARK button to mark or unmark a photo. USB USB Photo Selection and Popup Menu...
... Select the desired Popup menu. ■ Use the C H button to navigate in a slide show of the marked photos. G Unmark All: Deselect all photos on the screen. tos in the folder in the photo page. ■ Use the MARK button to mark or unmark a photo. USB USB Photo Selection and Popup Menu...

User Manual
Page 49
... 1/17 Delete Option Hide The aspect ratio of a photo may change the Photo List view so that it fills the screen. Press the RETURN button to move to navigate in full screen mode. button to the previous menu screen. ■ Use the C H photo page. More operations are available in the USB 47 Full...
... 1/17 Delete Option Hide The aspect ratio of a photo may change the Photo List view so that it fills the screen. Press the RETURN button to move to navigate in full screen mode. button to the previous menu screen. ■ Use the C H photo page. More operations are available in the USB 47 Full...
User Manual
Page 50
... time interval of the slide show . G Hide : Hide the menu on the full-sized screen. ■ To see the menu again on the full-sized screen, press ENTER button to select and control the menu on the full-sized screen. G B G M: Listen to set values. Press F G to music while viewing photos in full size...
... time interval of the slide show . G Hide : Hide the menu on the full-sized screen. ■ To see the menu again on the full-sized screen, press ENTER button to select and control the menu on the full-sized screen. G B G M: Listen to set values. Press F G to music while viewing photos in full size...
User Manual
Page 51
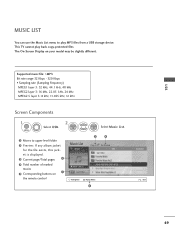
...3: 32 kHz, 44.1 kHz, 48 kHz MPEG2 layer 3: 16 kHz, 22.05 kHz, 24 kHz MPEG2.5 layer 3: 8 kHz, 11.025 kHz, 12 kHz Screen Components 1 MENU Select U S B. 2 ENTER ENTER Select Music List. 1 Moves to play back copy-protected files. USB MUSIC LIST You can use the Music List ... jacket is displayed. 3 Current page/Total pages 2 4 Total number of marked musics 1 5 Corresponding buttons on your model may be slightly different. The On-Screen Display on the remote control Music List Drive1 3 4 Page 2/3 No Marked Title Up Folder A 00:00 / 04:16 Up Folder Navigation Popup Menu 5 Duration...
...3: 32 kHz, 44.1 kHz, 48 kHz MPEG2 layer 3: 16 kHz, 22.05 kHz, 24 kHz MPEG2.5 layer 3: 8 kHz, 11.025 kHz, 12 kHz Screen Components 1 MENU Select U S B. 2 ENTER ENTER Select Music List. 1 Moves to play back copy-protected files. USB MUSIC LIST You can use the Music List ... jacket is displayed. 3 Current page/Total pages 2 4 Total number of marked musics 1 5 Corresponding buttons on your model may be slightly different. The On-Screen Display on the remote control Music List Drive1 3 4 Page 2/3 No Marked Title Up Folder A 00:00 / 04:16 Up Folder Navigation Popup Menu 5 Duration...


