User Manual
Page 7
... Technology 57 Advanced Control - Film Mode 60 Picture Reset 61 Demo mode 61 SOUND & LANGUAGE CONTROL Auto Volume Leveler (Auto Volume 62 Preset Sound Settings (Sound Mode) 63 Sound Setting Adjustment - Digital Broadcasting ... Editing 40 Channel Label 41 Input List 42 CONTENTS USB Entry Modes 43 Photo List 45 Music List 49 PICTURE CONTROL Picture Size (Aspect Ratio) Control 52 Preset Picture Settings - Color Tone Preset 55 Manual Picture Adjustment - SRS TruSurround XT 65 Clear Voice II 66 Balance 67 TV Speakers On/Off Setup 68 Audio...
... Technology 57 Advanced Control - Film Mode 60 Picture Reset 61 Demo mode 61 SOUND & LANGUAGE CONTROL Auto Volume Leveler (Auto Volume 62 Preset Sound Settings (Sound Mode) 63 Sound Setting Adjustment - Digital Broadcasting ... Editing 40 Channel Label 41 Input List 42 CONTENTS USB Entry Modes 43 Photo List 45 Music List 49 PICTURE CONTROL Picture Size (Aspect Ratio) Control 52 Preset Picture Settings - Color Tone Preset 55 Manual Picture Adjustment - SRS TruSurround XT 65 Clear Voice II 66 Balance 67 TV Speakers On/Off Setup 68 Audio...
User Manual
Page 20
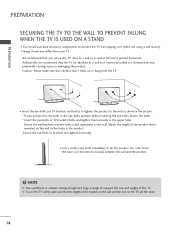
... differ from the TV. ■ Insert the eye-bolts (or TV brackets and bolts) to tighten the product to the wall as shown in the picture. * If your TV. NOTE G Use a platform or cabinet strong enough and large enough to support the size and weight of the bracket on the wall...
... differ from the TV. ■ Insert the eye-bolts (or TV brackets and bolts) to tighten the product to the wall as shown in the picture. * If your TV. NOTE G Use a platform or cabinet strong enough and large enough to support the size and weight of the bracket on the wall...

User Manual
Page 21
... Antenna (VHF, UHF) RF Coaxial Wire (75 ohm) Single-family Dwellings /Houses (Connect to wall jack for assistance. 19 For optimum picture quality, adjust the direction if needed. Cable Cable TV Wall Jack RF Coaxial Wire (75 ohm) ANTENNA IN M.P.I . Antenna (Analog or... without a Cable Box Connection. Wall Antenna Socket Multi-family Dwellings/Apartments (Connect to wall antenna socket) ANTENNA IN M.P.I . ■ To improve the picture quality in a poor signal area, please purchase a signal amplifier and install properly. ■ If the antenna needs to be split for two TV's, install...
... Antenna (VHF, UHF) RF Coaxial Wire (75 ohm) Single-family Dwellings /Houses (Connect to wall jack for assistance. 19 For optimum picture quality, adjust the direction if needed. Cable Cable TV Wall Jack RF Coaxial Wire (75 ohm) ANTENNA IN M.P.I . Antenna (Analog or... without a Cable Box Connection. Wall Antenna Socket Multi-family Dwellings/Apartments (Connect to wall antenna socket) ANTENNA IN M.P.I . ■ To improve the picture quality in a poor signal area, please purchase a signal amplifier and install properly. ■ If the antenna needs to be split for two TV's, install...
User Manual
Page 25
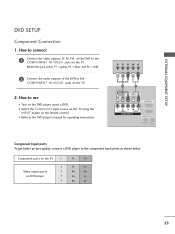
Y PB PR L R 1 2 GAME CONTROL AV IN 1 VIDEO AUDIO L(MONO) R 2 VIDEO L R AUDIO 1 COMPONENT IN R ( /DVI IN SPEAKER OUT REMOTE (8 ) CONTROL O Component Input ports To get better picture quality, connect a DVD player to use ■ Turn on the DVD player, insert a DVD. ■ Select the Component input source on the TV using the ...
Y PB PR L R 1 2 GAME CONTROL AV IN 1 VIDEO AUDIO L(MONO) R 2 VIDEO L R AUDIO 1 COMPONENT IN R ( /DVI IN SPEAKER OUT REMOTE (8 ) CONTROL O Component Input ports To get better picture quality, connect a DVD player to use ■ Turn on the DVD player, insert a DVD. ■ Select the Component input source on the TV using the ...
User Manual
Page 30
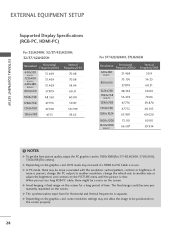
..., contrast or brightness. When you use . G Avoid keeping a fixed image on the screen. NOTES G To get the best picture quality, adjust the PC graphics card to be positioned on the PICTURE menu until the picture is separate. G Depending on the screen. If noise is present, change the PC output to another rate or...
..., contrast or brightness. When you use . G Avoid keeping a fixed image on the screen. NOTES G To get the best picture quality, adjust the PC graphics card to be positioned on the PICTURE menu until the picture is separate. G Depending on the screen. If noise is present, change the PC output to another rate or...
User Manual
Page 31
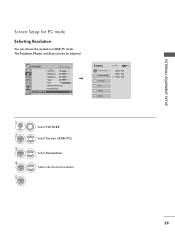
...x 768 1360 x 768 1 MENU 2 ENTER 3 ENTER 4 ENTER 5 ENTER Select PICTURE. The Position, Phase, and Size can choose the resolution in RGB-PC mode. Select Resolution. Select the desired resolution. 29 PICTURE Move E • Contrast 50 • Brightness 50 • Sharpness 50 • ...Color 50 • Tint 0R • Advanced Control • Picture Reset Screen (RGB-PC) Enter G Screen Resolution G Auto config...
...x 768 1360 x 768 1 MENU 2 ENTER 3 ENTER 4 ENTER 5 ENTER Select PICTURE. The Position, Phase, and Size can choose the resolution in RGB-PC mode. Select Resolution. Select the desired resolution. 29 PICTURE Move E • Contrast 50 • Brightness 50 • Sharpness 50 • ...Color 50 • Tint 0R • Advanced Control • Picture Reset Screen (RGB-PC) Enter G Screen Resolution G Auto config...
User Manual
Page 32
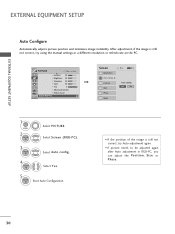
...image is still not correct, try using the manual settings or a different resolution or refresh rate on the PC. Yes No 1 MENU 2 ENTER Select PICTURE. G Position Size Phase Reset Move MENU Prev. Select Y e s. 5 ENTER Start Auto Configuration. • If the position of the image is ...still not correct, try Auto adjustment again. • If picture needs to be adjusted again after Auto adjustment in RGB-PC, you can adjust the Position, S i z e or P h a s e. 30 EXTERNAL EQUIPMENT SETUP...
...image is still not correct, try using the manual settings or a different resolution or refresh rate on the PC. Yes No 1 MENU 2 ENTER Select PICTURE. G Position Size Phase Reset Move MENU Prev. Select Y e s. 5 ENTER Start Auto Configuration. • If the position of the image is ...still not correct, try Auto adjustment again. • If picture needs to be adjusted again after Auto adjustment in RGB-PC, you can adjust the Position, S i z e or P h a s e. 30 EXTERNAL EQUIPMENT SETUP...
User Manual
Page 33
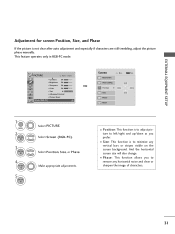
...function allows you prefer. ■ S i z e: This function is to remove any vertical bars or stripes visible on the screen background. Select Screen (RGB-PC). PICTURE Move E • Contrast 50 • Brightness 50 • Sharpness 50 • Color 50 • Tint 0R • Advanced Control •...RGB-PC) Enter G Screen Resolution Auto config. EXTERNAL EQUIPMENT SETUP Adjustment for screen Position, Size, and Phase If the picture is to adjust picture to left/right and up/down as you to minimize any horizontal noise and clear or sharpen the image of characters. ...
...function allows you prefer. ■ S i z e: This function is to remove any vertical bars or stripes visible on the screen background. Select Screen (RGB-PC). PICTURE Move E • Contrast 50 • Brightness 50 • Sharpness 50 • Color 50 • Tint 0R • Advanced Control •...RGB-PC) Enter G Screen Resolution Auto config. EXTERNAL EQUIPMENT SETUP Adjustment for screen Position, Size, and Phase If the picture is to adjust picture to left/right and up/down as you to minimize any horizontal noise and clear or sharpen the image of characters. ...
User Manual
Page 34
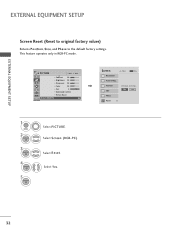
... Screen (RGB-PC) Enter G Screen Resolution Move MENU Prev. Yes No Phase Reset G 1 MENU 2 ENTER 3 ENTER 4 ENTER 5 ENTER Select PICTURE. This feature operates only in RGB-PC mode. Select Reset. EXTERNAL EQUIPMENT SETUP EXTERNAL EQUIPMENT SETUP Screen Reset (Reset to original factory values) Returns Position, S i z e, ...
... Screen (RGB-PC) Enter G Screen Resolution Move MENU Prev. Yes No Phase Reset G 1 MENU 2 ENTER 3 ENTER 4 ENTER 5 ENTER Select PICTURE. This feature operates only in RGB-PC mode. Select Reset. EXTERNAL EQUIPMENT SETUP EXTERNAL EQUIPMENT SETUP Screen Reset (Reset to original factory values) Returns Position, S i z e, ...
User Manual
Page 39
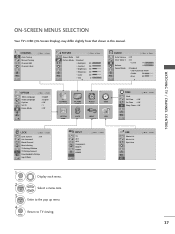
...On Screen Display) may differ slightly from that shown in this manual. CHANNEL Auto Tuning Manual Tuning Channel Edit Channel Label Move Enter PICTURE Move Aspect Ratio : 16:9 Picture Mode : Standard • Backlight • Contrast • Brightness • Sharpness • Color • Tint E 80 90...8226; Bass 50 E OPTION Menu Language Audio Language Caption Set ID Demo Mode Move Enter : English : English : Off : 1 : Off CHANNEL PICTURE AUDIO TIME OPTION LOCK INPUT USB TIME Clock Off Time : Off On Time : Off Sleep Timer : Off Move Enter LOCK Move Enter Lock System...
...On Screen Display) may differ slightly from that shown in this manual. CHANNEL Auto Tuning Manual Tuning Channel Edit Channel Label Move Enter PICTURE Move Aspect Ratio : 16:9 Picture Mode : Standard • Backlight • Contrast • Brightness • Sharpness • Color • Tint E 80 90...8226; Bass 50 E OPTION Menu Language Audio Language Caption Set ID Demo Mode Move Enter : English : English : Off : 1 : Off CHANNEL PICTURE AUDIO TIME OPTION LOCK INPUT USB TIME Clock Off Time : Off On Time : Off Sleep Timer : Off Move Enter LOCK Move Enter Lock System...

User Manual
Page 54
RETURN ■ You can also adjust Aspect Ratio in the PICTURE menu. PICTURE CONTROL 52 PICTURE CONTROL PICTURE SIZE (ASPECT RATIO) CONTROL This feature lets you choose the way an analog picture with a 4:3 aspect ratio is displayed on your TV. ■ RGB-PC input source use 4:3 or 16:9 aspect ratio. 16:9 1 RATIO Press the RATIO button repeatedly to select the picture options : Set By Program, 4:3, 16:9, Zoom, Just Scan. 2 Return to TV viewing.
RETURN ■ You can also adjust Aspect Ratio in the PICTURE menu. PICTURE CONTROL 52 PICTURE CONTROL PICTURE SIZE (ASPECT RATIO) CONTROL This feature lets you choose the way an analog picture with a 4:3 aspect ratio is displayed on your TV. ■ RGB-PC input source use 4:3 or 16:9 aspect ratio. 16:9 1 RATIO Press the RATIO button repeatedly to select the picture options : Set By Program, 4:3, 16:9, Zoom, Just Scan. 2 Return to TV viewing.

User Manual
Page 55
... screen. 53 Just Scan turns off this cropping and shows the complete video. Just Scan 16:9 Adjust the picture horizontally, in a linear proportion to view the picture without any alteration. However, the top and bottom portions of the picture will be cropped. (16:9 16:9) Set By Program 4:3 Choose 4:3 when you want to view... a picture with DTV/CADTV/HDMI-DTV/DVI-DTV (720p/1080i/1080p), Component(720p/1080i) input sources. Just Scan Normally the edges of the original signal, it ...
... screen. 53 Just Scan turns off this cropping and shows the complete video. Just Scan 16:9 Adjust the picture horizontally, in a linear proportion to view the picture without any alteration. However, the top and bottom portions of the picture will be cropped. (16:9 16:9) Set By Program 4:3 Choose 4:3 when you want to view... a picture with DTV/CADTV/HDMI-DTV/DVI-DTV (720p/1080i/1080p), Component(720p/1080i) input sources. Just Scan Normally the edges of the original signal, it ...

User Manual
Page 56
... 4 RETURN Return to TV viewing. MENU 54 ■ Vivid, Standard, Natural, Cinema, Sport, and G a m e Settings are preset for the optimum picture quality at the factory and are factory presets for sports. ■ G a m e: This is the video mode to emphasize dynamic video and primary color ...(e.g, white, uniform, grass, sky blue etc.) by realizing the optimal screen for picture settings available in the retail store. Return to the previous menu. Preset There are not adjustable. ■ Vivid: This is the mode to...
... 4 RETURN Return to TV viewing. MENU 54 ■ Vivid, Standard, Natural, Cinema, Sport, and G a m e Settings are preset for the optimum picture quality at the factory and are factory presets for sports. ■ G a m e: This is the video mode to emphasize dynamic video and primary color ...(e.g, white, uniform, grass, sky blue etc.) by realizing the optimal screen for picture settings available in the retail store. Return to the previous menu. Preset There are not adjustable. ■ Vivid: This is the mode to...
User Manual
Page 57
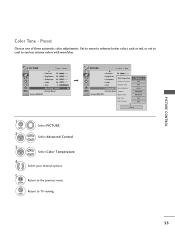
...; Brightness 50 • Sharpness 50 • Color 50 • Tint 0R G • Advanced Control • Picture Reset Screen (RGB-PC) 1 MENU 2 ENTER Select PICTURE. Preset Choose one of three automatic color adjustments. Return to TV viewing. MENU PICTURE Move Enter E • Contrast 50 • Brightness • Sharpness • Color • Tint 50 Color...
...; Brightness 50 • Sharpness 50 • Color 50 • Tint 0R G • Advanced Control • Picture Reset Screen (RGB-PC) 1 MENU 2 ENTER Select PICTURE. Preset Choose one of three automatic color adjustments. Return to TV viewing. MENU PICTURE Move Enter E • Contrast 50 • Brightness • Sharpness • Color • Tint 50 Color...

User Manual
Page 58
...5 ENTER Select Vivid, Standard, Natural, Cinema, Sport or Game. MENU 56 USER MODE Adjust the picture appearance to the previous menu. E E PICTURE CONTROL PICTURE Move Enter Aspect Ratio : 16:9 Picture Mode : Standard (User) • Backlight 90 • Contrast 90 • Brightness 50 •... 60 • Color 60 • Tint 0R G E E • Backlight 80 E Enter 1 MENU 2 ENTER Select PICTURE. Make appropriate adjustments. 6 RETURN Return to suit your preference and viewing situations. Return to TV viewing. Select Backlight, Contrast, Brightness, Sharpness...
...5 ENTER Select Vivid, Standard, Natural, Cinema, Sport or Game. MENU 56 USER MODE Adjust the picture appearance to the previous menu. E E PICTURE CONTROL PICTURE Move Enter Aspect Ratio : 16:9 Picture Mode : Standard (User) • Backlight 90 • Contrast 90 • Brightness 50 •... 60 • Color 60 • Tint 0R G E E • Backlight 80 E Enter 1 MENU 2 ENTER Select PICTURE. Make appropriate adjustments. 6 RETURN Return to suit your preference and viewing situations. Return to TV viewing. Select Backlight, Contrast, Brightness, Sharpness...

User Manual
Page 59
... 50 • Brightness 50 • Sharpness 50 • Color 50 • Tint 0R G • Advanced Control • Picture Reset Screen (RGB-PC) PICTURE Move Enter E • Contrast 50 • Brightness • Sharpness • Color • Tint 50 Color Temperature 50 5D0ynamic ...display high contrast images. This function is inputted through HDMI. This function is the function to TV viewing. PICTURE CONTROL PICTURE IMPROVEMENT TECHNOLOGY Dynamic Contrast: Optimizes the contrast automatically according to increase color quality. Return to express richer color....
... 50 • Brightness 50 • Sharpness 50 • Color 50 • Tint 0R G • Advanced Control • Picture Reset Screen (RGB-PC) PICTURE Move Enter E • Contrast 50 • Brightness • Sharpness • Color • Tint 50 Color Temperature 50 5D0ynamic ...display high contrast images. This function is inputted through HDMI. This function is the function to TV viewing. PICTURE CONTROL PICTURE IMPROVEMENT TECHNOLOGY Dynamic Contrast: Optimizes the contrast automatically according to increase color quality. Return to express richer color....

User Manual
Page 60
... of the screen. Select Advanced Control. 3 ENTER Select Black Level. 4 Select L o w or H i g h. 5 RETURN Return to 'Auto'. PICTURE Move Enter E • Contrast 50 • Brightness 50 • Sharpness 50 • Color 50 • Tint 0R G • Advanced Control •...; Picture Reset Screen (RGB-PC) PICTURE Move Enter E • Contrast 50 • Brightness • Sharpness • Color • Tint 50 Color Temperature 50 5D0ynamic ...
... of the screen. Select Advanced Control. 3 ENTER Select Black Level. 4 Select L o w or H i g h. 5 RETURN Return to 'Auto'. PICTURE Move Enter E • Contrast 50 • Brightness 50 • Sharpness 50 • Color 50 • Tint 0R G • Advanced Control •...; Picture Reset Screen (RGB-PC) PICTURE Move Enter E • Contrast 50 • Brightness • Sharpness • Color • Tint 50 Color Temperature 50 5D0ynamic ...

User Manual
Page 61
... 50 • Brightness 50 • Sharpness 50 • Color 50 • Tint 0R G • Advanced Control • Picture Reset Screen (RGB-PC) PICTURE Move Enter E • Contrast 50 • Brightness • Sharpness • Color • Tint 50 Color Temperature 50 5D0ynamic ... D0ynaRmic Color G • Advanced ContNrooisle Reduction • Picture Reset Gamma Screen (RGB-PC) Black Level Medium Off Off Auto Medium Low Eye Care Real Cinema F Off G Off E Close 1 MENU 2 ENTER Select PICTURE. PICTURE CONTROL ADVANCED CONTROL - EYE CARE Dims extremely bright...
... 50 • Brightness 50 • Sharpness 50 • Color 50 • Tint 0R G • Advanced Control • Picture Reset Screen (RGB-PC) PICTURE Move Enter E • Contrast 50 • Brightness • Sharpness • Color • Tint 50 Color Temperature 50 5D0ynamic ... D0ynaRmic Color G • Advanced ContNrooisle Reduction • Picture Reset Gamma Screen (RGB-PC) Black Level Medium Off Off Auto Medium Low Eye Care Real Cinema F Off G Off E Close 1 MENU 2 ENTER Select PICTURE. PICTURE CONTROL ADVANCED CONTROL - EYE CARE Dims extremely bright...
User Manual
Page 62
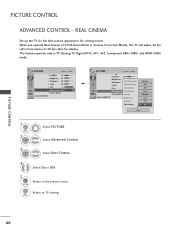
...TV (Analog TV, Digital DTV), AV1, AV2, Component 480i/1080i, and HDMI 1080i mode. REAL CINEMA Set up the TV for the best picture appearance for display. When you operate Real Cinema (3:2 Pull-Down Mode or Cinema Correction Mode), the TV will adjust 24 fps video from movies... to TV viewing. MENU PICTURE Move Enter E • Contrast 50 • Brightness • Sharpness • Color • Tint 50 Color Temperature 50 5D0ynamic Contrast D0ynaRmic Color G •...
...TV (Analog TV, Digital DTV), AV1, AV2, Component 480i/1080i, and HDMI 1080i mode. REAL CINEMA Set up the TV for the best picture appearance for display. When you operate Real Cinema (3:2 Pull-Down Mode or Cinema Correction Mode), the TV will adjust 24 fps video from movies... to TV viewing. MENU PICTURE Move Enter E • Contrast 50 • Brightness • Sharpness • Color • Tint 50 Color Temperature 50 5D0ynamic Contrast D0ynaRmic Color G •...
User Manual
Page 63
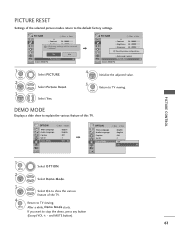
... be resetted. After a while, Demo Mode starts. If you want to the default factory settings. PICTURE Move Enter E • Contrast 50 • Brightness 50 ? Select Picture Reset. Select Demo Mode. 3 ENTER 4 MENU Select O n to show to explain the various ...feature of this TV. Continue? • Color 50 • TintYes 0R G No • Advanced Control • Picture Reset Screen (RGB-PC) PICTURE Move Enter E • Contrast 50 • Brightness 50 • Sharpness 50 i •RCeoselottring video 5co0nfiguration... • Tint 0R...
... be resetted. After a while, Demo Mode starts. If you want to the default factory settings. PICTURE Move Enter E • Contrast 50 • Brightness 50 ? Select Picture Reset. Select Demo Mode. 3 ENTER 4 MENU Select O n to show to explain the various ...feature of this TV. Continue? • Color 50 • TintYes 0R G No • Advanced Control • Picture Reset Screen (RGB-PC) PICTURE Move Enter E • Contrast 50 • Brightness 50 • Sharpness 50 i •RCeoselottring video 5co0nfiguration... • Tint 0R...

