Owners Manual
Page 3
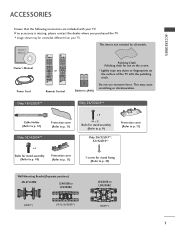
...cloth for use excessive force. I Image shown may cause scratching or discolouration. This item is missing, please contact the dealer where you purchased the TV. Only 19/22LD3** Only 26/32LD3** Cable Holder (Refer to p. 12) Protection cover (Refer to p. 11) Only 32/42LD4** x...M4 x 20 Bolts for stand assembly (Refer to p. 9) Only 26/32LD3**, 32/42LD4** Protection cover (Refer to p. 11) 1-screw for all models. ACCESSORIES ACCESSORIES Ensure that the following accessories are included with the polishing cloth. If an accessory is not included for stand fixing (Refer to p. 10...
...cloth for use excessive force. I Image shown may cause scratching or discolouration. This item is missing, please contact the dealer where you purchased the TV. Only 19/22LD3** Only 26/32LD3** Cable Holder (Refer to p. 12) Protection cover (Refer to p. 11) Only 32/42LD4** x...M4 x 20 Bolts for stand assembly (Refer to p. 9) Only 26/32LD3**, 32/42LD4** Protection cover (Refer to p. 11) 1-screw for all models. ACCESSORIES ACCESSORIES Ensure that the following accessories are included with the polishing cloth. If an accessory is not included for stand fixing (Refer to p. 10...

Owners Manual
Page 15
... with the Kensington Security System. NOTE G The Kensington Security System is nothing wrong with TV. PREPARATION SWIVEL STAND (Except 19/22LD3**) I This feature is not available for all models. For the detailed installation and use of the panel in various ways for expensive electronic equipment... connector on the screen, appearing as tiny red, green, or blue spots. G If the TV feels cold to suit your TV. I Image shown may be a small "flicker" when when it for all models. POSITIONING YOUR DISPLAY (Only 19/22LD3**) I Image shown may be visible on the back panel...
... with the Kensington Security System. NOTE G The Kensington Security System is nothing wrong with TV. PREPARATION SWIVEL STAND (Except 19/22LD3**) I This feature is not available for all models. For the detailed installation and use of the panel in various ways for expensive electronic equipment... connector on the screen, appearing as tiny red, green, or blue spots. G If the TV feels cold to suit your TV. I Image shown may be a small "flicker" when when it for all models. POSITIONING YOUR DISPLAY (Only 19/22LD3**) I Image shown may be visible on the back panel...

Owners Manual
Page 17
...the use a special wall mount, if you purchase a wall mounting bracket which may cause TV to the floor. e.g. Incorrect fastening of a LG Brand wall mounting bracket when mounting the TV to ceiling or slanted wall. G Should use of screws to surface which supports VESA ...standard. NOTE G Should Install wall mount on should be performed by a qualified professional installer. 10 cm 10 cm 10 cm 10 cm 10 cm A B AC IN CABLE MANAGEMENT Model...
...the use a special wall mount, if you purchase a wall mounting bracket which may cause TV to the floor. e.g. Incorrect fastening of a LG Brand wall mounting bracket when mounting the TV to ceiling or slanted wall. G Should use of screws to surface which supports VESA ...standard. NOTE G Should Install wall mount on should be performed by a qualified professional installer. 10 cm 10 cm 10 cm 10 cm 10 cm A B AC IN CABLE MANAGEMENT Model...

Owners Manual
Page 19
...Connecting with a component cable 1 Connect the video outputs (Y, PB, PR) of the digital set top box to the COMPONENT IN VIDEO jacks on the TV. /DVI IN 2 Connect the audio output of the digital set -top box.) 4 Select Component input source using the INPUT button on the remote control...Hz) 17 VIDEO AUDIO COMPONENT IN ANTENNA IN 3 Turn on the digital set-top box. (Refer to the owner's manual for the 26/32LD33* models. I To avoid damaging any equipment, never plug in any power cords until you have finished connecting all equipment. EXTERNAL EQUIPMENT SETUP 1 EXTERNAL EQUIPMENT ...
...Connecting with a component cable 1 Connect the video outputs (Y, PB, PR) of the digital set top box to the COMPONENT IN VIDEO jacks on the TV. /DVI IN 2 Connect the audio output of the digital set -top box.) 4 Select Component input source using the INPUT button on the remote control...Hz) 17 VIDEO AUDIO COMPONENT IN ANTENNA IN 3 Turn on the digital set-top box. (Refer to the owner's manual for the 26/32LD33* models. I To avoid damaging any equipment, never plug in any power cords until you have finished connecting all equipment. EXTERNAL EQUIPMENT SETUP 1 EXTERNAL EQUIPMENT ...

Owners Manual
Page 29
...33.75 59.94 60 50 24 30 ! G There may be no picture on the TV.(only HD Models) G Connect the audio cable from the PC to another resolution or change the refresh rate ...to the Audio input on the screen;use too long an RGB-PC cable, there may become permanently imprinted on the TV... We recommend using under 5m of the PC graphic card. NOTE G Avoid keeping a fixed image on the TV 's screen for prolonged periods of PC is over SXGA, there will be interference relating to PCM. 27 G ...
...33.75 59.94 60 50 24 30 ! G There may be no picture on the TV.(only HD Models) G Connect the audio cable from the PC to another resolution or change the refresh rate ...to the Audio input on the screen;use too long an RGB-PC cable, there may become permanently imprinted on the TV... We recommend using under 5m of the PC graphic card. NOTE G Avoid keeping a fixed image on the TV 's screen for prolonged periods of PC is over SXGA, there will be interference relating to PCM. 27 G ...
Owners Manual
Page 34
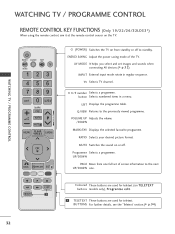
.../26/32LD33*) When using the remote control, aim it at the remote control sensor on TELETEXT buttons models only), Programme edit. 1 1 TELETEXT These buttons are used for teletext (on the TV. ENERGY SAVING Adjust the power saving mode of screen information to standby. AV MODE It helps you ...select and set of the TV. TV Selects TV channel. 0 to the previously viewed programme. Q.VIEW Returns to 9 number Selects a programme. Coloured These buttons are used for teletext. BUTTONS For further ...
.../26/32LD33*) When using the remote control, aim it at the remote control sensor on TELETEXT buttons models only), Programme edit. 1 1 TELETEXT These buttons are used for teletext (on the TV. ENERGY SAVING Adjust the power saving mode of screen information to standby. AV MODE It helps you ...select and set of the TV. TV Selects TV channel. 0 to the previously viewed programme. Q.VIEW Returns to 9 number Selects a programme. Coloured These buttons are used for teletext. BUTTONS For further ...

Owners Manual
Page 36
... in regular sequence. UP/DOWN PAGE Move from standby or off . BUTTONS For further details, see the 'Teletext' section.(G p.94) WATCHING TV / PROGRAMME CONTROL REMOTE CONTROL KEY FUNCTIONS (Except 19/22/26/32LD33*) When using the remote control, aim it at the remote control sensor ...on TELETEXT buttons models only), Programme edit. 1 TELETEXT These buttons are used for teletext. TV Selects TV channel. 0 to the previously viewed programme. Coloured These buttons are used for teletext (on the...
... in regular sequence. UP/DOWN PAGE Move from standby or off . BUTTONS For further details, see the 'Teletext' section.(G p.94) WATCHING TV / PROGRAMME CONTROL REMOTE CONTROL KEY FUNCTIONS (Except 19/22/26/32LD33*) When using the remote control, aim it at the remote control sensor ...on TELETEXT buttons models only), Programme edit. 1 TELETEXT These buttons are used for teletext. TV Selects TV channel. 0 to the previously viewed programme. Coloured These buttons are used for teletext (on the...

Owners Manual
Page 55
... menu is displayed, automatically. TO USE A USB DEVICE When connecting the USB device G It is not possible to the USB IN jack on the TV. • This TV Supports on JPEG, MP3 and SD DivX. USB memory stick 3 2 Select PHOTO LIST, MUSIC L IS T or MOVIE LIST. 3 OK PHOTO LIST MUSIC LIST MOVIE... menu before removing the USB device. 1 Q.MENU Select Eject. 2 OK TO USE A USB DEVICE 53 "POP UP MENU" will not be somewhat different from your TV. 1 Connect the USB device to use USB function in 19/22/26/32LD33...
... menu is displayed, automatically. TO USE A USB DEVICE When connecting the USB device G It is not possible to the USB IN jack on the TV. • This TV Supports on JPEG, MP3 and SD DivX. USB memory stick 3 2 Select PHOTO LIST, MUSIC L IS T or MOVIE LIST. 3 OK PHOTO LIST MUSIC LIST MOVIE... menu before removing the USB device. 1 Q.MENU Select Eject. 2 OK TO USE A USB DEVICE 53 "POP UP MENU" will not be somewhat different from your TV. 1 Connect the USB device to use USB function in 19/22/26/32LD33...

Owners Manual
Page 61
... MPEG1 layer 3: 32 k to 48 kHz TO USE A USB DEVICE Screen Components 1 MENU Select USB. 2 OK OK Select MUSIC LIST. 1 Moves to assist with the TV operation. Music file on the remote control 1 2 3 MUSIC LIST Music M002 Page 2/3 No Marked Title Up Folder 00:00 / 1:34 Up Folder M001 M002 M003... On Screen Display may contain copyright restrictions. MUSIC LIST Purchased music files(*.MP3) may be different from your USB device can be supported by this model.
... MPEG1 layer 3: 32 k to 48 kHz TO USE A USB DEVICE Screen Components 1 MENU Select USB. 2 OK OK Select MUSIC LIST. 1 Moves to assist with the TV operation. Music file on the remote control 1 2 3 MUSIC LIST Music M002 Page 2/3 No Marked Title Up Folder 00:00 / 1:34 Up Folder M001 M002 M003... On Screen Display may contain copyright restrictions. MUSIC LIST Purchased music files(*.MP3) may be different from your USB device can be supported by this model.
Owners Manual
Page 99
... HDMI Cable. *This feature is unstable A Check the signal cable. Vertical bar or stripe on or off and does not indicate a fault with the TV. or single colour A Reinstall the PC video card. Now, you have completed switching to Home use mode you should do the followings: From the... switched on background & Horizontal Noise & Incorrect position A Use Auto configure or adjust clock, phase, or H/V position. (Option) Screen colour is not available for all models. A It means that the TV is a problem with the broadcast. APPENDIX 97 The problem may result in an unusual noise when the...
... HDMI Cable. *This feature is unstable A Check the signal cable. Vertical bar or stripe on or off and does not indicate a fault with the TV. or single colour A Reinstall the PC video card. Now, you have completed switching to Home use mode you should do the followings: From the... switched on background & Horizontal Noise & Incorrect position A Use Auto configure or adjust clock, phase, or H/V position. (Option) Screen colour is not available for all models. A It means that the TV is a problem with the broadcast. APPENDIX 97 The problem may result in an unusual noise when the...

Owners Manual
Page 103
... Number Key 0 to 9 LIST Q.VIEW RED Key GREEN Key YELLOW Key BLUE Key TEXT T.OPT SIMPLINK A Stop G Play l l Pause FF Rew GG FF TV XSTUDIO EXIT CLEAR VOICE II TV/RAD SUBTITLE INFO i GUIDE Note R/C BUTTON (POWER ON/OFF) R/C BUTTON R/C BUTTON R/C BUTTON R/C BUTTON R/C BUTTON R/C BUTTON R/C BUTTON R/C BUTTON R/C BUTTON R/C BUTTON R/C BUTTON R/C BUTTON R/C BUTTON... R/C BUTTON R/C BUTTON R/C BUTTON R/C BUTTON R/C BUTTON R/C BUTTON R/C BUTTON R/C BUTTON R/C BUTTON R/C BUTTON R/C BUTTON R/C BUTTON R/C BUTTON R/C BUTTON APPENDIX 101 IR CODES *This feature is not available for all models.
... Number Key 0 to 9 LIST Q.VIEW RED Key GREEN Key YELLOW Key BLUE Key TEXT T.OPT SIMPLINK A Stop G Play l l Pause FF Rew GG FF TV XSTUDIO EXIT CLEAR VOICE II TV/RAD SUBTITLE INFO i GUIDE Note R/C BUTTON (POWER ON/OFF) R/C BUTTON R/C BUTTON R/C BUTTON R/C BUTTON R/C BUTTON R/C BUTTON R/C BUTTON R/C BUTTON R/C BUTTON R/C BUTTON R/C BUTTON R/C BUTTON R/C BUTTON... R/C BUTTON R/C BUTTON R/C BUTTON R/C BUTTON R/C BUTTON R/C BUTTON R/C BUTTON R/C BUTTON R/C BUTTON R/C BUTTON R/C BUTTON R/C BUTTON R/C BUTTON R/C BUTTON APPENDIX 101 IR CODES *This feature is not available for all models.

Owners Manual
Page 107
Power (Command: k a) To control Power On/Off of the TV. There might be described like "Note: In this model, TV will send the Acknowledge after power on /off . Volume Mute (Command: k e) To control volume mute on processing completion. Volume Control (Command: k f) To adjust volume. See ...
Power (Command: k a) To control Power On/Off of the TV. There might be described like "Note: In this model, TV will send the Acknowledge after power on /off . Volume Mute (Command: k e) To control volume mute on processing completion. Volume Control (Command: k f) To adjust volume. See ...

Owners Manual
Page 110
Record the model number and serial number of the TV. Model : Serial No. : Refer to the label on the back cover and quote this information to your dealer when requiring any service.
Record the model number and serial number of the TV. Model : Serial No. : Refer to the label on the back cover and quote this information to your dealer when requiring any service.


