
Owners Manual
Page 2
...the wall mount plate 15 - HDMI connection 17 Connecting to Use the Joystick Button 7 Input Connector 8 Moving and Lifting the Monitor 9 Installing the Monitor 9 - Pivot Feature 14 - HDMI connection 16 - Main Menu Features 19 User Settings 19 - Adjusting the stand height 12 - Menu Settings 23 TROUBLESHOOTING 25 SPECIFICATIONS 25 27UD69P 26... 4 Product Components 5 Supported Drivers and Software 6 Component and Button Description 6 - Assembling the stand base 11 - Using the cable holder 11 - Installing to a wall 16 USING THE MONITOR 16 Connecting to AV Devices 17 -
...the wall mount plate 15 - HDMI connection 17 Connecting to Use the Joystick Button 7 Input Connector 8 Moving and Lifting the Monitor 9 Installing the Monitor 9 - Pivot Feature 14 - HDMI connection 16 - Main Menu Features 19 User Settings 19 - Adjusting the stand height 12 - Menu Settings 23 TROUBLESHOOTING 25 SPECIFICATIONS 25 27UD69P 26... 4 Product Components 5 Supported Drivers and Software 6 Component and Button Description 6 - Assembling the stand base 11 - Using the cable holder 11 - Installing to a wall 16 USING THE MONITOR 16 Connecting to AV Devices 17 -
Owners Manual
Page 14
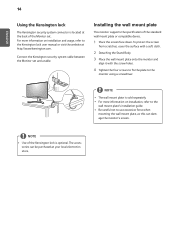
...the Kensington lock The Kensington security system connector is located at the back of the standard wall mount plate or compatible device. 1 Place the screen face down. Installing the wall mount plate This monitor supports the specification of the Monitor set and a table. NOTE y yUse...Kensington security system cable between the Monitor set . y yBe careful not to the wall mount plate's installation guide. y yFor more information on installation, refer to use excessive force when mounting the wall mount plate, as this can be purchased at http://www.kensington.com. For more ...
...the Kensington lock The Kensington security system connector is located at the back of the standard wall mount plate or compatible device. 1 Place the screen face down. Installing the wall mount plate This monitor supports the specification of the Monitor set and a table. NOTE y yUse...Kensington security system cable between the Monitor set . y yBe careful not to the wall mount plate's installation guide. y yFor more information on installation, refer to use excessive force when mounting the wall mount plate, as this can be purchased at http://www.kensington.com. For more ...

Owners Manual
Page 15
... of the monitor. y yThe wall mount kit includes the installation guide and all necessary parts. ENEGNLGISH Wall mount Pad Back Cover Wall mount Pad Back Cover Standard screw Max. 8mm (0.31 inches) NOTE y yUse the screws specified by the use the genuine LG wall mounting bracket. Ensure the correct length ...screw is optional. Please refer to the manual to install and set up a tilting wall mounting bracket. 100 mm (3.94 inches) 100 mm (3.94 inches) 100 mm ...
... of the monitor. y yThe wall mount kit includes the installation guide and all necessary parts. ENEGNLGISH Wall mount Pad Back Cover Wall mount Pad Back Cover Standard screw Max. 8mm (0.31 inches) NOTE y yUse the screws specified by the use the genuine LG wall mounting bracket. Ensure the correct length ...screw is optional. Please refer to the manual to install and set up a tilting wall mounting bracket. 100 mm (3.94 inches) 100 mm (3.94 inches) 100 mm ...


