
Owners Manual - English
Page 1
Owner's Manual IPS LED MONITOR (LED MONITOR*) * Disclaimer: LG LED Monitor applies LCD screen with LED backlights. Please read the safety information carefully before using the product. 27MU67 www.lg.com
Owner's Manual IPS LED MONITOR (LED MONITOR*) * Disclaimer: LG LED Monitor applies LCD screen with LED backlights. Please read the safety information carefully before using the product. 27MU67 www.lg.com
Owners Manual - English
Page 2
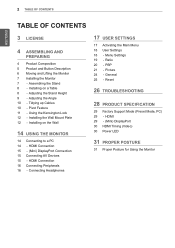
... USER SETTINGS 17 Activating the Main Menu 18 User Settings 18 - 2 Table of Contents ENGLISH TABLE OF CONTENTS 3 LICENSE 4 ASSEMBLING AND PREPARING 4 Product Composition 5 Product and Button Description 6 Moving and Lifting the Monitor 7 Installing the Monitor 7 - Adjusting the Angle 10 - Tidying up Cables 10 - Menu Settings 19 - General 25 - Installing the Wall Mount Plate 12 - Adjusting the Stand Height 9 - Using the Kensington Lock 12 - HDMI Connection 16 Connecting Peripherals 16 - HDMI 29 - (Mini) DisplayPort 30 HDMI Timing (Video) 30 Power LED...
... USER SETTINGS 17 Activating the Main Menu 18 User Settings 18 - 2 Table of Contents ENGLISH TABLE OF CONTENTS 3 LICENSE 4 ASSEMBLING AND PREPARING 4 Product Composition 5 Product and Button Description 6 Moving and Lifting the Monitor 7 Installing the Monitor 7 - Adjusting the Angle 10 - Tidying up Cables 10 - Menu Settings 19 - General 25 - Installing the Wall Mount Plate 12 - Adjusting the Stand Height 9 - Using the Kensington Lock 12 - HDMI Connection 16 Connecting Peripherals 16 - HDMI 29 - (Mini) DisplayPort 30 HDMI Timing (Video) 30 Power LED...
Owners Manual - English
Page 4
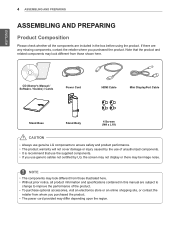
.... If there are subject to change to ensure safety and product performance. yy If you purchased the product. CD (Owner's Manual / Software / Guides) / Cards Power Cord HDMI Cable Mini DisplayPort Cable Stand Base Stand Body 4 Screws (M4 x L10) CAUTION yy Always use generic cables not certified by the use the supplied components. ENGLISH 4 ASSEMBLING AND PREPARING ASSEMBLING AND PREPARING Product Composition Please check whether all product information and specifications contained in the box before...
.... If there are subject to change to ensure safety and product performance. yy If you purchased the product. CD (Owner's Manual / Software / Guides) / Cards Power Cord HDMI Cable Mini DisplayPort Cable Stand Base Stand Body 4 Screws (M4 x L10) CAUTION yy Always use generic cables not certified by the use the supplied components. ENGLISH 4 ASSEMBLING AND PREPARING ASSEMBLING AND PREPARING Product Composition Please check whether all product information and specifications contained in the box before...
Owners Manual - English
Page 8
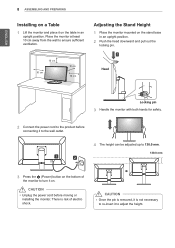
... 10 cm Head Locking pin 3 Handle the monitor with both hands for safety. 2 Connect the power cord to the product before moving or installing the monitor. CAUTION yy Unplug the power cord before connecting it on. Place the monitor at least 10 cm away from the wall to ensure sufficient ventilation. ENGLISH 8 ASSEMBLING AND PREPARING Installing on a Table 1 Lift the monitor and place it to adjust the height.
... 10 cm Head Locking pin 3 Handle the monitor with both hands for safety. 2 Connect the power cord to the product before moving or installing the monitor. CAUTION yy Unplug the power cord before connecting it on. Place the monitor at least 10 cm away from the wall to ensure sufficient ventilation. ENGLISH 8 ASSEMBLING AND PREPARING Installing on a Table 1 Lift the monitor and place it to adjust the height.

Owners Manual - English
Page 11
... not place your Windows operating system. Note that some Windows versions and some graphics card drivers may use different settings for the screen pivot key or may not support the pivot key at the back of the display is not supported. Connect the monitor to the Kensington lock owner's manual or visit the website at http://www.kensington.com. yy Supported Windows versions: Windows 7 and Windows 8.1 yy Windows screen pivot shortcut...
... not place your Windows operating system. Note that some Windows versions and some graphics card drivers may use different settings for the screen pivot key or may not support the pivot key at the back of the display is not supported. Connect the monitor to the Kensington lock owner's manual or visit the website at http://www.kensington.com. yy Supported Windows versions: Windows 7 and Windows 8.1 yy Windows screen pivot shortcut...
Owners Manual - English
Page 12
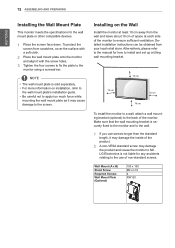
...-standard screws. 12 ASSEMBLING AND PREPARING ENGLISH Installing the Wall Mount Plate This monitor meets the specifications for how to install and set up a tilting wall mounting bracket. 10 cm 10 cm 10 cm 10 cm To install the monitor to a wall, attach a wall mounting bracket (optional) to the wall mount plate's installation guide. Make sure that the wall mounting bracket is securely fixed to the monitor and to the wall. 1 If you use of the monitor to the monitor using a screwdriver...
...-standard screws. 12 ASSEMBLING AND PREPARING ENGLISH Installing the Wall Mount Plate This monitor meets the specifications for how to install and set up a tilting wall mounting bracket. 10 cm 10 cm 10 cm 10 cm To install the monitor to a wall, attach a wall mounting bracket (optional) to the wall mount plate's installation guide. Make sure that the wall mounting bracket is securely fixed to the monitor and to the wall. 1 If you use of the monitor to the monitor using a screwdriver...
Owners Manual - English
Page 14
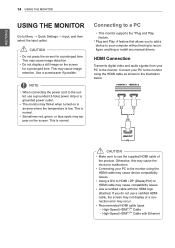
..., use the supplied HDMI cable of the product. yy Recommended HDMI cable types -- High-Speed HDMI®/TM Cable -- yy Do not display a still image on the screen. This may cause image distortion. NOTE yy When connecting the power cord to use a grounded (3-hole) power strip or a grounded power outlet. This is normal. Connecting to the monitor using the HDMI cable may occur. HDMI Connection Transmits digital video and audio signals from your PC to a PC yy This monitor supports the *Plug...
..., use the supplied HDMI cable of the product. yy Recommended HDMI cable types -- High-Speed HDMI®/TM Cable -- yy Do not display a still image on the screen. This may cause image distortion. NOTE yy When connecting the power cord to use a grounded (3-hole) power strip or a grounded power outlet. This is normal. Connecting to the monitor using the HDMI cable may occur. HDMI Connection Transmits digital video and audio signals from your PC to a PC yy This monitor supports the *Plug...
Owners Manual - English
Page 17
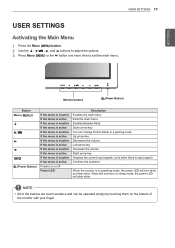
... Displays the current input signals. (only when there is in sleep mode, the power LED will turn white and then dims. When the monitor is input signal) Confirms the selection. Exits the main menu. When the monitor is in operating mode, the power LED will blink white. NOTE yy All of the monitor with your finger. Up arrow key Decreases the volume. ENGLISH User Settings 17 USER SETTINGS Activating the Main Menu 1 Press the Menu ( ) button. PHQX Monitor buttons (Power Button) PHQX Button Menu ( PHQX ) (Power Button...
... Displays the current input signals. (only when there is in sleep mode, the power LED will turn white and then dims. When the monitor is input signal) Confirms the selection. Exits the main menu. When the monitor is in operating mode, the power LED will blink white. NOTE yy All of the monitor with your finger. Up arrow key Decreases the volume. ENGLISH User Settings 17 USER SETTINGS Activating the Main Menu 1 Press the Menu ( ) button. PHQX Monitor buttons (Power Button) PHQX Button Menu ( PHQX ) (Power Button...
Owners Manual - English
Page 18
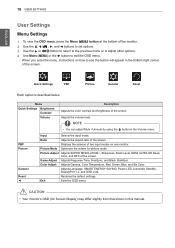
... manual. Picture Adjust Adjusts SUPER RESOLUTION+, Sharpness, Black Level, HDMI ULTRA HD Deep Color, and DFC of the monitor. Adjusts Language, SMART ENERGY SAVING, Power LED, Automatic Standby, DisplayPort 1.2, and OSD Lock. Restores the default settings. CAUTION yy Your monitor's OSD (On Screen Display) may differ slightly from that shown in the Volume menu. PPHHQPQ2XHXQPXHUQseXthe , , , and buttons to set options. 3 Use the or button to return to the previous menu or to adjust other options. 4PHUQsXe Menu ( ) or the button to use the button...
... manual. Picture Adjust Adjusts SUPER RESOLUTION+, Sharpness, Black Level, HDMI ULTRA HD Deep Color, and DFC of the monitor. Adjusts Language, SMART ENERGY SAVING, Power LED, Automatic Standby, DisplayPort 1.2, and OSD Lock. Restores the default settings. CAUTION yy Your monitor's OSD (On Screen Display) may differ slightly from that shown in the Volume menu. PPHHQPQ2XHXQPXHUQseXthe , , , and buttons to set options. 3 Use the or button to return to the previous menu or to adjust other options. 4PHUQsXe Menu ( ) or the button to use the button...
Owners Manual - English
Page 19
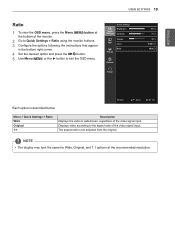
.... ◄: Back ▲/▼: Move / ►: Ok Menu > Quick Settings > Ratio Wide Original 1:1 Description Displays the video in the bottom right corner. Quick Settings Quick Settings Brightness Contrast PBP Volume Input Picture Ratio General Reset 100 > 70 > 30 > HDMI1 > Wide > Each option is not adjusted from the original. Displays video according to the aspect ratio of the video signal input. ENGLISH User Settings 19 Ratio 1 To view the OSD menu, press the Menu ( the bottom of the monitor. ) button at the recommended resolution.
.... ◄: Back ▲/▼: Move / ►: Ok Menu > Quick Settings > Ratio Wide Original 1:1 Description Displays the video in the bottom right corner. Quick Settings Quick Settings Brightness Contrast PBP Volume Input Picture Ratio General Reset 100 > 70 > 30 > HDMI1 > Wide > Each option is not adjusted from the original. Displays video according to the aspect ratio of the video signal input. ENGLISH User Settings 19 Ratio 1 To view the OSD menu, press the Menu ( the bottom of the monitor. ) button at the recommended resolution.
Owners Manual - English
Page 20
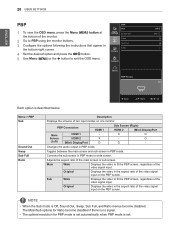
... video signal input. Original Displays the video in the aspect ratio of the video signal input on the PBP screen. PBP Connection HDMI 1 Sub Screen (Right) HDMI 2 (Mini) DisplayPort Main HDMI 1 - Changes the audio output in PBP mode to PBP using the monitor buttons. 3 Configure the options following the instructions that appear in PBP mode. Converts the sub screen in PBP mode. O (Left) (Mini) DisplayPort O O - Adjusts the aspect ratio of the video signal input. X O Screen HDMI 2 X - Toggles between the main screen...
... video signal input. Original Displays the video in the aspect ratio of the video signal input on the PBP screen. PBP Connection HDMI 1 Sub Screen (Right) HDMI 2 (Mini) DisplayPort Main HDMI 1 - Changes the audio output in PBP mode to PBP using the monitor buttons. 3 Configure the options following the instructions that appear in PBP mode. Converts the sub screen in PBP mode. O (Left) (Mini) DisplayPort O O - Adjusts the aspect ratio of the video signal input. X O Screen HDMI 2 X - Toggles between the main screen...
Owners Manual - English
Page 21
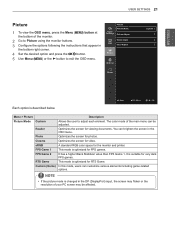
...) Description Allows the user to exit the OSD menu. Quick Settings Picture Picture Mode Picture Adjust PBP Game Adjust Color Adjust Picture General Reset Custom > > > > Each option is suitable for viewing documents. A standard RGB color space for FPS games. NOTE yy If the picture mode is optimized for the monitor and printer. This mode is changed in the OSD menu. Optimizes the screen for video. ENGLISH User Settings 21 Picture 1 To view the OSD menu, press the Menu ( the bottom of the main menu can customize various elements...
...) Description Allows the user to exit the OSD menu. Quick Settings Picture Picture Mode Picture Adjust PBP Game Adjust Color Adjust Picture General Reset Custom > > > > Each option is suitable for viewing documents. A standard RGB color space for FPS games. NOTE yy If the picture mode is optimized for the monitor and printer. This mode is changed in the OSD menu. Optimizes the screen for video. ENGLISH User Settings 21 Picture 1 To view the OSD menu, press the Menu ( the bottom of the main menu can customize various elements...
Owners Manual - English
Page 22
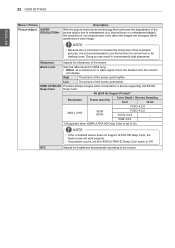
... image. DFC Adjusts the brightness automatically according to a device supporting ULTRA HD Deep Color Deep Color. 4K @ 60 Hz Support Format1) Resolution Frame rate (Hz) Color Depth / Chroma Sampling 8 bit 10 bit YCbCr 4:2:0 3840 x 2160 59.94 60.00 YCbCr 4:2:2 YCbCr 4:4:4 - Sharpness Adjusts the sharpness of the screen. RGB 4:4:4 - 1) Supported when HDMI ULTRA HD Deep Color is the darkest color the monitor can display. NOTE yy If the connected device...
... image. DFC Adjusts the brightness automatically according to a device supporting ULTRA HD Deep Color Deep Color. 4K @ 60 Hz Support Format1) Resolution Frame rate (Hz) Color Depth / Chroma Sampling 8 bit 10 bit YCbCr 4:2:0 3840 x 2160 59.94 60.00 YCbCr 4:2:2 YCbCr 4:4:4 - Sharpness Adjusts the sharpness of the screen. RGB 4:4:4 - 1) Supported when HDMI ULTRA HD Deep Color is the darkest color the monitor can display. NOTE yy If the connected device...

Owners Manual - English
Page 23
... natural images by synchronizing the vertical frequency of the input signal with that you use the FreeSync feature, a graphic card that 9300K is necessary. Meets the user requirements for displayed pictures based on the speed of the screen colors. The lower the value, the less saturated and brighter the colors become . High Sets the response time to the default settings. Saturation Adjusts the saturation of the six colors (red, green, blue, cyan...
... natural images by synchronizing the vertical frequency of the input signal with that you use the FreeSync feature, a graphic card that 9300K is necessary. Meets the user requirements for displayed pictures based on the speed of the screen colors. The lower the value, the less saturated and brighter the colors become . High Sets the response time to the default settings. Saturation Adjusts the saturation of the six colors (red, green, blue, cyan...

Owners Manual - English
Page 24
... time. ENGLISH 24 User Settings General 1 To view the OSD menu, press the Menu ( the bottom of the monitor. ) button at 2 Go to General using the high-efficiency SMART ENERGY SAVING feature. Off The power LED turns off . On Disables key input Off Enables key input NOTE yy All features are disabled except Brightness, Contrast, Volume, Input in Quick Settings, OSD Lock in the bottom right corner. Quick Settings General Language SMART ENERGY SAVING PBP Picture Power LED Automatic Standby DisplayPort 1.2 OSD Lock General English > Low...
... time. ENGLISH 24 User Settings General 1 To view the OSD menu, press the Menu ( the bottom of the monitor. ) button at 2 Go to General using the high-efficiency SMART ENERGY SAVING feature. Off The power LED turns off . On Disables key input Off Enables key input NOTE yy All features are disabled except Brightness, Contrast, Volume, Input in Quick Settings, OSD Lock in the bottom right corner. Quick Settings General Language SMART ENERGY SAVING PBP Picture Power LED Automatic Standby DisplayPort 1.2 OSD Lock General English > Low...
Owners Manual - English
Page 26
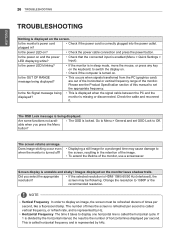
... the power on ? yy Check if the computer is locked. Is the power LED on and the power LED displaying white? yy This occurs when signals transferred from the PC (graphics card) are out of the horizontal or vertical frequency range of the monitor, use a screensaver. yy The OSD is turned on . yy If the selected resolution is enabled (Menu > Quick Settings > Input). Change the resolution to the screen, resulting in ? yy Check that the connected input is HDMI 1080i 60...
... the power on ? yy Check if the computer is locked. Is the power LED on and the power LED displaying white? yy This occurs when signals transferred from the PC (graphics card) are out of the horizontal or vertical frequency range of the monitor, use a screensaver. yy The OSD is turned on . yy If the selected resolution is enabled (Menu > Quick Settings > Input). Change the resolution to the screen, resulting in ? yy Check that the connected input is HDMI 1080i 60...

Owners Manual - English
Page 27
... HDMI input without sound? Does the display color appear unstable or monochrome? Are there spots on the monitor. yy Set the audio output of your graphics card. The display color is it to the recommended (optimal) resolution may not support 3840 x 2160 resolution. Reconnect the cable or reinsert the PC's graphics card. It is not an error, nor is abnormal. yy Try increasing the volume using the monitor, pixilated spots (red, green, blue, white, or black...
... HDMI input without sound? Does the display color appear unstable or monochrome? Are there spots on the monitor. yy Set the audio output of your graphics card. The display color is it to the recommended (optimal) resolution may not support 3840 x 2160 resolution. Reconnect the cable or reinsert the PC's graphics card. It is not an error, nor is abnormal. yy Try increasing the volume using the monitor, pixilated spots (red, green, blue, white, or black...
Owners Manual - English
Page 28
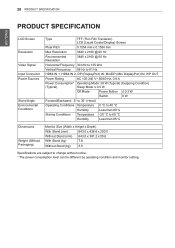
28 Product Specification ENGLISH PRODUCT SPECIFICATION LCD Screen Resolution Video Signal Input Connector Power Sources Stand Angle Environmental Conditions Type TFT (Thin Film Transistor) LCD (Liquid Crystal Display) Screen Pixel Pitch 0.1554 mm x 0.1554 mm Max Resolution 3840 x 2160 @ 60 Hz Recommended Resolution 3840 x 2160 @ 60 Hz Horizontal Frequency 30 kHz to 135 kHz Vertical Frequency 56 Hz to 61 Hz HDMI IN 1, HDMI IN 2, DP (DisplayPort) IN, MiniDP (Mini DisplayPort) IN, H/P OUT Power Rating AC 100-240 V~ 50...
28 Product Specification ENGLISH PRODUCT SPECIFICATION LCD Screen Resolution Video Signal Input Connector Power Sources Stand Angle Environmental Conditions Type TFT (Thin Film Transistor) LCD (Liquid Crystal Display) Screen Pixel Pitch 0.1554 mm x 0.1554 mm Max Resolution 3840 x 2160 @ 60 Hz Recommended Resolution 3840 x 2160 @ 60 Hz Horizontal Frequency 30 kHz to 135 kHz Vertical Frequency 56 Hz to 61 Hz HDMI IN 1, HDMI IN 2, DP (DisplayPort) IN, MiniDP (Mini DisplayPort) IN, H/P OUT Power Rating AC 100-240 V~ 50...
Owners Manual - English
Page 30
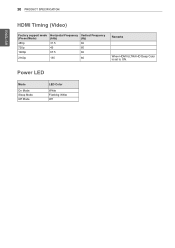
Power LED Mode On Mode Sleep Mode Off Mode LED Color White Flashing White Off 30 Product Specification ENGLISH HDMI Timing (Video) Factory support mode (Preset Mode) 480p 720p 1080p Horizontal Frequency (kHz) 31.5 45 67.5 Vertical Frequency (Hz) 60 60 60 2160p 135 60 Remarks When HDMI ULTRA HD Deep Color is set to ON.
Power LED Mode On Mode Sleep Mode Off Mode LED Color White Flashing White Off 30 Product Specification ENGLISH HDMI Timing (Video) Factory support mode (Preset Mode) 480p 720p 1080p Horizontal Frequency (kHz) 31.5 45 67.5 Vertical Frequency (Hz) 60 60 60 2160p 135 60 Remarks When HDMI ULTRA HD Deep Color is set to ON.

Owners Manual - English
Page 32
... open source code to you purchased the product. This device can be used in this product meets the ENERGY STAR guidelines for technical support. S. This device meets the EMC requirements for home appliances (Class B) and is a set of media, shipping, and handling) upon email request to the product provides information for energy efficiency. Model Serial No. Read the owner's manual...
... open source code to you purchased the product. This device can be used in this product meets the ENERGY STAR guidelines for technical support. S. This device meets the EMC requirements for home appliances (Class B) and is a set of media, shipping, and handling) upon email request to the product provides information for energy efficiency. Model Serial No. Read the owner's manual...


