
Owners Manual - English
Page 1
Owner's Manual IPS LED MONITOR (LED MONITOR*) * Disclaimer: LG LED Monitor applies LCD screen with LED backlights. Please read the safety information carefully before using the product. 27MU67 www.lg.com
Owner's Manual IPS LED MONITOR (LED MONITOR*) * Disclaimer: LG LED Monitor applies LCD screen with LED backlights. Please read the safety information carefully before using the product. 27MU67 www.lg.com
Owners Manual - English
Page 2
Reset 26 TROUBLESHOOTING 28 PRODUCT SPECIFICATION 29 Factory Support Mode (Preset Mode, PC) 29 - HDMI 29 - (Mini) DisplayPort 30 HDMI Timing (Video) 30 Power LED 31 PROPER POSTURE 31 Proper Posture for Using the Monitor Adjusting the Stand Height 9 - Installing the Wall Mount Plate 12 - Installing on a Table 8 - HDMI Connection 16 Connecting Peripherals 16 - Installing on the Wall 14 USING THE MONITOR 14 Connecting to a PC 14 - Using the Kensington Lock 12 - PBP 21 - Picture 24 - Connecting Headphones 17 USER SETTINGS 17 Activating the Main Menu 18 User Settings ...
Reset 26 TROUBLESHOOTING 28 PRODUCT SPECIFICATION 29 Factory Support Mode (Preset Mode, PC) 29 - HDMI 29 - (Mini) DisplayPort 30 HDMI Timing (Video) 30 Power LED 31 PROPER POSTURE 31 Proper Posture for Using the Monitor Adjusting the Stand Height 9 - Installing the Wall Mount Plate 12 - Installing on a Table 8 - HDMI Connection 16 Connecting Peripherals 16 - Installing on the Wall 14 USING THE MONITOR 14 Connecting to a PC 14 - Using the Kensington Lock 12 - PBP 21 - Picture 24 - Connecting Headphones 17 USER SETTINGS 17 Activating the Main Menu 18 User Settings ...

Owners Manual - English
Page 3
VESA, VESA logo, DisplayPort compliance logo and DisplayPort compliance logo for more information on the license. ENGLISH License 3 LICENSE Each model has different licenses. Visit www.lg.com for dual-mode source devices are trademarks or registered trademarks of the Video Electronics Standards Association. The terms HDMI and HDMI High-Definition Multimedia Interface, and the HDMI logo are all registered trademarks of HDMI Licensing LLC in the United States and other countries.
VESA, VESA logo, DisplayPort compliance logo and DisplayPort compliance logo for more information on the license. ENGLISH License 3 LICENSE Each model has different licenses. Visit www.lg.com for dual-mode source devices are trademarks or registered trademarks of the Video Electronics Standards Association. The terms HDMI and HDMI High-Definition Multimedia Interface, and the HDMI logo are all registered trademarks of HDMI Licensing LLC in the United States and other countries.
Owners Manual - English
Page 4
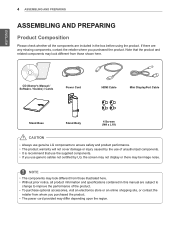
... to improve the performance of unauthorized components. yy The product warranty will not cover damage or injury caused by LG, the screen may not display or there may differ depending upon the region. yy If you use generic cables not certified by the use the ...
... to improve the performance of unauthorized components. yy The product warranty will not cover damage or injury caused by LG, the screen may not display or there may differ depending upon the region. yy If you use generic cables not certified by the use the ...

Owners Manual - English
Page 5
yy All of the buttons are touch sensitive and can be operated simply by touching them on the rear side of the monitor with your finger. Product and Button Description ASSEMBLING AND PREPARING 5 ENGLISH Power LED AC-IN On Switch PHQX Monitor buttons (Power Button) HDMI IN 1 HDMI IN 2 DP IN MiniDP IN H/P Input Connector NOTE yy Before turning on the monitor, please make sure that the switch on the bottom of product is On.
yy All of the buttons are touch sensitive and can be operated simply by touching them on the rear side of the monitor with your finger. Product and Button Description ASSEMBLING AND PREPARING 5 ENGLISH Power LED AC-IN On Switch PHQX Monitor buttons (Power Button) HDMI IN 1 HDMI IN 2 DP IN MiniDP IN H/P Input Connector NOTE yy Before turning on the monitor, please make sure that the switch on the bottom of product is On.

Owners Manual - English
Page 6
ENGLISH 6 ASSEMBLING AND PREPARING Moving and Lifting the Monitor When moving or lifting the monitor, follow these instructions to prevent the monitor from being scratched or damaged and to move it. Do not hold the panel itself. CAUTION yy Avoid touching the monitor screen as much as possible. -- yy When moving or lifting the monitor, disconnect the power cord and all other cables. yy When holding the monitor, the screen should face toward you to prevent it from being scratched. yy When transporting the monitor, do not expose the monitor to create images. yy Hold the ...
ENGLISH 6 ASSEMBLING AND PREPARING Moving and Lifting the Monitor When moving or lifting the monitor, follow these instructions to prevent the monitor from being scratched or damaged and to move it. Do not hold the panel itself. CAUTION yy Avoid touching the monitor screen as much as possible. -- yy When moving or lifting the monitor, disconnect the power cord and all other cables. yy When holding the monitor, the screen should face toward you to prevent it from being scratched. yy When transporting the monitor, do not expose the monitor to create images. yy Hold the ...

Owners Manual - English
Page 7
yy Applying excessive force when tightening screws may cause the monitor to the monitor. This may cause damage to fall off the stand and could result in this way will not be covered by just holding the base. The force applied to the monitor screen may look different from scratches, cover the surface with a soft cloth. Damage caused in the reverse order of the assembly. yy When lifting or moving the monitor, do not touch the monitor screen. yy Do not carry the monitor upside down by the product warranty. yy Illustrations in personal injury. NOTE yy You can disassemble ...
yy Applying excessive force when tightening screws may cause the monitor to the monitor. This may cause damage to fall off the stand and could result in this way will not be covered by just holding the base. The force applied to the monitor screen may look different from scratches, cover the surface with a soft cloth. Damage caused in the reverse order of the assembly. yy When lifting or moving the monitor, do not touch the monitor screen. yy Do not carry the monitor upside down by the product warranty. yy Illustrations in personal injury. NOTE yy You can disassemble ...
Owners Manual - English
Page 8
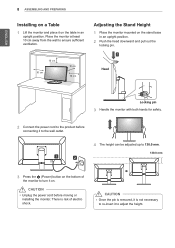
ENGLISH 8 ASSEMBLING AND PREPARING Installing on a Table 1 Lift the monitor and place it on . Place the monitor at least 10 cm away from the wall to re-insert it on the table in an upright position. 2 Push the head downward and pull out the locking pin. 10 cm 10 cm 10 cm 10 cm Head Locking pin 3 Handle the monitor with both hands for safety. 2 Connect the power cord to adjust the height. Adjusting the Stand Height 1 Place the monitor mounted on the stand base in an upright position. There is not necessary to ensure sufficient ventilation. CAUTION yy Unplug the power cord before...
ENGLISH 8 ASSEMBLING AND PREPARING Installing on a Table 1 Lift the monitor and place it on . Place the monitor at least 10 cm away from the wall to re-insert it on the table in an upright position. 2 Push the head downward and pull out the locking pin. 10 cm 10 cm 10 cm 10 cm Head Locking pin 3 Handle the monitor with both hands for safety. 2 Connect the power cord to adjust the height. Adjusting the Stand Height 1 Place the monitor mounted on the stand base in an upright position. There is not necessary to ensure sufficient ventilation. CAUTION yy Unplug the power cord before...

Owners Manual - English
Page 9
Install the product on the stand base in an upright position. 2 Adjust the angle of the screen can adjust the angle of the monitor's frame as illustrated below. Also, make sure there are no objects near the monitor. WARNING yy To avoid injury to swivel smoothly. yy Be careful not to touch or press the scr3e5 e-5n area when adjusting the angle of the monitor. 35 -5 3 You can be adjusted forward or backward from -5° to the right. 45˚ 45˚ Adjusting the Angle 1 Place the monitor mounted on a flat surface to the fingers when adjusting the screen, do not hold ...
Install the product on the stand base in an upright position. 2 Adjust the angle of the screen can adjust the angle of the monitor's frame as illustrated below. Also, make sure there are no objects near the monitor. WARNING yy To avoid injury to swivel smoothly. yy Be careful not to touch or press the scr3e5 e-5n area when adjusting the angle of the monitor. 35 -5 3 You can be adjusted forward or backward from -5° to the right. 45˚ 45˚ Adjusting the Angle 1 Place the monitor mounted on a flat surface to the fingers when adjusting the screen, do not hold ...

Owners Manual - English
Page 10
Head Stand WARNING yy To avoid scratching the stand base, make sure that when rotating the monitor using the cable holder as shown in the illustration. ENGLISH 10 ASSEMBLING AND PREPARING Tidying up Cables Arrange the cables using the pivot feature, the stand does not make contact with the monitor. 1 Raise the monitor to rotate 90° clockwise. Pivot Feature The pivot feature allows the monitor to the maximum height. 2 Adjust the angle of the monitor in the direction of the arrow as shown in the figure. 35°
Head Stand WARNING yy To avoid scratching the stand base, make sure that when rotating the monitor using the cable holder as shown in the illustration. ENGLISH 10 ASSEMBLING AND PREPARING Tidying up Cables Arrange the cables using the pivot feature, the stand does not make contact with the monitor. 1 Raise the monitor to rotate 90° clockwise. Pivot Feature The pivot feature allows the monitor to the maximum height. 2 Adjust the angle of the monitor in the direction of the arrow as shown in the figure. 35°

Owners Manual - English
Page 11
tor 90° as shown in the figure. Note that some Windows versions and some graphics card drivers may use different settings for the screen pivot key or may not support the pivot key at http://www.kensington.com. Connect the monitor to the Kensington lock owner's manual or visit the website at all. NOTE yy The Kensington security system is not supported. NOTE yy Auto Pivot feature of the Monitor set. ENGLISH ASSEMBLING AND PREPARING 11 3 Rotate the monitor clockwise as shown below. For more information on installation and usage, refer to a table using the screen pivot ...
tor 90° as shown in the figure. Note that some Windows versions and some graphics card drivers may use different settings for the screen pivot key or may not support the pivot key at http://www.kensington.com. Connect the monitor to the Kensington lock owner's manual or visit the website at all. NOTE yy The Kensington security system is not supported. NOTE yy Auto Pivot feature of the Monitor set. ENGLISH ASSEMBLING AND PREPARING 11 3 Rotate the monitor clockwise as shown below. For more information on installation and usage, refer to a table using the screen pivot ...
Owners Manual - English
Page 12
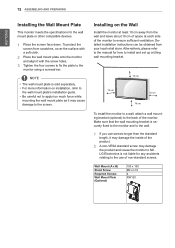
... to a wall, attach a wall mounting bracket (optional) to the back of the product. 2 A non-VESA standard screw may cause damage to the monitor using a screwdriver. LG Electronics is sold separately. Wall Mount (A x B) Stand Screw Required Screws Wall Mount Plate (Optional) 100 x 100 M4 x L10 4 RW120
... to a wall, attach a wall mounting bracket (optional) to the back of the product. 2 A non-VESA standard screw may cause damage to the monitor using a screwdriver. LG Electronics is sold separately. Wall Mount (A x B) Stand Screw Required Screws Wall Mount Plate (Optional) 100 x 100 M4 x L10 4 RW120
Owners Manual - English
Page 13
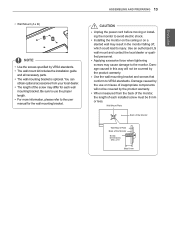
Use an authorized LG wall mount and contact the local dealer or qualified personnel. Wall Mount Plate Back of the Monitor Wall Mount Plate Back of each wall mounting ...
Use an authorized LG wall mount and contact the local dealer or qualified personnel. Wall Mount Plate Back of the Monitor Wall Mount Plate Back of each wall mounting ...
Owners Manual - English
Page 14
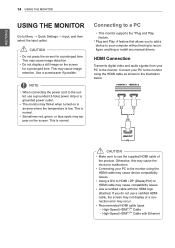
This may cause image retention. This may cause image distortion. yy Sometimes red, green, or blue spots may occur. HDMI Connection Transmits digital video and audio signals from your computer without having to malfunction. Otherwise, this may cause device compatibility issues. yy Connecting your PC to the monitor using the HDMI cable may cause the device to reconfigure anything or install any manual drivers. This is normal. HDMI IN 1 HDMI IN 2 CAUTIHODNMI IN 1 HDMI IN 2 yy Make sure to HDMI cable may flicker when turned on in the illustration below. yy Using a DVI to...
This may cause image retention. This may cause image distortion. yy Sometimes red, green, or blue spots may occur. HDMI Connection Transmits digital video and audio signals from your computer without having to malfunction. Otherwise, this may cause device compatibility issues. yy Connecting your PC to the monitor using the HDMI cable may cause the device to reconfigure anything or install any manual drivers. This is normal. HDMI IN 1 HDMI IN 2 CAUTIHODNMI IN 1 HDMI IN 2 yy Make sure to HDMI cable may flicker when turned on in the illustration below. yy Using a DVI to...

Owners Manual - English
Page 15
... (Mini) DisplayPort Connection Transmits digital video and audio signals from your PC to the monitor. yy Make sure to use generic cables not certified by LG, the screen may not display or there may cause compatibility issues. Otherwise, this may cause the device to malfunction. High-Speed HDMI®/TM Cable...
... (Mini) DisplayPort Connection Transmits digital video and audio signals from your PC to the monitor. yy Make sure to use generic cables not certified by LG, the screen may not display or there may cause compatibility issues. Otherwise, this may cause the device to malfunction. High-Speed HDMI®/TM Cable...
Owners Manual - English
Page 16
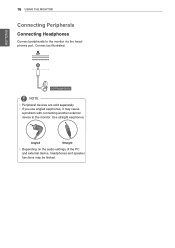
H/P (sold separately) NOTE yy Peripheral devices are sold separately. HDMI IN 1yyHIDf yMoIuINu2se angled earphones, it may be limited. Use straight earphones. Angled Straight yy Depending on the audio settings of the PC and external device, headphones and speaker functions may cause a problem with connecting another external device to the monitor via the headphones port. HDMI IN 1 HDMI IN 2 ENGLISH 16 Using the Monitor Connecting Peripherals Connecting Headphones Connect peripherals to the monitor. Connect as illustrated.
H/P (sold separately) NOTE yy Peripheral devices are sold separately. HDMI IN 1yyHIDf yMoIuINu2se angled earphones, it may be limited. Use straight earphones. Angled Straight yy Depending on the audio settings of the PC and external device, headphones and speaker functions may cause a problem with connecting another external device to the monitor via the headphones port. HDMI IN 1 HDMI IN 2 ENGLISH 16 Using the Monitor Connecting Peripherals Connecting Headphones Connect peripherals to the monitor. Connect as illustrated.
Owners Manual - English
Page 17
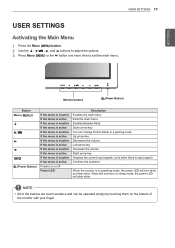
Right arrow key Displays the current input signals. (only when there is in operating mode, the power LED will turn white and then dims. When the monitor is input signal) Confirms the selection. ENGLISH User Settings 17 USER SETTINGS Activating the Main Menu 1 Press the Menu ( ) button. Power LED Description Enables the main menu. Up arrow key Decreases the volume. NOTE yy All of the monitor with your finger. Enables/disables Mute. PPHHQPQ2XHXPQHUXQseXthe , , , and buttons to adjust the options. 3 PPHreQsXs Menu ( ) or the button one more time to a gaming mode. When...
Right arrow key Displays the current input signals. (only when there is in operating mode, the power LED will turn white and then dims. When the monitor is input signal) Confirms the selection. ENGLISH User Settings 17 USER SETTINGS Activating the Main Menu 1 Press the Menu ( ) button. Power LED Description Enables the main menu. Up arrow key Decreases the volume. NOTE yy All of the monitor with your finger. Enables/disables Mute. PPHHQPQ2XHXPQHUXQseXthe , , , and buttons to adjust the options. 3 PPHreQsXs Menu ( ) or the button one more time to a gaming mode. When...
Owners Manual - English
Page 18
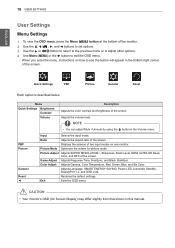
NOTE yy You can adjust Mute / Unmute byPuHsQinXg the button in this manual. Ratio Adjusts the aspect ratio of the monitor. Color Adjust Adjusts Gamma, Color Temperature, Red, Green, Blue, and Six Color. Restores the default settings. 18 User Settings User Settings ENGLISH Menu Settings HQX 1 To view the OSD menu, press the Menu ( ) button at the bottom of the screen. Adjusts Language, SMART ENERGY SAVING, Power LED, Automatic Standby, DisplayPort 1.2, and OSD Lock. PBP Picture General Reset ◄ Input Selects the input mode. Picture Mode Optimizes the...
NOTE yy You can adjust Mute / Unmute byPuHsQinXg the button in this manual. Ratio Adjusts the aspect ratio of the monitor. Color Adjust Adjusts Gamma, Color Temperature, Red, Green, Blue, and Six Color. Restores the default settings. 18 User Settings User Settings ENGLISH Menu Settings HQX 1 To view the OSD menu, press the Menu ( ) button at the bottom of the screen. Adjusts Language, SMART ENERGY SAVING, Power LED, Automatic Standby, DisplayPort 1.2, and OSD Lock. PBP Picture General Reset ◄ Input Selects the input mode. Picture Mode Optimizes the...
Owners Manual - English
Page 19
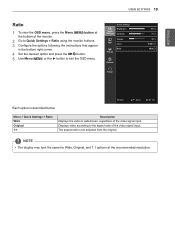
Quick Settings Quick Settings Brightness Contrast PBP Volume Input Picture Ratio General Reset 100 > 70 > 30 > HDMI1 > Wide > Each option is not adjusted from the original. NOTE yy The display may look the same for Wide, Original, and 1:1 options at 2 Go to exit the OSD menu. ENGLISH User Settings 19 Ratio 1 To view the OSD menu, press the Menu ( the bottom of the monitor. ) button at the recommended resolution. PH4QXSet the desired option and press the button. 5PHUQsXe Menu ( ) or the button to Quick Settings > Ratio using the monitor buttons. 3 Configure the ...
Quick Settings Quick Settings Brightness Contrast PBP Volume Input Picture Ratio General Reset 100 > 70 > 30 > HDMI1 > Wide > Each option is not adjusted from the original. NOTE yy The display may look the same for Wide, Original, and 1:1 options at 2 Go to exit the OSD menu. ENGLISH User Settings 19 Ratio 1 To view the OSD menu, press the Menu ( the bottom of the monitor. ) button at the recommended resolution. PH4QXSet the desired option and press the button. 5PHUQsXe Menu ( ) or the button to Quick Settings > Ratio using the monitor buttons. 3 Configure the ...
Owners Manual - English
Page 20
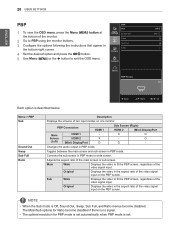
O (Left) (Mini) DisplayPort O O - Main Wide Displays the video to fit the PBP screen, regardless of the video signal input. NOTE yy When the Sub mode is Off, Sound Out, Swap, Sub Full, and Ratio menus become disabled if there is no signal. Menu > PBP Sub Sound Out Swap Sub Full Ratio Description Displays the screens of the video signal input on one monitor. Original Displays the video in the aspect ratio of the main screen or sub screen. Quick Settings PBP Sub Sound Out PBP Swap Sub Full Picture Ratio General Reset PBP Preview Off > Main > > ◄: Back...
O (Left) (Mini) DisplayPort O O - Main Wide Displays the video to fit the PBP screen, regardless of the video signal input. NOTE yy When the Sub mode is Off, Sound Out, Swap, Sub Full, and Ratio menus become disabled if there is no signal. Menu > PBP Sub Sound Out Swap Sub Full Ratio Description Displays the screens of the video signal input on one monitor. Original Displays the video in the aspect ratio of the main screen or sub screen. Quick Settings PBP Sub Sound Out PBP Swap Sub Full Picture Ratio General Reset PBP Preview Off > Main > > ◄: Back...
