
Owners Manual
Page 2
... Adjusting the Stand Height Adjusting the Angle Pivot Feature Tidying up Cables Using the Kensington Lock Installing the Wall Mount Plate Installing on the Wall USING THE MONITOR 15 --Connecting to a PC 16 HDMI Connection DisplayPort Connection --Connecting AV Devices 17 HDMI Connection --Connecting Peripherals 17 Connecting Headphones --Upgrading the Software via USB 18 USER SETTINGS 19 --Activating the Main Menu 19 Main Menu Features --User Settings 21 Menu Settings TROUBLESHOOTING 34 PRODUCT SPECIFICATION....... 37 --Factory Support Mode 43 --HDMI Timing (Video 45 --Power LED...
... Adjusting the Stand Height Adjusting the Angle Pivot Feature Tidying up Cables Using the Kensington Lock Installing the Wall Mount Plate Installing on the Wall USING THE MONITOR 15 --Connecting to a PC 16 HDMI Connection DisplayPort Connection --Connecting AV Devices 17 HDMI Connection --Connecting Peripherals 17 Connecting Headphones --Upgrading the Software via USB 18 USER SETTINGS 19 --Activating the Main Menu 19 Main Menu Features --User Settings 21 Menu Settings TROUBLESHOOTING 34 PRODUCT SPECIFICATION....... 37 --Factory Support Mode 43 --HDMI Timing (Video 45 --Power LED...
Owners Manual
Page 4
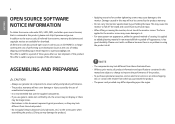
... notice, all product information and specifications contained in this way will also provide open source licenses, that use the supplied components. •• If you use generic cables not certified by LG, the screen may not display or there may be covered by the product warranty. •• Do not carry the monitor upside down by the use of unauthorized components. ••...
... notice, all product information and specifications contained in this way will also provide open source licenses, that use the supplied components. •• If you use generic cables not certified by LG, the screen may not display or there may be covered by the product warranty. •• Do not carry the monitor upside down by the use of unauthorized components. ••...
Owners Manual
Page 5
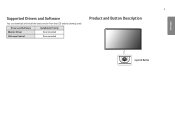
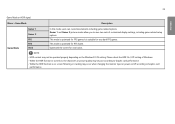
Drivers and Software Monitor Driver OnScreen Control Installation Priority Recommended Recommended Product and Button Description Joystick Button ENGLISH 5 Supported Drivers and Software You can download and install the latest version from the LGE website (www.lg.com).
Drivers and Software Monitor Driver OnScreen Control Installation Priority Recommended Recommended Product and Button Description Joystick Button ENGLISH 5 Supported Drivers and Software You can download and install the latest version from the LGE website (www.lg.com).
Owners Manual
Page 6
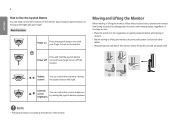
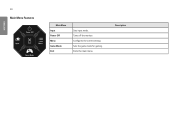
... or lifting the monitor, disconnect the power cord and all other cables. •• Hold the bottom and side of the monitor. Basic Functions Power on the monitor. Do not hold the joystick button Power off once with your finger to turn on Press the joystick button once with your finger. ENGLISH 6 How to Use the Joystick Button You can control the screen's brightness by pressing the...
... or lifting the monitor, disconnect the power cord and all other cables. •• Hold the bottom and side of the monitor. Basic Functions Power on the monitor. Do not hold the joystick button Power off once with your finger to turn on Press the joystick button once with your finger. ENGLISH 6 How to Use the Joystick Button You can control the screen's brightness by pressing the...
Owners Manual
Page 9
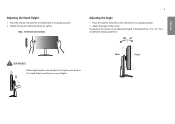
Adjusting the Stand Height 1 Place the monitor mounted on the stand base in an upright position. 2 Handle the monitor with both hands for a comfortable viewing experience. ENGLISH WARNING •• When adjusting the screen height, do not place your hand on the stand body to avoid injury to 15° for safety. Max. 110.0 mm (4.3 inches) 9 Adjusting the Angle 1 Place the monitor mounted on the stand base in an upright position. 2 Adjust the angle of the screen can be adjusted forward or backward from -5° to your fingers. The angle of the screen. Rear Front
Adjusting the Stand Height 1 Place the monitor mounted on the stand base in an upright position. 2 Handle the monitor with both hands for a comfortable viewing experience. ENGLISH WARNING •• When adjusting the screen height, do not place your hand on the stand body to avoid injury to 15° for safety. Max. 110.0 mm (4.3 inches) 9 Adjusting the Angle 1 Place the monitor mounted on the stand base in an upright position. 2 Adjust the angle of the screen can be adjusted forward or backward from -5° to your fingers. The angle of the screen. Rear Front
Owners Manual
Page 11
... the installation by rotating the monitor 90° as shown in the direction of the display is not supported. •• The screen can be rotated easily using the screen pivot shortcut key provided with your Windows operating system. ENGLISH 3 Rotate the monitor clockwise as shown below. Note that some Windows versions and some graphics card drivers may use different settings for the screen pivot key...
... the installation by rotating the monitor 90° as shown in the direction of the display is not supported. •• The screen can be rotated easily using the screen pivot shortcut key provided with your Windows operating system. ENGLISH 3 Rotate the monitor clockwise as shown below. Note that some Windows versions and some graphics card drivers may use different settings for the screen pivot key...

Owners Manual
Page 13
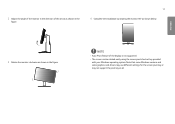
... specifications for how to install and set up a tilting wall mounting bracket. 100 mm (3.94 inches) 100 mm (3.94 inches) 100 mm (3.94 inches) 100 mm (3.94 inches) ENGLISH Alternatively, please refer to the manual for the wall mount plate or other compatible devices. 1 Place the screen face down. To protect the monitor panel (screen), cover the surface with a soft cloth or the monitor protection pad included in the product package. 2 Remove...
... specifications for how to install and set up a tilting wall mounting bracket. 100 mm (3.94 inches) 100 mm (3.94 inches) 100 mm (3.94 inches) 100 mm (3.94 inches) ENGLISH Alternatively, please refer to the manual for the wall mount plate or other compatible devices. 1 Place the screen face down. To protect the monitor panel (screen), cover the surface with a soft cloth or the monitor protection pad included in the product package. 2 Remove...
Owners Manual
Page 15
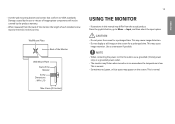
... connecting the power cord to VESA standards. Press the joystick button, go to Menu → Input, and then select the input option. This is low. Use a screensaver if possible. ENGLISH This is normal. •• Sometimes red, green, or blue spots may cause image distortion. •• Do not display a still image on the screen. Wall Mount Plate Back of the Monitor Wall Mount Plate Back of each installed screw must be covered by the use...
... connecting the power cord to VESA standards. Press the joystick button, go to Menu → Input, and then select the input option. This is low. Use a screensaver if possible. ENGLISH This is normal. •• Sometimes red, green, or blue spots may cause image distortion. •• Do not display a still image on the screen. Wall Mount Plate Back of the Monitor Wall Mount Plate Back of each installed screw must be covered by the use...
Owners Manual
Page 16
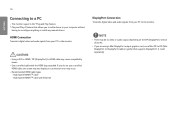
... video or audio output depending on the DP (DisplayPort) version of the PC. •• If you to add a device to your PC to reconfigure anything or install any manual drivers. ENGLISH 16 Connecting to a PC •• This monitor supports the *Plug and Play feature. * Plug and Play: A feature that supports DisplayPort1.4. (sold separately) High-Speed HDMI®/TM cable -- CAUTION •• Using a DVI...
... video or audio output depending on the DP (DisplayPort) version of the PC. •• If you to add a device to your PC to reconfigure anything or install any manual drivers. ENGLISH 16 Connecting to a PC •• This monitor supports the *Plug and Play feature. * Plug and Play: A feature that supports DisplayPort1.4. (sold separately) High-Speed HDMI®/TM cable -- CAUTION •• Using a DVI...
Owners Manual
Page 20
ENGLISH 20 Main Menu Features Power Off Input Exit Menu Game Mode Main Menu Input Power Off Menu Game Mode Exit Sets input mode. Turns off the monitor. Sets the game mode for gaming. Exits the main menu. Description Configures the screen settings.
ENGLISH 20 Main Menu Features Power Off Input Exit Menu Game Mode Main Menu Input Power Off Menu Game Mode Exit Sets input mode. Turns off the monitor. Sets the game mode for gaming. Exits the main menu. Description Configures the screen settings.
Owners Manual
Page 23
... on HDR signal. 23 ENGLISH Game Mode on the Windows10 OS setting. This mode is suitable for very dark FPS games. NOTE •• HDR content may occur when changing the monitor input or power on/off according to save two sets of customized display settings, including game-related setup options. This mode is optimized for FPS games.It is optimized for vivid colors. Gamer 1 and Gamer 2 picture modes allow...
... on HDR signal. 23 ENGLISH Game Mode on the Windows10 OS setting. This mode is suitable for very dark FPS games. NOTE •• HDR content may occur when changing the monitor input or power on/off according to save two sets of customized display settings, including game-related setup options. This mode is optimized for FPS games.It is optimized for vivid colors. Gamer 1 and Gamer 2 picture modes allow...
Owners Manual
Page 26
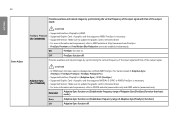
... Adjust Provides seamless and natural images by synchronizing the vertical frequency of the input signal with that of the output signal. CAUTION •• Supported Interface: DisplayPort,HDMI. Off FreeSync function off . FreeSync Premium •• Supported Graphic Card : A graphic card that supports AMD's FreeSync is necessary. (for 27GN650) CAUTION •• In HDMI input, the menu name is displayed as certified AMD FreeSync Tier name instead of Adaptive-Sync...
... Adjust Provides seamless and natural images by synchronizing the vertical frequency of the input signal with that of the output signal. CAUTION •• Supported Interface: DisplayPort,HDMI. Off FreeSync function off . FreeSync Premium •• Supported Graphic Card : A graphic card that supports AMD's FreeSync is necessary. (for 27GN650) CAUTION •• In HDMI input, the menu name is displayed as certified AMD FreeSync Tier name instead of Adaptive-Sync...
Owners Manual
Page 27
... input signal with that supports AMD's FreeSync is necessary. FreeSync Premium (for 24GN650) •• Supported Version : Make sure to update the graphic card to the latest driver. •• For more information and requirement, refer to have better visibility in dark scenes. Black Stabilizer You can easily distinguish objects on . (Enable basic frequency range of the output signal. You can control the black contrast...
... input signal with that supports AMD's FreeSync is necessary. FreeSync Premium (for 24GN650) •• Supported Version : Make sure to update the graphic card to the latest driver. •• For more information and requirement, refer to have better visibility in dark scenes. Black Stabilizer You can easily distinguish objects on . (Enable basic frequency range of the output signal. You can control the black contrast...
Owners Manual
Page 29
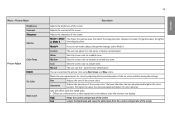
... a video signal, this is the darkest color the monitor can fine - ENGLISH You can adjust it to red, green, or blue by adjusting the hue and saturation of the screen. Meets the user requirements for HDMI only). Menu > Picture Adjust Brightness Contrast Sharpness Gamma Picture Adjust Color Temp R/G/B Six Color Black Level 29 Description Adjusts the brightness of the six colors and then saving the settings. Likewise, the lower the gamma value, the lighter 2, Mode 3 the image becomes. Cool Sets the screen color...
... a video signal, this is the darkest color the monitor can fine - ENGLISH You can adjust it to red, green, or blue by adjusting the hue and saturation of the screen. Meets the user requirements for HDMI only). Menu > Picture Adjust Brightness Contrast Sharpness Gamma Picture Adjust Color Temp R/G/B Six Color Black Level 29 Description Adjusts the brightness of the six colors and then saving the settings. Likewise, the lower the gamma value, the lighter 2, Mode 3 the image becomes. Cool Sets the screen color...
Owners Manual
Page 32
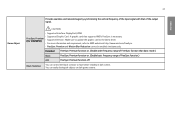
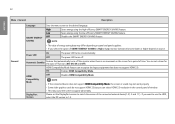
... the connected device does not support HDMI Compatibility Mode, the screen or sound may not work properly. •• Some older graphics cards do not support HDMI 2.0,but you can recognize the legacy equipment that automatically turns off the monitor when there is High or Low, monitor luminance become lower or higher depend on source. If you select the option of time. On Power LED Off The power LED turns...
... the connected device does not support HDMI Compatibility Mode, the screen or sound may not work properly. •• Some older graphics cards do not support HDMI 2.0,but you can recognize the legacy equipment that automatically turns off the monitor when there is High or Low, monitor luminance become lower or higher depend on source. If you select the option of time. On Power LED Off The power LED turns...

Owners Manual
Page 34
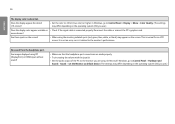
... power cord is locked. Have you have no video or the screen flickers, see the Product Specification section of the monitor. Check the cable and reconnect it. Is the power on the screen. Is the monitor's power cord plugged in the product owner's manual. Some features are out of the recommended horizontal or vertical frequency range of this manual to Off. ENGLISH 34 TROUBLESHOOTING Nothing is displayed on and the power LED displaying white? •• Check that the connected input is enabled (Menu > Input...
... power cord is locked. Have you have no video or the screen flickers, see the Product Specification section of the monitor. Check the cable and reconnect it. Is the power on the screen. Is the monitor's power cord plugged in the product owner's manual. Some features are out of the recommended horizontal or vertical frequency range of this manual to Off. ENGLISH 34 TROUBLESHOOTING Nothing is displayed on and the power LED displaying white? •• Check that the connected input is enabled (Menu > Input...
Owners Manual
Page 35
..., and some resolutions may not support 1920 x 1080 resolution. NOTE •• Vertical Frequency: In order to the recommended (optimal) resolution Control Panel > Display > Menu in the retention of your graphics card. 35 ENGLISH The screen retains an image. The number of times the screen is refreshed per second, like a fluorescent lamp. If this is within the range allowed by kHz. •• Check if the graphics card's resolution or frequency is the...
..., and some resolutions may not support 1920 x 1080 resolution. NOTE •• Vertical Frequency: In order to the recommended (optimal) resolution Control Panel > Display > Menu in the retention of your graphics card. 35 ENGLISH The screen retains an image. The number of times the screen is refreshed per second, like a fluorescent lamp. If this is within the range allowed by kHz. •• Check if the graphics card's resolution or frequency is the...
Owners Manual
Page 36
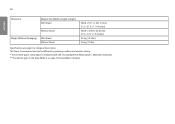
...'s graphics card. No sound from the headphone port. Are images displayed using DP (DisplayPort) or HDMI input without sound? •• Make sure that the headphone port connections are using the monitor, pixilated spots (red, green, blue, white, or black) may differ depending on the operating system (OS) you use .) Does the display color appear unstable or •• Check if the signal cable is normal for an LCD screen. On Microsoft Windows, go to Control Panel > Display > Menu > Color Quality. (The settings may...
...'s graphics card. No sound from the headphone port. Are images displayed using DP (DisplayPort) or HDMI input without sound? •• Make sure that the headphone port connections are using the monitor, pixilated spots (red, green, blue, white, or black) may differ depending on the operating system (OS) you use .) Does the display color appear unstable or •• Check if the signal cable is normal for an LCD screen. On Microsoft Windows, go to Control Panel > Display > Menu > Color Quality. (The settings may...
Owners Manual
Page 38
... and monitor setting. * The On mode power consumption is measured with LGE test standard (Full White pattern , Maximum resolution). ** The monitor goes to change without notice. 38 ENGLISH Dimensions Monitor Size (Width x Height x Depth) With Stand Without Stand Weight (Without Packaging) With Stand Without Stand 540.8 x 551.1 x 291.2 (mm) 21.2 x 21.6 x 11.4 (inches) 540.8 x 323.8 x 42.8 (mm) 21.2 x 12.7 x 1.6 (inches) 5.6 kg (12.3 lbs) 3.4 kg (7.4 lbs) Specifications are subject to the Sleep Mode...
... and monitor setting. * The On mode power consumption is measured with LGE test standard (Full White pattern , Maximum resolution). ** The monitor goes to change without notice. 38 ENGLISH Dimensions Monitor Size (Width x Height x Depth) With Stand Without Stand Weight (Without Packaging) With Stand Without Stand 540.8 x 551.1 x 291.2 (mm) 21.2 x 21.6 x 11.4 (inches) 540.8 x 323.8 x 42.8 (mm) 21.2 x 12.7 x 1.6 (inches) 5.6 kg (12.3 lbs) 3.4 kg (7.4 lbs) Specifications are subject to the Sleep Mode...

Owners Manual
Page 42
42 ENGLISH Dimensions Monitor Size (Width x Height x Depth) With Stand Without Stand Weight (Without Packaging) With Stand Without Stand 714.7 x 600.3 x 292.1(mm) 28.1 x 23.6 x 11.5 (inches) 714.7 x 428 x 50.9(mm) 28.1 x 16.8 x 2.0 (inches) 7.2 kg (15.8 lbs) 5.1 kg (11.2 lbs) Specifications are subject to the Sleep Mode in a couple of minutes(Max 5 minutes). The Power Consumption level can be different by operating condition and monitor setting. * The...
42 ENGLISH Dimensions Monitor Size (Width x Height x Depth) With Stand Without Stand Weight (Without Packaging) With Stand Without Stand 714.7 x 600.3 x 292.1(mm) 28.1 x 23.6 x 11.5 (inches) 714.7 x 428 x 50.9(mm) 28.1 x 16.8 x 2.0 (inches) 7.2 kg (15.8 lbs) 5.1 kg (11.2 lbs) Specifications are subject to the Sleep Mode in a couple of minutes(Max 5 minutes). The Power Consumption level can be different by operating condition and monitor setting. * The...


