
Owners Manual
Page 1
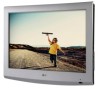
OWNER'S MANUAL LCD TV Please read this manual carefully before operating your set and retain it for future reference. 22LG3DDH 26LG3DDH 32LG3DDH P/NO : SAC34026007 (1006-REV02) www.lg.com
OWNER'S MANUAL LCD TV Please read this manual carefully before operating your set and retain it for future reference. 22LG3DDH 26LG3DDH 32LG3DDH P/NO : SAC34026007 (1006-REV02) www.lg.com
Owners Manual
Page 4
... earth ground wire to telephone wires, lightening rods, or gas pipes. Protect the power cord from direct sunlight. 3 Be sure do not expose this owner's manual to the same AC power outlet as gasoline or candles or expose the TV to direct air conditioning. 16 Do not expose to plugs, wall...
... earth ground wire to telephone wires, lightening rods, or gas pipes. Protect the power cord from direct sunlight. 3 Be sure do not expose this owner's manual to the same AC power outlet as gasoline or candles or expose the TV to direct air conditioning. 16 Do not expose to plugs, wall...

Owners Manual
Page 6
...Channel Editing 37 Channel Label 38 Input List 39 PICTURE CONTROL Picture Size (Aspect Ratio) Control 40 Preset Picture Settings - Preset . 42 Manual Picture Adjustment - Digital Broadcasting System Captions 59 - Picture Mode - Analog Broadcasting System Captions 58 - User Mode 43 Picture Improvement Technology 44...Adjustment 31 Initial Setting 32 On-Screen Menus Selection 34 Channel Setup - Auto Scan (Auto Tuning 35 - Add / Delete Channel (Manual Tuning 36 - Caption Option 60 TIME SETTING Clock Setting - User Mode 52 TV Speakers On/Off Setup 53 Audio Reset 54 ...
...Channel Editing 37 Channel Label 38 Input List 39 PICTURE CONTROL Picture Size (Aspect Ratio) Control 40 Preset Picture Settings - Preset . 42 Manual Picture Adjustment - Digital Broadcasting System Captions 59 - Picture Mode - Analog Broadcasting System Captions 58 - User Mode 43 Picture Improvement Technology 44...Adjustment 31 Initial Setting 32 On-Screen Menus Selection 34 Channel Setup - Auto Scan (Auto Tuning 35 - Add / Delete Channel (Manual Tuning 36 - Caption Option 60 TIME SETTING Clock Setting - User Mode 52 TV Speakers On/Off Setup 53 Audio Reset 54 ...

Owners Manual
Page 8
.../32LG3DDH There is missing, please contact the dealer where you purchased the TV. The accessories included may cause scratches or able for Model No. Owner's Manual CD Manual Power Cord Protective Bracket and Bolt for Power Cord (Refer to P.12) (This feature is not available for the 22/26/32LG3DDH models. PREPARATION...
.../32LG3DDH There is missing, please contact the dealer where you purchased the TV. The accessories included may cause scratches or able for Model No. Owner's Manual CD Manual Power Cord Protective Bracket and Bolt for Power Cord (Refer to P.12) (This feature is not available for the 22/26/32LG3DDH models. PREPARATION...

Owners Manual
Page 15
... Wall Mounting Bracket (sold separately) PREPARATION 22LG3DDH 100 * 100 M4 4 RW120 26LG3DDH 200 * 100 M4 4 32LG3DDH RW230 RW230 AW-47LG30M ! For further information,... For wall mounts that wall mounting be securely attached to the wall in the table. LG recommends that do not comply with the installation instructions. 14 NOTE G Screw length needed depends...wall perpendicular to the floor. G When purchasing our wall mount kit, a detailed installation manual and all parts necessary for assembly are shown in accordance with the VESA standard screw specifications...
... Wall Mounting Bracket (sold separately) PREPARATION 22LG3DDH 100 * 100 M4 4 RW120 26LG3DDH 200 * 100 M4 4 32LG3DDH RW230 RW230 AW-47LG30M ! For further information,... For wall mounts that wall mounting be securely attached to the wall in the table. LG recommends that do not comply with the installation instructions. 14 NOTE G Screw length needed depends...wall perpendicular to the floor. G When purchasing our wall mount kit, a detailed installation manual and all parts necessary for assembly are shown in accordance with the VESA standard screw specifications...

Owners Manual
Page 18
... = blue, and PR = red). 2 Connect the audio output of the digital set -top box.) I Turn on the digital set-top box. (Refer to the owner's manual for 32LG3DDH model. EXTERNAL EQUIPMENT SETUP I This part of EXTERNAL EQUIPMENT SETUP mainly uses the picture for the digital set -top box to the COMPONENT...
... = blue, and PR = red). 2 Connect the audio output of the digital set -top box.) I Turn on the digital set-top box. (Refer to the owner's manual for 32LG3DDH model. EXTERNAL EQUIPMENT SETUP I This part of EXTERNAL EQUIPMENT SETUP mainly uses the picture for the digital set -top box to the COMPONENT...

Owners Manual
Page 19
... using the INPUT button on the TV. 2 No separate audio connection is necessary. How to connect 1 Connect the digital set-top box to the owner's manual for the digital set-top box.) I Select H D M I Turn on the digital set-top box. (Refer to HDMI/DVI IN jack on the remote control...
... using the INPUT button on the TV. 2 No separate audio connection is necessary. How to connect 1 Connect the digital set-top box to the owner's manual for the digital set-top box.) I Select H D M I Turn on the digital set-top box. (Refer to HDMI/DVI IN jack on the remote control...

Owners Manual
Page 20
... to connect 1 Connect the DVI output of the digital set -top box.) I Select the H D M I Turn on the digital set-top box. (Refer to the owner's manual for this connection. (SERVICE ONLY) ( ) RGB IN (PC) AUDIO IN (RGB/DVI) REMOTE SPEA CONTROL OUT EXTERNAL EQUIPMENT SETUP DVI to HDMI cable or adapter...
... to connect 1 Connect the DVI output of the digital set -top box.) I Select the H D M I Turn on the digital set-top box. (Refer to the owner's manual for this connection. (SERVICE ONLY) ( ) RGB IN (PC) AUDIO IN (RGB/DVI) REMOTE SPEA CONTROL OUT EXTERNAL EQUIPMENT SETUP DVI to HDMI cable or adapter...

Owners Manual
Page 21
I Refer to the DVD player's manual for operating instructions. I Select the Component input source on the TV using the INPUT button on the remote control. Match the jack colors (Y = green, PB = ...
I Refer to the DVD player's manual for operating instructions. I Select the Component input source on the TV using the INPUT button on the remote control. Match the jack colors (Y = green, PB = ...

Owners Manual
Page 22
HDMI supports both audio and video. 2. I Select the HDMI input source on the TV using the INPUT button on the TV. 2 No separate audio connection is necessary. HDMI Connection 1. How to use I Refer to the HDMI/DVI IN jack on the remote control. COMPONENT IN AV IN 1 RS-232C IN (SERVICE ONLY) ( ) RGB IN (PC) AUDIO IN (RGB/DVI) CO HDMI/DVI IN UPDATE USB IN SERVUCE ONLY AUDIO (MONO) VIDEO 1 VIDEO AUDIO HDMI OUTPUT EXTERNAL EQUIPMENT SETUP RESET 21 How to connect 1 Connect the HDMI output of the DVD to the DVD player's manual for operating instructions.
HDMI supports both audio and video. 2. I Select the HDMI input source on the TV using the INPUT button on the TV. 2 No separate audio connection is necessary. HDMI Connection 1. How to use I Refer to the HDMI/DVI IN jack on the remote control. COMPONENT IN AV IN 1 RS-232C IN (SERVICE ONLY) ( ) RGB IN (PC) AUDIO IN (RGB/DVI) CO HDMI/DVI IN UPDATE USB IN SERVUCE ONLY AUDIO (MONO) VIDEO 1 VIDEO AUDIO HDMI OUTPUT EXTERNAL EQUIPMENT SETUP RESET 21 How to connect 1 Connect the HDMI output of the DVD to the DVD player's manual for operating instructions.

Owners Manual
Page 23
... VCR. (Refer to the RF antenna in socket of the screen may remain visible on the TV. 2 Connect the antenna cable to the VCR owner's manual.) 1 S-VIDEO VIDEO L R ANT OUT OUTPUT SWITCH ANT IN Wall Jack 2 ANTENNA IN M.P.I Set VCR output switch to 3 or 4 and then tune TV to all TVs...
... VCR. (Refer to the RF antenna in socket of the screen may remain visible on the TV. 2 Connect the antenna cable to the VCR owner's manual.) 1 S-VIDEO VIDEO L R ANT OUT OUTPUT SWITCH ANT IN Wall Jack 2 ANTENNA IN M.P.I Set VCR output switch to 3 or 4 and then tune TV to all TVs...

Owners Manual
Page 24
... jacks between TV and VCR. How to use I Insert a video tape into the VCR and press PLAY on the VCR. (Refer to the VCR owner's manual.) I If connected to AV IN2, select AV2 input source on the remote control. Match the jack colors (Video = yellow, Audio Left = white, and Audio Right...
... jacks between TV and VCR. How to use I Insert a video tape into the VCR and press PLAY on the VCR. (Refer to the VCR owner's manual.) I If connected to AV IN2, select AV2 input source on the remote control. Match the jack colors (Video = yellow, Audio Left = white, and Audio Right...
Owners Manual
Page 30
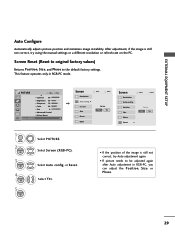
.... EXTERNAL EQUIPMENT SETUP Auto Configure Automatically adjusts picture position and minimizes image instability. After adjustment, if the image is still not correct, try using the manual settings or a different resolution or refresh rate on the PC. To Set Yes No 1 MENU 2 ENTER 3 ENTER 4 ENTER 5 ENTER Select PICTURE...
.... EXTERNAL EQUIPMENT SETUP Auto Configure Automatically adjusts picture position and minimizes image instability. After adjustment, if the image is still not correct, try using the manual settings or a different resolution or refresh rate on the PC. To Set Yes No 1 MENU 2 ENTER 3 ENTER 4 ENTER 5 ENTER Select PICTURE...

Owners Manual
Page 31
... config. Select Position, S i z e, or Phase. I Position: This function is not clear after auto adjustment and especially if characters are still trembling, adjust the picture phase manually. Make appropriate adjustments. This feature operates only in RGB-PC mode. EXTERNAL EQUIPMENT SETUP EXTERNAL EQUIPMENT SETUP Adjustment for screen Position, Size, and Phase If...
... config. Select Position, S i z e, or Phase. I Position: This function is not clear after auto adjustment and especially if characters are still trembling, adjust the picture phase manually. Make appropriate adjustments. This feature operates only in RGB-PC mode. EXTERNAL EQUIPMENT SETUP EXTERNAL EQUIPMENT SETUP Adjustment for screen Position, Size, and Phase If...

Owners Manual
Page 35
CHANNEL Auto Tuning Manual Tuning Channel Edit Channel Label Move Enter PICTURE Move Aspect Ratio : 16:9 Picture Mode : Standard • Backlight • Contrast • Brightness • Sharpness • Color &#... Rating Input Block WATCHING TV / CHANNEL CONTROL ON-SCREEN MENUS SELECTION Your TV's OSD (On Screen Display) may differ slightly from that shown in this manual.
CHANNEL Auto Tuning Manual Tuning Channel Edit Channel Label Move Enter PICTURE Move Aspect Ratio : 16:9 Picture Mode : Standard • Backlight • Contrast • Brightness • Sharpness • Color &#... Rating Input Block WATCHING TV / CHANNEL CONTROL ON-SCREEN MENUS SELECTION Your TV's OSD (On Screen Display) may differ slightly from that shown in this manual.

Owners Manual
Page 36
Auto Tuning memorizes only the channels available at the time. I When setting the Auto tuning or Manual tuning, the number of maximum channel you set up in the LOCK Menu to allow a channel search. Run this function with the antenna connected ... I The TV will be updated during TV broadcasting hours. Also, make sure to change your antenna connection. CHANNEL Auto Tuning Manual Tuning Channel Edit Channel Label Move Enter CHANNEL Auto Tuning Manual Tuning Channel Edit Channel Label Move Enter Check your residence or move the TV. MENU I Automatically finds all channels available...
Auto Tuning memorizes only the channels available at the time. I When setting the Auto tuning or Manual tuning, the number of maximum channel you set up in the LOCK Menu to allow a channel search. Run this function with the antenna connected ... I The TV will be updated during TV broadcasting hours. Also, make sure to change your antenna connection. CHANNEL Auto Tuning Manual Tuning Channel Edit Channel Label Move Enter CHANNEL Auto Tuning Manual Tuning Channel Edit Channel Label Move Enter Check your residence or move the TV. MENU I Automatically finds all channels available...

Owners Manual
Page 37
... the LOCK Menu to allow a channel search. Channel F2 G DIGITAL 2-1 Bad Normal Good Delete Close I When setting the Auto tuning or Manual tuning, the number of maximum channel you can view the on the broadcasting signal environment. 36 It is 700. MENU CHANNEL Auto Tuning... control has been activated (LOCK Menu). Return to the previous menu. WATCHING TV / CHANNEL CONTROL WATCHING TV / CHANNEL CONTROL Add/Delete Channel (Manual Tuning) If selecting DTV or CADTV input signal, you can store is subject to change depending on -screen signal strength monitor to see the quality...
... the LOCK Menu to allow a channel search. Channel F2 G DIGITAL 2-1 Bad Normal Good Delete Close I When setting the Auto tuning or Manual tuning, the number of maximum channel you can view the on the broadcasting signal environment. 36 It is 700. MENU CHANNEL Auto Tuning... control has been activated (LOCK Menu). Return to the previous menu. WATCHING TV / CHANNEL CONTROL WATCHING TV / CHANNEL CONTROL Add/Delete Channel (Manual Tuning) If selecting DTV or CADTV input signal, you can store is subject to change depending on -screen signal strength monitor to see the quality...

Owners Manual
Page 38
... menu. Return to select the deleted channel, directly enter the channel number with the NUMBER buttons or select it using CH viewing. CHANNEL Auto Tuning Manual Tuning Channel Edit Channel Label Move Enter Ch. button during TV If you wish to TV viewing.
... menu. Return to select the deleted channel, directly enter the channel number with the NUMBER buttons or select it using CH viewing. CHANNEL Auto Tuning Manual Tuning Channel Edit Channel Label Move Enter Ch. button during TV If you wish to TV viewing.

Owners Manual
Page 39
... to set logo. 5 Select the appropriate logo for the channel. 6 RETURN Return to TV viewing. MENU 38 CHANNEL Auto Tuning Manual Tuning Channel Edit Channel Label Move Enter CHANNEL Auto Tuning Manual Tuning Channel Edit Channel Label Move Enter Channel DIGITAL 2-1 Logo F Disney G Close 1 MENU 2 ENTER 3 ENTER Select CHANNEL. Return to the...
... to set logo. 5 Select the appropriate logo for the channel. 6 RETURN Return to TV viewing. MENU 38 CHANNEL Auto Tuning Manual Tuning Channel Edit Channel Label Move Enter CHANNEL Auto Tuning Manual Tuning Channel Edit Channel Label Move Enter Channel DIGITAL 2-1 Logo F Disney G Close 1 MENU 2 ENTER 3 ENTER Select CHANNEL. Return to the...

Owners Manual
Page 43
... Select Vivid, Standard, Natural, Cinema, Sport or Game. 4 RETURN Return to TV viewing. Return to the previous menu. You can use a preset, change each setting manually. Preset There are adjustable. I S p o r t: This is the mode to emphasize dynamic video and primary color (e.g, white, uniform, grass, sky blue etc.) by realizing the optimal...
... Select Vivid, Standard, Natural, Cinema, Sport or Game. 4 RETURN Return to TV viewing. Return to the previous menu. You can use a preset, change each setting manually. Preset There are adjustable. I S p o r t: This is the mode to emphasize dynamic video and primary color (e.g, white, uniform, grass, sky blue etc.) by realizing the optimal...


