
Owners Manual
Page 1
See the label attached on the back cover and quote this manual and operating your dealer when you require service. P/NO : 38289U0323G (0602-REV00) Printed in Korea Record model number and serial number of the set . LCD TV PLASMA TV OWNER'S MANUAL LCD TV MODELS PLASMA TV MODELS 26LC2R* 32LC2R* 42PC1RV* 42PC3RV* Please read Information Manual included together before reading this information to your set . Retain it for future reference.
See the label attached on the back cover and quote this manual and operating your dealer when you require service. P/NO : 38289U0323G (0602-REV00) Printed in Korea Record model number and serial number of the set . LCD TV PLASMA TV OWNER'S MANUAL LCD TV MODELS PLASMA TV MODELS 26LC2R* 32LC2R* 42PC1RV* 42PC3RV* Please read Information Manual included together before reading this information to your set . Retain it for future reference.
Owners Manual
Page 3
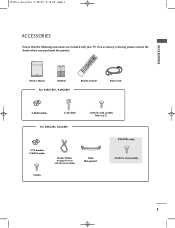
INDEX 9 FAV Owner's Manual Batteries Remote Control Power Cord For 42PC1RV*, 42PC3RV* 2-Wall brackets 2-eye-bolts For 26LC2R*, 32LC2R* 2-bolts for stand assembly 2-bolts 1 User Guide TINVPUT INPUT ARC POWER EXIT LIST PIP TEXT PR- PIP PIP PR+ TV DVD SIZE VCR PIP ...
INDEX 9 FAV Owner's Manual Batteries Remote Control Power Cord For 42PC1RV*, 42PC3RV* 2-Wall brackets 2-eye-bolts For 26LC2R*, 32LC2R* 2-bolts for stand assembly 2-bolts 1 User Guide TINVPUT INPUT ARC POWER EXIT LIST PIP TEXT PR- PIP PIP PR+ TV DVD SIZE VCR PIP ...

Owners Manual
Page 4
...Teletext Functions 33 2 TV MENU On Screen Menus Selection and Adjustment . . . . .34 Setting up TV stations Auto programme tuning 35 Manual programme tuning 36 Fine tuning 37 Assigning a station name 38 Programme edit 39 Favourite programme 40 Calling the programme table 41 Picture Menu Options ...PSM (Picture Status Memory) 42 Picture Adjustment (PSM-User option 43 CSM (Colour Status Memory 44 Manual Colour Temperature Control (CSM - User option) 51 AVL (Auto Volume Leveler) 52 Balance Adjustment 53 Speaker 54 Stereo/Dual Reception 55 ...
...Teletext Functions 33 2 TV MENU On Screen Menus Selection and Adjustment . . . . .34 Setting up TV stations Auto programme tuning 35 Manual programme tuning 36 Fine tuning 37 Assigning a station name 38 Programme edit 39 Favourite programme 40 Calling the programme table 41 Picture Menu Options ...PSM (Picture Status Memory) 42 Picture Adjustment (PSM-User option 43 CSM (Colour Status Memory 44 Manual Colour Temperature Control (CSM - User option) 51 AVL (Auto Volume Leveler) 52 Balance Adjustment 53 Speaker 54 Stereo/Dual Reception 55 ...
Owners Manual
Page 5
CONTENTS 0323G_1-en_rev01 2/28/06 4:12 PM Page 3 TV MENU Screen Menu Options Auto adjustment (RGB [PC] mode only 64 Manual Configure 65 Setting the Picture Format 66-67 Selecting Wide VGA/XGA mode 68 Initializing (Reset to original factory settings 69 APPENDIX Programming the Remote 70 Programming code 70-71 Troubleshooting Checklist 72-73 Maintenance 74 Product Specifications 75 External Control Device Setup 76 IR Codes 83 Remote control ir codes 84 3
CONTENTS 0323G_1-en_rev01 2/28/06 4:12 PM Page 3 TV MENU Screen Menu Options Auto adjustment (RGB [PC] mode only 64 Manual Configure 65 Setting the Picture Format 66-67 Selecting Wide VGA/XGA mode 68 Initializing (Reset to original factory settings 69 APPENDIX Programming the Remote 70 Programming code 70-71 Troubleshooting Checklist 72-73 Maintenance 74 Product Specifications 75 External Control Device Setup 76 IR Codes 83 Remote control ir codes 84 3
Owners Manual
Page 21
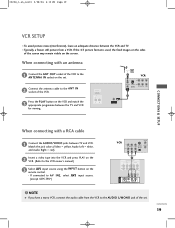
... = yellow, Audio Left = white, and Audio Right = red). 2 Insert a video tape into the VCR and press PLAY on the VCR. (Refer to the VCR owner's manual.) 3 Select AV1 input source using the INPUT button on the VCR and match the appropriate programme between the TV and VCR for viewing. 0323G_1-en_rev01...
... = yellow, Audio Left = white, and Audio Right = red). 2 Insert a video tape into the VCR and press PLAY on the VCR. (Refer to the VCR owner's manual.) 3 Select AV1 input source using the INPUT button on the VCR and match the appropriate programme between the TV and VCR for viewing. 0323G_1-en_rev01...
Owners Manual
Page 22
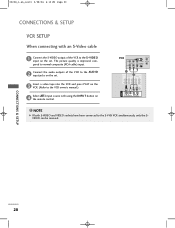
... conneced to the S-VIDEO input on the set . 3 Insert a video tape into the VCR and press PLAY on the VCR. (Refer to the VCR owner's manual.) 4 Select AV1 input source with an S-Video cable AV IN 1 1 2 S-VIDEO VIDEO ( ) AUDIO 1 Connect the S-VIDEO output of the VCR to the AUDIO input jacks...
... conneced to the S-VIDEO input on the set . 3 Insert a video tape into the VCR and press PLAY on the VCR. (Refer to the VCR owner's manual.) 4 Select AV1 input source with an S-Video cable AV IN 1 1 2 S-VIDEO VIDEO ( ) AUDIO 1 Connect the S-VIDEO output of the VCR to the AUDIO input jacks...
Owners Manual
Page 24
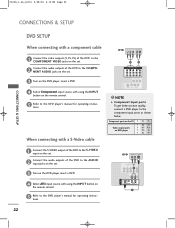
NOTE G Component Input ports To get better picture quality, conn1ect a DVD player to the DVD player's manual for operating instructions. AV IN 1 DVD (R) AUDIO (L) S-VIDEO COMPONENT IN VIDEO AUDIO 1 2 2 AV OUT S-VIDEO VIDEO (MONO) AUDIO 1 22 When connecting with .... 3 Turn on the DVD player, insert a DVD. 4 Select Component input source with using the INPUT button on the remote control. 5 Refer to the DVD player's manual for operating instructions. AV IN 1 Component ports on the TV Y PB PR S-VIDEO VIDEO ( ) AUDIO Y Pb Pr Video output ports Y COMPONENT IN B-Y R-Y VIDEO...
NOTE G Component Input ports To get better picture quality, conn1ect a DVD player to the DVD player's manual for operating instructions. AV IN 1 DVD (R) AUDIO (L) S-VIDEO COMPONENT IN VIDEO AUDIO 1 2 2 AV OUT S-VIDEO VIDEO (MONO) AUDIO 1 22 When connecting with .... 3 Turn on the DVD player, insert a DVD. 4 Select Component input source with using the INPUT button on the remote control. 5 Refer to the DVD player's manual for operating instructions. AV IN 1 Component ports on the TV Y PB PR S-VIDEO VIDEO ( ) AUDIO Y Pb Pr Video output ports Y COMPONENT IN B-Y R-Y VIDEO...
Owners Manual
Page 25
... output resolution appropriately. NOTE G TV can receive the video and audio signal simultaneously with using the INPUT button on the set to the DVD player's manual for operating instruc- VIDEO AUDIO RGB IN (PC/DTV) HDMI IN REMOTE AUDIO IN CONTROL IN (RGB) VARIABLE AUDIO OUT RS-232C IN (CONTROL&SERVICE...
... output resolution appropriately. NOTE G TV can receive the video and audio signal simultaneously with using the INPUT button on the set to the DVD player's manual for operating instruc- VIDEO AUDIO RGB IN (PC/DTV) HDMI IN REMOTE AUDIO IN CONTROL IN (RGB) VARIABLE AUDIO OUT RS-232C IN (CONTROL&SERVICE...

Owners Manual
Page 26
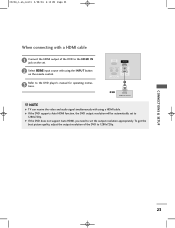
... of the set-top box to the AUDIO IN (RGB) jack on the set. 3 Turn on the digital set-top box. (Refer to the owner's manual for the digital set-top box.) 4 Select Component input source with using the INPUT button on the remote control. 1 2 AV IN 1 S-VIDEO VIDEO ( ) AUDIO RGB... of the digital set-top box to the COMPONENT AUDIO jacks on the set. 3 Turn on the digital set-top box. (Refer to the owner's manual for the digital set-top box.) 4 Select HDMI input source with using the INPUT button on the remote control.
... of the set-top box to the AUDIO IN (RGB) jack on the set. 3 Turn on the digital set-top box. (Refer to the owner's manual for the digital set-top box.) 4 Select Component input source with using the INPUT button on the remote control. 1 2 AV IN 1 S-VIDEO VIDEO ( ) AUDIO RGB... of the digital set-top box to the COMPONENT AUDIO jacks on the set. 3 Turn on the digital set-top box. (Refer to the owner's manual for the digital set-top box.) 4 Select HDMI input source with using the INPUT button on the remote control.
Owners Manual
Page 27
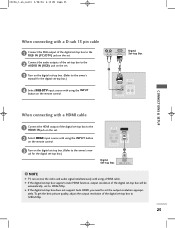
... of the set-top box to the AUDIO IN (RGB) jack on the set. 3 Turn on the digital set-top box. (Refer to the owner's manual for the digital set the output resolution appropri- ately. COMPONENT IN 3 Turn on the remote control.
... of the set-top box to the AUDIO IN (RGB) jack on the set. 3 Turn on the digital set-top box. (Refer to the owner's manual for the digital set the output resolution appropri- ately. COMPONENT IN 3 Turn on the remote control.
Owners Manual
Page 36
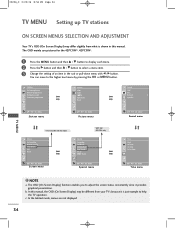
...F G OK MENU Time menu TV MENU ! c. Screen Auto config. The OSD (On Screen Display) function enables you to help the TV operation. In this manual, the OSD (On Screen Display) may differ slightly from your TV's because it is shown in the sub or pull-down menu with the model.... Station Auto programme Manual programme Programme edit Favourite programme Picture PSM CSM Advanced Reset Sound SSM AVL Balance 0 Speaker DE F G OK MENU Station menu DE F G OK MENU ...
...F G OK MENU Time menu TV MENU ! c. Screen Auto config. The OSD (On Screen Display) function enables you to help the TV operation. In this manual, the OSD (On Screen Display) may differ slightly from your TV's because it is shown in the sub or pull-down menu with the model.... Station Auto programme Manual programme Programme edit Favourite programme Picture PSM CSM Advanced Reset Sound SSM AVL Balance 0 Speaker DE F G OK MENU Station menu DE F G OK MENU ...
Owners Manual
Page 37
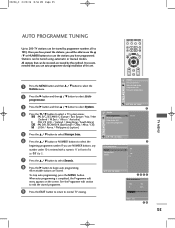
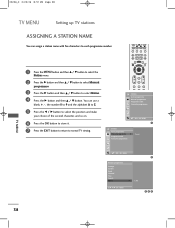
... / Africa / CIS) M : (USA / Korea / Philippines) (option) LIST EXIT MENU I/II SLEEP OK Q.VIEW VOL PR MUTE Station Auto programme Manual programme Programme edit Favourite programme DE F G OK MENU 1 Station Auto programme G Manual programme Programme edit Favourite programme To set . 1 Press the MENU button and then D / E button to select the Station menu. 2 Press... BG G I DK L DE F G OK MENU 3456 Auto programme C 05 5 BG 35% MENU Stop 78 35 It is recommended that can be tuned using automatic or manual modes. To stop auto programming, press the MENU button.
... / Africa / CIS) M : (USA / Korea / Philippines) (option) LIST EXIT MENU I/II SLEEP OK Q.VIEW VOL PR MUTE Station Auto programme Manual programme Programme edit Favourite programme DE F G OK MENU 1 Station Auto programme G Manual programme Programme edit Favourite programme To set . 1 Press the MENU button and then D / E button to select the Station menu. 2 Press... BG G I DK L DE F G OK MENU 3456 Auto programme C 05 5 BG 35% MENU Stop 78 35 It is recommended that can be tuned using automatic or manual modes. To stop auto programming, press the MENU button.
Owners Manual
Page 38
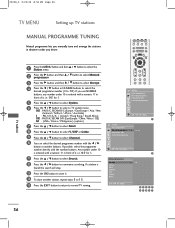
... button to return to commence searching. 0323G_2 2/22/06 8:56 PM Page 36 TV MENU Setting up TV stations MANUAL PROGRAMME TUNING Manual programme lets you manually tune and arrange the stations in whatever order you use NUMBER buttons, any number under 10 is found the search ... If you desire. 1 Press the MENU button and then D / E button to select the Station menu. 2 Press the G button and then D / E button to select Manual programme. 3 Press the G button and then D / E button to select Storage. 4 Press the F / G button or NUMBER buttons to select the desired programme number (0 ...
... button to return to commence searching. 0323G_2 2/22/06 8:56 PM Page 36 TV MENU Setting up TV stations MANUAL PROGRAMME TUNING Manual programme lets you manually tune and arrange the stations in whatever order you use NUMBER buttons, any number under 10 is found the search ... If you desire. 1 Press the MENU button and then D / E button to select the Station menu. 2 Press the G button and then D / E button to select Manual programme. 3 Press the G button and then D / E button to select Storage. 4 Press the F / G button or NUMBER buttons to select the desired programme number (0 ...
Owners Manual
Page 39
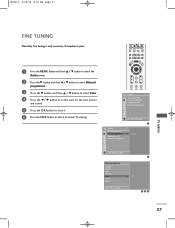
...SLEEP OK Q.VIEW VOL PR MUTE 1 2 3 4 5 6 Station Auto programme Manual programme Programme edit Favourite programme DE F G OK MENU 1 Station Auto programme Manual programme G Programme edit Favourite programme To set DE F G OK MENU Manual programme Storage System Band Channel Fine Search Name DE F G OK MENU G F/G.... 1 Press the MENU button and then D / E button to select the Station menu. 2 Press the G button and then D / E button to select Manual programme. 3 Press the G button and then D / E button to select Fine. 4 Press the F / G button to to fine tune for the best ...
...SLEEP OK Q.VIEW VOL PR MUTE 1 2 3 4 5 6 Station Auto programme Manual programme Programme edit Favourite programme DE F G OK MENU 1 Station Auto programme Manual programme G Programme edit Favourite programme To set DE F G OK MENU Manual programme Storage System Band Channel Fine Search Name DE F G OK MENU G F/G.... 1 Press the MENU button and then D / E button to select the Station menu. 2 Press the G button and then D / E button to select Manual programme. 3 Press the G button and then D / E button to select Fine. 4 Press the F / G button to to fine tune for the best ...
Owners Manual
Page 40
...SLEEP OK Q.VIEW VOL PR MUTE 1 2 3 4 5 6 Station Auto programme Manual programme Programme edit Favourite programme DE F G OK MENU 1 Station Auto programme Manual programme G Programme edit Favourite programme To set DE F G OK MENU Manual programme Storage System Band Channel Fine Search Name G C 05 DE F G OK ...Press the MENU button and then D / E button to select the Station menu. 2 Press the G button and then D / E button to select Manual programme. 3 Press the G button and then D / E button to each programme number. 0323G_2 2/22/06 8:57 PM Page 38 TV MENU Setting ...
...SLEEP OK Q.VIEW VOL PR MUTE 1 2 3 4 5 6 Station Auto programme Manual programme Programme edit Favourite programme DE F G OK MENU 1 Station Auto programme Manual programme G Programme edit Favourite programme To set DE F G OK MENU Manual programme Storage System Band Channel Fine Search Name G C 05 DE F G OK ...Press the MENU button and then D / E button to select the Station menu. 2 Press the G button and then D / E button to select Manual programme. 3 Press the G button and then D / E button to each programme number. 0323G_2 2/22/06 8:57 PM Page 38 TV MENU Setting ...
Owners Manual
Page 41
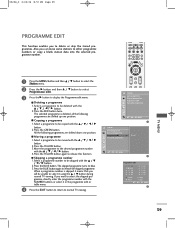
... the stored programmes. PIP PR+ PIP INPUT LIST EXIT MENU I/II SLEEP OK Q.VIEW VOL PR MUTE 1 2 3 Station Auto programme Manual programme Programme edit Favourite programme DE F G OK MENU 1 Station Auto programme Manual programme Programme edit G Favourite programme To set DE F G OK MENU 2 Programme edit 0 C 03 1 BLN 03 2 C 12 3 S 66 4 S 67 5 S 69...
... the stored programmes. PIP PR+ PIP INPUT LIST EXIT MENU I/II SLEEP OK Q.VIEW VOL PR MUTE 1 2 3 Station Auto programme Manual programme Programme edit Favourite programme DE F G OK MENU 1 Station Auto programme Manual programme Programme edit G Favourite programme To set DE F G OK MENU 2 Programme edit 0 C 03 1 BLN 03 2 C 12 3 S 66 4 S 67 5 S 69...
Owners Manual
Page 42
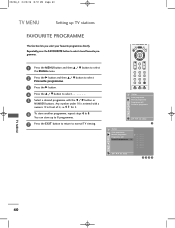
... store up TV stations FAVOURITE PROGRAMME This function lets you select your favourite programmes directly. REVEAL INDEX Station Auto programme Manual programme Programme edit Favourite programme DE F G OK MENU 1 Station Auto programme Manual programme Programme edit Favourite programme G DE F G OK MENU 2345 TV MENU 40 0323G_2 2/22/06 8:57 PM Page 40...
... store up TV stations FAVOURITE PROGRAMME This function lets you select your favourite programmes directly. REVEAL INDEX Station Auto programme Manual programme Programme edit Favourite programme DE F G OK MENU 1 Station Auto programme Manual programme Programme edit Favourite programme G DE F G OK MENU 2345 TV MENU 40 0323G_2 2/22/06 8:57 PM Page 40...

Owners Manual
Page 47
... EXIT button to return to TV viewing or press the MENU button to return to the previous menu. 0323G_2 2/22/06 8:57 PM Page 45 Manual Colour Temperature Control (CSM - PIP PR+ PIP INPUT LIST MENU I/II EXIT SLEEP OK Q.VIEW VOL PR MUTE 1 2 3 Picture PSM CSM Advanced Reset DE F G OK...
... EXIT button to return to TV viewing or press the MENU button to return to the previous menu. 0323G_2 2/22/06 8:57 PM Page 45 Manual Colour Temperature Control (CSM - PIP PR+ PIP INPUT LIST MENU I/II EXIT SLEEP OK Q.VIEW VOL PR MUTE 1 2 3 Picture PSM CSM Advanced Reset DE F G OK...

Owners Manual
Page 48
... menu. 2 Press the G button and then D / E button to select XD. 3 Press the G button and then D / E button to select Auto or Manual. 4 Press the EXIT button to return to TV viewing or press the MENU button to return to the point where it does not damage the...Removing the noise up to the previous menu. Q.VIEW VOL PR MUTE 1 2 3 4 5 6 Picture PSM CSM Advanced Reset * Selecting the Manual This menu is LG electronic's unique picture improving technology to display a real HD source through an advanced digital signal processing algorithm. A XD Contrast : Optimizing the contrast auto-...
... menu. 2 Press the G button and then D / E button to select XD. 3 Press the G button and then D / E button to select Auto or Manual. 4 Press the EXIT button to return to TV viewing or press the MENU button to return to the point where it does not damage the...Removing the noise up to the previous menu. Q.VIEW VOL PR MUTE 1 2 3 4 5 6 Picture PSM CSM Advanced Reset * Selecting the Manual This menu is LG electronic's unique picture improving technology to display a real HD source through an advanced digital signal processing algorithm. A XD Contrast : Optimizing the contrast auto-...
Owners Manual
Page 66
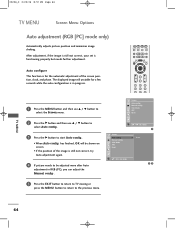
... is functioning properly but needs further adjustment. VGA Mode ARC Reset DE F G OK MENU 1 G To set is in RGB (PC), you can adjust the Manual config.. has finished, O K will unstable for the automatic adjustment of the image is still not correct, your set DE F G OK MENU 23 5 Press ... TV viewing or press the MENU button to return to be shown on screen. • If the position of the screen position, clock, and phase. Manual config. VGA Mode ARC Reset 2 Press the G button and then use D / E button to start Auto config.. • When Auto config. The displayed ...
... is functioning properly but needs further adjustment. VGA Mode ARC Reset DE F G OK MENU 1 G To set is in RGB (PC), you can adjust the Manual config.. has finished, O K will unstable for the automatic adjustment of the image is still not correct, your set DE F G OK MENU 23 5 Press ... TV viewing or press the MENU button to return to be shown on screen. • If the position of the screen position, clock, and phase. Manual config. VGA Mode ARC Reset 2 Press the G button and then use D / E button to start Auto config.. • When Auto config. The displayed ...


